- Page 1: POWER PROTECTION Npower UPS OPTIONS
- Page 4 and 5: 7.2 Installation . . . . . . . . .
- Page 6 and 7: 18.2 General Description . . . . .
- Page 8 and 9: Figure 50 Dial Out Phone Number Scr
- Page 11 and 12: IMPORTANT SAFETY INSTRUCTIONS Save
- Page 13 and 14: 2.0 OPTION DESCRIPTIONS The NpowerU
- Page 15 and 16: 3.0 GENERAL INFORMATION CONCERNING
- Page 17 and 18: Figure 2 Detail F and View B-B IFM
- Page 19 and 20: Figure 5 Diagram of Npower with OPS
- Page 21 and 22: Figure 6 Diagram of Npower with Add
- Page 23 and 24: 4.0 GENERAL OPTION INSTALLATION INS
- Page 25 and 26: 5.0 ENABLING COMMUNICATION OPTIONS
- Page 27 and 28: Figure 15 System Settings Screen wi
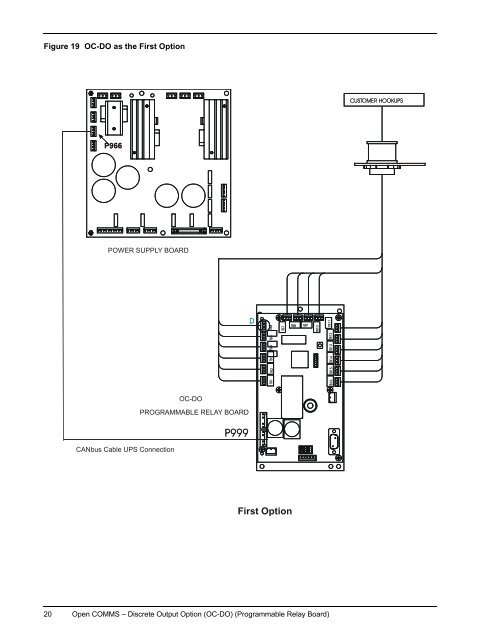
- Page 29: 6.0 OPEN COMMS - DISCRETE OUTPUT OP
- Page 33 and 34: Figure 21 Customer Connections See
- Page 35 and 36: 6.3 Programming the Open Comms - Di
- Page 37 and 38: Figure 26 Programmable Output Relay
- Page 39 and 40: You may attach up to four alarms to
- Page 41 and 42: 6.5 Configuring the Programmable Re
- Page 43 and 44: Figure 31 Wire Routing for OC-DI CA
- Page 45 and 46: All harnesses and cables should be
- Page 47 and 48: Figure 36 Contact Signal Assignment
- Page 49 and 50: Figure 37 OPS Installation Detail D
- Page 51 and 52: Figure 39 OPS Customer Connections
- Page 53 and 54: 9.0 REMOTE ALARM STATUS PANEL (RAS)
- Page 55 and 56: Figure 41 RAS Details B and C RED 1
- Page 57 and 58: Table 6 Remote Alarm Status DIP Swi
- Page 59 and 60: 9.3 Interpreting the LED indicators
- Page 61 and 62: Figure 44 Installation of the Inter
- Page 63 and 64: 10.3 Installation Instructions for
- Page 65 and 66: The default status of the Modem sho
- Page 67 and 68: Stop Bits 1 Terminal Emulation ANSI
- Page 69 and 70: HLn? History Log 1, History Log 2,
- Page 71 and 72: 11.0 SITESCAN INTERFACE SiteScan ca
- Page 73 and 74: Figure 52 Pager Support Screen PAGE
- Page 75 and 76: 13.0 RS 232 PORT As a standard feat
- Page 77 and 78: 14.1 MBB Board 14.1.1 Kit Contents
- Page 79 and 80: Figure 53 Multiple Battery Breaker
- Page 81 and 82:
14.2 Input Contact Isolator (ICI or
- Page 83 and 84:
14.2.3 Testing of ICI Board 1. Perf
- Page 85 and 86:
Dimensions: Net: 178mm x 102mm x 38
- Page 87 and 88:
Figure 58 Installing the NIC Option
- Page 89 and 90:
15.5.3 Configuring the NIC on a Ser
- Page 91 and 92:
15.5.3.5 Factory Settings Menu The
- Page 93:
15.6.3 HTTP Status and alarm inform
- Page 96 and 97:
Figure 66 HTTP Battery Screen Figur
- Page 98 and 99:
Figure 69 HTTP Load Screen 88 Open
- Page 100 and 101:
Table 10 LED Identifiers LED Identi
- Page 102 and 103:
tainty of responding time of the Op
- Page 104 and 105:
Function Code Support The OpenComms
- Page 106 and 107:
RTU Framing Examples READ REGISTERS
- Page 108 and 109:
15.8.6 Modbus Troubleshooting If th
- Page 110 and 111:
! WARNING ENSURE THAT ALL CUSTOMER
- Page 112 and 113:
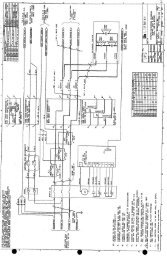
Figure 75 Npower UPS 80 - 130 KVA 1
- Page 114 and 115:
Figure 77 DC Ground Fault Wiring Co
- Page 116 and 117:
17.0 AUTO RESTART The Auto Restart
- Page 118 and 119:
The LBS Control Panel contains circ
- Page 120 and 121:
To install the LBS Transformer Cabi
- Page 122 and 123:
Figure 83 Details of Connection to
- Page 124 and 125:
Control Fuse Assembly LBS Interface
- Page 126 and 127:
Close and re-latch the control door
- Page 128 and 129:
Figure 85 LBS Npower to Npower Wiri
- Page 130 and 131:
Sync indicators will be lighted. Th
- Page 132 and 133:
20.0 APPENDIX Table 14 Alarms, Func
- Page 134 and 135:
Actual Alarm/fault Name Displayed O
- Page 136 and 137:
Actual Alarm/fault Name Displayed O
- Page 138 and 139:
Actual Alarm/fault Name Displayed O
- Page 140 and 141:
Actual Alarm/fault Name Displayed O
- Page 142 and 143:
Actual Alarm/fault Name Displayed O
- Page 144 and 145:
Actual Alarm/fault Name Displayed O
- Page 146:
Actual Alarm/fault Name Displayed O