SL-24533.book(SL-24533 FC.fm) - Emerson Network Power
SL-24533.book(SL-24533 FC.fm) - Emerson Network Power
SL-24533.book(SL-24533 FC.fm) - Emerson Network Power

You also want an ePaper? Increase the reach of your titles
YUMPU automatically turns print PDFs into web optimized ePapers that Google loves.
delay to the selected time period. If an alarm is set to Latch, it will only recognize the alarm and latch, after the<br />
delay period.<br />
To set the alarm parameters, select the CONTACT number to be configured and move it to the top position in the<br />
register. Using the arrow keys, move the cursor to Select, press SELECT. The following screen will appear.<br />
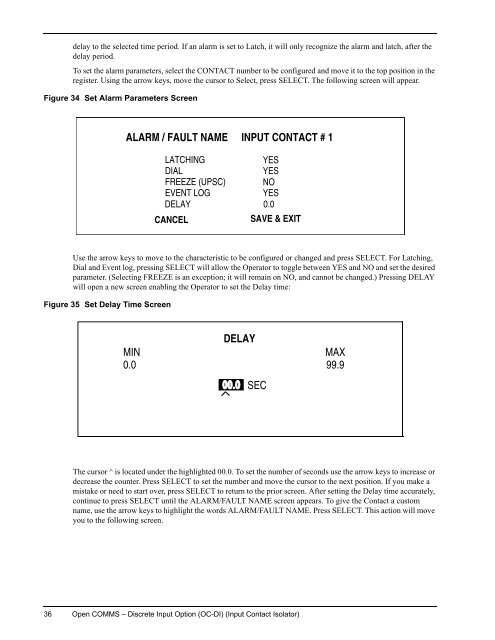
Figure 34 Set Alarm Parameters Screen<br />
ALARM / FAULT NAME<br />
INPUT CONTACT # 1<br />
LATCHING<br />
YES<br />
DIAL<br />
YES<br />
FREEZE (UPSC) NO<br />
EVENT LOG<br />
YES<br />
DELAY 0.0<br />
CANCEL<br />
SAVE & EXIT<br />
Use the arrow keys to move to the characteristic to be configured or changed and press SELECT. For Latching,<br />
Dial and Event log, pressing SELECT will allow the Operator to toggle between YES and NO and set the desired<br />
parameter. (Selecting FREEZE is an exception; it will remain on NO, and cannot be changed.) Pressing DELAY<br />
will open a new screen enabling the Operator to set the Delay time:<br />
Figure 35 Set Delay Time Screen<br />
DELAY<br />
MIN<br />
MAX<br />
0.0 99.9<br />
SEC<br />
The cursor ^ is located under the highlighted 00.0. To set the number of seconds use the arrow keys to increase or<br />
decrease the counter. Press SELECT to set the number and move the cursor to the next position. If you make a<br />
mistake or need to start over, press SELECT to return to the prior screen. After setting the Delay time accurately,<br />
continue to press SELECT until the ALARM/FAULT NAME screen appears. To give the Contact a custom<br />
name, use the arrow keys to highlight the words ALARM/FAULT NAME. Press SELECT. This action will move<br />
you to the following screen.<br />
36 Open COMMS – Discrete Input Option (OC-DI) (Input Contact Isolator)