SL-24533.book(SL-24533 FC.fm) - Emerson Network Power
SL-24533.book(SL-24533 FC.fm) - Emerson Network Power
SL-24533.book(SL-24533 FC.fm) - Emerson Network Power

Create successful ePaper yourself
Turn your PDF publications into a flip-book with our unique Google optimized e-Paper software.
NOTE<br />
Alarms have a separately programmable function that allows them to be latching or<br />
non-latching. If the alarm is latched, then the programmable relay will also latch<br />
until the alarm is reset.<br />
To begin programming the User Defined Relays, highlight the relay to be programmed and press the SELECT<br />
button. This action will bring up the List of Alarms/Faults screen. (Figure 29). Initially, the box beneath the relay<br />
will be empty.<br />
To attach alarms to each relay, follow the steps below under Navigating Protocol.<br />
!<br />
CAUTION<br />
Navigating through screens with additional navigational selections at the bottom<br />
of the display screen is slightly different from navigation involving only the<br />
navigation buttons below the display screen. Specific instruction is given below.<br />
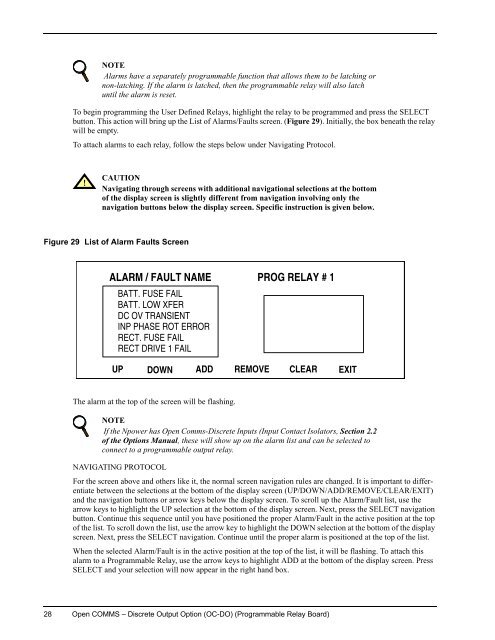
Figure 29 List of Alarm Faults Screen<br />
ALARM / FAULT NAME<br />
BATT. FUSE FAIL<br />
BATT. LOW XFER<br />
DC OV TRANSIENT<br />
INP PHASE ROT ERROR<br />
RECT. FUSE FAIL<br />
RECT DRIVE 1 FAIL<br />
PROG RELAY # 1<br />
BATTERY FUSE FAIL<br />
UP<br />
DOWN<br />
ADD<br />
REMOVE<br />
CLEAR<br />
EXIT<br />
The alarm at the top of the screen will be flashing.<br />
NOTE<br />
If the Npower has Open Comms-Discrete Inputs (Input Contact Isolators, Section 2.2<br />
of the Options Manual, these will show up on the alarm list and can be selected to<br />
connect to a programmable output relay.<br />
NAVIGATING PROTOCOL<br />
For the screen above and others like it, the normal screen navigation rules are changed. It is important to differentiate<br />
between the selections at the bottom of the display screen (UP/DOWN/ADD/REMOVE/CLEAR/EXIT)<br />
and the navigation buttons or arrow keys below the display screen. To scroll up the Alarm/Fault list, use the<br />
arrow keys to highlight the UP selection at the bottom of the display screen. Next, press the SELECT navigation<br />
button. Continue this sequence until you have positioned the proper Alarm/Fault in the active position at the top<br />
of the list. To scroll down the list, use the arrow key to highlight the DOWN selection at the bottom of the display<br />
screen. Next, press the SELECT navigation. Continue until the proper alarm is positioned at the top of the list.<br />
When the selected Alarm/Fault is in the active position at the top of the list, it will be flashing. To attach this<br />
alarm to a Programmable Relay, use the arrow keys to highlight ADD at the bottom of the display screen. Press<br />
SELECT and your selection will now appear in the right hand box.<br />
28 Open COMMS – Discrete Output Option (OC-DO) (Programmable Relay Board)