SL-24533.book(SL-24533 FC.fm) - Emerson Network Power
SL-24533.book(SL-24533 FC.fm) - Emerson Network Power
SL-24533.book(SL-24533 FC.fm) - Emerson Network Power

You also want an ePaper? Increase the reach of your titles
YUMPU automatically turns print PDFs into web optimized ePapers that Google loves.
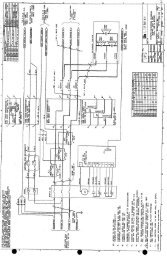
6.2 Installing the OC-DO (Programmable Relay Board)<br />
Before beginning the installation process, read through these instructions and take all necessary safety precautions<br />
for protection of the installer and the equipment to be installed. Observe all warnings and cautions listed in<br />
the front of this manual when wiring the OC-DO option.<br />
Once installed the OC-DO board needs to be connected to the CANbus. If it is the first option installed, utilize<br />
the system CANbus cable that is coiled in the center of the option area. If another option has been previously<br />
installed and connected to the system CANbus cable, use either the short (77-814000-03) or the long (77-<br />
814000-04) jumper cable as required.<br />
Two wires should be brought to each Terminal Block position on the OC-DO requiring a NO/NC output signal.<br />
Wire should be brought to the Npower via appropriately sized conduit and attached to either the top or bottom<br />
entry mounting plates. Wire should be routed down the right side of the Option area and then at a 90-degree<br />
angle to the Option board. (See Figure 21)<br />
All user option connecting cables are to be provided by others and are to be 16 gauge 300 V Min. tinned copper<br />
stranded wire. All option connections are made in the option section. Customer wires route through option plate.<br />
22 Open COMMS – Discrete Output Option (OC-DO) (Programmable Relay Board)