Günther Heisskanaltechnik & Heisskanalsysteme, Hot runner
Günther Heisskanaltechnik & Heisskanalsysteme, Hot runner
Günther Heisskanaltechnik & Heisskanalsysteme, Hot runner

Create successful ePaper yourself
Turn your PDF publications into a flip-book with our unique Google optimized e-Paper software.
User Manual <strong>Hot</strong> Runner Systems DPK<br />
Input Lowering (Abs.)<br />
By using potential-free external contact, the DPK can be set to lowering.<br />
GÜNTHER<br />
<strong>Hot</strong> Runner Systems<br />
Hint:<br />
Attention: Never connect any voltage to this input!<br />
Serial Interface<br />
One serial interface (RS232) is included in every DPK.<br />
For a connection to a molding machine a second serial interface is required. Depending on the<br />
molding machine and its protocol a RS232, RS 485, RS422 or TTY- (current loop) interface is<br />
required. You can get this interface as an add on kit or from the manufacturer installed when<br />
ordering a new DPK. For further information please contact <strong>Günther</strong> <strong>Hot</strong> Runner Systems.<br />
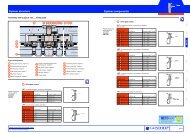
6.1.3 Additional Interface<br />
The add on kit includes:<br />
• 1 interface module<br />
• 1 preassembled flatcable<br />
• 5 m interface cable 2 x 0.5 mm² shielded, assembled for connection to the molding<br />
machine Arburg, Engel or Krauss - Maffei (please note the type at your order).<br />
• 2 pcs. spacer bolts including nut<br />
Installation:<br />
Hint:<br />
Attention: Disconnect main power before opening system!<br />
• Remove the top cover by removing the four screws on the side of the unit.<br />
• Plug the interface into the 10 pin an 14 pin conectors on the front panel (LR27) (take<br />
caution of the right direction!).<br />
• Remover the cover panel at the rear side of the DPK.<br />
• Pull the pole connector with its flat cable through the opening of the unit and connect the<br />
D-SUB 9 pin connector by using the spacer bolts and nuts from the outside of the unit.<br />
• Plug the flat cable onto the interface module (take caution of the direction!).<br />
Attention:<br />
Check the polarity! Pin 1 of the PCD must correspond to pin 1 of the socket!<br />
• Check the right jumper settings<br />
• Close the top cover and fix it by using the srews.<br />
• Install the cable to the molding machine, connect it on both sides and fix the screws of<br />
the connectors.<br />
• Setup the right protocol type in the DPK.<br />
6-32<br />
10/99 DPK 1.09