Günther Heisskanaltechnik & Heisskanalsysteme, Hot runner
Günther Heisskanaltechnik & Heisskanalsysteme, Hot runner
Günther Heisskanaltechnik & Heisskanalsysteme, Hot runner

You also want an ePaper? Increase the reach of your titles
YUMPU automatically turns print PDFs into web optimized ePapers that Google loves.
User Manual <strong>Hot</strong> Runner Systems DPK<br />
6.2.4 Additional Information:<br />
GÜNTHER<br />
<strong>Hot</strong> Runner Systems<br />
Hint:<br />
When working with the 230V loads, switch off the DPK and disconnect it from the power<br />
source!<br />
Opposite of other regulating units for 230V, the DPK checks the loads at the power up precedure by<br />
using a current measurement. So a clear statement about a load disconnection could be given.<br />
For all channels the set value in ampere can be displayed.<br />
To check the heater current a clamp-ampmeter with true RMS measurement should be used. For<br />
low voltage nozzles a range of 0-150A is required. High voltage nozzles requires a range of 0-10A.<br />
If there are problems with the installation of the DPK, please contact our service department for<br />
help. Please use the service form in appendix E and send it to the next service department.<br />
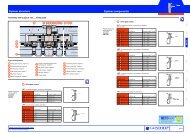
6.3 Installing new EPROM updates<br />
Hint:<br />
Attention: Disconnect the mains voltage and take care that there is no voltage at the DPK<br />
before opening the device!<br />
Please follow the safety instructions!<br />
To install a software update disconnect the power and thermocouple connections from the DPK.<br />
Disconnect also the serial interface to a molding machine.<br />
Now remove the top cover of the DPK and get the EPROM out of the module LR28. When<br />
installing the new EPROM take care of the right direction and fit in socket of the circuit.<br />
After that get the EPROM out of the module LR27. When installing the new EPROM take also care<br />
of the right direction and fit in socket of the circuit.<br />
Following this step close the cover of the DPK.<br />
Attention!<br />
Do never exchage the EPROMs!<br />
After turning on the DPK again, the DPK performs an update and an adjustment.<br />
Now the DPK should work normally.<br />
The actual software version is displayed in the right lower edge of the display, when the DPK is<br />
turned on.<br />
6-36<br />
10/99 DPK 1.09