capriz 25 capriz 28 - Heatline
capriz 25 capriz 28 - Heatline
capriz 25 capriz 28 - Heatline

Create successful ePaper yourself
Turn your PDF publications into a flip-book with our unique Google optimized e-Paper software.
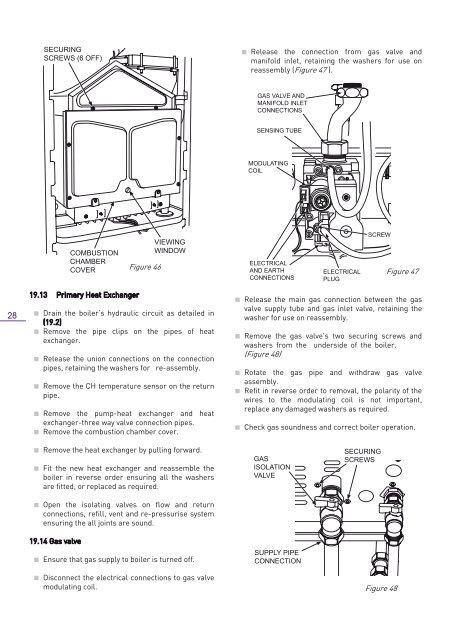
SECURING<br />
SCREWS (6 OFF)<br />
Release the connection from gas valve and<br />
manifold inlet, retaining the washers for use on<br />
reassembly (Figure 47 ).<br />
GAS VALVE AND<br />
MANIFOLD INLET<br />
CONNECTIONS<br />
SENSING TUBE<br />
MODULATING<br />
COIL<br />
COMBUSTION<br />
CHAMBER<br />
COVER<br />
Figure 46<br />
VIEWING<br />
WINDOW<br />
ELECTRICAL<br />
AND EARTH<br />
CONNECTIONS<br />
ELECTRICAL<br />
PLUG<br />
SCREW<br />
Figure 47<br />
<strong>28</strong><br />
19.13 Primary Heat Exchanger<br />
Drain the boiler’s hydraulic circuit as detailed in<br />
(19.2)<br />
Remove the pipe clips on the pipes of heat<br />
exchanger.<br />
Release the union connections on the connection<br />
pipes, retaining the washers for re-assembly.<br />
Remove the CH temperature sensor on the return<br />
pipe.<br />
Remove the pump-heat exchanger and heat<br />
exchanger-three way valve connection pipes.<br />
Remove the combustion chamber cover.<br />
Release the main gas connection between the gas<br />
valve supply tube and gas inlet valve, retaining the<br />
washer for use on reassembly.<br />
Remove the gas valve's two securing screws and<br />
washers from the underside of the boiler.<br />
(Figure 48)<br />
Rotate the gas pipe and withdraw gas valve<br />
assembly.<br />
Refit in reverse order to removal, the polarity of the<br />
wires to the modulating coil is not important,<br />
replace any damaged washers as required.<br />
Check gas soundness and correct boiler operation.<br />
Remove the heat exchanger by pulling forward.<br />
Fit the new heat exchanger and reassemble the<br />
boiler in reverse order ensuring all the washers<br />
are fitted, or replaced as required.<br />
Open the isolating valves on flow and return<br />
connections, refill, vent and re-pressurise system<br />
ensuring the all joints are sound.<br />
19.14 Gas valve<br />
Ensure that gas supply to boiler is turned off.<br />
Disconnect the electrical connections to gas valve<br />
modulating coil.<br />
GAS<br />
ISOLATION<br />
VALVE<br />
SUPPLY PIPE<br />
CONNECTION<br />
SECURING<br />
SCREWS<br />
Figure 48<br />
Page <strong>28</strong>