n o v/d e c • 2 0 0 8 - Subscribe
n o v/d e c • 2 0 0 8 - Subscribe
n o v/d e c • 2 0 0 8 - Subscribe

You also want an ePaper? Increase the reach of your titles
YUMPU automatically turns print PDFs into web optimized ePapers that Google loves.
24<br />
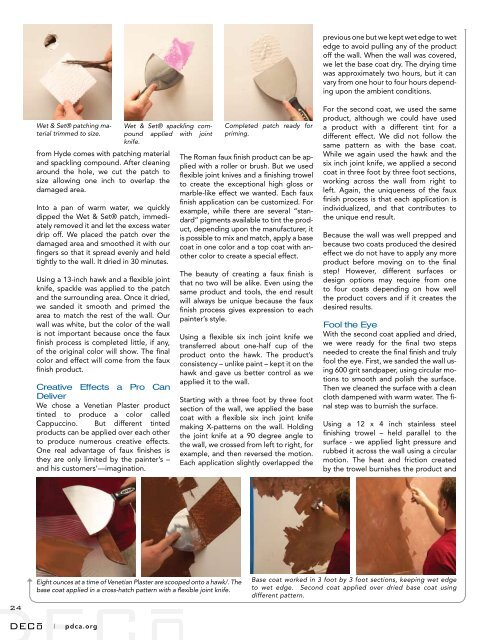
Wet & Set® patching material<br />
trimmed to size.<br />
from Hyde comes with patching material<br />
and spackling compound. After cleaning<br />
around the hole, we cut the patch to<br />
size allowing one inch to overlap the<br />
damaged area.<br />
Into a pan of warm water, we quickly<br />
dipped the Wet & Set® patch, immediately<br />
removed it and let the excess water<br />
drip off. We placed the patch over the<br />
damaged area and smoothed it with our<br />
fingers so that it spread evenly and held<br />
tightly to the wall. It dried in 30 minutes.<br />
Using a 13-inch hawk and a flexible joint<br />
knife, spackle was applied to the patch<br />
and the surrounding area. Once it dried,<br />
we sanded it smooth and primed the<br />
area to match the rest of the wall. Our<br />
wall was white, but the color of the wall<br />
is not important because once the faux<br />
finish process is completed little, if any,<br />
of the original color will show. The final<br />
color and effect will come from the faux<br />
finish product.<br />
Creative Effects a Pro Can<br />
Deliver<br />
We chose a Venetian Plaster product<br />
tinted to produce a color called<br />
Cappuccino. But different tinted<br />
products can be applied over each other<br />
to produce numerous creative effects.<br />
One real advantage of faux finishes is<br />
they are only limited by the painter’s –<br />
and his customers’—imagination.<br />
| pdca.org<br />
Wet & Set® spackling compound<br />
applied with joint<br />
knife.<br />
Eight ounces at a time of Venetian Plaster are scooped onto a hawk/. The<br />
base coat applied in a cross-hatch pattern with a flexible joint knife.<br />
Completed patch ready for<br />
priming.<br />
The Roman faux finish product can be applied<br />
with a roller or brush. But we used<br />
flexible joint knives and a finishing trowel<br />
to create the exceptional high gloss or<br />
marble-like effect we wanted. Each faux<br />
finish application can be customized. For<br />
example, while there are several “standard”<br />
pigments available to tint the product,<br />
depending upon the manufacturer, it<br />
is possible to mix and match, apply a base<br />
coat in one color and a top coat with another<br />
color to create a special effect.<br />
The beauty of creating a faux finish is<br />
that no two will be alike. Even using the<br />
same product and tools, the end result<br />
will always be unique because the faux<br />
finish process gives expression to each<br />
painter’s style.<br />
Using a flexible six inch joint knife we<br />
transferred about one-half cup of the<br />
product onto the hawk. The product’s<br />
consistency – unlike paint – kept it on the<br />
hawk and gave us better control as we<br />
applied it to the wall.<br />
Starting with a three foot by three foot<br />
section of the wall, we applied the base<br />
coat with a flexible six inch joint knife<br />
making X-patterns on the wall. Holding<br />
the joint knife at a 90 degree angle to<br />
the wall, we crossed from left to right, for<br />
example, and then reversed the motion.<br />
Each application slightly overlapped the<br />
previous one but we kept wet edge to wet<br />
edge to avoid pulling any of the product<br />
off the wall. When the wall was covered,<br />
we let the base coat dry. The drying time<br />
was approximately two hours, but it can<br />
vary from one hour to four hours depending<br />
upon the ambient conditions.<br />
For the second coat, we used the same<br />
product, although we could have used<br />
a product with a different tint for a<br />
different effect. We did not follow the<br />
same pattern as with the base coat.<br />
While we again used the hawk and the<br />
six inch joint knife, we applied a second<br />
coat in three foot by three foot sections,<br />
working across the wall from right to<br />
left. Again, the uniqueness of the faux<br />
finish process is that each application is<br />
individualized, and that contributes to<br />
the unique end result.<br />
Because the wall was well prepped and<br />
because two coats produced the desired<br />
effect we do not have to apply any more<br />
product before moving on to the final<br />
step! However, different surfaces or<br />
design options may require from one<br />
to four coats depending on how well<br />
the product covers and if it creates the<br />
desired results.<br />
Fool the Eye<br />
With the second coat applied and dried,<br />
we were ready for the final two steps<br />
needed to create the final finish and truly<br />
fool the eye. First, we sanded the wall using<br />
600 grit sandpaper, using circular motions<br />
to smooth and polish the surface.<br />
Then we cleaned the surface with a clean<br />
cloth dampened with warm water. The final<br />
step was to burnish the surface.<br />
Using a 12 x 4 inch stainless steel<br />
finishing trowel – held parallel to the<br />
surface - we applied light pressure and<br />
rubbed it across the wall using a circular<br />
motion. The heat and friction created<br />
by the trowel burnishes the product and<br />
Base coat worked in 3 foot by 3 foot sections, keeping wet edge<br />
to wet edge. Second coat applied over dried base coat using<br />
different pattern.