
Create successful ePaper yourself
Turn your PDF publications into a flip-book with our unique Google optimized e-Paper software.
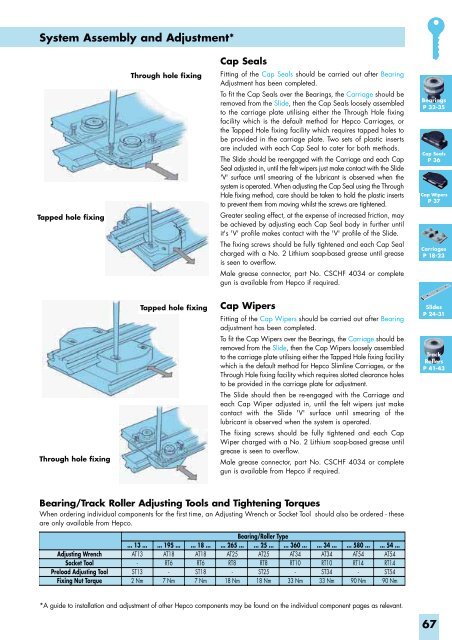
System Assembly and Adjustment*<br />
Cap Seals<br />
Through hole fixing<br />
Fitting of the Cap Seals should be carried out after Bearing<br />
Adjustment has been completed.<br />
To fit the Cap Seals over the Bearings, the Carriage should be<br />
removed from the Slide, then the Cap Seals loosely assembled<br />
to the carriage plate utilising either the Through Hole fixing<br />
facility which is the default method for Hepco Carriages, or<br />
the Tapped Hole fixing facility which requires tapped holes to<br />
be provided in the carriage plate. Two sets of plastic inserts<br />
are included with each Cap Seal to cater for both methods.<br />
The Slide should be re-engaged with the Carriage and each Cap<br />
Seal adjusted in, until the felt wipers just make contact with the Slide<br />
'V' surface until smearing of the lubricant is observed when the<br />
system is operated. When adjusting the Cap Seal using the Through<br />
Hole fixing method, care should be taken to hold the plastic inserts<br />
to prevent them from moving whilst the screws are tightened.<br />
Greater sealing effect, at the expense of increased friction, may<br />
be achieved by adjusting each Cap Seal body in further until<br />
it's 'V' profile makes contact with the 'V' profile of the Slide.<br />
The fixing screws should be fully tightened and each Cap Seal<br />
charged with a No. 2 Lithium soap-based grease until grease<br />
is seen to overflow.<br />
Male grease connector, part No. CSCHF 4034 or complete<br />
gun is available from Hepco if required.<br />
Bearings<br />
P 32-35<br />
Cap Seals<br />
P 36<br />
Cap Wipers<br />
P 37<br />
Tapped hole fixing<br />
Carriages<br />
P 18-23<br />
Tapped hole fixing<br />
Cap Wipers<br />
Fitting of the Cap Wipers should be carried out after Bearing<br />
adjustment has been completed.<br />
To fit the Cap Wipers over the Bearings, the Carriage should be<br />
removed from the Slide, then the Cap Wipers loosely assembled<br />
to the carriage plate utilising either the Tapped Hole fixing facility<br />
which is the default method for Hepco Slimline Carriages, or the<br />
Through Hole fixing facility which requires slotted clearance holes<br />
to be provided in the carriage plate for adjustment.<br />
The Slide should then be re-engaged with the Carriage and<br />
each Cap Wiper adjusted in, until the felt wipers just make<br />
contact with the Slide 'V' surface until smearing of the<br />
lubricant is observed when the system is operated.<br />
The fixing screws should be fully tightened and each Cap<br />
Wiper charged with a No. 2 Lithium soap-based grease until<br />
grease is seen to overflow.<br />
Male grease connector, part No. CSCHF 4034 or complete<br />
gun is available from Hepco if required.<br />
Slides<br />
P 24-31<br />
Track<br />
Rollers<br />
P 41-43<br />
Through hole fixing<br />
Bearing/Track Roller Adjusting Tools and Tightening Torques<br />
When ordering individual components for the first time, an Adjusting Wrench or Socket Tool should also be ordered - these<br />
are only available from Hepco.<br />
Adjusting Wrench<br />
Socket Tool<br />
Preload Adjusting Tool<br />
Fixing Nut Torque<br />
... 13 ...<br />
AT13<br />
-<br />
ST13<br />
2 Nm<br />
... 195 ...<br />
AT18<br />
RT6<br />
-<br />
7 Nm<br />
... 18 ...<br />
AT18<br />
RT6<br />
ST18<br />
7 Nm<br />
... 265 ...<br />
AT25<br />
RT8<br />
-<br />
18 Nm<br />
Bearing/Roller Type<br />
... 25 ...<br />
AT25<br />
RT8<br />
ST25<br />
18 Nm<br />
... 360 ...<br />
AT34<br />
RT10<br />
-<br />
33 Nm<br />
... 34 ...<br />
AT34<br />
RT10<br />
ST34<br />
33 Nm<br />
... 580 ...<br />
AT54<br />
RT14<br />
-<br />
90 Nm<br />
... 54 ...<br />
AT54<br />
RT14<br />
ST54<br />
90 Nm<br />
*A guide to installation and adjustment of other Hepco components may be found on the individual component pages as relevant.<br />
67