BLADE BALANCER
BLADE BALANCER
BLADE BALANCER

You also want an ePaper? Increase the reach of your titles
YUMPU automatically turns print PDFs into web optimized ePapers that Google loves.
Bag G<br />
Main Frame Assembly-4 / -4<br />
No.<br />
1<br />
2<br />
3<br />
4<br />
5<br />
Material No.<br />
BK2602<br />
BK2603<br />
BK1473<br />
HNX2-6B<br />
BK1038<br />
Description<br />
ANTENNA HOLDER<br />
CANOPY CLIP<br />
LANDING SKID (BLACK)<br />
Button Head Socket Screw, M2x6<br />
LANDING SKID DAMPER<br />
名 稱<br />
天 線 管 座<br />
機 殼 固 定 夾<br />
腳 架 ( 黑 )<br />
半 圓 頭 內 六 角 自 攻 螺 絲 M2×6<br />
腳 架 墊 圈<br />
Qty<br />
1<br />
1<br />
1<br />
8<br />
4<br />
No.<br />
6<br />
7<br />
8<br />
9<br />
Material No.<br />
BK1020<br />
HME3-3B<br />
HMC2-14B<br />
HML2<br />
Description<br />
MAIN SHAFT LOCK RING<br />
SET SCREW M3×3<br />
SOCKET SCREW M2×14<br />
M2 NUT<br />
名 稱<br />
止 擋 圈<br />
無 頭 內 六 角 螺 絲 M3×3<br />
內 六 角 螺 絲 M2×14<br />
M2 螺 帽<br />
Qty<br />
1<br />
1<br />
1<br />
1<br />
HNX2-6B<br />
Button Head Socket Screw, M2x6<br />
半 圓 頭 內 六 角 自 攻 螺 絲 M2×6<br />
(4)<br />
(4)<br />
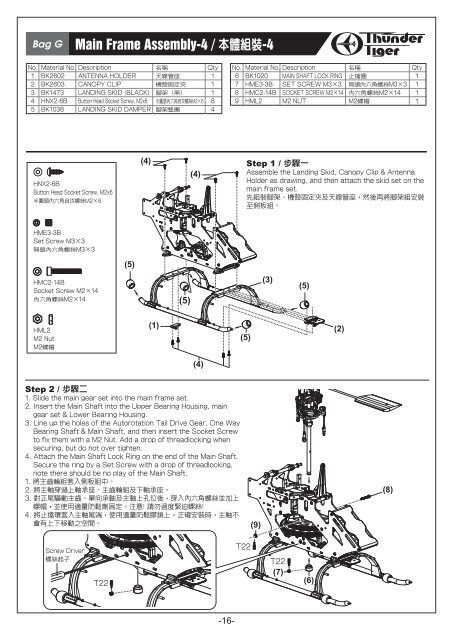
Step 1 / 步 驟 一<br />
Assemble the Landing Skid, Canopy Clip & Antenna<br />
Holder as drawing, and then attach the skid set on the<br />
main frame set.<br />
先 組 裝 腳 架 、 機 殼 固 定 夾 及 天 線 管 座 , 然 後 再 將 腳 架 組 安 裝<br />
至 側 板 組 。<br />
HME3-3B<br />
Set Screw M3×3<br />
無 頭 內 六 角 螺 絲 M3×3<br />
(5)<br />
HMC2-14B<br />
Socket Screw M2×14<br />
內 六 角 螺 絲 M2×14<br />
(5)<br />
(3)<br />
(5)<br />
HML2<br />
M2 Nut<br />
M2 螺 帽<br />
(1)<br />
(5)<br />
(2)<br />
(4)<br />
Step 2 / 步 驟 二<br />
1. Slide the main gear set into the main frame set.<br />
2. Insert the Main Shaft into the Upper Bearing Housing, main<br />
gear set & Lower Bearing Housing.<br />
3. Line up the holes of the Autorotation Tail Drive Gear, One Way<br />
Bearing Shaft & Main Shaft, and then insert the Socket Screw<br />
to fix them with a M2 Nut. Add a drop of threadlocking when<br />
securing, but do not over tighten.<br />
4. Attach the Main Shaft Lock Ring on the end of the Main Shaft.<br />
Secure the ring by a Set Screw with a drop of threadlocking,<br />
note there should be no play of the Main Shaft.<br />
1. 將 主 齒 輪 組 套 入 側 板 組 中 。<br />
2. 將 主 軸 穿 過 上 軸 承 座 、 主 齒 輪 組 及 下 軸 承 座 。<br />
3. 對 正 尾 驅 動 主 齒 、 單 向 承 軸 及 主 軸 上 孔 位 後 , 穿 入 內 六 角 螺 絲 並 加 上<br />
螺 帽 , 並 使 用 適 量 防 鬆 劑 固 定 。 注 意 ! 請 勿 過 度 緊 迫 螺 絲 !<br />
4. 將 止 擋 環 套 入 主 軸 尾 端 , 使 用 適 量 防 鬆 膠 鎖 上 , 正 確 安 裝 時 , 主 軸 不<br />
會 有 上 下 移 動 之 空 間 。<br />
(9)<br />
(8)<br />
Screw Driver<br />
螺 絲 起 子<br />
T22<br />
T22<br />
T22<br />
(7)<br />
(6)<br />
-16-