BLADE BALANCER
BLADE BALANCER
BLADE BALANCER

You also want an ePaper? Increase the reach of your titles
YUMPU automatically turns print PDFs into web optimized ePapers that Google loves.
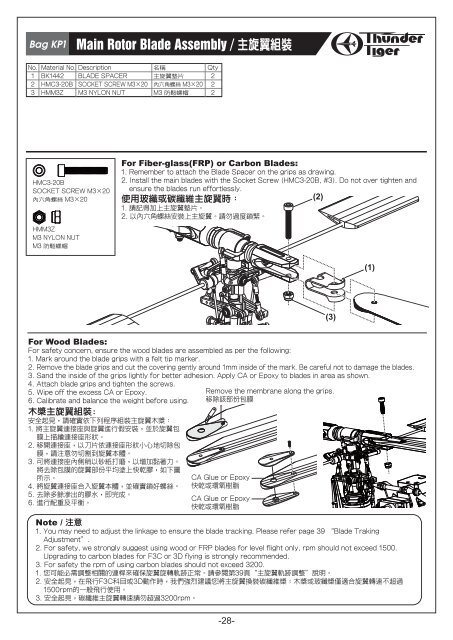
Bag KP1<br />
Main Rotor Blade Assembly / <br />
No.<br />
1<br />
2<br />
3<br />
Material No.<br />
BK1442<br />
HMC3-20B<br />
HMM3Z<br />
Description<br />
<strong>BLADE</strong> SPACER<br />
SOCKET SCREW M3×20<br />
M3 NYLON NUT<br />
名 稱<br />
主 旋 翼 墊 片<br />
內 六 角 螺 絲 M3×20<br />
M3 防 鬆 螺 帽<br />
Qty<br />
2<br />
2<br />
2<br />
HMC3-20B<br />
SOCKET SCREW M3×20<br />
內 六 角 螺 絲 M3×20<br />
HMM3Z<br />
M3 NYLON NUT<br />
M3 防 鬆 螺 帽<br />
For Fiber-glass(FRP) or Carbon Blades:<br />
1. Remember to attach the Blade Spacer on the grips as drawing.<br />
2. Install the main blades with the Socket Screw (HMC3-20B, #3). Do not over tighten and<br />
ensure the blades run effortlessly.<br />
使 用 玻 纖 或 碳 纖 維 主 旋 翼 時 :<br />
(2)<br />
1. 請 記 得 加 上 主 旋 翼 墊 片 。<br />
2. 以 內 六 角 螺 絲 安 裝 上 主 旋 翼 。 請 勿 過 度 鎖 緊 。<br />
(1)<br />
(3)<br />
For Wood Blades:<br />
For safety concern, ensure the wood blades are assembled as per the following:<br />
1. Mark around the blade grips with a felt tip marker.<br />
2. Remove the blade grips and cut the covering gently around 1mm inside of the mark. Be careful not to damage the blades.<br />
3. Sand the inside of the grips lightly for better adhesion. Apply CA or Epoxy to blades in area as shown.<br />
4. Attach blade grips and tighten the screws.<br />
5. Wipe off the excess CA or Epoxy.<br />
6. Calibrate and balance the weight before using.<br />
木 槳 主 旋 翼 組 裝 :<br />
安 全 起 見 , 請 確 實 依 下 列 程 序 組 裝 主 旋 翼 木 槳 :<br />
1. 將 主 旋 翼 連 接 座 與 旋 翼 進 行 假 安 裝 , 並 於 旋 翼 包<br />
膜 上 描 繪 連 接 座 形 狀 。<br />
2. 移 開 連 接 座 , 以 刀 片 依 連 接 座 形 狀 小 心 地 切 除 包<br />
膜 , 請 注 意 勿 切 割 到 旋 翼 本 體 。<br />
3. 可 將 連 接 座 內 側 稍 以 砂 紙 打 磨 , 以 增 加 黏 著 力 。<br />
將 去 除 包 膜 的 旋 翼 部 份 平 均 塗 上 快 乾 膠 , 如 下 圖<br />
所 示 。<br />
4. 將 旋 翼 連 接 座 合 入 旋 翼 本 體 , 並 確 實 鎖 好 螺 絲 。<br />
5. 去 除 多 餘 滲 出 的 膠 水 , 即 完 成 。<br />
6. 進 行 配 重 及 平 衡 。<br />
Remove the membrane along the grips.<br />
移 除 該 部 份 包 膜<br />
CA Glue or Epoxy<br />
快 乾 或 環 氧 樹 脂<br />
CA Glue or Epoxy<br />
快 乾 或 環 氧 樹 脂<br />
Note / 注 意<br />
1. You may need to adjust the linkage to ensure the blade tracking. Please refer page 39 “Blade Traking<br />
Adjustment”.<br />
2. For safety, we strongly suggest using wood or FRP blades for level flight only, rpm should not exceed 1500.<br />
Upgrading to carbon blades for F3C or 3D flying is strongly recommended.<br />
3. For safety the rpm of using carbon blades should not exceed 3200.<br />
1. 您 可 能 必 需 調 整 相 關 的 連 桿 來 確 保 旋 翼 旋 轉 軌 跡 正 常 。 請 參 閱 第 39 頁 “ 主 旋 翼 軌 跡 調 整 ” 說 明 。<br />
2. 安 全 起 見 , 在 飛 行 F3C 科 目 或 3D 動 作 時 , 我 們 強 烈 建 議 您 將 主 旋 翼 換 裝 碳 纖 維 槳 ; 木 槳 或 玻 纖 槳 僅 適 合 旋 翼 轉 速 不 超 過<br />
1500rpm 的 一 般 飛 行 使 用 。<br />
3. 安 全 起 見 , 碳 纖 維 主 旋 翼 轉 速 請 勿 超 過 3200rpm。<br />
-28-