BLADE BALANCER
BLADE BALANCER
BLADE BALANCER

Create successful ePaper yourself
Turn your PDF publications into a flip-book with our unique Google optimized e-Paper software.
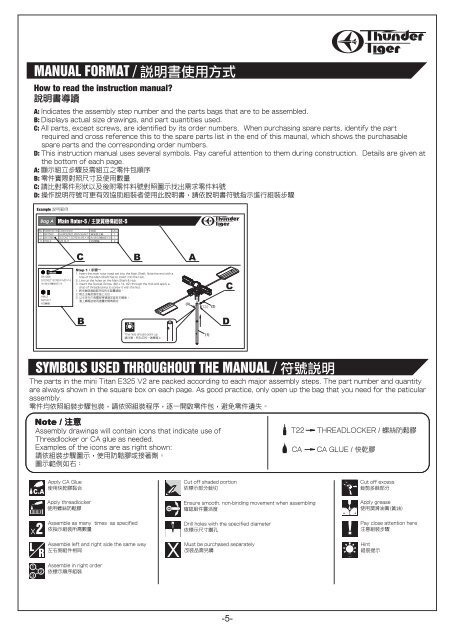
MANUAL FORMAT / 說 明 書 使 用 方 式<br />
How to read the instruction manual?<br />
說 明 書 導 讀<br />
A: Indicates the assembly step number and the parts bags that are to be assembled.<br />
B: Displays actual size drawings, and part quantities used.<br />
C: All parts, except screws, are identified by its order numbers. When purchasing spare parts, identify the part<br />
required and cross reference this to the spare parts list in the end of this maunal, which shows the purchasable<br />
spare parts and the corresponding order numbers.<br />
D: This instruction manual uses several symbols. Pay careful attention to them during construction. Details are given at<br />
the bottom of each page.<br />
A: 顯 示 組 立 步 驟 及 需 組 立 之 零 件 包 順 序<br />
B: 零 件 實 際 對 照 尺 寸 及 使 用 數 量<br />
C: 請 比 對 零 件 形 狀 以 及 後 附 零 件 料 號 對 照 圖 示 找 出 需 求 零 件 料 號<br />
D: 操 作 說 明 符 號 可 更 有 效 協 助 組 裝 者 使 用 此 說 明 書 , 請 依 說 明 書 符 號 指 示 進 行 組 裝 步 驟<br />
Example <br />
Bag A Main Rotor-5 / -5<br />
No. Material No. Description<br />
名 稱<br />
Qty<br />
1 BK1502 HARDENED MAIN SHAFT 高 強 度 主 軸 1<br />
2 BK1086 SOCKET SCREW M2×14 內 六 角 半 牙 螺 絲 M2×14 1<br />
3 HML2 M2 NUT<br />
M2 螺 帽<br />
2<br />
C<br />
B<br />
A<br />
BK1086<br />
SOCKET SCREW M2×14<br />
內 六 角 半 牙 螺 絲 M2×14<br />
HML2<br />
M2 NUT<br />
M2 螺 帽<br />
Step 1 / 步 驟 一<br />
1. Insert the main rotor head set into the Main Shaft. Note the end with a<br />
hole of the Main Shaft has to insert into the Hub.<br />
2. Line up the holes on the Main Shaft & Hub.<br />
3. Insert the Socket Screw (M2 x 14, #2) through the Hub and apply a<br />
drop of threadlocking to screw it with the Nut.<br />
1. 將 主 軸 穿 過 組 裝 完 成 的 主 旋 翼 頭 組 。<br />
2. 對 正 主 軸 及 固 定 座 上 孔 位 。<br />
3. 以 半 牙 內 六 角 螺 絲 穿 過 固 定 座 及 主 軸 後 ,<br />
套 上 螺 帽 並 使 用 適 量 防 鬆 劑 固 定 。<br />
(3)<br />
T22 (2)<br />
C<br />
B<br />
D<br />
The hole should point up.<br />
請 注 意 , 有 孔 位 的 一 端 應 朝 上<br />
(1)<br />
SYMBOLS USED THROUGHOUT THE MANUAL / 符 號 說 明<br />
The parts in the mini Titan E325 V2 are packed according to each major assembly steps. The part number and quantity<br />
are always shown in the square box on each page. As good practice, only open up the bag that you need for the paticular<br />
assembly.<br />
零 件 均 依 照 組 裝 步 驟 包 裝 , 請 依 照 組 裝 程 序 , 逐 一 開 啟 零 件 包 , 避 免 零 件 遺 失 。<br />
Note / 注 意<br />
Assembly drawings will contain icons that indicate use of<br />
Threadlocker or CA glue as needed.<br />
Examples of the icons are as right shown:<br />
請 依 組 裝 步 驟 圖 示 , 使 用 防 鬆 膠 或 接 著 劑 。<br />
圖 示 範 例 如 右 :<br />
T22<br />
CA<br />
THREADLOCKER / 螺 絲 防 鬆 膠<br />
CA GLUE / 快 乾 膠<br />
Apply CA Glue<br />
使 用 快 乾 膠 黏 合<br />
Cut off shaded portion<br />
依 標 示 部 分 裁 切<br />
Cut off excess<br />
裁 剪 多 餘 部 分<br />
Apply threadlocker<br />
使 用 螺 絲 防 鬆 膠<br />
Ensure smooth, non-binding movement when assembling<br />
確 認 組 件 靈 活 度<br />
Apply grease<br />
使 用 潤 滑 油 膏 ( 黃 油 )<br />
Assemble as many times as specified<br />
依 指 示 組 裝 所 需 數 量<br />
Drill holes with the specified diameter<br />
依 標 示 尺 寸 鑽 孔<br />
Pay close attention here<br />
注 意 組 裝 步 驟<br />
Assemble left and right side the same way<br />
左 右 側 組 件 相 同<br />
Must be purchased separately<br />
改 裝 品 需 另 購<br />
Hint<br />
組 裝 提 示<br />
Assemble in right order<br />
依 標 示 順 序 組 裝<br />
-5-