BLADE BALANCER
BLADE BALANCER
BLADE BALANCER

You also want an ePaper? Increase the reach of your titles
YUMPU automatically turns print PDFs into web optimized ePapers that Google loves.
Bag M<br />
Tail Boom Bracket Set-2 / -2<br />
No.<br />
1<br />
2<br />
Material No.<br />
HNX2-10B<br />
HSA2-6<br />
Description<br />
名 稱<br />
SOCKET BUTTON HEAD SELF TAPPING SCREW, M2×10 半 圓 頭 內 六 角 自 攻 螺 絲 M2×10<br />
BUTTON HEAD SOCKET SCREW, M2X6 半 圓 頭 內 六 角 螺 絲 M2X6<br />
Qty<br />
4<br />
4<br />
HNX2-10B<br />
SOCKET BUTTON HEAD SELF TAPPING SCREW, M2×10<br />
半 圓 頭 內 六 角 自 攻 螺 絲 M2×10<br />
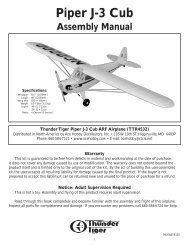
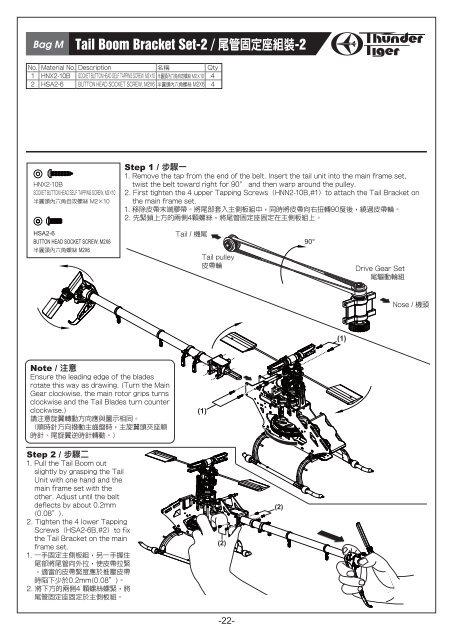
Step 1 / 步 驟 一<br />
1. Remove the tap from the end of the belt. Insert the tail unit into the main frame set,<br />
twist the belt toward right for 90° and then warp around the pulley.<br />
2. First tighten the 4 upper Tapping Screws(HNN2-10B,#1)to attach the Tail Bracket on<br />
the main frame set.<br />
1. 移 除 皮 帶 末 端 膠 帶 。 將 尾 部 套 入 主 側 板 組 中 , 同 時 將 皮 帶 向 右 扭 轉 90 度 後 , 繞 過 皮 帶 輪 。<br />
2. 先 緊 鎖 上 方 的 兩 側 4 顆 螺 絲 , 將 尾 管 固 定 座 固 定 在 主 側 板 組 上 。<br />
HSA2-6<br />
BUTTON HEAD SOCKET SCREW, M2X6<br />
半 圓 頭 內 六 角 螺 絲 M2X6<br />
Tail / 機 尾<br />
Tail pulley<br />
皮 帶 輪<br />
90°<br />
Drive Gear Set<br />
尾 驅 動 輪 組<br />
Nose / 機 頭<br />
(1)<br />
Note / 注 意<br />
Ensure the leading edge of the blades<br />
rotate this way as drawing. (Turn the Main<br />
Gear clockwise, the main rotor grips turns<br />
clockwise and the Tail Blades turn counter<br />
clockwise.)<br />
請 注 意 旋 翼 轉 動 方 向 應 與 圖 示 相 同 。<br />
( 順 時 針 方 向 撥 動 主 齒 盤 時 , 主 旋 翼 頭 夾 座 順<br />
時 針 、 尾 旋 翼 逆 時 針 轉 動 。)<br />
(1)<br />
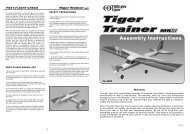
Step 2 / 步 驟 二<br />
1. Pull the Tail Boom out<br />
slightly by grasping the Tail<br />
Unit with one hand and the<br />
main frame set with the<br />
other. Adjust until the belt<br />
deflects by about 0.2mm<br />
(0.08”).<br />
2. Tighten the 4 lower Tapping<br />
Screws(HSA2-6B,#2)to fix<br />
the Tail Bracket on the main<br />
frame set.<br />
1. 一 手 固 定 主 側 板 組 , 另 一 手 握 住<br />
尾 部 將 尾 管 向 外 拉 , 使 皮 帶 拉 緊<br />
。 適 當 的 皮 帶 緊 度 應 於 推 壓 皮 帶<br />
時 陷 下 少 於 0.2mm(0.08”)。<br />
2. 將 下 方 的 兩 側 4 顆 螺 絲 螺 緊 , 將<br />
尾 管 固 定 座 固 定 於 主 側 板 組 。<br />
(2)<br />
(2)<br />
-22-