
You also want an ePaper? Increase the reach of your titles
YUMPU automatically turns print PDFs into web optimized ePapers that Google loves.
SETTINGS<br />
Before using the USB memory device<br />
CAUTION:<br />
• Do not remove the USB memory device or unplug<br />
the AC cord while the operations for “USB Memory<br />
Management” or “Software Update Settings (<strong>Manual</strong><br />
Update from USB memory device)” are being<br />
performed.<br />
• Do not use a USB extension cable when connecting<br />
a USB memory device to the USB1 or USB2 terminal<br />
on the player.<br />
−−Using a USB extension cable may prevent the<br />
player from performing correctly.<br />
NOTE:<br />
• SHARP cannot guarantee that all brands’ USB<br />
memory devices will operate with this player.<br />
• Only USB memory devices formatted with FAT 32/16<br />
are compatible.<br />
When formatting a USB memory device using a PC,<br />
perform the following settings.<br />
Format File System: FAT32<br />
Allocation Unit Size: Default Allocation Size<br />
USB Memory Management<br />
The following instructions explain how to delete data<br />
such as the Virtual Package data and the <strong>BD</strong>-LIVE<br />
data in a USB memory device.<br />
When you insert or remove a USB memory device,<br />
be sure to turn the main power off and make sure<br />
that “Quick Start” is set to “No” (See page 43).<br />
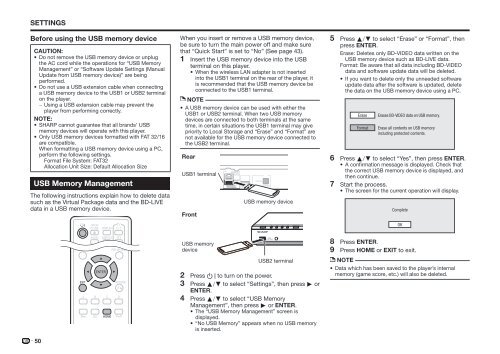
1 Insert the USB memory device into the USB<br />
terminal on this player.<br />
• When the wireless LAN adapter is not inserted<br />
into the USB1 terminal on the rear of the player, it<br />
is recommended that the USB memory device be<br />
connected to the USB1 terminal.<br />
NOTE<br />
• A USB memory device can be used with either the<br />
USB1 or USB2 terminal. When two USB memory<br />
devices are connected to both terminals at the same<br />
time, in certain situations the USB1 terminal may give<br />
priority to Local Storage and “Erase” and “Format” are<br />
not available for the USB memory device connected to<br />
the USB2 terminal.<br />
Rear<br />
USB1 terminal<br />
Front<br />
USB memory device<br />
5 Press a/b to select “Erase” or “Format”, then<br />
press ENTER.<br />
Erase: Deletes only <strong>BD</strong>-VIDEO data written on the<br />
USB memory device such as <strong>BD</strong>-LIVE data.<br />
Format: Be aware that all data including <strong>BD</strong>-VIDEO<br />
data and software update data will be deleted.<br />
• If you want to delete only the unneeded software<br />
update data after the software is updated, delete<br />
the data on the USB memory device using a PC.<br />
Erase<br />
Format<br />
Erases <strong>BD</strong>-VIDEO data on USB memory.<br />
Erase all contents on USB memory<br />
including protected contents.<br />
6 Press a/b to select “Yes”, then press ENTER.<br />
• A confirmation message is displayed. Check that<br />
the correct USB memory device is displayed, and<br />
then continue.<br />
7 Start the process.<br />
• The screen for the current operation will display.<br />
Complete<br />
OK<br />
50<br />
USB memory<br />
device<br />
USB2 terminal<br />
2 Press B to turn on the power.<br />
3 Press a/b to select “Settings”, then press d or<br />
ENTER.<br />
4 Press a/b to select “USB Memory<br />
Management”, then press d or ENTER.<br />
• The “USB Memory Management” screen is<br />
displayed.<br />
• “No USB Memory” appears when no USB memory<br />
is inserted.<br />
8 Press ENTER.<br />
9 Press HOME or EXIT to exit.<br />
NOTE<br />
• Data which has been saved to the player’s internal<br />
memory (game score, etc.) will also be deleted.