- Page 1 and 2: Nanosurf easyScan 2 AFM Operating I
- Page 3 and 4: Table of contents
- Page 5 and 6: 4.4: Approaching the sample .......
- Page 7 and 8: CHAPTER 13: Imaging 121 13.1: Intro
- Page 9 and 10: 17.9: SPM Parameters dialog........
- Page 11 and 12: CHAPTER 1: The easyScan 2 AFM 0 0
- Page 13 and 14: COMPONENTS OF THE SYSTEM 1.2: Compo
- Page 15 and 16: CONNECTORS, INDICATORS AND CONTROLS
- Page 17 and 18: CONNECTORS, INDICATORS AND CONTROLS
- Page 19 and 20: CHAPTER 2: Installing the easyScan
- Page 21 and 22: INSTALLING THE HARDWARE 2 Connect t
- Page 23 and 24: INSTALLING THE SPM CONTROL SOFTWARE
- Page 25 and 26: INSTALLING THE SPM CONTROL SOFTWARE
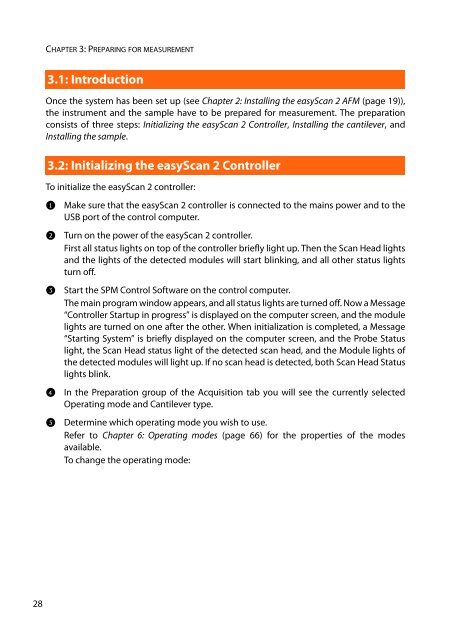
- Page 27: CHAPTER 3: Preparing for measuremen
- Page 31 and 32: INSTALLING THE CANTILEVER 3.3.2: In
- Page 33 and 34: INSTALLING THE CANTILEVER Figure 3-
- Page 35 and 36: INSTALLING THE SAMPLE 100 nm Figure
- Page 37 and 38: INSTALLING THE SAMPLE layer with an
- Page 39 and 40: INSTALLING THE SAMPLE Figure 3-10:
- Page 41 and 42: CHAPTER 4: A first measurement 0 0
- Page 43 and 44: PREPARING THE INSTRUMENT 4.3: Prepa
- Page 45 and 46: APPROACHING THE SAMPLE - Green The
- Page 47 and 48: APPROACHING THE SAMPLE 2 While obse
- Page 49 and 50: STARTING A MEASUREMENT new folder w
- Page 51 and 52: SELECTING A MEASUREMENT AREA Figure
- Page 53 and 54: CREATING A BASIC REPORT 4.8: Creati
- Page 55 and 56: CHAPTER 5: Improving measurement qu
- Page 57 and 58: ADJUSTING THE MEASUREMENT PLANE 3 R
- Page 59 and 60: ADJUSTING THE MEASUREMENT PLANE Fig
- Page 61 and 62: JUDGING TIP QUALITY When the image
- Page 63 and 64: CHAPTER 6: Operating modes
- Page 65 and 66: 4 Select the Static Force mode in t
- Page 67 and 68: FORCE MODULATION MODE > Select the
- Page 69 and 70: KELVIN PROBE FORCE MICROSCOPY IMPOR
- Page 71 and 72: KELVIN PROBE FORCE MICROSCOPY Detec
- Page 73 and 74: KELVIN PROBE FORCE MICROSCOPY Softw
- Page 75 and 76: KELVIN PROBE FORCE MICROSCOPY Figur
- Page 77 and 78: KELVIN PROBE FORCE MICROSCOPY Figur
- Page 79 and 80:
KELVIN PROBE FORCE MICROSCOPY Figur
- Page 81 and 82:
CHAPTER 7: Finishing measurements 0
- Page 83 and 84:
STORING THE INSTRUMENT 3 Exit the S
- Page 85 and 86:
CHAPTER 8: Maintenance 0 0
- Page 87 and 88:
CHAPTER 9: Problems and solutions 0
- Page 89 and 90:
SOFTWARE AND DRIVER PROBLEMS If thi
- Page 91 and 92:
AFM MEASUREMENT PROBLEMS 9.3: AFM m
- Page 93 and 94:
NANOSURF SUPPORT 3 Try to induce ch
- Page 95 and 96:
CHAPTER 10: AFM theory 0 0
- Page 97 and 98:
THE EASYSCAN 2 AFM resonance freque
- Page 99 and 100:
CHAPTER 11: Technical data 0 0 0
- Page 101 and 102:
THE EASYSCAN 2 AFM SCAN HEADS Field
- Page 103 and 104:
Nanosurf easyScan 2 Scripting Inter
- Page 105 and 106:
HARDWARE MODULES AND OPTIONS AFM Mo
- Page 107 and 108:
HARDWARE MODULES AND OPTIONS Signal
- Page 109 and 110:
CHAPTER 12: The SPM Control Softwar
- Page 111 and 112:
THE WORKSPACE 12.2: The workspace W
- Page 113 and 114:
DOCUMENT SPACE The Operating window
- Page 115 and 116:
PANELS border of the main window an
- Page 117 and 118:
STATUS BAR tab displays different b
- Page 119 and 120:
VIEW TAB IMPORTANT The “Video”
- Page 121 and 122:
CHAPTER 13: Imaging 0 0
- Page 123 and 124:
IMAGING PANEL Figure 13-1: The Imag
- Page 125 and 126:
+ + + + - IMAGING PANEL Z-Controlle
- Page 127 and 128:
THE IMAGING TOOLBAR 13.3: The Imagi
- Page 129 and 130:
ACQUISITION TAB 13.4.1: Preparation
- Page 131 and 132:
ACQUISITION TAB Home Increases the
- Page 133 and 134:
STAGE PANEL 13.5: Stage panel This
- Page 135 and 136:
VIDEO PANEL This dialog is only ava
- Page 137 and 138:
VIDEO PANEL Switch view The “Swit
- Page 139 and 140:
VIDEO PANEL High-Resolution Mode Bu
- Page 141 and 142:
VIDEO PANEL Image Exposure time Adj
- Page 143 and 144:
ONLINE PANEL and right of the inner
- Page 145 and 146:
CHAPTER 14: Spectroscopy 0 0
- Page 147 and 148:
INTRODUCTION IMPORTANT AFM users mu
- Page 149 and 150:
SPECTROSCOPY TOOLBAR Position secti
- Page 151 and 152:
CHAPTER 15: Lithography
- Page 153 and 154:
PERFORMING LITHOGRAPHY By default,
- Page 155 and 156:
- Dynamic Force - STM (STM only) LI
- Page 157 and 158:
LITHOGRAPHY PANEL 15.3.1: Layer Edi
- Page 159 and 160:
LITHOGRAPHY PANEL 15.3.2: Object Ed
- Page 161 and 162:
LITHOGRAPHY TOOLBAR Launcher icon T
- Page 163 and 164:
LITHOGRAPHY TOOLBAR 15.5.1: Vector
- Page 165 and 166:
LITHOGRAPHY TOOLBAR 15.5.2: Pixel G
- Page 167 and 168:
- Static Force Setpoint - Dynamic F
- Page 169 and 170:
CHAPTER 16: Working with documents
- Page 171 and 172:
CHARTS Just like the panels of the
- Page 173 and 174:
CHARTS This histogram displays the
- Page 175 and 176:
CHARTS Add chart The “Add Chart
- Page 177 and 178:
CHARTS Figure 16-3: Data filter typ
- Page 179 and 180:
CHARTS Figure 16-5: Shading option.
- Page 181 and 182:
GALLERY PANEL 16.4: Gallery panel T
- Page 183 and 184:
GALLERY PANEL recommended to do thi
- Page 185 and 186:
GALLERY PANEL 16.4.5: File Rename d
- Page 187 and 188:
ANALYSIS TAB To stop using a tool:
- Page 189 and 190:
ANALYSIS TAB Measure Angle Calculat
- Page 191 and 192:
ANALYSIS TAB Figure 16-7: Correct s
- Page 193 and 194:
ANALYSIS TAB The Roughness Average,
- Page 195 and 196:
ANALYSIS TAB 16.5.5: Tools group Cr
- Page 197 and 198:
ANALYSIS TAB Report The “Report
- Page 199 and 200:
TOOL PANEL Cursor Position section
- Page 201 and 202:
CHAPTER 17: Advanced settings 0 0
- Page 203 and 204:
FILE MENU 17.2: File menu The File
- Page 205 and 206:
FILE MENU The data lines are stored
- Page 207 and 208:
FILE MENU User Interface Language S
- Page 209 and 210:
FILE MENU Scripting Allows you to s
- Page 211 and 212:
FILE MENU Gallery Settings History
- Page 213 and 214:
SETTINGS TAB 17.3.1: Scan Head grou
- Page 215 and 216:
SCAN HEAD CALIBRATION EDITOR DIALOG
- Page 217 and 218:
SCAN HEAD CALIBRATION EDITOR DIALOG
- Page 219 and 220:
SCAN HEAD DIAGNOSIS DIALOG 17.7.1:
- Page 221 and 222:
SPM PARAMETERS DIALOG USB Connectio
- Page 223 and 224:
SPM PARAMETERS DIALOG Time / Line T
- Page 225 and 226:
SPM PARAMETERS DIALOG Rel. Tip-Pos
- Page 227 and 228:
SPM PARAMETERS DIALOG Averages The
- Page 229 and 230:
SPM PARAMETERS DIALOG temporarily c
- Page 231 and 232:
SPM PARAMETERS DIALOG 17.9.5: Appro
- Page 233 and 234:
SPM PARAMETERS DIALOG 17.9.6: Z-Con
- Page 235 and 236:
SPM PARAMETERS DIALOG 17.9.7: Signa
- Page 237 and 238:
- Voltage source output Sets the ti
- Page 239 and 240:
VIBRATION FREQUENCY SEARCH DIALOG 1
- Page 241 and 242:
VIBRATION FREQUENCY SEARCH DIALOG s
- Page 243 and 244:
Start = Center - (Span / 2) End = C
- Page 245 and 246:
CANTILEVER BROWSER DIALOG If the ma
- Page 247 and 248:
CANTILEVER BROWSER DIALOG Chart Set
- Page 249 and 250:
ATS STAGE AND TSC 3000 DRIVER CONFI
- Page 251 and 252:
ATS STAGE AND TSC 3000 DRIVER CONFI
- Page 253 and 254:
Quick reference


