TOPAX DE Operation & Maintenance Instructions
TOPAX DE Operation & Maintenance Instructions
TOPAX DE Operation & Maintenance Instructions

You also want an ePaper? Increase the reach of your titles
YUMPU automatically turns print PDFs into web optimized ePapers that Google loves.
e<br />
lues<br />
int<br />
values<br />
value<br />
ol<br />
0.30mg/l<br />
e 0.20mg/l<br />
m values<br />
.00mg/l<br />
.00mg/l<br />
0s<br />
ta<br />
ta p<br />
ta.<br />
data<br />
nd<br />
Cl2<br />
h<br />
/l tend Cl2<br />
**<br />
<strong>TOPAX</strong><br />
<strong>DE</strong> 2<br />
***<br />
<strong>TOPAX</strong><br />
<strong>DE</strong> 4<br />
art 0.00mg/l<br />
d 1.00mg/l<br />
ook***<br />
Date<br />
10.08.06<br />
lutFailure<br />
D****<br />
flow input* pH Compensation<br />
pH calib. data Chlorine value<br />
Language OFF<br />
Bus address<br />
Test functions<br />
Manual mode<br />
Cl2 SP1 H-OFF<br />
Default Cl2 SP2 settingH-OFF<br />
Contr. pH SP1 release ——**<br />
Cl2 Controller<br />
Meter Manual test max. ON<br />
time 0 min<br />
pH** Controller<br />
Meter test<br />
4.<br />
Start-up pH SP2 ——**<br />
General<br />
Delay<br />
Settings<br />
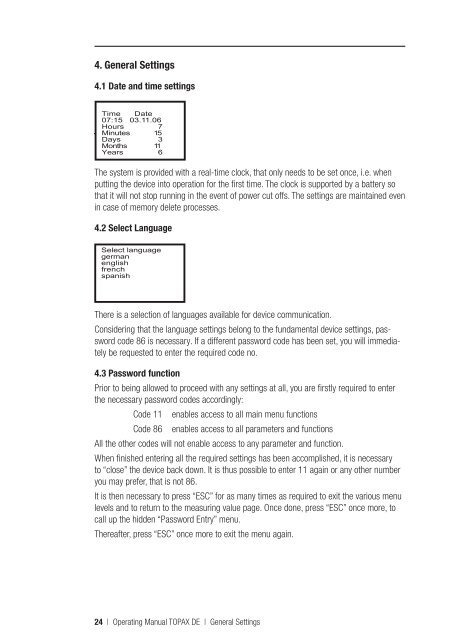
4.1 Date and time settings<br />
mA Time outputs Date<br />
07:15 03.11.06<br />
mA Hours outputs 17<br />
Minutes 15<br />
mA Days outputs 23<br />
Months 11<br />
mA Years outputs 36<br />
Input mínactive<br />
with logic -3h<br />
mg/l tend<br />
h<br />
Cl2<br />
Start 0.00mg/l<br />
End 1.00mg/l<br />
**<strong>TOPAX</strong> ***Logbook*** <strong>DE</strong> 2<br />
Time Date<br />
Output 11:16 10.08.06 1<br />
Output of Cl2<br />
TestSolutFailure<br />
output *****END**** 0-20mA<br />
Start 0.00mg<br />
End 1.00mg<br />
spanish 0s<br />
= 0s<br />
OFF<br />
The system is provided with a real-time clock, that only needs to be set once, i.e. when<br />
putting pH Calib. the device data into operation for the first flow time. input The clock is supported by a battery so<br />
Buffer solution 1<br />
100%<br />
that it will 7.00pH not stop running in the event of power cut offs. The settings are maintained even<br />
Buffer solution 2<br />
flow input OFF<br />
in case of memory delete processes.<br />
4.00pH<br />
Int. electrode<br />
float buffer<br />
7.00pH<br />
4.2 Select Language<br />
Select language<br />
german<br />
english<br />
french<br />
spanish<br />
Bus address<br />
the RS485<br />
Interface<br />
0<br />
(Option)<br />
Start<br />
Start<br />
End<br />
0-20 mA<br />
0.0%<br />
100%<br />
Preset<br />
Preset<br />
Delay<br />
Unit data<br />
Unit number<br />
115<br />
Software Status<br />
6.06<br />
Production date<br />
8.06<br />
Measurement<br />
analogue<br />
Test functions On<br />
Output 1 4.00mA<br />
Output 2 6.20mA<br />
Output 3 7.05mA<br />
*<strong>TOPAX</strong> <strong>DE</strong> 3 / <strong>DE</strong> 6<br />
There is a selection of languages available for device communication.<br />
Considering that the language settings belong to the fundamental device settings, password<br />
code 86 is necessary. If a different password code has been set, you will immediately<br />
be requested to enter the required code no.<br />
4.3 Test Password functions function<br />
Prior Unit to data being allowed to proceed with any settings at all, you are firstly required to enter<br />
Analogue inputs<br />
the Digital necessary inputs password codes accordingly:<br />
Analogue outputs<br />
InterfaceCode 11 enables access to all main menu functions<br />
Delete memory<br />
Code 86 enables access to all parameters and functions<br />
All the other codes will not enable access to any parameter and function.<br />
When finished entering all the required settings has been accomplished, it is necessary<br />
to “close” the device back down. It is thus possible to enter 11 again or any other number<br />
you may prefer, that is not 86.<br />
It is then necessary to press “ESC” for as many times as required to exit the various menu<br />
levels and to return to the measuring value page. Once done, press “ESC” once more, to<br />
call up the hidden “Password Entry” menu.<br />
Thereafter, press “ESC” once more to exit the menu again.<br />
Reduce<br />
SP2 bo<br />
Hi Alarm<br />
Lo Alar<br />
P-Paus<br />
P-min<br />
Bus address<br />
the RS485<br />
Interface<br />
PI-Con<br />
0Pulse-F<br />
Reduce<br />
SP2 cu<br />
(Option) Hi Alarm<br />
Lo Alar<br />
Impulse<br />
Test functions<br />
setting<br />
Unit data<br />
Analogue inputs PID-Co<br />
Digital inputs Boost s<br />
Analogue outputs Motor c<br />
Interface Motor o<br />
Delete memoryHi Alarm<br />
Lo Alarm<br />
Run tim<br />
P-min<br />
on/off -<br />
Reduce<br />
SP2 bo<br />
Hi Alarm<br />
Lo Alar<br />
Hyst.<br />
Measurement<br />
input test<br />
Input 1 52m<br />
Input 2 -12m<br />
Input 3 736m<br />
Input 4 27°C<br />
Measurement<br />
digital<br />
Interface<br />
>>>>>>