

DeNight Special 50 Manual - CMC Versand
DeNight Special 50 Manual - CMC Versand
DeNight Special 50 Manual - CMC Versand

You also want an ePaper? Increase the reach of your titles
YUMPU automatically turns print PDFs into web optimized ePapers that Google loves.
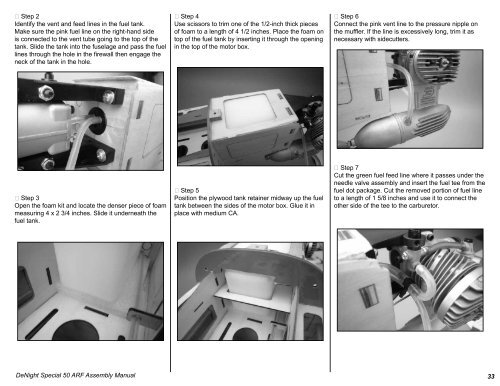
Step 2<br />
Identify the vent and feed lines in the fuel tank.<br />
Make sure the pink fuel line on the right-hand side<br />
is connected to the vent tube going to the top of the<br />
tank. Slide the tank into the fuselage and pass the fuel<br />
lines through the hole in the firewall then engage the<br />
neck of the tank in the hole.<br />
Step 4<br />
Use scissors to trim one of the 1/2-inch thick pieces<br />
of foam to a length of 4 1/2 inches. Place the foam on<br />
top of the fuel tank by inserting it through the opening<br />
in the top of the motor box.<br />
Step 6<br />
Connect the pink vent line to the pressure nipple on<br />
the muffler. If the line is excessively long, trim it as<br />
necessary with sidecutters.<br />
Step 3<br />
Open the foam kit and locate the denser piece of foam<br />
measuring 4 x 2 3/4 inches. Slide it underneath the<br />
fuel tank.<br />
Step 5<br />
Position the plywood tank retainer midway up the fuel<br />
tank between the sides of the motor box. Glue it in<br />
place with medium CA.<br />
Step 7<br />
Cut the green fuel feed line where it passes under the<br />
needle valve assembly and insert the fuel tee from the<br />
fuel dot package. Cut the removed portion of fuel line<br />
to a length of 1 5/8 inches and use it to connect the<br />
other side of the tee to the carburetor.<br />
<strong>DeNight</strong> <strong>Special</strong> <strong>50</strong> ARF Assembly <strong>Manual</strong><br />
33


![P01(Oxalys EP) [更新済み].ai - Kyosho](https://img.yumpu.com/26948574/1/184x260/p01oxalys-ep-ai-kyosho.jpg?quality=85)


