

DeNight Special 50 Manual - CMC Versand
DeNight Special 50 Manual - CMC Versand
DeNight Special 50 Manual - CMC Versand

Create successful ePaper yourself
Turn your PDF publications into a flip-book with our unique Google optimized e-Paper software.
Step 11<br />
Place the fuselage inverted on the workbench in a<br />
suitable stand, or remove the canopy using a 3/32-<br />
inch hex wrench so that it does not get damaged.<br />
Set the landing gear in place and use a #2 Phillips<br />
screwdriver to secure it to the fuselage with the two<br />
8-32 x 3/4-inch screws.<br />
Tail Installation<br />
Parts Required<br />
Fuselage<br />
Stabilizer with elevators<br />
Fin and rudder Wing tube<br />
CA hinges (6)<br />
Tools Required<br />
Ruler T-pins (6)<br />
Toothpicks<br />
Hobby knife w/ #11 blade<br />
Rubbing alcohol Paper towels<br />
Low-tack tape Coarse sandpaper<br />
Mixing cups<br />
Mixing sticks<br />
30-minute epoxy String (40 inches)<br />
Waxed paper Felt-tipped pen<br />
Thin CA<br />
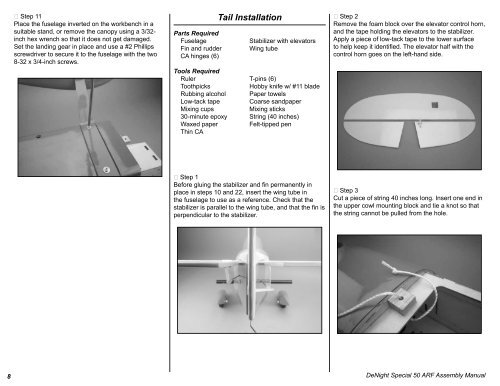
Step 2<br />
Remove the foam block over the elevator control horn,<br />
and the tape holding the elevators to the stabilizer.<br />
Apply a piece of low-tack tape to the lower surface<br />
to help keep it identified. The elevator half with the<br />
control horn goes on the left-hand side.<br />
Step 1<br />
Before gluing the stabilizer and fin permanently in<br />
place in steps 10 and 22, insert the wing tube in<br />
the fuselage to use as a reference. Check that the<br />
stabilizer is parallel to the wing tube, and that the fin is<br />
perpendicular to the stabilizer.<br />
Step 3<br />
Cut a piece of string 40 inches long. Insert one end in<br />
the upper cowl mounting block and tie a knot so that<br />
the string cannot be pulled from the hole.<br />
8 <strong>DeNight</strong> <strong>Special</strong> <strong>50</strong> ARF Assembly <strong>Manual</strong>


![P01(Oxalys EP) [更新済み].ai - Kyosho](https://img.yumpu.com/26948574/1/184x260/p01oxalys-ep-ai-kyosho.jpg?quality=85)


