

DeNight Special 50 Manual - CMC Versand
DeNight Special 50 Manual - CMC Versand
DeNight Special 50 Manual - CMC Versand

Create successful ePaper yourself
Turn your PDF publications into a flip-book with our unique Google optimized e-Paper software.
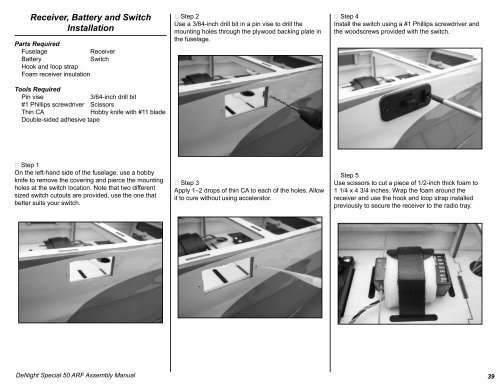
Receiver, Battery and Switch<br />
Installation<br />
Parts Required<br />
Fuselage<br />
Receiver<br />
Battery<br />
Switch<br />
Hook and loop strap<br />
Foam receiver insulation<br />
Tools Required<br />
Pin vise<br />
3/64-inch drill bit<br />
#1 Phillips screwdriver Scissors<br />
Thin CA<br />
Hobby knife with #11 blade<br />
Double-sided adhesive tape<br />
Step 2<br />
Use a 3/64-inch drill bit in a pin vise to drill the<br />
mounting holes through the plywood backing plate in<br />
the fuselage.<br />
Step 4<br />
Install the switch using a #1 Phillips screwdriver and<br />
the woodscrews provided with the switch.<br />
Step 1<br />
On the left-hand side of the fuselage, use a hobby<br />
knife to remove the covering and pierce the mounting<br />
holes at the switch location. Note that two different<br />
sized switch cutouts are provided, use the one that<br />
better suits your switch.<br />
Step 3<br />
Apply 1–2 drops of thin CA to each of the holes. Allow<br />
it to cure without using accelerator.<br />
Step 5<br />
Use scissors to cut a piece of 1/2-inch thick foam to<br />
1 1/4 x 4 3/4 inches. Wrap the foam around the<br />
receiver and use the hook and loop strap installed<br />
previously to secure the receiver to the radio tray.<br />
<strong>DeNight</strong> <strong>Special</strong> <strong>50</strong> ARF Assembly <strong>Manual</strong><br />
39


![P01(Oxalys EP) [更新済み].ai - Kyosho](https://img.yumpu.com/26948574/1/184x260/p01oxalys-ep-ai-kyosho.jpg?quality=85)


