

DeNight Special 50 Manual - CMC Versand
DeNight Special 50 Manual - CMC Versand
DeNight Special 50 Manual - CMC Versand

Create successful ePaper yourself
Turn your PDF publications into a flip-book with our unique Google optimized e-Paper software.
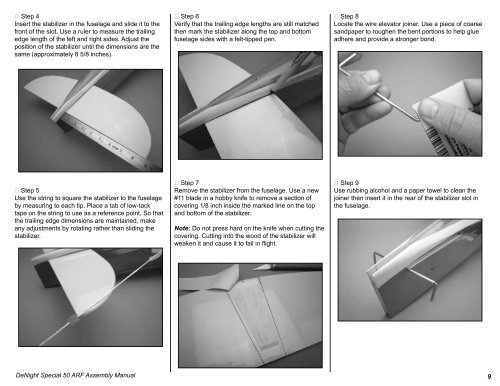
Step 4<br />
Insert the stabilizer in the fuselage and slide it to the<br />
front of the slot. Use a ruler to measure the trailing<br />
edge length of the left and right sides. Adjust the<br />
position of the stabilizer until the dimensions are the<br />
same (approximately 8 5/8 inches).<br />
Step 6<br />
Verify that the trailing edge lengths are still matched<br />
then mark the stabilizer along the top and bottom<br />
fuselage sides with a felt-tipped pen.<br />
Step 8<br />
Locate the wire elevator joiner. Use a piece of coarse<br />
sandpaper to roughen the bent portions to help glue<br />
adhere and provide a stronger bond.<br />
Step 5<br />
Use the string to square the stabilizer to the fuselage<br />
by measuring to each tip. Place a tab of low-tack<br />
tape on the string to use as a reference point. So that<br />
the trailing edge dimensions are maintained, make<br />
any adjustments by rotating rather than sliding the<br />
stabilizer.<br />
Step 7<br />
Remove the stabilizer from the fuselage. Use a new<br />
#11 blade in a hobby knife to remove a section of<br />
covering 1/8 inch inside the marked line on the top<br />
and bottom of the stabilizer.<br />
Note: Do not press hard on the knife when cutting the<br />
covering. Cutting into the wood of the stabilizer will<br />
weaken it and cause it to fail in flight.<br />
Step 9<br />
Use rubbing alcohol and a paper towel to clean the<br />
joiner then insert it in the rear of the stabilizer slot in<br />
the fuselage.<br />
<strong>DeNight</strong> <strong>Special</strong> <strong>50</strong> ARF Assembly <strong>Manual</strong><br />
9


![P01(Oxalys EP) [更新済み].ai - Kyosho](https://img.yumpu.com/26948574/1/184x260/p01oxalys-ep-ai-kyosho.jpg?quality=85)


