

INSTALLATION INSTRUCTIONS - Lennox
INSTALLATION INSTRUCTIONS - Lennox
INSTALLATION INSTRUCTIONS - Lennox

You also want an ePaper? Increase the reach of your titles
YUMPU automatically turns print PDFs into web optimized ePapers that Google loves.
6 − Adjust the thermostat to deactivate the heating demand<br />
and wait for the combustion air inducer to stop.<br />
At this point, the trap should be primed with sufficient<br />
water to ensure proper condensate drain operation.<br />
BEFORE LIGHTING the unit, smell all around the furnace<br />
area for gas. Be sure to smell next to the floor because<br />
some gas is heavier than air and will settle on the<br />
floor.<br />
The gas valve on the G43UF is equipped with a gas control<br />
switch (lever). Use only your hand to move switch.<br />
Never use tools. If the the switch will not move by hand,<br />
do not try to repair it. Force or attempted repair may result<br />
in a fire or explosion.<br />
Placing the furnace into operation:<br />
G43UF units are equipped with an automatic hot surface<br />
ignition system. Do not attempt to manually light burners<br />
on this furnace. Each time the thermostat calls for heat,<br />
the burners will automatically light. The ignitor does not<br />
get hot when there is no call for heat on these units.<br />
WARNING<br />
If you do not follow these instructions exactly, a fire<br />
or explosion may result causing property damage,<br />
personal injury or death.<br />
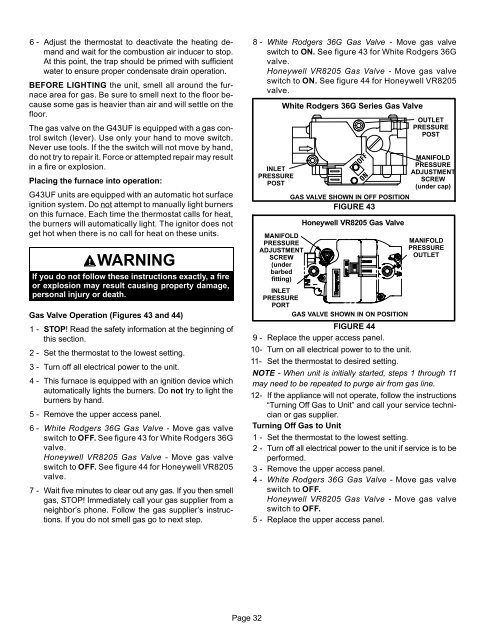
Gas Valve Operation (Figures 43 and 44)<br />
1 − STOP! Read the safety information at the beginning of<br />
this section.<br />
2 − Set the thermostat to the lowest setting.<br />
3 − Turn off all electrical power to the unit.<br />
4 − This furnace is equipped with an ignition device which<br />
automatically lights the burners. Do not try to light the<br />
burners by hand.<br />
5 − Remove the upper access panel.<br />
6 − White Rodgers 36G Gas Valve − Move gas valve<br />
switch to OFF. See figure 43 for White Rodgers 36G<br />
valve.<br />
Honeywell VR8205 Gas Valve − Move gas valve<br />
switch to OFF. See figure 44 for Honeywell VR8205<br />
valve.<br />
7 − Wait five minutes to clear out any gas. If you then smell<br />
gas, STOP! Immediately call your gas supplier from a<br />
neighbor’s phone. Follow the gas supplier’s instructions.<br />
If you do not smell gas go to next step.<br />
8 − White Rodgers 36G Gas Valve − Move gas valve<br />
switch to ON. See figure 43 for White Rodgers 36G<br />
valve.<br />
Honeywell VR8205 Gas Valve − Move gas valve<br />
switch to ON. See figure 44 for Honeywell VR8205<br />
valve.<br />
INLET<br />
PRESSURE<br />
POST<br />
MANIFOLD<br />
PRESSURE<br />
ADJUSTMENT<br />
SCREW<br />
(under<br />
barbed<br />
fitting)<br />
White Rodgers 36G Series Gas Valve<br />
GAS VALVE SHOWN IN OFF POSITION<br />
FIGURE 43<br />
Honeywell VR8205 Gas Valve<br />
OUTLET<br />
PRESSURE<br />
POST<br />
MANIFOLD<br />
PRESSURE<br />
ADJUSTMENT<br />
SCREW<br />
(under cap)<br />
MANIFOLD<br />
PRESSURE<br />
OUTLET<br />
INLET<br />
PRESSURE<br />
PORT<br />
GAS VALVE SHOWN IN ON POSITION<br />
FIGURE 44<br />
9 − Replace the upper access panel.<br />
10− Turn on all electrical power to to the unit.<br />
11− Set the thermostat to desired setting.<br />
NOTE − When unit is initially started, steps 1 through 11<br />
may need to be repeated to purge air from gas line.<br />
12− If the appliance will not operate, follow the instructions<br />
Turning Off Gas to Unit" and call your service technician<br />
or gas supplier.<br />
Turning Off Gas to Unit<br />
1 − Set the thermostat to the lowest setting.<br />
2 − Turn off all electrical power to the unit if service is to be<br />
performed.<br />
3 − Remove the upper access panel.<br />
4 − White Rodgers 36G Gas Valve − Move gas valve<br />
switch to OFF.<br />
Honeywell VR8205 Gas Valve − Move gas valve<br />
switch to OFF.<br />
5 − Replace the upper access panel.<br />
Page 32


