
Create successful ePaper yourself
Turn your PDF publications into a flip-book with our unique Google optimized e-Paper software.
• After the search progress is completed, the<br />
message “ Completed searching for upgrade.<br />
No new software was found” appears on the<br />
screen if no new software is found.<br />
• Do not forget to re enable the automatic OAD<br />
function after you have made your recording<br />
by repeating the above instructions but this<br />
time selecting ENABLE.<br />
Note: Your <strong>TV</strong> may start in First Time Installation<br />
mode after OAD update.<br />
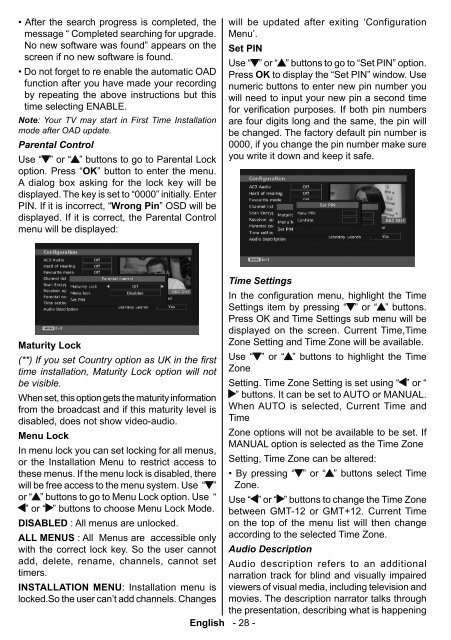
Parental Control<br />
Use “ ” or “ ” buttons to go to Parental Lock<br />
option. Press “OK” button to enter the menu.<br />
A dialog box asking for the lock key will be<br />
displayed. The key is set to “0000” initially. Enter<br />
PIN. If it is incorrect, “Wrong Pin” OSD will be<br />
displayed. If it is correct, the Parental Control<br />
menu will be displayed:<br />
will be updated after exiting ‘Configuration<br />
Menu’.<br />
Set PIN<br />
Use “ ” or “ ” buttons to go to “Set PIN” option.<br />
Press OK to display the “Set PIN” window. Use<br />
numeric buttons to enter new pin number you<br />
will need to input your new pin a second time<br />
for verifi cation purposes. If both pin numbers<br />
are four digits long and the same, the pin will<br />
be changed. The factory default pin number is<br />
0000, if you change the pin number make sure<br />
you write it down and keep it safe.<br />
Maturity Lock<br />
(**) If you set Country option as UK in the fi rst<br />
time installation, Maturity Lock option will not<br />
be visible.<br />
When set, this option gets the maturity information<br />
from the broadcast and if this maturity level is<br />
disabled, does not show video-audio.<br />
Menu Lock<br />
In menu lock you can set locking for all menus,<br />
or the Installation Menu to restrict access to<br />
these menus. If the menu lock is disabled, there<br />
will be free access to the menu system. Use “ ”<br />
or “ ” buttons to go to Menu Lock option. Use “<br />
” or “ ” buttons to choose Menu Lock Mode.<br />
DISABLED : All menus are unlocked.<br />
ALL MENUS : All Menus are accessible only<br />
with the correct lock key. So the user cannot<br />
add, delete, rename, channels, cannot set<br />
timers.<br />
INSTALLATION MENU : Installation menu is<br />
locked.So the user can’t add channels. Changes<br />
Time Settings<br />
In the configuration menu, highlight the Time<br />
Settings item by pressing “ ” or “ ” buttons.<br />
Press OK and Time Settings sub menu will be<br />
displayed on the screen. Current Time,Time<br />
Zone Setting and Time Zone will be available.<br />
Use “ ” or “ ” buttons to highlight the Time<br />
Zone<br />
Setting. Time Zone Setting is set using “ ” or “<br />
” buttons. It can be set to AUTO or MANUAL.<br />
When AUTO is selected, Current Time and<br />
Time<br />
Zone options will not be available to be set. If<br />
MANUAL option is selected as the Time Zone<br />
Setting, Time Zone can be altered:<br />
• By pressing “ ” or “ ” buttons select Time<br />
Zone.<br />
Use “ ” or “ ” buttons to change the Time Zone<br />
between GMT-12 or GMT+12. Current Time<br />
on the top of the menu list will then change<br />
according to the selected Time Zone.<br />
Audio Description<br />
Audio description refers to an additional<br />
narration track for blind and visually impaired<br />
viewers of visual media, including television and<br />
movies. The description narrator talks through<br />
the presentation, describing what is happening<br />
English - 28 -<br />
A01-[GB]-MB35_ID<strong>TV</strong>-PANEU_BRONZE3_26856W_1050UK_10059700_50140542.indd 28 09.01.2009 19:17:57