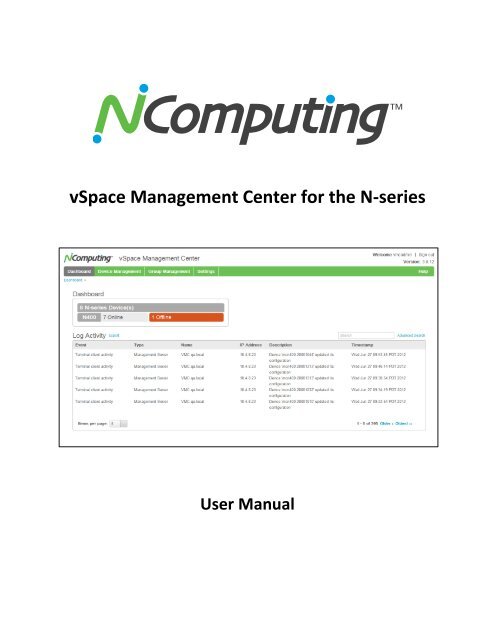
vSpace Management Center for the N-series
vSpace Management Center for the N-series
vSpace Management Center for the N-series

Create successful ePaper yourself
Turn your PDF publications into a flip-book with our unique Google optimized e-Paper software.
<strong>vSpace</strong> <strong>Management</strong> <strong>Center</strong> <strong>for</strong> <strong>the</strong> N-<strong>series</strong><br />
User Manual
NComputing <strong>vSpace</strong> <strong>Management</strong> <strong>Center</strong> User Manual rev06.27.12.2<br />
Important Notices<br />
Please note that reproduction of this User Manual in whole or in part, without express written<br />
permission from NComputing, is not permitted.<br />
NComputing reserves <strong>the</strong> right to make improvements and/or changes to this User Manual and to <strong>the</strong><br />
products, programs and/or specifications described herein at any time without notice. In<strong>for</strong>mation<br />
contained in this document may have been obtained from internal testing or from a third party.<br />
NComputing shall not be liable <strong>for</strong> any direct, indirect, special, incidental or consequential damages in<br />
connection with <strong>the</strong> use of this material. The latest version of this User Manual can be downloaded from<br />
<strong>the</strong> “Documentation” page in <strong>the</strong> Support section of <strong>the</strong> NComputing website at:<br />
www.ncomputing.com<br />
The NComputing software products described in this user manual are protected by numerous granted<br />
and pending U.S. and international patents.<br />
Page 2 of 31
NComputing <strong>vSpace</strong> <strong>Management</strong> <strong>Center</strong> User Manual rev06.27.12.2<br />
TABLE OF CONTENTS<br />
Important Notices ......................................................................................................................................... 2<br />
1.0 <strong>vSpace</strong> <strong>Management</strong> <strong>Center</strong> Overview .................................................................................................. 4<br />
2.0 Installation and Registration ................................................................................................................... 5<br />
2.1 Software Installation ........................................................................................................................... 5<br />
2.2 Registration ......................................................................................................................................... 6<br />
2.3 Starting <strong>vSpace</strong> <strong>Management</strong> <strong>Center</strong> ................................................................................................. 6<br />
3.0 <strong>vSpace</strong> <strong>Management</strong> <strong>Center</strong> Dashboard ................................................................................................ 7<br />
3.1 The Navigation Bar .............................................................................................................................. 7<br />
3.2 The Dashboard Summary .................................................................................................................... 8<br />
3.3 Log Activity .......................................................................................................................................... 8<br />
4.0 Device <strong>Management</strong> ............................................................................................................................... 9<br />
4.1 Manage Devices .................................................................................................................................. 9<br />
4.2 Advanced Search ............................................................................................................................... 10<br />
4.3 Remove, Reset, Store Profile, Apply Profile ...................................................................................... 10<br />
4.4 View/Edit Configuration .................................................................................................................... 11<br />
4.5 Manage and Apply Profiles ............................................................................................................... 11<br />
4.6 Update Firmware .............................................................................................................................. 13<br />
5.0 Group <strong>Management</strong> .............................................................................................................................. 15<br />
5.1 Browse Existing Groups..................................................................................................................... 15<br />
5.2 Add / Edit Group ............................................................................................................................... 16<br />
6.0 Settings .................................................................................................................................................. 18<br />
6.1 Manage Firmware ............................................................................................................................. 18<br />
6.2 User Administration .......................................................................................................................... 19<br />
6.3 Configure Au<strong>the</strong>ntication .................................................................................................................. 20<br />
6.4 <strong>Management</strong> Server Administration ................................................................................................ 21<br />
6.5 Registration and Licensing ................................................................................................................ 22<br />
7.0 Common Usage Scenarios ..................................................................................................................... 24<br />
7.1 Adding an N-<strong>series</strong> device to <strong>vSpace</strong> <strong>Management</strong> <strong>Center</strong> .............................................................. 24<br />
7.2 Configuring <strong>vSpace</strong> <strong>Management</strong> <strong>Center</strong> with Active Directory ...................................................... 25<br />
7.3 Configuring devices using device profiles ......................................................................................... 26<br />
7.4 Adding a new <strong>vSpace</strong> <strong>Management</strong> <strong>Center</strong> server to your <strong>vSpace</strong> <strong>Management</strong> <strong>Center</strong> Zone ...... 27<br />
8.0 Troubleshooting .................................................................................................................................... 29<br />
9.0 Support and Additional Resources ........................................................................................................ 31<br />
9.1 Disclaimers and Legal In<strong>for</strong>mation.................................................................................................... 31<br />
Page 3 of 31
NComputing <strong>vSpace</strong> <strong>Management</strong> <strong>Center</strong> User Manual rev06.27.12.2<br />
1.0 <strong>vSpace</strong> <strong>Management</strong> <strong>Center</strong> Overview<br />
For organizations deploying <strong>the</strong> NComputing N-<strong>series</strong> thin clients <strong>for</strong> Citrix HDX, <strong>vSpace</strong> <strong>Management</strong><br />
<strong>Center</strong> provides a highly scalable, flexible and easy to use single point of device management. With its<br />
web-based console, IT administrators can manage <strong>the</strong>ir N-<strong>series</strong> devices from anywhere, anytime.<br />
<strong>vSpace</strong> <strong>Management</strong> <strong>Center</strong> helps organize a deployment whe<strong>the</strong>r it is a single site or multiple sites –<br />
and makes it easy to per<strong>for</strong>m management tasks remotely including firmware updates, configuration<br />
changes, device resets and more. By allowing administrators to access and manage all N-<strong>series</strong> devices<br />
from a single location, regardless of <strong>the</strong> size or number of deployment sites, <strong>vSpace</strong> <strong>Management</strong><br />
<strong>Center</strong> dramatically reduces <strong>the</strong> administrative overhead needed to maintain and control <strong>the</strong>ir<br />
environment.<br />
Key Features and Attributes<br />
• Centralized: access an entire N-<strong>series</strong> deployment from a single console<br />
• Scalable: manage 100, 1000 or 10,000 devices across multiple networks and locations<br />
• Simple: easy to install and use with a flexible web-based user interface<br />
• Profile-based configuration: assign devices to common profiles <strong>for</strong> scalable management of<br />
device settings<br />
• 1:1 or 1:many management: use profiles <strong>for</strong> 1:many management or push settings to an<br />
individual device<br />
• Easy firmware updates: <strong>the</strong> firmware update wizard simplifies device updates and scheduling<br />
• Simple status: <strong>the</strong> dashboard with logging and group views enables rapid assessment of your<br />
environment’s status<br />
• Consolidated install: install <strong>the</strong> complete <strong>vSpace</strong> <strong>Management</strong> <strong>Center</strong> via one installer in under<br />
10 minutes<br />
• Comprehensive logging: system events are continually logged to aid in troubleshooting and to<br />
confirm actions<br />
• Delegated Administration: supports two levels of management <strong>for</strong> “view-only” and “editcapable”<br />
access and can be easily configured via Active Directory/LDAP<br />
This user manual provides a comprehensive guide to <strong>the</strong> features offered by <strong>vSpace</strong> <strong>Management</strong><br />
<strong>Center</strong> as well as a detailed explanation of <strong>the</strong>ir functions. From remotely updating device firmware to<br />
backing up critical in<strong>for</strong>mation and settings, this document will walk you through each step of using<br />
<strong>vSpace</strong> <strong>Management</strong> <strong>Center</strong>’s powerful administrative toolset.<br />
Page 4 of 31
NComputing <strong>vSpace</strong> <strong>Management</strong> <strong>Center</strong> User Manual rev06.27.12.2<br />
2.0 Installation and Registration<br />
This section of <strong>the</strong> guide will walk you through <strong>the</strong> installation and registration process <strong>for</strong> <strong>vSpace</strong><br />
<strong>Management</strong> <strong>Center</strong>. Keep in mind that this document assumes <strong>the</strong> user has already acquired both <strong>the</strong><br />
<strong>vSpace</strong> <strong>Management</strong> <strong>Center</strong> installation software and a number of licenses appropriate <strong>for</strong> <strong>the</strong>ir<br />
environment. For <strong>the</strong> latest NComputing software version please visit <strong>the</strong> NComputing software<br />
download site at http://www.ncomputing.com/softwaredownload .<br />
2.1 Software Installation<br />
The begin installation, run <strong>the</strong> <strong>vSpace</strong> <strong>Management</strong> <strong>Center</strong> installation (<strong>vSpace</strong> <strong>Management</strong> <strong>Center</strong><br />
Installer.msi) and proceed as directed through <strong>the</strong> installation process.<br />
You will be given <strong>the</strong> option to per<strong>for</strong>m a “Default” or “Advanced”<br />
installation. The Default method automatically installs all components<br />
necessary to run <strong>vSpace</strong> <strong>Management</strong> <strong>Center</strong>. This includes Java and<br />
Apache Server.<br />
The Advanced method gives you more control over which<br />
components are installed. You will also have <strong>the</strong> option to<br />
automatically join your new server to an existing <strong>vSpace</strong> <strong>Management</strong><br />
<strong>Center</strong> management zone if this is not <strong>the</strong> first management server<br />
you have installed in your environment.<br />
Once you have selected your installation method, proceed as directed<br />
through <strong>the</strong> installation process until you are notified that <strong>the</strong> process<br />
is complete. At this point a system restart will be required.<br />
Note: Attempting to complete <strong>the</strong> installation process or run <strong>vSpace</strong> <strong>Management</strong> <strong>Center</strong> without <strong>the</strong><br />
presence of Java and Apache Server will result in an error message. See <strong>the</strong> troubleshooting section <strong>for</strong><br />
more in<strong>for</strong>mation.<br />
Page 5 of 31
NComputing <strong>vSpace</strong> <strong>Management</strong> <strong>Center</strong> User Manual rev06.27.12.2<br />
2.2 Registration<br />
Each new install of <strong>vSpace</strong> <strong>Management</strong> <strong>Center</strong> includes a trial license <strong>for</strong> 30 days with up to 100<br />
managed devices. For in<strong>for</strong>mation on adding license keys to your <strong>vSpace</strong> <strong>Management</strong> <strong>Center</strong> server,<br />
review <strong>the</strong> Registration and Licensing section of this user manual.<br />
2.3 Starting <strong>vSpace</strong> <strong>Management</strong> <strong>Center</strong><br />
Once you have successfully completed <strong>the</strong> installation process, you can access <strong>the</strong> <strong>vSpace</strong> <strong>Management</strong><br />
<strong>Center</strong> user interface by opening <strong>the</strong> <strong>vSpace</strong> <strong>Management</strong> <strong>Center</strong> folder in <strong>the</strong> Windows Start menu (on<br />
<strong>the</strong> server you installed on). Click “Open <strong>vSpace</strong><br />
<strong>Management</strong> <strong>Center</strong>” to launch <strong>the</strong> user interface<br />
within your default web browser. You can also<br />
access <strong>the</strong> interface from o<strong>the</strong>r computers on your<br />
network by opening a browser and entering <strong>the</strong> IP<br />
address of your server followed by: “:8080/vmc” For<br />
example, if your <strong>vSpace</strong> <strong>Management</strong> <strong>Center</strong> server’s<br />
IP address is: 192.168.1.10, <strong>the</strong>n enter:<br />
“192.168.1.10:8080/vmc” in your browser.<br />
Opening <strong>the</strong> <strong>vSpace</strong> <strong>Management</strong> <strong>Center</strong> user<br />
interface requires a User ID and Password. When you<br />
start <strong>vSpace</strong> <strong>Management</strong> <strong>Center</strong> <strong>for</strong> <strong>the</strong> first time,<br />
enter <strong>the</strong> default User ID (“vmcadmin”) and<br />
Password (“vmcadmin”) and click “Submit.”<br />
Note: It is recommended that you clear your browser’s cache prior to using <strong>vSpace</strong> <strong>Management</strong><br />
<strong>Center</strong> <strong>for</strong> <strong>the</strong> first time and between updates.<br />
Page 6 of 31
NComputing <strong>vSpace</strong> <strong>Management</strong> <strong>Center</strong> User Manual rev06.27.12.2<br />
3.0 <strong>vSpace</strong> <strong>Management</strong> <strong>Center</strong> Dashboard<br />
The dashboard is <strong>the</strong> first screen you will see when connecting to your <strong>vSpace</strong> <strong>Management</strong> <strong>Center</strong><br />
server. From here, you are presented with a brief summary of device and server status. By using <strong>the</strong><br />
navigation bar along <strong>the</strong> top of <strong>the</strong> screen, you can access each of <strong>the</strong> management modules. This<br />
section will outline each of <strong>the</strong> functions available to you from this screen.<br />
3.1 The Navigation Bar<br />
The Navigation Bar is your primary means of navigating between <strong>vSpace</strong> <strong>Management</strong> <strong>Center</strong>’s various<br />
modules. As seen below, it offers access to Device <strong>Management</strong>, Group <strong>Management</strong>, <strong>vSpace</strong><br />
<strong>Management</strong> <strong>Center</strong> Settings, as well as <strong>the</strong> Help feature.<br />
Note <strong>the</strong> breadcrumb navigation feature to <strong>the</strong> bottom left of <strong>the</strong> Navigation Bar. As you navigate<br />
deeper within <strong>vSpace</strong> <strong>Management</strong> <strong>Center</strong>, this will track each step you have taken and give you <strong>the</strong><br />
ability to step backwards through <strong>vSpace</strong> <strong>Management</strong> <strong>Center</strong> until you have returned to <strong>the</strong><br />
Dashboard.<br />
Page 7 of 31
NComputing <strong>vSpace</strong> <strong>Management</strong> <strong>Center</strong> User Manual rev06.27.12.2<br />
3.2 The Dashboard Summary<br />
The Dashboard Summary provides at-a-glance in<strong>for</strong>mation on <strong>the</strong> connection status of your access<br />
devices.<br />
3.3 Log Activity<br />
The Log Activity section of <strong>the</strong> dashboard presents a detailed breakdown of recent server and device<br />
activity. You can search <strong>for</strong> specific log in<strong>for</strong>mation through <strong>the</strong> use of <strong>the</strong> Advanced Search button<br />
located at <strong>the</strong> top right of <strong>the</strong> activity list.<br />
The Advanced Search Options menu allows you to search <strong>for</strong> activities<br />
by time and date, activity type, keyword search, and by a singular or<br />
range search. Once you have entered <strong>the</strong> criteria you wish to search<br />
by, press <strong>the</strong> “Search” button to begin your search.<br />
You can export search results to HTML, XLS, or CSV file <strong>for</strong>mats using<br />
<strong>the</strong> “Export” button located to <strong>the</strong> top left of <strong>the</strong> Log Activity section.<br />
Page 8 of 31
NComputing <strong>vSpace</strong> <strong>Management</strong> <strong>Center</strong> User Manual rev06.27.12.2<br />
4.0 Device <strong>Management</strong><br />
The Device <strong>Management</strong> module of <strong>vSpace</strong> <strong>Management</strong> <strong>Center</strong> allows administrators to remotely<br />
configure <strong>the</strong>ir devices, create and manage device profiles, and push firmware updates. This section of<br />
<strong>the</strong> manual will outline each of <strong>the</strong>se functions in detail.<br />
4.1 Manage Devices<br />
The Manage Devices screen presents <strong>the</strong> user with a list of each of <strong>the</strong> devices that <strong>the</strong>y currently have<br />
linked with <strong>vSpace</strong> <strong>Management</strong> <strong>Center</strong>. From this screen you can per<strong>for</strong>m basic administrative tasks<br />
such as applying or storing profiles, resetting devices, and verifying device in<strong>for</strong>mation such as: Device<br />
Name, IP address, Serial Numbers, Firmware versions, and Device Model.<br />
Page 9 of 31
NComputing <strong>vSpace</strong> <strong>Management</strong> <strong>Center</strong> User Manual rev06.27.12.2<br />
4.2 Advanced Search<br />
By clicking “Advanced Search” at <strong>the</strong> top left of <strong>the</strong><br />
Manage Devices screen, you gain access to <strong>the</strong><br />
Advanced Search Options menu. From here, you can<br />
search <strong>for</strong> devices by specifying a number of details<br />
including Subnet and Device Group, or specific device<br />
in<strong>for</strong>mation such as Device Model, Name, Serial<br />
Number, MAC address, or even <strong>the</strong> name of <strong>the</strong> user<br />
currently logged in to <strong>the</strong> device.<br />
4.3 Remove, Reset, Store Profile, Apply Profile<br />
Along <strong>the</strong> top right section of <strong>the</strong> Manage Devices screen are four buttons that will allow you to per<strong>for</strong>m<br />
common management functions. Select one or more devices by clicking <strong>the</strong> checkbox to <strong>the</strong> left of <strong>the</strong><br />
devices in question and <strong>the</strong>n click on <strong>the</strong> desired function.<br />
Remove<br />
Remove <strong>the</strong> selected device(s) from <strong>vSpace</strong> <strong>Management</strong> <strong>Center</strong>. See section Section 7.1 Adding a<br />
Device to <strong>vSpace</strong> <strong>Management</strong> <strong>Center</strong> if you wish to link <strong>the</strong> device(s) with <strong>vSpace</strong> <strong>Management</strong> <strong>Center</strong><br />
again in <strong>the</strong> future. Note that you will only be able to remove devices that show up as being “offline.” If<br />
no devices are currently offline, <strong>the</strong> “Remove” button will be grey and inactive.<br />
Reset<br />
Reset <strong>the</strong> selected device(s). NOTE: Be sure to verify whe<strong>the</strong>r <strong>the</strong> device is currently in use as this will<br />
immediately interrupt <strong>the</strong> user’s session and restart <strong>the</strong> device (similar to powering off <strong>the</strong> device and<br />
powering it back on).<br />
Store Profile<br />
Store <strong>the</strong> configuration options currently in use by this device as a profile that can later be applied to<br />
any device of <strong>the</strong> same model.<br />
Apply Profile<br />
Select from a list of currently stored device profiles and apply that profile to <strong>the</strong> selected device(s).<br />
NOTE: Be sure to verify whe<strong>the</strong>r <strong>the</strong> device is currently in use as this will immediately interrupt <strong>the</strong><br />
user’s session.<br />
Page 10 of 31
NComputing <strong>vSpace</strong> <strong>Management</strong> <strong>Center</strong> User Manual rev06.27.12.2<br />
4.4 View/Edit Configuration<br />
To <strong>the</strong> far right of each device entry you will find a link called “View/Edit Configuration”. Clicking this<br />
button will bring up an interface that allows you to view and make changes to <strong>the</strong> device you selected.<br />
These options will vary by device model. The interface <strong>for</strong> making <strong>the</strong>se changes is similar to <strong>the</strong><br />
interface <strong>for</strong> creating and editing profiles per <strong>the</strong> following section. The only difference is that when you<br />
are in <strong>the</strong> View/Edit Configuration screens, <strong>the</strong> data in <strong>the</strong> fields <strong>for</strong> <strong>the</strong> specific device will be prepopulated.<br />
4.5 Manage and Apply Profiles<br />
The Manage and Apply Profiles screen allows you to create, view or edit device profiles. A profile is<br />
common set of configurations <strong>for</strong> a particular device type in your environment. When you create a<br />
profile, you can associate one or more devices to that profile – and from that point on, <strong>the</strong> devices will<br />
continue to be associated with <strong>the</strong> profile. This means that if you later edit <strong>the</strong> profile settings, all<br />
devices associated with that profile will be updated with <strong>the</strong> new settings as well. This makes it very<br />
easy to manage common settings in a large number of devices simultaneously.<br />
To begin, choose whe<strong>the</strong>r you wish to create a new profile or work with a previously stored profile.<br />
Click “Next” and you will be taken to <strong>the</strong> profile wizard where on <strong>the</strong> first screen you can select/edit <strong>the</strong><br />
devices that will be associated with this profile. Then step through each of <strong>the</strong> following screens to set<br />
<strong>the</strong> configuration <strong>for</strong> your profile. Note that a profile does not need to include all <strong>the</strong> settings of <strong>the</strong><br />
device. For example, you may wish to have some settings configured uniquely <strong>for</strong> each device and not<br />
set by <strong>the</strong> common profile. To enable this, each component of <strong>the</strong> profile can be enabled or disabled by<br />
checking <strong>the</strong> box at <strong>the</strong> top of each section labeled with “Edit Settings.” If this section is unchecked <strong>for</strong> a<br />
specific profile, <strong>the</strong> local data in <strong>the</strong> device will be preserved and not affected by <strong>the</strong> profile.<br />
Page 11 of 31
NComputing <strong>vSpace</strong> <strong>Management</strong> <strong>Center</strong> User Manual rev06.27.12.2<br />
For example, in <strong>the</strong> image below, <strong>the</strong> Keyboard settings will not be associated with <strong>the</strong> profile since <strong>the</strong><br />
“Edit Settings” box is not checked.<br />
Proceed through <strong>the</strong> wizard to configure (or skip) each setting screen. The last screen shows a summary<br />
of <strong>the</strong> settings and has <strong>the</strong> “Apply” button. When you click <strong>the</strong> “Apply” button <strong>the</strong> settings in <strong>the</strong> profile<br />
will be pushed to all of <strong>the</strong> devices that you associated it with. Note that you can also store and apply<br />
profiles from <strong>the</strong> Manage Devices screen, by using an existing device’s settings as a template (see<br />
section 7.3 Configuring devices using device profiles).<br />
IMPORTANT: Note that if at any time, you overwrite a profile’s setting in a particular device by ei<strong>the</strong>r<br />
changing <strong>the</strong> setting manually via <strong>the</strong> local user interface on <strong>the</strong> N-<strong>series</strong> device or by using <strong>the</strong> edit<br />
configuration function (see 4.1 Manage Devices) <strong>the</strong>n that manually-configured setting will no longer<br />
pull from <strong>the</strong> profile and <strong>the</strong> device will always use this manually overridden setting. If you wish to<br />
revert <strong>the</strong> device to use <strong>the</strong> profile <strong>for</strong> that setting, you must first remove <strong>the</strong> device from <strong>the</strong> profile<br />
(edit profile, deselect <strong>the</strong> device, and apply <strong>the</strong> profile) and <strong>the</strong>n re-attach it (edit profile, select <strong>the</strong><br />
device, and apply <strong>the</strong> profile).<br />
Page 12 of 31
NComputing <strong>vSpace</strong> <strong>Management</strong> <strong>Center</strong> User Manual rev06.27.12.2<br />
4.6 Update Firmware<br />
The Update Firmware screen allows you to select from a list of currently available firmware versions and<br />
<strong>the</strong>n push a selected version of firmware to one or more devices.<br />
To begin a firmware update, select <strong>the</strong> firmware version from <strong>the</strong> list provided <strong>for</strong> <strong>the</strong> device model in<br />
question, and <strong>the</strong>n press “Next”. To upload new firmware versions <strong>for</strong> your devices refer to 6.1 Manage<br />
Firmware<br />
Next, select <strong>the</strong> devices you wish to push this firmware to and press “Next”.<br />
Page 13 of 31
NComputing <strong>vSpace</strong> <strong>Management</strong> <strong>Center</strong> User Manual rev06.27.12.2<br />
At this stage, you’ll be given <strong>the</strong> option to push <strong>the</strong> firmware immediately, or schedule <strong>the</strong> update <strong>for</strong> a<br />
future date and time. This is especially useful if you wish to per<strong>for</strong>m <strong>the</strong> update later in <strong>the</strong> day when<br />
usage is at a minimum (firmware updates will cause a device reboot and will disconnect users from <strong>the</strong>ir<br />
session). Press “Next” when you have selected a time <strong>for</strong> <strong>the</strong> update.<br />
Lastly, you will be presented with a summary of <strong>the</strong> choices you have made including firmware version,<br />
device to be updated, <strong>the</strong> timing of <strong>the</strong> update, and o<strong>the</strong>r details. Once you are satisfied with <strong>the</strong><br />
update plan, press “Update firmware” to initiate <strong>the</strong> update.<br />
Page 14 of 31
NComputing <strong>vSpace</strong> <strong>Management</strong> <strong>Center</strong> User Manual rev06.27.12.2<br />
5.0 Group <strong>Management</strong><br />
The Group <strong>Management</strong> module of <strong>vSpace</strong> <strong>Management</strong> <strong>Center</strong> allows administrators to create and<br />
maintain Device and Server Groups. This allows administrators to create logical groupings that<br />
correspond to device models, geographical locations, or usage needs.<br />
5.1 Browse Existing Groups<br />
You can view all currently existing Groups by selecting “Brows Existing Groups” from <strong>the</strong> Group<br />
<strong>Management</strong> menu.<br />
Each group can be expanded to display a list of <strong>the</strong> individual devices and management servers<br />
contained within that group. You can remove individual members of <strong>the</strong> group by clicking “Remove” to<br />
<strong>the</strong> right of <strong>the</strong> list. You can also remove or edit <strong>the</strong> entire group by clicking <strong>the</strong> “Remove” or “Edit”<br />
button to <strong>the</strong> right of <strong>the</strong> group name.<br />
To create a new group, click <strong>the</strong> “Add New Group” button at <strong>the</strong> top right of <strong>the</strong> screen.<br />
Page 15 of 31
NComputing <strong>vSpace</strong> <strong>Management</strong> <strong>Center</strong> User Manual rev06.27.12.2<br />
5.2 Add / Edit Group<br />
To create a new Group, select “Add / Edit Group” from <strong>the</strong> Group <strong>Management</strong> menu.<br />
Begin by defining <strong>the</strong> group you wish to create by selecting a Group Name and Description. Lastly, select<br />
whe<strong>the</strong>r <strong>the</strong> group will contain devices, management servers, or a combination of both (a Mixed<br />
Group). Once you click “Next”, you’ll be taken to a list of currently available Devices that you can select<br />
<strong>for</strong> inclusion in your new Group.<br />
Next, click <strong>the</strong> checkbox next to <strong>the</strong> device(s) you wish to include in your group. Click <strong>the</strong> “Add Devices”<br />
button to <strong>the</strong> bottom left of <strong>the</strong> screen to add <strong>the</strong>se to your group. You can view <strong>the</strong> currently selected<br />
Devices by clicking <strong>the</strong> “Selected Devices” tab at <strong>the</strong> top of <strong>the</strong> screen, and return to <strong>the</strong> “All Virtual<br />
Devices” tab to add additional devices if desired.<br />
Page 16 of 31
NComputing <strong>vSpace</strong> <strong>Management</strong> <strong>Center</strong> User Manual rev06.27.12.2<br />
NOTE: You can search <strong>for</strong> Devices with specific characteristics by using <strong>the</strong> Advanced Search<br />
function at <strong>the</strong> top right of <strong>the</strong> screen.<br />
Once you are done selecting devices, click <strong>the</strong> “Next” button.<br />
If you wish to include <strong>Management</strong> Servers in your Group, you may do so at this stage. Click <strong>the</strong> check<br />
box next to <strong>the</strong> Server(s) you wish to add and click “Add <strong>Management</strong> Servers”. Click “Next” when you<br />
are satisfied with your selections.<br />
Once you have finished selecting Devices and/or Servers <strong>for</strong> your Group, you will be presented with a<br />
summary of <strong>the</strong> Group. Note that even at this stage in <strong>the</strong> group creation process, you are still free to go<br />
back and add or remove devices and servers as needed. To complete <strong>the</strong> group creation process, click<br />
<strong>the</strong> “Next” button to <strong>the</strong> bottom right of <strong>the</strong> screen.<br />
Page 17 of 31
NComputing <strong>vSpace</strong> <strong>Management</strong> <strong>Center</strong> User Manual rev06.27.12.2<br />
6.0 Settings<br />
The Settings module allows you to configure <strong>the</strong> <strong>vSpace</strong> <strong>Management</strong> <strong>Center</strong> server itself, configure<br />
Au<strong>the</strong>ntication Settings, upload firmware to be distributed to devices, as well as o<strong>the</strong>r server specific<br />
tasks such as registration.<br />
6.1 Manage Firmware<br />
The Manage Firmware section of <strong>the</strong> Settings module allows you to update your inventory of device<br />
firmware as new versions become available.<br />
To add a new firmware build, click <strong>the</strong> “Choose File” button at <strong>the</strong> top of <strong>the</strong> screen and navigate to <strong>the</strong><br />
file’s location within Windows. All currently stored firmware builds are displayed in a list at <strong>the</strong> bottom<br />
of <strong>the</strong> screen.<br />
Page 18 of 31
NComputing <strong>vSpace</strong> <strong>Management</strong> <strong>Center</strong> User Manual rev06.27.12.2<br />
6.2 User Administration<br />
The User Administration screen allows you to create and configure custom user accounts with varying<br />
access to <strong>vSpace</strong> <strong>Management</strong> <strong>Center</strong> servers in <strong>the</strong> event that you do not wish to use Active Directory<br />
or a generic LDAP directory service <strong>for</strong> centralized au<strong>the</strong>ntication.<br />
Existing user accounts are displayed at <strong>the</strong> bottom of <strong>the</strong> screen. To add a new user, click <strong>the</strong> “Add New<br />
User” button to <strong>the</strong> right of <strong>the</strong> screen.<br />
Enter <strong>the</strong> required account in<strong>for</strong>mation into<br />
<strong>the</strong> fields provided and select whe<strong>the</strong>r <strong>the</strong><br />
user is to be given admin rights. If enabled,<br />
<strong>the</strong>y will have full administrative control over<br />
<strong>vSpace</strong> <strong>Management</strong> <strong>Center</strong> servers and <strong>the</strong>ir<br />
associated devices. If unchecked, <strong>the</strong>y will<br />
connect as guests with view-only privileges.<br />
Once you are satisfied with <strong>the</strong> in<strong>for</strong>mation entered, press <strong>the</strong> “Save” button to complete <strong>the</strong> process.<br />
The associated user will <strong>the</strong>n be able access your <strong>vSpace</strong> <strong>Management</strong> <strong>Center</strong> server(s) using <strong>the</strong>se<br />
credentials. You can return to <strong>the</strong> User Administration screen at any time to modify <strong>the</strong>se settings.<br />
NOTE: If au<strong>the</strong>ntication to <strong>vSpace</strong> <strong>Management</strong> <strong>Center</strong> is configured <strong>for</strong> use with Active<br />
Directory or a generic LDAP directory, <strong>the</strong>n most of <strong>the</strong> options within <strong>the</strong> User Administration<br />
screen will be disabled to prevent <strong>the</strong>m from conflicting with domain permissions.<br />
Page 19 of 31
NComputing <strong>vSpace</strong> <strong>Management</strong> <strong>Center</strong> User Manual rev06.27.12.2<br />
6.3 Configure Au<strong>the</strong>ntication<br />
The Configure Au<strong>the</strong>ntication screen allows administrators to choose how users can au<strong>the</strong>nticate to<br />
<strong>vSpace</strong> <strong>Management</strong> <strong>Center</strong>, ei<strong>the</strong>r through using Active Directory or ano<strong>the</strong>r vendors generic LDAP<br />
based directory service. This allows multiple levels of administrative access ranging from view-only<br />
privileges within <strong>vSpace</strong> <strong>Management</strong> <strong>Center</strong> servers to full editing permissions.<br />
Firstly, select whe<strong>the</strong>r or not you wish <strong>for</strong> <strong>vSpace</strong> <strong>Management</strong> <strong>Center</strong> to use Active Directory or a<br />
generic LDAP based directory service. By unchecking <strong>the</strong> “Enable Au<strong>the</strong>ntication” box, <strong>vSpace</strong><br />
<strong>Management</strong> <strong>Center</strong> will rely on <strong>the</strong> local <strong>vSpace</strong> <strong>Management</strong> <strong>Center</strong> user accounts you create within<br />
<strong>the</strong> User Administration section of <strong>the</strong> Settings module.<br />
If enabled, you are given <strong>the</strong> choice between Active Directory integration or LDAP. Use <strong>the</strong> fields<br />
provided to enter <strong>the</strong> name and location of your domain controller. Then enter <strong>the</strong> user credentials of a<br />
valid domain admin account. Once done, press <strong>the</strong> “Save” button to <strong>the</strong> bottom right of <strong>the</strong> screen.<br />
NOTE: The username and password are only used to verify a successful connection with Active<br />
Directory/generic LDAP directory service.<br />
Page 20 of 31
NComputing <strong>vSpace</strong> <strong>Management</strong> <strong>Center</strong> User Manual rev06.27.12.2<br />
6.4 <strong>Management</strong> Server Administration<br />
The <strong>Management</strong> Server Administration screen allows administrators to control how multiple <strong>vSpace</strong><br />
<strong>Management</strong> <strong>Center</strong> servers relate to one ano<strong>the</strong>r and sets logging parameters.<br />
Under <strong>the</strong> <strong>Management</strong> Server Properties section<br />
of this screen, you can decide whe<strong>the</strong>r new<br />
management servers automatically join your<br />
current server’s <strong>vSpace</strong> <strong>Management</strong> <strong>Center</strong> zone,<br />
or whe<strong>the</strong>r <strong>the</strong>y must be allowed to do so via<br />
manual acceptance. You can also set <strong>the</strong> limit <strong>for</strong><br />
events in your event log within a certain timeframe.<br />
The Join management zone section of <strong>the</strong> screen<br />
allows you to manually join an existing <strong>vSpace</strong><br />
<strong>Management</strong> <strong>Center</strong> zone by connecting to a server<br />
within that zone. If this is <strong>the</strong> first time a connection<br />
between <strong>vSpace</strong> <strong>Management</strong> <strong>Center</strong> servers has<br />
occurred within your domain, a new zone will be<br />
created automatically and your servers will enter a<br />
master / slave relationship based on <strong>the</strong> order in<br />
which <strong>the</strong>y were joined. In a scenario where server B joins server A, server A becomes <strong>the</strong> master. In<br />
o<strong>the</strong>r words: <strong>the</strong> joining server becomes <strong>the</strong> slave and <strong>the</strong> server it joins becomes <strong>the</strong> master.<br />
Page 21 of 31
NComputing <strong>vSpace</strong> <strong>Management</strong> <strong>Center</strong> User Manual rev06.27.12.2<br />
Lastly, <strong>the</strong> bottom of <strong>the</strong> screen displays a list of servers within <strong>the</strong> current server’s zone. This list<br />
includes servers that have already been joined and servers that are awaiting approval to join. If this<br />
screen is viewed from <strong>the</strong> master server, you can accept or reject server applications from this list. You<br />
can also view <strong>the</strong> <strong>Management</strong> Zone ID from this section of <strong>the</strong> screen, which is unique to each zone.<br />
6.5 Registration and Licensing<br />
The Registration and Licensing screen provides you with a summary of your current <strong>vSpace</strong><br />
<strong>Management</strong> <strong>Center</strong> licensing status and lets you add license keys. The initial registration process<br />
consists of filling out <strong>the</strong> Contact In<strong>for</strong>mation section of this screen, and <strong>the</strong>n adding a license key as<br />
outlined below.<br />
Page 22 of 31
NComputing <strong>vSpace</strong> <strong>Management</strong> <strong>Center</strong> User Manual rev06.27.12.2<br />
The Current Status section to <strong>the</strong> right of <strong>the</strong> screen displays basic in<strong>for</strong>mation on your current <strong>vSpace</strong><br />
<strong>Management</strong> <strong>Center</strong> registration status and licensing scheme. The bottom of <strong>the</strong> screen lists each of<br />
your currently installed licenses. Note that licenses can be continually added to <strong>vSpace</strong> <strong>Management</strong><br />
<strong>Center</strong> to accommodate an increase in <strong>the</strong> volume of managed devices over time as a deployment<br />
grows.<br />
To add licenses to your <strong>vSpace</strong> <strong>Management</strong> <strong>Center</strong><br />
installation, click <strong>the</strong> “Add” button to <strong>the</strong> bottom left<br />
of <strong>the</strong> Registration and Licensing screen and enter <strong>the</strong><br />
serial number(s) of <strong>the</strong> license(s) in question. Note<br />
that <strong>the</strong> Add button will not appear until you have<br />
filled out <strong>the</strong> Contact In<strong>for</strong>mation section.<br />
Page 23 of 31
NComputing <strong>vSpace</strong> <strong>Management</strong> <strong>Center</strong> User Manual rev06.27.12.2<br />
7.0 Common Usage Scenarios<br />
This section of <strong>the</strong> user manual includes several common usage scenarios that demonstrate <strong>the</strong> use of<br />
<strong>vSpace</strong> <strong>Management</strong> <strong>Center</strong> to per<strong>for</strong>m some common administrative tasks such as selecting and<br />
pushing firmware updates to multiple devices simultaneously, configuring devices using profiles, and<br />
backing up <strong>vSpace</strong> <strong>Management</strong> <strong>Center</strong> server files.<br />
7.1 Adding an N-<strong>series</strong> device to <strong>vSpace</strong> <strong>Management</strong> <strong>Center</strong><br />
In this scenario we’ll go over <strong>the</strong> task of linking NComputing N-<strong>series</strong> devices to <strong>vSpace</strong> <strong>Management</strong><br />
<strong>Center</strong> so that <strong>the</strong>y can be remotely managed using <strong>the</strong> <strong>vSpace</strong> <strong>Management</strong> <strong>Center</strong> toolset.<br />
1. Enter <strong>the</strong> Settings Menu from your N-<strong>series</strong> device and click <strong>the</strong> Device Tab.<br />
2. By setting Discovery to Enabled (default setting), your N-<strong>series</strong> device will automatically join any<br />
<strong>vSpace</strong> <strong>Management</strong> <strong>Center</strong> server within its subnet.<br />
3. (Optional): If <strong>the</strong>re is no <strong>vSpace</strong> <strong>Management</strong> <strong>Center</strong> server within your device’s subnet, or you<br />
wish to manually enter <strong>the</strong> <strong>vSpace</strong> <strong>Management</strong> <strong>Center</strong> server’s location, you may do so by<br />
disabling Discovery and entering <strong>the</strong> IP address or Fully Qualified Domain Name in <strong>the</strong> Services<br />
field.<br />
Note: You can also configure your DHCP Server to automatically direct N-<strong>series</strong> devices to a <strong>vSpace</strong><br />
<strong>Management</strong> <strong>Center</strong> server. Visit http://www.ncomputing.com/kb/Configuring-DHCP-<strong>for</strong>-Automatic-N<strong>series</strong>-Configuration_338.html<br />
<strong>for</strong> more details.<br />
Page 24 of 31
NComputing <strong>vSpace</strong> <strong>Management</strong> <strong>Center</strong> User Manual rev06.27.12.2<br />
7.2 Configuring <strong>vSpace</strong> <strong>Management</strong> <strong>Center</strong> with Active Directory<br />
To help keep your account management centralized within your environment, <strong>vSpace</strong> <strong>Management</strong><br />
<strong>Center</strong> includes <strong>the</strong> option <strong>for</strong> users to au<strong>the</strong>nticate to <strong>vSpace</strong> <strong>Management</strong> <strong>Center</strong> via Active Directory.<br />
1. From <strong>the</strong> Settings module, navigate to <strong>the</strong> Configure Au<strong>the</strong>ntication screen.<br />
2. Check <strong>the</strong> box next to “Enable LDAP Au<strong>the</strong>ntication” and <strong>the</strong>n select “Active Directory” from <strong>the</strong><br />
Connection Type dropdown.<br />
3. Enter <strong>the</strong> URL of your Active<br />
Directory server in <strong>the</strong> LDAP<br />
Server field.<br />
4. Enter <strong>the</strong> name of your Domain in<br />
<strong>the</strong> Base Distinguished Name<br />
field.<br />
5. Enter <strong>the</strong> admin and user group<br />
names you wish to use <strong>for</strong> <strong>vSpace</strong><br />
<strong>Management</strong> <strong>Center</strong><br />
administrators and users. Default<br />
values are provided, but you can<br />
use an alternate naming scheme if you desire.<br />
6. Supply <strong>the</strong> Username and Password of a user account with access to your Active Directory<br />
server in <strong>the</strong> LDAP Username and Password fields, and <strong>the</strong>n press <strong>the</strong> “Save” button to <strong>the</strong><br />
bottom right of <strong>the</strong> screen.<br />
7. Lastly, Using Active Directory Users and Computers on your AD server, create two new user<br />
groups with <strong>the</strong> group names you selected in step 5. <strong>vSpace</strong> <strong>Management</strong> <strong>Center</strong> will convey<br />
<strong>the</strong> appropriate privileges to members of <strong>the</strong>se groups. (Users = read only. Admins = read/edit.)<br />
Page 25 of 31
NComputing <strong>vSpace</strong> <strong>Management</strong> <strong>Center</strong> User Manual rev06.27.12.2<br />
7.3 Configuring devices using device profiles<br />
In this scenario we’ll describe <strong>the</strong> process of creating, managing, and pushing device profiles to your<br />
NComputing devices.<br />
A device profile can be created from scratch or imported from any device in your deployment. For <strong>the</strong><br />
purpose of this scenario, we’ll import a profile, save it as a preset, and <strong>the</strong>n push that profile out to<br />
additional devices. To do so, follow <strong>the</strong>se steps:<br />
1. From <strong>the</strong> Device <strong>Management</strong> module within <strong>vSpace</strong> <strong>Management</strong> <strong>Center</strong>, open <strong>the</strong> Manage<br />
Devices screen.<br />
2. Select <strong>the</strong> device whose profile you wish to store by checking <strong>the</strong> checkbox to its left.<br />
3. Click <strong>the</strong> “Store Profile” button to <strong>the</strong> top right of <strong>the</strong> screen to proceed through <strong>the</strong> profile<br />
storing dialog.<br />
4. (Optional): You can review and make alterations to <strong>the</strong> profile you have just created from <strong>the</strong><br />
Manage and Apply Profiles screen within <strong>the</strong> Device <strong>Management</strong> module.<br />
5. From <strong>the</strong> Manage Devices screen, select <strong>the</strong> device(s) you wish to push your new profile using<br />
<strong>the</strong> checkboxes as in step 2.<br />
6. Once you are satisfied with your selection, click <strong>the</strong> “Apply Profile” button to apply your new<br />
profile to <strong>the</strong> selected device(s).<br />
Page 26 of 31
NComputing <strong>vSpace</strong> <strong>Management</strong> <strong>Center</strong> User Manual rev06.27.12.2<br />
7.4 Adding a new <strong>vSpace</strong> <strong>Management</strong> <strong>Center</strong> server to your <strong>vSpace</strong><br />
<strong>Management</strong> <strong>Center</strong> Zone<br />
A group of <strong>vSpace</strong> <strong>Management</strong> <strong>Center</strong> servers working toge<strong>the</strong>r to manage your NComputing<br />
deployment is referred to as a “management zone” or simply “zone.” In this scenario we’ll discuss <strong>the</strong><br />
task of adding additional <strong>vSpace</strong> <strong>Management</strong> <strong>Center</strong> servers to your zone as well as outline some of <strong>the</strong><br />
benefits that multiple servers can offer administrators.<br />
<strong>vSpace</strong> <strong>Management</strong> <strong>Center</strong> servers will automatically join each o<strong>the</strong>r to <strong>for</strong>m a management zone if<br />
<strong>the</strong>y are within <strong>the</strong> same subnet and <strong>the</strong> <strong>Management</strong> Server Auto-Acceptance feature is enabled. If <strong>the</strong><br />
Auto-Acceptance feature is not enabled, or differing subnets separate your <strong>vSpace</strong> <strong>Management</strong> <strong>Center</strong><br />
servers, use <strong>the</strong> following steps to manually join <strong>the</strong>m toge<strong>the</strong>r:<br />
Joining a Zone from within <strong>vSpace</strong> <strong>Management</strong> <strong>Center</strong>:<br />
1. Open <strong>the</strong> <strong>Management</strong> Server Administration section of <strong>the</strong> Settings module within <strong>vSpace</strong><br />
<strong>Management</strong> <strong>Center</strong>.<br />
2. In <strong>the</strong> Join management zone field,<br />
enter <strong>the</strong> IP address or fully qualified<br />
domain name of <strong>the</strong> <strong>vSpace</strong><br />
<strong>Management</strong> <strong>Center</strong> server you wish to<br />
join in <strong>the</strong> Host field, with <strong>the</strong><br />
appropriate port (1284 by default).<br />
NOTE: If you already have a <strong>vSpace</strong> <strong>Management</strong> <strong>Center</strong> Zone comprised of multiple<br />
<strong>vSpace</strong> <strong>Management</strong> <strong>Center</strong> servers, you’ll need to join <strong>the</strong> master server within that<br />
Zone. The master server is flagged as such in <strong>the</strong> server list at <strong>the</strong> bottom of <strong>the</strong><br />
<strong>Management</strong> Server Administration screen on all servers within <strong>the</strong> Zone (as seen<br />
below).<br />
3. From <strong>the</strong> server you elected to join, accept <strong>the</strong> join request which should now appear at <strong>the</strong><br />
bottom of <strong>the</strong> <strong>Management</strong> Server Administration screen. This completes <strong>the</strong> process and<br />
creates a <strong>vSpace</strong> <strong>Management</strong> <strong>Center</strong> Zone.<br />
Page 27 of 31
NComputing <strong>vSpace</strong> <strong>Management</strong> <strong>Center</strong> User Manual rev06.27.12.2<br />
Joining a Zone during Installation:<br />
In addition to joining from <strong>the</strong> Settings module, you can also per<strong>for</strong>m this task automatically when you<br />
install <strong>vSpace</strong> <strong>Management</strong> <strong>Center</strong>. This option is available to you as part of <strong>the</strong> installer.<br />
During <strong>the</strong> installation process, select <strong>the</strong> Advanced Installation option. In <strong>the</strong> dialog that follows, check<br />
<strong>the</strong> option titled “Connect to an existing management zone”. Enter <strong>the</strong> <strong>the</strong> IP address of <strong>the</strong> <strong>vSpace</strong><br />
<strong>Management</strong> <strong>Center</strong> server you wish to join and proceed with installation. Your new <strong>vSpace</strong><br />
<strong>Management</strong> <strong>Center</strong> server will automatically join with your existing Zone once <strong>the</strong> installation process<br />
is complete.<br />
Joining a Zone from Windows:<br />
Lastly, you can use <strong>the</strong> CMFconnect utility included with <strong>vSpace</strong> <strong>Management</strong> <strong>Center</strong> to join your server<br />
to a Zone.<br />
1. From <strong>the</strong> Windows Start menu, click on <strong>vSpace</strong> <strong>Management</strong> <strong>Center</strong> as you would to launch <strong>the</strong><br />
management interface.<br />
2. Click <strong>the</strong> CMFconnect utility to launch <strong>the</strong> connection dialog and proceed as directed through<br />
<strong>the</strong> utility to join your <strong>vSpace</strong> <strong>Management</strong> <strong>Center</strong> to an existing Zone.<br />
Page 28 of 31
NComputing <strong>vSpace</strong> <strong>Management</strong> <strong>Center</strong> User Manual rev06.27.12.2<br />
8.0 Troubleshooting<br />
Error: There is a problem with this Windows Installer package.<br />
Both Java and Apache Server are required <strong>for</strong> <strong>vSpace</strong><br />
<strong>Management</strong> <strong>Center</strong> to function properly. If you<br />
encounter this error during installation, check to make<br />
sure that you have successfully installed both of <strong>the</strong>se<br />
components and try again. For your convenience,<br />
installers <strong>for</strong> both of <strong>the</strong>se products are included as part<br />
of <strong>the</strong> “Default” <strong>vSpace</strong> <strong>Management</strong> <strong>Center</strong> installation method.<br />
Error: Au<strong>the</strong>ntication failed<br />
If you receive this error while attempting to log in to <strong>the</strong><br />
<strong>vSpace</strong> <strong>Management</strong> <strong>Center</strong> user interface, check that<br />
you are using <strong>the</strong> correct credentials and try again. Also<br />
check that your caps lock and num lock settings are not<br />
interfering with <strong>the</strong> correct entry of your User ID and<br />
Password.<br />
My device doesn’t show up in <strong>vSpace</strong> <strong>Management</strong> <strong>Center</strong><br />
Make sure that you’ve added <strong>the</strong> device to <strong>vSpace</strong> <strong>Management</strong> <strong>Center</strong>. Note that this doesn’t<br />
necessarily happen automatically. Refer to Section 7.1 Adding a Device to <strong>vSpace</strong> <strong>Management</strong> <strong>Center</strong><br />
within this document <strong>for</strong> detailed instructions. For in<strong>for</strong>mation on configuring your DHCP server to<br />
automatically link NComputing devices to <strong>vSpace</strong> <strong>Management</strong> <strong>Center</strong>, review <strong>the</strong> following Knowledge<br />
Base article: http://www.ncomputing.com/kb/Configuring-DHCP-<strong>for</strong>-Automatic-N-<strong>series</strong>-<br />
Configuration_338.html<br />
Also, be sure that your firewall and network security resources are configured to allow <strong>vSpace</strong><br />
<strong>Management</strong> <strong>Center</strong> to communicate with devices in your environment. For detailed in<strong>for</strong>mation on<br />
Firewall and Antivirus configuration <strong>for</strong> NComputing products, review <strong>the</strong> following Knowledge Base<br />
article: http://www.ncomputing.com/kb/Configuring-Firewall-and-Antivirus-<strong>for</strong>-NComputing-<br />
Products_63.html<br />
Page 29 of 31
NComputing <strong>vSpace</strong> <strong>Management</strong> <strong>Center</strong> User Manual rev06.27.12.2<br />
<strong>Management</strong> Server Connection Status:<br />
Offline<br />
An offline status can be an indication that <strong>the</strong> NC<br />
<strong>Management</strong> Server service is not currently running on<br />
<strong>the</strong> host system.<br />
To check <strong>the</strong> status of <strong>the</strong> <strong>Management</strong> Server service,<br />
open <strong>the</strong> Services window under Start->Administrative<br />
Tools on <strong>the</strong> host system or simply run “services.msc”<br />
from <strong>the</strong> start menu. Once opened, search <strong>for</strong> “NC<br />
<strong>Management</strong> Server”.<br />
HTTP Status 500 Error<br />
An HTTP Status 500 error can usually be resolved by<br />
simply clearing your browser’s cache. This error may<br />
present itself in certain rare cases including when <strong>the</strong><br />
browser cache is not cleared after a new version of VMC<br />
is installed, as outlined in <strong>the</strong> installation section of this<br />
manual.<br />
Page 30 of 31
NComputing <strong>vSpace</strong> <strong>Management</strong> <strong>Center</strong> User Manual rev06.27.12.2<br />
9.0 Support and Additional Resources<br />
The Help module of <strong>the</strong> Navigation bar can direct you to several of NComputing’s support resources.<br />
These resources are outlined below:<br />
NComputing Technical Support<br />
To request Technical Support <strong>for</strong> NComputing products, please visit <strong>the</strong> NComputing Support<br />
page at http://www.ncomputing.com/support<br />
NComputing Knowledge Base<br />
For additional technical documentation, solutions, and how-toe’s, visit<br />
http://www.ncomputing.com/kb/<br />
NComputing Community Forums<br />
For access to community-driven solutions, discussions, and o<strong>the</strong>r resources, visit<br />
http://community.ncomputing.com/<br />
9.1 Disclaimers and Legal In<strong>for</strong>mation<br />
In<strong>for</strong>mation contained in this document may have been obtained from internal testing or from a third party.<br />
This in<strong>for</strong>mation is <strong>for</strong> in<strong>for</strong>mational purposes only. In<strong>for</strong>mation may be changed or updated without<br />
notice. NComputing reserves <strong>the</strong> right to make improvements and/or changes in <strong>the</strong> products, programs<br />
and/or specifications described herein anytime without notice. All NComputing software is subject to<br />
NComputing intellectual property rights and may be used only in conjunction with Genuine NComputing<br />
hardware and in accordance to <strong>the</strong> NComputing End User Licensing agreement and Terms of Use.<br />
www.ncomputing.com<br />
© 2003-2012 NComputing Inc. All rights reserved. NComputing and Numo are registered trademarks of NComputing Inc. – USA.<br />
VESA is a trademark of Video Electronics Standards Association. Kensington is a trademark of ACCO World Corporation. All o<strong>the</strong>r<br />
trademarks are <strong>the</strong> property of <strong>the</strong>ir respective owners.<br />
Page 31 of 31