
You also want an ePaper? Increase the reach of your titles
YUMPU automatically turns print PDFs into web optimized ePapers that Google loves.
DC IN 9V<br />
A.SURROUND<br />
MONITOR MODE<br />
PICTURE MODE<br />
OPEN<br />
CHG<br />
<strong>DVD</strong>/<strong>SD</strong>/AUX<br />
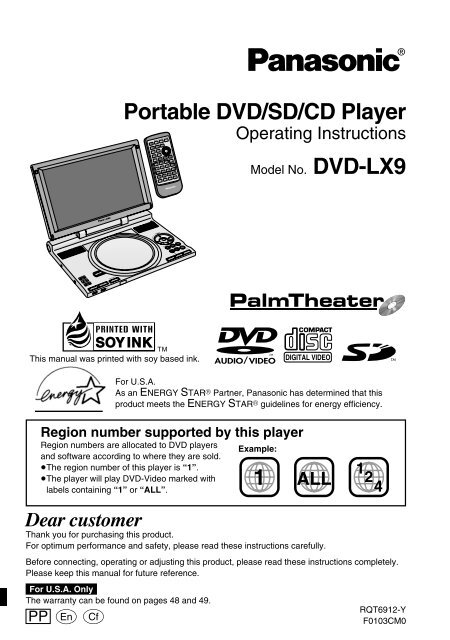
<strong>Portable</strong> <strong>DVD</strong>/<strong>SD</strong>/<strong>CD</strong> <strong>Player</strong><br />
Í<br />
SETUP<br />
∫ ; 1<br />
TOP MENU DISPLAY<br />
MENU RETURN<br />
A.SURROUND ANGLE<br />
1 2 3<br />
4 5 6<br />
7 8 9 0<br />
6 5 : 9<br />
SEARCH<br />
ENTER<br />
S10<br />
s r<br />
GROUP PAGE VOLUME<br />
TOP MENU DISPLAY VOL<br />
This manual was printed with soy based ink. AUDIO/VIDEO<br />
PLAY MODE <strong>DVD</strong>/<strong>SD</strong>/AUX<br />
AUDIO<br />
SUB<br />
-TITLE<br />
CANCEL<br />
MENU RETURN<br />
OFF<br />
ON<br />
Operating Instructions<br />
Model No. <strong>DVD</strong>-LX9<br />
For U.S.A.<br />
As an ENERGY STAR R Partner, Panasonic has determined that this<br />
product meets the ENERGY STAR R guidelines for energy efficiency.<br />
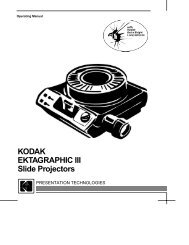
Region number supported by this player<br />
Region numbers are allocated to <strong>DVD</strong> players<br />
and software according to where they are sold.<br />
≥The region number of this player is “1”.<br />
≥The player will play <strong>DVD</strong>-Video marked with<br />
labels containing “1” or “ALL”.<br />
Example:<br />
1<br />
1 ALL 2<br />
4<br />
Dear customer<br />
Thank you for purchasing this product.<br />
For optimum performance and safety, please read these instructions carefully.<br />
Before connecting, operating or adjusting this product, please read these instructions completely.<br />
Please keep this manual for future reference.<br />
For U.S.A. Only<br />
The warranty can be found on pages 48 and 49.<br />
PP pq<br />
®<br />
RQT6912-Y<br />
F0103CM0
RQT6912<br />
2<br />
WARNING:<br />
TO REDUCE THE RISK OF FIRE,<br />
ELECTRIC SHOCK OR PRODUCT<br />
DAMAGE, DO NOT EXPOSE THIS<br />
APPARATUS TO RAIN, MOISTURE,<br />
DRIPPING OR SPLASHING AND<br />
THAT NO OBJECTS FILLED WITH<br />
LIQUIDS, SUCH AS VASES, SHALL<br />
BE PLACED ON THE APPARATUS.<br />
CAUTION!<br />
THIS PRODUCT UTILIZES A LASER.<br />
USE OF CONTROLS OR ADJUSTMENTS<br />
OR PERFORMANCE OF PROCEDURES<br />
OTHER THAN THOSE SPECIFIED<br />
HEREIN MAY RESULT IN HAZARDOUS<br />
RADIATION EXPOSURE.<br />
DO NOT OPEN COVERS AND DO NOT<br />
REPAIR YOURSELF. REFER SERVICING<br />
TO QUALIFIED PERSONNEL.<br />
CAUTION!<br />
DO NOT INSTALL OR PLACE THIS UNIT<br />
IN A BOOKCASE, BUILT-IN CABINET OR<br />
IN ANOTHER CONFINED SPACE.<br />
ENSURE THE UNIT IS WELL<br />
VENTILATED. TO PREVENT RISK OF<br />
ELECTRIC SHOCK OR FIRE HAZARD<br />
DUE TO OVERHEATING, ENSURE THAT<br />
CURTAINS AND ANY OTHER<br />
MATERIALS DO NOT OBSTRUCT THE<br />
VENTILATION VENTS.<br />
CAUTION – VISIBLE AND INVISIBLE LASER<br />
RADIATION WHEN OPEN.<br />
DO NOT STARE INTO BEAM.<br />
THE FOLLOWING APPLIES ONLY IN THE U.S.A.<br />
CAUTION:<br />
This equipment has been tested and found to<br />
comply with the limits for a Class B digital<br />
device, pursuant to Part 15 of the FCC Rules.<br />
These limits are designed to provide<br />
reasonable protection against harmful<br />
interference in a residential installation. This<br />
equipment generates, uses and can radiate<br />
radio frequency energy and, if not installed<br />
and used in accordance with the instructions,<br />
may cause harmful interference to radio<br />
communications. However, there is no<br />
guarantee that interference will not occur in a<br />
particular installation. If this equipment does<br />
cause harmful interference to radio or<br />
television reception, which can be determined<br />
by turning the equipment off and on, the user<br />
is encouraged to try to correct the interference<br />
by one or more of the following measures:<br />
The following mark and symbols are located on<br />
bottom of the unit.<br />
CAUTION: TO REDUCE THE RISK OF<br />
ELECTRIC SHOCK, DO NOT<br />
REMOVE SCREWS.<br />
NO USER-SERVICEABLE<br />
PARTS INSIDE.<br />
REFER SERVICING TO<br />
QUALIFIED SERVICE<br />
PERSONNEL.<br />
ATTENTION – RAYONNEMENT LASER VISIBLE ET<br />
INVISIBLE EN CAS D’OUVERTURE.<br />
NE PAS REGARDER DANS LE FAISCEAU.<br />
CAUTION<br />
RISK OF ELECTRIC SHOCK<br />
DO NOT OPEN<br />
The lightning flash with arrowhead<br />
symbol, within an equilateral<br />
triangle, is intended to alert the<br />
user to the presence of uninsulated<br />
“dangerous voltage” within the<br />
product’s enclosure that may be of<br />
sufficient magnitude to constitute a<br />
risk of electric shock to persons.<br />
The exclamation point within an<br />
equilateral triangle is intended to<br />
alert the user to the presence of<br />
important operating and<br />
maintenance (servicing)<br />
instructions in the literature<br />
accompanying the appliance.<br />
Marking sign is located on bottom of the unit.<br />
(Bottom of product)<br />
≥Reorient or relocate the receiving antenna.<br />
≥Increase the separation between the<br />
equipment and receiver.<br />
≥Connect the equipment into an outlet on a<br />
circuit different from that to which the<br />
receiver is connected.<br />
≥Consult the dealer or an experienced<br />
radio/TV technician for help.<br />
Any unauthorized changes or modifications to<br />
this equipment would void the user’s authority<br />
to operate this device.<br />
This device complies with Part 15 of the FCC<br />
Rules. Operation is subject to the following<br />
two conditions: (1) This device may not cause<br />
harmful interference, and (2) this device must<br />
accept any interference received, including<br />
interference that may cause undesired<br />
operation.
Batteries<br />
1. Battery pack (Lithium ion battery pack)<br />
1. ≥Use this unit to recharge the battery pack.<br />
1. ≥Do not use the battery pack with<br />
equipment other than the specified<br />
player.<br />
1. ≥Do not use the player outside if it is<br />
snowing or raining. (The battery pack is<br />
not waterproof.)<br />
1. ≥Do not get dirt, sand, liquids, or other<br />
foreign matter on the terminals.<br />
1. ≥Do not touch the plug terminals (i and<br />
j) with metal objects.<br />
1. ≥Do not disassemble, remodel, heat or<br />
throw into fire.<br />
2. Button-type battery (Lithium battery)<br />
1. ≥Insert with poles aligned.<br />
1. ≥Do not touch the terminals (i and j)<br />
with metal objects.<br />
1. ≥Do not disassemble, remodel, heat or<br />
throw into fire.<br />
1. ≥Keep out of reach of children.<br />
If any electrolyte should come into contact<br />
with your hands or clothes, wash it off<br />
thoroughly with water.<br />
If any electrolyte should come into contact<br />
with your eyes, never rub the eyes.<br />
Rinse eyes thoroughly with water, and then<br />
consult a doctor.<br />
3. Disposing of the batteries<br />
1. Check and follow your local regulations<br />
before disposal.<br />
CAUTION:<br />
The batteries used in this device may<br />
present a risk of fire or chemical burn if<br />
mistreated. Do not disassemble or<br />
incinerate the batteries. Do not heat the<br />
batteries above the following temperatures.<br />
Button-type battery 100 oC (212 oF)<br />
Battery pack 60 oC (140 oF)<br />
Do not recharge the button-type battery.<br />
Replace only with Panasonic part number<br />
indicated below:<br />
Button-type battery (Lithium battery)<br />
(for remote control) CR2025<br />
Battery pack<br />
(Lithium ion battery pack) CGR-H604<br />
Optional battery pack<br />
(Lithium ion battery pack) CGP-H501<br />
Use of other batteries may present a risk of<br />
fire or explosion.<br />
AC adaptor<br />
This AC adaptor operates on AC between<br />
100 V and 240 V.<br />
But<br />
≥In the U.S.A. and Canada, the AC power<br />
supply cord must be connected to a 120 V<br />
AC power supply only.<br />
≥When connecting to an AC supply outside<br />
of the U.S.A. or Canada, use a plug<br />
adaptor to suit the AC outlet configuration.<br />
≥When connecting to a supply of greater<br />
than AC 125 V, ensure the cord you use is<br />
suited to the voltage of the AC supply and<br />
the rated current of the AC adaptor.<br />
≥Contact an electrical parts distributor for<br />
assistance in selecting a suitable AC plug<br />
adaptor or AC cord set.<br />
CAUTION:<br />
Use only Panasonic car adaptor<br />
DY-DC95.<br />
A lithium ion/polymer battery that is<br />
recyclable powers the product you have<br />
purchased. Please call 1-800-8-BATTERY<br />
for information on how to recycle this<br />
battery.<br />
RBRC<br />
TM<br />
Li-ion<br />
THE FOLLOWING APPLIES ONLY IN THE<br />
U.S.A.<br />
Notice:<br />
This product has parts that contains a small<br />
amount of mercury. It also contains lead in<br />
some components. Disposal of these<br />
materials may be regulated in your<br />
community due to environmental<br />
considerations. For disposal or recycling<br />
information please contact your local<br />
authorities, or the Electronics Industries<br />
Alliance: <br />
RQT6912<br />
3
Getting Started<br />
RQT6912<br />
4<br />
Accessories<br />
Please check and identify the supplied accessories.<br />
Use numbers indicated in parentheses when asking for replacement parts.<br />
(For U.S.A.) To order accessories contact 1-800-332-5368 or the website<br />
(http://www.panasonic.com).<br />
(For Canada) To order accessories, call the dealer from whom you have<br />
made your purchase.<br />
∏ Remote control . . . . . . . . . . . . . . . . . . . . . 1<br />
∏ (N2QAJC000005)<br />
∏ Button-type battery . . . . . . . . . . . . . . . . . . 1<br />
∏ for remote control<br />
∏ (for replacement, see right)<br />
∏ Audio/video cable . . . . . . . . . . . . . . . . . . . 1<br />
∏ (K2KA6CB00003)<br />
∏ AC adaptor. . . . . . . . . . . . . . . . . . . . . . . . . 1<br />
∏ (RFEA905W-W)<br />
∏ AC power supply cord . . . . . . . . . . . . . . . 1<br />
∏ (RJA0065-A)<br />
∏ Rechargeable battery pack . . . . . . . . . . . 1<br />
∏ (attached upon shipment)<br />
∏ (for replacement, see right)<br />
∏ Multi cradle . . . . . . . . . . . . . . . . . . . . . . . . 1<br />
∏ (RAQ0032A)<br />
∏ Speakers . . . . . . . . . . . . . . . . . . . . . . . . . . 2<br />
∏ (RYQ0446-S)<br />
Optional accessories:<br />
Button-type battery (CR2025)<br />
Replacement rechargeable battery pack<br />
(CGR-H604: Available from Panasonic<br />
dealers.)<br />
Optional rechargeable battery pack (CGP-H501)<br />
Car stereo cassette adaptor (RP-CC20)<br />
Car adaptor (DY-DC95)<br />
Mini optical digital audio cable (RP-CA2120)<br />
[Available\only\in\U.S.A.]<br />
Headphones (RP-HC100 or RP-HC70)<br />
Note<br />
The included AC power supply cord and AC<br />
adaptor are for use with this unit only. Do not<br />
use them with other equipment.<br />
Operations in these instructions are described mainly with the main unit, but you can do the<br />
operations on the remote control if the controls are the same (➡ page 10).<br />
The L<strong>CD</strong><br />
Some of the L<strong>CD</strong>’s pixels (less than 0.01 %) may light constantly or fail to light. This is<br />
normal and does not indicate a malfunction.
Table of contents<br />
Getting Started<br />
Basic<br />
Operations<br />
Advanced<br />
Operations<br />
Reference<br />
Accessories . . . . . . . . . . . . . . . . . . . . . . . . . . . . . . . . . . . . . . . . . . 04<br />
IMPORTANT SAFETY INSTRUCTIONS. . . . . . . . . . . . . . . . . . . . . 06<br />
Disc and Card information. . . . . . . . . . . . . . . . . . . . . . . . . . . . . . . 08<br />
Control reference guide. . . . . . . . . . . . . . . . . . . . . . . . . . . . . . . . . 10<br />
Adjusting the angle of the L<strong>CD</strong>. . . . . . . . . . . . . . . . . . . . . . . . . . . 11<br />
Preparing the multi cradle and power supply . . . . . . . . . . . . . . . 12<br />
≥Multi cradle (AC adaptor) . . . . . . . . . . . . . . . . . . . . . . . . . . . . . . . . 12<br />
≥Battery pack . . . . . . . . . . . . . . . . . . . . . . . . . . . . . . . . . . . . . . . . . . 13<br />
≥Car adaptor . . . . . . . . . . . . . . . . . . . . . . . . . . . . . . . . . . . . . . . . . . 15<br />
The remote control. . . . . . . . . . . . . . . . . . . . . . . . . . . . . . . . . . . . . 15<br />
Playing discs. . . . . . . . . . . . . . . . . . . . . . . . . . . . . . . . . . . . . . . . . . 16<br />
Playing <strong>SD</strong> cards . . . . . . . . . . . . . . . . . . . . . . . . . . . . . . . . . . . . . . 18<br />
Playing the programs or play lists on <strong>DVD</strong>-RAM . . . . . . . . . . . . 22<br />
WMA/MP3, <strong>CD</strong> text and JPEG navigation menus . . . . . . . . . . . . 23<br />
≥Playing HighMAT discs . . . . . . . . . . . . . . . . . . . . . . . . . . . . . . . . . 25<br />
Convenient features. . . . . . . . . . . . . . . . . . . . . . . . . . . . . . . . . . . . 26<br />
≥Starting play from a selected program, title, track or picture . . . . . 26<br />
≥Selecting still pictures—Page Skip . . . . . . . . . . . . . . . . . . . . . . . . 26<br />
≥Rotating pictures . . . . . . . . . . . . . . . . . . . . . . . . . . . . . . . . . . . . . . 26<br />
≥Selecting groups to play. . . . . . . . . . . . . . . . . . . . . . . . . . . . . . . . . 26<br />
≥Changing the play sequence . . . . . . . . . . . . . . . . . . . . . . . . . . . . . 27<br />
≥A-B Repeat. . . . . . . . . . . . . . . . . . . . . . . . . . . . . . . . . . . . . . . . . . . 28<br />
≥Repeat play . . . . . . . . . . . . . . . . . . . . . . . . . . . . . . . . . . . . . . . . . . 28<br />
≥Marker . . . . . . . . . . . . . . . . . . . . . . . . . . . . . . . . . . . . . . . . . . . . . . 29<br />
Increasing your enjoyment of movies . . . . . . . . . . . . . . . . . . . . . 29<br />
≥Advanced Surround . . . . . . . . . . . . . . . . . . . . . . . . . . . . . . . . . . . . 29<br />
≥Changing soundtracks, subtitle languages and angles . . . . . . . . . 30<br />
Changing the monitor settings . . . . . . . . . . . . . . . . . . . . . . . . . . . 31<br />
≥Changing the size of the picture. . . . . . . . . . . . . . . . . . . . . . . . . . . 31<br />
≥Picture quality. . . . . . . . . . . . . . . . . . . . . . . . . . . . . . . . . . . . . . . . . 31<br />
Using On-Screen Menu Icons . . . . . . . . . . . . . . . . . . . . . . . . . . . . 32<br />
≥Common procedures . . . . . . . . . . . . . . . . . . . . . . . . . . . . . . . . . . . 32<br />
≥Progress indicator . . . . . . . . . . . . . . . . . . . . . . . . . . . . . . . . . . . . . 32<br />
≥Disc information . . . . . . . . . . . . . . . . . . . . . . . . . . . . . . . . . . . . . . . 33<br />
≥Unit information . . . . . . . . . . . . . . . . . . . . . . . . . . . . . . . . . . . . . . . 34<br />
Using this unit with other equipment . . . . . . . . . . . . . . . . . . . . . . 35<br />
≥Enjoying more powerful sound. . . . . . . . . . . . . . . . . . . . . . . . . . . . 35<br />
≥Using this unit with a television . . . . . . . . . . . . . . . . . . . . . . . . . . . 36<br />
≥Watching video from a video camera. . . . . . . . . . . . . . . . . . . . . . . 37<br />
≥Recording to digital recording equipment or cassette tapes . . . . . 38<br />
Changing settings . . . . . . . . . . . . . . . . . . . . . . . . . . . . . . . . . . . . . 38<br />
≥Common procedures . . . . . . . . . . . . . . . . . . . . . . . . . . . . . . . . . . . 38<br />
≥Language code list. . . . . . . . . . . . . . . . . . . . . . . . . . . . . . . . . . . . . 42<br />
Maintenance . . . . . . . . . . . . . . . . . . . . . . . . . . . . . . . . . . . . . . . . . . 42<br />
Troubleshooting Guide . . . . . . . . . . . . . . . . . . . . . . . . . . . . . . . . . 43<br />
Glossary . . . . . . . . . . . . . . . . . . . . . . . . . . . . . . . . . . . . . . . . . . . . . 46<br />
Product Service . . . . . . . . . . . . . . . . . . . . . . . . . . . . . . . . . . . . . . . 46<br />
Specifications . . . . . . . . . . . . . . . . . . . . . . . . . . . . . . . . . . . . . . . . . 47<br />
Limited Warranty (ONLY FOR U.S.A.). . . . . . . . . . . . . . . . . . . . . . 48<br />
Getting Started<br />
RQT6912<br />
5
Getting Started<br />
RQT6912<br />
6<br />
IMPORTANT SAFETY INSTRUCTIONS<br />
Read these operating instructions carefully before using the unit. Follow the safety instructions on<br />
the unit and the applicable safety instructions listed below. Keep these operating instructions handy<br />
for future reference.<br />
1) Read these instructions.<br />
2) Keep these instructions.<br />
3) Heed all warnings.<br />
4) Follow all instructions.<br />
5) Do not use this apparatus near water.<br />
6) Clean only with dry cloth.<br />
7) Do not block any ventilation openings.<br />
Install in accordance with the<br />
manufacturer’s instructions.<br />
8) Do not install near any heat sources such as<br />
radiators, heat registers, stoves, or other<br />
apparatus (including amplifiers) that<br />
produce heat.<br />
9) Do not defeat the safety purpose of the<br />
polarized or grounding-type plug. A<br />
polarized plug has two blades with one<br />
wider than the other. A grounding-type plug<br />
has two blades and a third grounding prong.<br />
The wide blade or the third prong are<br />
provided for your safety. If the provided plug<br />
does not fit into your outlet, consult an<br />
electrician for replacement of the obsolete<br />
outlet.<br />
10) Protect the power cord from being walked<br />
on or pinched particularly at plugs,<br />
convenience receptacles, and the point<br />
where they exit from the apparatus.<br />
11) Only use attachments/accessories specified<br />
by the manufacturer.<br />
12) Use only with the cart,<br />
stand, tripod, bracket, or<br />
table specified by the<br />
manufacturer, or sold with<br />
the apparatus. When a cart<br />
is used, use caution when moving the<br />
cart/apparatus combination to avoid injury<br />
from tip-over.<br />
13) Unplug this apparatus during lightning<br />
storms or when unused for long periods of<br />
time.<br />
14) Refer all servicing to qualified service<br />
personnel. Servicing is required when the<br />
apparatus has been damaged in any way,<br />
such as power-supply cord or plug is<br />
damaged, liquid has been spilled or objects<br />
have fallen into the apparatus, the<br />
apparatus has been exposed to rain or<br />
moisture, does not operate normally, or has<br />
been dropped.<br />
Do not rest the unit on your lap for a long time while using it. The unit can become hot<br />
and cause burns.<br />
To prevent damage<br />
Avoid the following;<br />
≥Spraying flammable insecticides near the unit.<br />
≥Pressing the L<strong>CD</strong>.<br />
≥Touching the lens and other parts of the laser pickup.<br />
Do not use the unit in the following places;<br />
≥Where the temperature is below 5 oC (41 oF) or above 35 oC (95 oF). (Operating the unit<br />
beyond this range can cause the protection circuitry to function and render the unit<br />
inoperable.)<br />
≥Sandy places such as beaches.<br />
≥On top of cushions, sofas, or hot equipment such as amplifiers.
Listening caution<br />
E LE C T R O N I C I N D U S T R I ES<br />
• A S S O C I A T I O N •<br />
EST. 1924<br />
Do not play your headphones or earphones at a high volume. Hearing experts advise against<br />
continuous extended play.<br />
If you experience a ringing in your ears, reduce volume or discontinue use.<br />
Do not use while operating a motorized vehicle. It may create a traffic hazard and is illegal in<br />
many areas.<br />
You should use extreme caution or temporarily discontinue use in potentially hazardous<br />
situations.<br />
Even if your headphones or earphones are the open-air type designed to let you hear<br />
outside sounds, don’t turn up the volume so high that you can’t hear what’s around you.<br />
Sound can be deceiving. Over time your hearing “comfort level” adapts to higher volumes of<br />
sound. So what sounds “normal” can actually be loud and harmful to your hearing.<br />
Guard against this by setting your equipment at a safe level BEFORE your hearing adapts.<br />
To establish a safe level:<br />
≥Start your volume control at a low setting.<br />
≥Slowly increase the sound until you can hear it comfortably and clearly, and without distortion.<br />
Once you have established a comfortable sound level:<br />
≥Leave it there.<br />
The model number and serial number of this<br />
product can be found on either the back or<br />
the bottom of the unit.<br />
Please note them in the space provided<br />
below and keep for future reference.<br />
MODEL NUMBER<br />
SERIAL NUMBER<br />
<strong>DVD</strong>-LX9<br />
Manufactured under license from Dolby<br />
Laboratories.<br />
“Dolby”, “Pro Logic” and the double-D<br />
symbol are trademarks of Dolby<br />
Laboratories.<br />
MPEG Layer-3 audio decoding technology<br />
licensed from Fraunhofer IIS and Thomson<br />
multimedia.<br />
User memo:<br />
DATE OF PURCHASE<br />
DEALER NAME<br />
DEALER ADDRESS<br />
TELEPHONE NUMBER<br />
Manufactured under license from Digital<br />
Theater Systems, Inc. US Pat. No.<br />
5,451,942, 5,956,674, 5,974,380, 5,978,762<br />
and other world-wide patents issued and<br />
pending. “DTS” and “DTS Digital Surround”<br />
are registered trademarks of Digital Theater<br />
Systems, Inc. C 1996, 2000 Digital Theater<br />
Systems, Inc. All rights reserved.<br />
Apparatus Claims of U.S. Patent Nos. 4,631,603, 4,577,216, and 4,819,098, licensed for<br />
limited viewing uses only.<br />
This product incorporates copyright protection technology that is protected by method claims<br />
of certain U.S. patents and other intellectual property rights owned by Macrovision<br />
Corporation and other rights owners. Use of this copyright protection technology must be<br />
authorized by Macrovision Corporation, and is intended for home and other limited viewing<br />
uses only unless otherwise authorized by Macrovision Corporation. Reverse engineering or<br />
disassembly is prohibited.<br />
Getting Started<br />
RQT6912<br />
7
Getting Started<br />
RQT6912<br />
8<br />
Disc and Card information<br />
Discs<br />
∫ Discs that can be played<br />
<strong>DVD</strong>-RAM<br />
[RAM]<br />
<strong>DVD</strong>-Audio<br />
[<strong>DVD</strong>-A]<br />
<strong>DVD</strong>-Video<br />
<strong>DVD</strong>-R<br />
[<strong>DVD</strong>-V]<br />
Use discs with the above logos and that conform to specifications. The unit cannot play other discs<br />
correctly.<br />
Do not use irregularly shaped discs (e.g. heart-shaped), as these can damage the unit.<br />
It may not be possible to play <strong>CD</strong>-R, <strong>CD</strong>-RW, <strong>DVD</strong>-R and <strong>DVD</strong>-RAM in all cases due to the type of<br />
disc or condition of the recording.<br />
∫ Discs that cannot be played<br />
PAL discs (<strong>DVD</strong>-Audio can be played.),<br />
<strong>DVD</strong>-ROM, <strong>CD</strong>-ROM, <strong>CD</strong>V, <strong>CD</strong>-G, iRW,<br />
<strong>DVD</strong>-RW, CVD, SA<strong>CD</strong>, Divx Video Discs, Photo<br />
<strong>CD</strong>, <strong>DVD</strong>-RAM that cannot be removed from<br />
their cartridge, 2.6-GB and 5.2-GB <strong>DVD</strong>-RAM,<br />
and “Chaoji V<strong>CD</strong>” available on the market<br />
including CVD, DV<strong>CD</strong> and SV<strong>CD</strong> that do not<br />
conform to IEC62107.<br />
∫ Built-in decoders<br />
This unit can play discs with these symbols.<br />
∫ Video systems<br />
NTSC is used. This unit converts still picture<br />
parts of PAL system <strong>DVD</strong>-Audio to NTSC for<br />
play on NTSC television. The picture is<br />
compressed to show it in its entirety, but this<br />
may cause it to be stretched vertically.<br />
∫ Playing <strong>DVD</strong>s and Video <strong>CD</strong>s<br />
The producer of these discs can control how<br />
they are played so you may not always be able<br />
to control play as described in these operating<br />
instructions (for example if the play time is not<br />
displayed or if a Video <strong>CD</strong> has menus). Read<br />
the disc’s instructions carefully.<br />
Video <strong>CD</strong><br />
SV<strong>CD</strong><br />
(conforming<br />
to IEC62107)<br />
[V<strong>CD</strong>]<br />
<strong>CD</strong><br />
[<strong>CD</strong>]<br />
<strong>CD</strong>-R/RW<br />
∫ <strong>CD</strong>-R and <strong>CD</strong>-RW discs<br />
This unit can play <strong>CD</strong>-R/RW (audio recording<br />
disc) recorded with <strong>CD</strong>-DA, video <strong>CD</strong>, SV<strong>CD</strong><br />
(conforming to IEC62107), WMA, MP3, or<br />
JPEG. Close the session or finalize after<br />
recording.<br />
See page 24 for more information about<br />
WMA, MP3, and JPEG.<br />
HighMAT discs (➡ page 25)<br />
∫ <strong>DVD</strong>-R discs<br />
Panasonic <strong>DVD</strong>-R recorded and finalized on a<br />
Panasonic <strong>DVD</strong> video recorder or <strong>DVD</strong> video<br />
camera are played as <strong>DVD</strong>-Video on this unit.<br />
∫ <strong>DVD</strong>-RAM discs<br />
The <strong>DVD</strong>-RAM you can play on this unit are<br />
those recorded with <strong>DVD</strong> video recorders, <strong>DVD</strong><br />
video cameras, personal computers, etc. using<br />
Version 1.1 of the Video Recording Format (a<br />
unified video recording standard).<br />
≥Remove discs from their cartridges before use<br />
and return them when you are finished,<br />
making sure that the labels of the disc and<br />
cartridge face the same way.<br />
≥Some parts of the disc, for example where one<br />
program ends and another begins, may not<br />
play smoothly.<br />
—<br />
[WMA] [MP3] [JPEG]
∫ To clean discs<br />
<strong>DVD</strong>-Audio, <strong>DVD</strong>-Video, Video <strong>CD</strong>, <strong>CD</strong><br />
Wipe with a damp cloth and then wipe dry.<br />
<strong>DVD</strong>-RAM, <strong>DVD</strong>-R<br />
≥Clean with an optional <strong>DVD</strong>-RAM/PD disc<br />
cleaner (LF-K200DCA1, where available).<br />
≥Never use cloths or cleaners for <strong>CD</strong>s, etc.<br />
∫ Handling precautions<br />
≥Do not write on the label side with a ball-point<br />
pen or other writing instrument.<br />
≥Do not use record cleaning sprays, benzine,<br />
thinner, static electricity prevention liquids or<br />
any other solvent.<br />
≥Do not attach labels or stickers to discs.<br />
≥Do not use discs with exposed adhesive from<br />
tape or left over peeled off stickers.<br />
≥Do not use scratch-proof protectors or covers.<br />
≥Do not use discs printed with label printers<br />
available on the market.<br />
Cards<br />
∫ Cards that can be played<br />
<strong>SD</strong> Memory Card<br />
<strong>SD</strong><br />
≥Play may not be possible sometimes due to<br />
the condition of the data.<br />
≥Operation is not guaranteed with<br />
MultiMediaCard.<br />
≥Do not eject the card or unplug the AC adaptor<br />
while the unit is using the card. This can<br />
corrupt your data.<br />
∫ Handling precautions<br />
Do not detach the label and do not attach other<br />
labels.<br />
≥<strong>SD</strong> logo is a trademark.<br />
≥Portions of this product are protected<br />
under copyright law and are provided<br />
under license by ARIS/SOLANA/4C.<br />
≥Licensed AAC Patents (U.S. patent<br />
numbers);<br />
08/937,950 5,394,473 5,579,430<br />
5,481,614 5,299,238 5,581,654<br />
5848391 5,583,962 08/678,666<br />
5,592,584 5,299,239 05-183,988<br />
5,291,557 5,274,740 98/03037<br />
5,781,888 5,299,240 5,548,574<br />
5,451,954 5,633,981 97/02875<br />
08/039,478 5,197,087 08/506,729<br />
5 400 433 5 297 236 97/02874<br />
08/211,547 5,490,170 08/576,495<br />
5,222,189 4,914,701 98/03036<br />
5,703,999 5,264,846 5,717,821<br />
5,357,594 5,235,671 5,227,788<br />
08/557,046 5,268,685 08/392,756<br />
5 752 225 07/640,550 5,285,498<br />
08/894,844 5,375,189<br />
Getting Started<br />
RQT6912<br />
9
Getting Started<br />
RQT6912<br />
10<br />
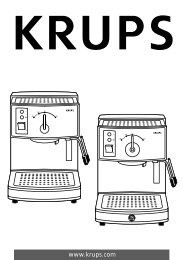
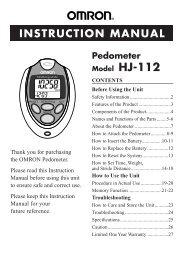
Control reference guide<br />
∫ Main unit<br />
<<br />
=<br />
><br />
A.SURROUND<br />
MONITOR MODE<br />
PICTURE MODE<br />
?<br />
;<br />
OPEN<br />
DC IN 9V Ë<br />
3 4<br />
<strong>DVD</strong>/<strong>SD</strong>/AUX<br />
@<br />
PICTURE MODE<br />
CHG<br />
MONITOR MODE<br />
A.SURROUND<br />
<strong>DVD</strong>/<strong>SD</strong>/AUX<br />
OPEN<br />
2<br />
OFF<br />
TOP MENU DISPLAY VOL<br />
MENU RETURN<br />
ON<br />
ENTER<br />
SEARCH<br />
<strong>SD</strong> CARD : PUSH RELEASE<br />
1<br />
AUDIO<br />
VIDEO OPTOUT<br />
56 7 8 9:<br />
∫ Multi cradle<br />
Left side Right side<br />
DC IN 9V<br />
3<br />
Buttons and terminals such as 3 function the same as the controls on the unit.<br />
1 9-inch wide screen L<strong>CD</strong><br />
2 Stereo speakers<br />
3 DC IN terminal (DC IN) . . . . . . . . . . . . . . 12<br />
4 Headphone jack (Ë). . . . . . . . . . . . . . . . 16<br />
5 Standby indicator (Í) . . . . . . . . . . . . . . 13<br />
6 Charge indicator (CHG) . . . . . . . . . . . . . 13<br />
7 Remote control signal sensor<br />
8 Card slot . . . . . . . . . . . . . . . . . . . . . . . . . 19<br />
9 Video output/input terminal<br />
(VIDEO) . . . . . . . . . . . . . . . . . . . . . . . . . . 36<br />
: Audio output/input, Optical digital<br />
output terminal<br />
(AUDIO, OPT OUT) . . . . . . . . . . . . . . 35, 36<br />
; Disc lid open button (OPEN) . . . . . . . . . 16<br />
< Advanced surround button<br />
(A.SURROUND). . . . . . . . . . . . . . . . . . . . 29<br />
= Monitor mode button<br />
(MONITOR MODE) . . . . . . . . . . . . . . . . . 31<br />
> Picture mode button<br />
(PICTURE MODE) . . . . . . . . . . . . . . . . . . 31<br />
K<br />
RELEASE<br />
A<br />
B<br />
C<br />
SEARCH<br />
RETURN<br />
TOP MENU DISPLAY<br />
MENU RETURN<br />
VOL<br />
OFF ON<br />
H I J<br />
D<br />
E<br />
F<br />
G<br />
? Skip buttons (:, 9) . . . . . . . . . . . . 17<br />
@ Input select button<br />
(<strong>DVD</strong>/<strong>SD</strong>/AUX). . . . . . . . . . . . . . . . . . . . . 16<br />
A Shuttle dial (6 SEARCH 5) . . . . . . 17<br />
B Top menu button<br />
(TOP MENU) . . . . . . . . . . . . . . . . . . . 17, 22<br />
C Menu button (MENU) . . . . . . . . . 17, 22, 38<br />
D Cursor jockey (3, 4, 2, 1)/<br />
Enter button (ENTER) . . . . . . . . . . . . . . 17<br />
Move the cursor jockey in the direction you<br />
want to move the cursor.<br />
You can turn the cursor jockey’s light on and<br />
off (➡ page 31, “BLUE LED”).<br />
E Display button (DISPLAY) . . . . . . . . 13, 32<br />
F Volume buttons (VOL r, s) . . . . . . . . . 16<br />
G Return button (RETURN) . . . . . . . . . . . . 17<br />
H Pause button (;) . . . . . . . . . . . . . . . . . . 17<br />
I Stop/Off button (∫, – OFF) . . . . . . . . . . 17<br />
J Play/On button (1, ON) . . . . . . . . . . . . . 16<br />
K Release lever (2 RELEASE) . . . . . . . . . 12
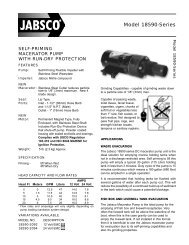
∫ Remote control<br />
L<br />
M<br />
N<br />
B<br />
E<br />
C<br />
G<br />
<<br />
O<br />
P<br />
A<br />
Q<br />
R<br />
Í<br />
∫ ; 1<br />
TOP MENU DISPLAY<br />
MENU RETURN<br />
1 2 3<br />
4 5 6<br />
7 8 9 0<br />
6 5<br />
SETUP PLAY MODE <strong>DVD</strong>/<strong>SD</strong>/AUX<br />
A.SURROUND AUDIO ANGLE<br />
: 9<br />
GROUP PAGE VOLUME<br />
s<br />
SUB<br />
-TITLE<br />
CANCEL<br />
S10<br />
r<br />
S<br />
@<br />
T<br />
H<br />
D<br />
U<br />
V<br />
W<br />
?<br />
F<br />
L Setup button (SETUP) . . . . . . . . . . . . . . 38<br />
M Standby/on switch (Í). . . . . . . . . . . . . . 17<br />
N Stop button (∫). . . . . . . . . . . . . . . . . . . . 17<br />
O Audio button (AUDIO) . . . . . . . . . . . . . . 30<br />
P Numbered buttons (1–9, 0, S10) . . . . . . 17<br />
Q Group button (GROUP) . . . . . . . . . . . . . 26<br />
R Page button (PAGE) . . . . . . . . . . . . . . . . 26<br />
S Play mode button (PLAY MODE) . . . . . 27<br />
T Play button (1). . . . . . . . . . . . . . . . . . . . 16<br />
U Angle button (ANGLE) . . . . . . . . . . . 26, 30<br />
V Subtitle button (SUBTITLE) . . . . . . . . . . 30<br />
W Cancel button (CANCEL) . . . . . . . . . . . . 27<br />
Although it is not labeled [ENTER], the<br />
cursor jockey on the remote control<br />
functions the same as the cursor jockey on<br />
the main unit. Press it to enter selections.<br />
CHG<br />
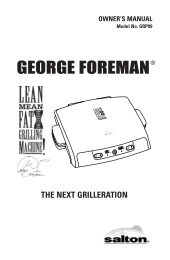
Adjusting the angle<br />
of the L<strong>CD</strong><br />
Change the angle of the L<strong>CD</strong> to suit your<br />
viewing style.<br />
Open the L<strong>CD</strong><br />
CHG<br />
CH<br />
MONITOR MODE<br />
PICTURE MODE<br />
<strong>DVD</strong>/TV/<strong>SD</strong>/AUX<br />
AUDIO /VIDEO<br />
OPEN<br />
A.SURROUND<br />
OFF<br />
ON<br />
MENU RETURN<br />
<strong>DVD</strong>-LX9<br />
PORTABLE <strong>DVD</strong>/<strong>SD</strong>/<strong>CD</strong> PLAYER<br />
<strong>DVD</strong>-RAM VIDEO PLAYBACK<br />
TOP MENU DISPLAY VOL<br />
ENTER<br />
<strong>SD</strong> CARD : PUSH RELEASE<br />
Traditional Viewing<br />
MONITOR MODE<br />
PICTURE MODE<br />
<strong>DVD</strong>/<strong>SD</strong>/AUX<br />
CHG<br />
CHG<br />
A.SURROUND<br />
OPEN <strong>SD</strong> CARD : PUSH RELEASEVIDEO<br />
OFF<br />
ON<br />
MONITOR MODE<br />
PICTURE MODE<br />
<strong>DVD</strong>/<strong>SD</strong>/AUX<br />
MONITOR MODE<br />
PICTURE MODE<br />
<strong>DVD</strong>/<strong>SD</strong>/AUX<br />
AUDIO /VIDEO<br />
OPEN<br />
A.SURROUND<br />
Slide<br />
OFF<br />
MENU RETURN<br />
ON<br />
A.SURROUND<br />
OFF<br />
ON<br />
TOP MENU DISPLAY VOL<br />
MENU RETURN<br />
ENTER<br />
TOP MENU DISPLAY VOL<br />
SEARCH<br />
ENTER<br />
SEARCH<br />
VIDEO<br />
AUDIO<br />
OPT OUT<br />
OPEN <strong>SD</strong> CARD : PUSH RELEASEVIDEO<br />
MENU RETURN<br />
<strong>DVD</strong>-LX9<br />
PORTABLE <strong>DVD</strong>/<strong>SD</strong>/<strong>CD</strong> PLAYER<br />
<strong>DVD</strong>-RAM VIDEO PLAYBACK<br />
TOP MENU DISPLAY VOL<br />
ENTER<br />
<strong>SD</strong> CARD : PUSH RELEASE<br />
AUDIO<br />
OPT OUT<br />
Enhanced Angle Viewing<br />
Compact viewing<br />
SEARCH<br />
SEARCH<br />
VIDEO<br />
AUDIO<br />
OPT OUT<br />
AUDIO<br />
OPT OUT<br />
Note<br />
Close the L<strong>CD</strong> when moving the unit.<br />
Do not carry by the L<strong>CD</strong>.<br />
Click!<br />
Getting Started<br />
RQT6912<br />
11
Getting Started<br />
12<br />
RQT6912<br />
Preparing the multi cradle and power supply<br />
BEFORE USE<br />
Remove the<br />
insulation sheet<br />
PULL<br />
Make sure the built-in battery is attached<br />
whenever you use the unit.<br />
Multi cradle (AC adaptor)<br />
1 Unwind speaker wire,<br />
then fit the wire back<br />
into the groove of the<br />
speaker base.<br />
2 Twist and pull off the vinyl tip.<br />
3 Connect the speakers.<br />
Y<br />
L<br />
R L R L<br />
COMPONENT VIDEO OUT S VIDEO<br />
AUDIO OUT VIDEO<br />
5.1ch<br />
+<br />
(480P/480I)<br />
OUT<br />
2ch (MIX)<br />
OUT<br />
SUB<br />
+<br />
PBPR WOOFER CENTER SORROUND<br />
FRONT<br />
SPEAKER<br />
SPEAKER<br />
HAUT<br />
HAUT<br />
PARLEUR<br />
PARLEUR<br />
4≠<br />
R<br />
4≠<br />
-<br />
-<br />
Push the levers and insert the wires.<br />
Light gray<br />
Dark gray<br />
DC IN 9V<br />
Ë<br />
No line<br />
Black line<br />
Caution<br />
Use the speakers only with<br />
the recommended system.<br />
Failure to do so may lead to<br />
damage to the connected<br />
equipment and/or the<br />
speakers, and may result in<br />
the risk of fire. Consult a<br />
qualified service person if<br />
damage has occurred or if<br />
you experience a sudden<br />
change in performance.<br />
4 Attach to cradle.<br />
(When the unit is off)<br />
Make sure built-in battery<br />
is attached.<br />
DC IN 9V<br />
DC IN<br />
DC IN 9V Ë<br />
DC IN<br />
2<br />
1<br />
Fit so unit<br />
clicks firmly<br />
into place.<br />
Household AC outlet<br />
(AC 120 V, 60 Hz)<br />
When using only the player<br />
Connect the AC adaptor directly to the player’s<br />
DC IN terminal.<br />
The unit is in the standby condition (the [Í]<br />
indicator lights) when the AC power supply<br />
cord is connected. The primary circuit is<br />
always “live” as long as the AC adaptor is<br />
connected to an electrical outlet.<br />
≥To conserve power<br />
When the unit is not going to be used for a long<br />
time, disconnect the AC power supply cord from<br />
the AC outlet.<br />
The unit consumes a small amount of power<br />
(approx. 0.9 W, when in the multi cradle) when<br />
in standby mode.<br />
∫ To detach<br />
(When the unit is off)<br />
<strong>SD</strong> CARD : PUSH RELEASE<br />
RELEASE<br />
VIDEO<br />
AUDIO<br />
OPT OUT<br />
Pull the lever so the unit lifts off the cradle.
Battery pack (Lithium ion battery pack)<br />
≥Charge the battery pack before using it for the<br />
first time.<br />
≥Use together with the optional battery pack<br />
(➡ page 14) for longer play.<br />
≥For replacement (➡ page 4)<br />
∫ To recharge<br />
∫ (When the unit is off)<br />
Attach the unit to the multi cradle (➡ left).<br />
≥You can also connect the AC adaptor directly<br />
to the player to recharge the battery.<br />
[Recharging]<br />
CHG<br />
[CHG] lights<br />
[Í] goes out<br />
Recharging is complete when [CHG] goes<br />
out. ([Í] lights.)<br />
∫ Recharging and play times<br />
Times shown are approximate. Actual times<br />
depend on operating conditions.<br />
Recharging [at 20 oC (68 oF)]: 4 (13) hours<br />
Play (in hours, at room temperature, using<br />
headphones)<br />
<strong>DVD</strong><br />
<strong>SD</strong><br />
L<strong>CD</strong> brightness level<br />
j5<br />
2.5 (7.5)<br />
3 (9)<br />
0 (factory<br />
preset)<br />
2 (6)<br />
2.5 (7.5)<br />
i5<br />
1.5 (4.5) 3.5 (10.5)<br />
2 (6)<br />
L<strong>CD</strong> off<br />
8 (24)<br />
≥Times for when used along with the optional<br />
battery pack are in parentheses.<br />
≥To change the L<strong>CD</strong> brightness (➡ page 31).<br />
∫ To confirm the battery charge<br />
PICTURE MODE<br />
CHG<br />
MONITOR MODE<br />
A.SURROUND<br />
<strong>DVD</strong>/<strong>SD</strong>/AUX<br />
OPEN<br />
When the unit is on and powered by the battery<br />
pack<br />
Press [DISPLAY].<br />
The battery display appears on the L<strong>CD</strong> for a<br />
few seconds to show the approximate remaining<br />
charge.<br />
Full Low Recharge<br />
(Appears automatically when there is f<br />
a few minutes of charge remaining.) ----------}<br />
≥Press [RETURN] to clear the on-screen menu<br />
icons.<br />
∫ If the unit is not to be used for a<br />
long time<br />
≥Detach the battery pack. (Even if the unit is off,<br />
it still uses some power. This can drain the<br />
battery completely and lead to a malfunction.)<br />
≥Recharge the battery pack when you are<br />
ready to use it again.<br />
OFF<br />
RETURN<br />
TOP MENU DISPLAY VOL<br />
MENU RETURN<br />
ON<br />
ENTER<br />
SEARCH<br />
<strong>SD</strong> CARD : PUSH RELEASE<br />
AUDIO<br />
VIDEO OPTOUT<br />
DISPLAY<br />
Getting Started<br />
RQT6912<br />
(Continued on the next page)<br />
13
Getting Started<br />
RQT6912<br />
14<br />
Preparing the multi cradle and power supply<br />
Battery pack (Lithium ion battery pack)<br />
∫ To detach the built-in battery<br />
pack (When the unit is off)<br />
Slide and hold.<br />
Bottom<br />
2<br />
1<br />
∫ To attach (When the unit is off)<br />
1<br />
Bottom<br />
2<br />
Push the battery so<br />
it clicks into place.<br />
∫ To attach the optional battery<br />
pack (When the unit is off)<br />
Use together with built-in battery pack.<br />
This unit (Bottom)<br />
1<br />
2<br />
Slide the pack so it<br />
clicks and locks into place.<br />
Battery pack<br />
Part number CGP-H501<br />
DC IN<br />
≥Connect the AC adaptor directly to the player’s<br />
DC IN terminal to recharge the battery pack.<br />
∫ To detach (When the unit is off)<br />
2<br />
Slide and hold.<br />
1
Car adaptor (optional)<br />
This unit (Left side)<br />
DC IN<br />
DC IN 9V Ë<br />
Ë<br />
Car adaptor<br />
Part number DY-DC95<br />
To the cigarette<br />
lighter socket<br />
Note<br />
≥Read the car adaptor’s operating instructions<br />
carefully.<br />
≥In the interests of the traffic safety, do not<br />
perform operations on the unit or watch video<br />
while driving a vehicle.<br />
≥You can enjoy sound through your car audio<br />
system by connecting a car stereo cassette<br />
adaptor (➡ page 4) to this unit’s headphone<br />
jack.<br />
The remote control<br />
∫ Battery (Lithium battery)<br />
1<br />
2<br />
Replacement: CR2025<br />
∫ Use<br />
7 m<br />
(23 feet)<br />
Remote control<br />
signal sensor<br />
30 ˚<br />
30˚<br />
PICTURE MODE<br />
CHG<br />
MONITOR MODE<br />
A.SURROUND<br />
<strong>DVD</strong>/<strong>SD</strong>/AUX<br />
OPEN<br />
3<br />
Face + upwards.<br />
OFF<br />
TOP MENU DISPLAY VOL<br />
MENU RETURN<br />
ON<br />
Aim at the sensor,<br />
avoiding obstacles, at a<br />
maximum range of 7 m<br />
(23 feet) directly in front<br />
of the unit.<br />
ENTER<br />
SEARCH<br />
<strong>SD</strong> CARD : PUSH RELEASE<br />
AUDIO<br />
VIDEO OPTOUT<br />
Getting Started<br />
RQT6912<br />
15
Basic Operations<br />
RQT6912<br />
16<br />
Playing discs<br />
Headphones<br />
3.5 mm (<br />
Ë<br />
1 ⁄8q)<br />
stereo<br />
PICTURE MODE<br />
CHG<br />
MONITOR MODE<br />
A.SURROUND<br />
[1]<br />
<strong>DVD</strong>/<strong>SD</strong>/AUX<br />
Í<br />
OPEN<br />
82 17<br />
<strong>DVD</strong>/<strong>SD</strong>/AUX<br />
6 5<br />
Í<br />
∫ ∫ ; 1 1<br />
TOP MENU DISPLAY<br />
CANCEL<br />
1 2 3<br />
4 5 6 S10<br />
7 8 9 0<br />
6 5<br />
SETUP PLAY MODE <strong>DVD</strong>/<strong>SD</strong>/AUX<br />
MENU RETURN<br />
A.SURROUND AUDIO ANGLE<br />
;<br />
∫, -OFF<br />
: 9<br />
GROUP PAGE VOLUME<br />
s r<br />
TOP MENU<br />
MENU<br />
RETURN<br />
6 5<br />
OFF<br />
SUB<br />
-TITLE<br />
TOP MENU DISPLAY VOL<br />
MENU RETURN<br />
ON<br />
ENTER<br />
[2] [3]<br />
SEARCH<br />
<strong>SD</strong> CARD : PUSH RELEASE<br />
AUDIO<br />
VIDEO OPTOUT<br />
3421<br />
ENTER<br />
Numbered<br />
buttons<br />
Note<br />
≥If “$” appears on the L<strong>CD</strong><br />
≥The operation is prohibited by the unit or disc.<br />
≥Discs continue to rotate while menus are<br />
displayed even after playing an item. Press [∫]<br />
when you finish to preserve the unit’s motor.<br />
[RAM] [<strong>DVD</strong>-A] [<strong>DVD</strong>-V] [V<strong>CD</strong>] [<strong>CD</strong>] [WMA] [MP3] [JPEG]<br />
Preparations<br />
≥Open the L<strong>CD</strong> (➡ page 11).<br />
≥[RAM] Remove discs from their cartridges.<br />
The menu language is set to English, but<br />
you can change it to French or Spanish<br />
(➡ page 40, Display—Menu Language).<br />
English is used in the examples.<br />
[1] Press [OPEN] to open the disc<br />
lid and insert a disc.<br />
Label up.<br />
(With double-sided discs,<br />
load so the label for the side<br />
you want to play is facing up.)<br />
DC IN 9V<br />
A.SURROUND<br />
MONITOR MODE<br />
PICTURE MODE<br />
OPEN<br />
<strong>DVD</strong>-LX9<br />
PORTABLE <strong>DVD</strong>/<strong>SD</strong>/<strong>CD</strong> PLAYER<br />
<strong>DVD</strong>-RAM VIDEO PLAYBACK<br />
CHG<br />
<strong>DVD</strong>/<strong>SD</strong>/AUX<br />
AUDIO/VIDEO<br />
SEARCH<br />
ENTER<br />
TOP MENU DISPLAY VOL<br />
MENU RETURN<br />
OFF<br />
ON<br />
Clicks<br />
Close the disc lid by hand.<br />
[2] Press and hold [1, ON] to<br />
start play.<br />
The unit comes on automatically.<br />
≥When a source other than <strong>DVD</strong> is<br />
selected<br />
≥Press [<strong>DVD</strong>/<strong>SD</strong>/AUX] to select “<strong>DVD</strong>”<br />
and press [1] (Play).<br />
≥If the disc contains both audio data<br />
(WMA and MP3) and JPEG<br />
≥Check “Mixed Disc-Audio&Stills” setting<br />
in the SETUP menu (➡ page 42). Select<br />
“Stills (JPEG)” or “Audio (MP3/WMA)”,<br />
then open and close the lid so the unit<br />
reads the disc again.<br />
≥[<strong>CD</strong>] [WMA] [MP3] [JPEG]<br />
≥On-screen menu icons (➡ page 32) and<br />
disc information [[WMA] [MP3] [<strong>CD</strong>]<br />
(<strong>CD</strong> text only)] appear on the display.<br />
[3] Adjust the volume.<br />
Using headphones<br />
Turn down the volume before connection,<br />
and then adjust the level.<br />
≥Play may not be possible when you hold the<br />
unit at different angles.
Stop<br />
Pause<br />
Skip<br />
Search<br />
Slowmotion<br />
Frameby-frame<br />
Menus<br />
Press [∫].<br />
“!” flashes on the display. Press [1] (Play) to restart from this position or [∫] to<br />
clear it.<br />
<strong>DVD</strong>-Video: Press [1] (Play) again to review chapters (➡ below).<br />
Press [;].<br />
Press [1] (Play) to restart.<br />
Press [:] (backward) or [9] (forward).<br />
Group skip [JPEG]<br />
Use [4] (backward) or [3] (forward).<br />
OMain unitN Turn the shuttle dial.<br />
OMain unitN Release the shuttle dial to restart play.<br />
ORemote controlN Press [6] (backward) or [5] (forward).<br />
ORemote controlN Press [1] (Play) to restart play.<br />
You can turn off the sound during search (➡ page 40, Audio—Audio during Search).<br />
While paused<br />
OMain unitN Turn the shuttle dial.<br />
ORemote controlN Press [6] (backward) or [5] (forward).<br />
≥Press [1] (Play) to restart play.<br />
While paused, use [2] (backward) or [1] (forward).<br />
Move and hold to change in succession.<br />
Or, press [;] repeatedly for forward frame-by-frame.<br />
Use [3, 4, 2, 1] to select an item and [ENTER] to confirm.<br />
Or, press the numbered buttons.<br />
To return to the menu<br />
[<strong>DVD</strong>-A] Press [TOP MENU].<br />
[<strong>DVD</strong>-V] Press [TOP MENU] or [MENU].<br />
[V<strong>CD</strong>] Press [RETURN].<br />
Notes<br />
≥The speed of search and slow-motion increases up to 5 steps.<br />
≥Slow-motion and frame-by-frame only work on moving pictures.<br />
When playing Video <strong>CD</strong>s<br />
≥You cannot move backwards during frame-by-frame and slow-motion.<br />
≥Turning the shuttle dial or pressing buttons to perform skip, search or slow-motion may take<br />
you to a menu screen.<br />
Chapter Preview [<strong>DVD</strong>-V]<br />
The following message appears immediately<br />
after you press [1] (Play).<br />
Press PLAY to Preview Chapters<br />
Press [1] (Play) while the message is displayed<br />
and the beginning portions of each chapter up<br />
to the current one are played. Full play resumes<br />
from the point where you stopped play.<br />
(This feature works only within a title.)<br />
If you do not press [1] (Play), the message<br />
disappears and play starts from where you<br />
stopped it.<br />
To turn the unit off<br />
Press and hold [∫, – OFF] until “OFF” appears<br />
on the L<strong>CD</strong>.<br />
Turning the unit on and off with the remote<br />
control<br />
Press [Í].<br />
≥You cannot use the remote control to turn the<br />
unit on when powered by the battery pack.<br />
Auto standby function<br />
The unit automatically turns off after being<br />
stopped for 15 minutes (5 minutes when the<br />
battery pack is being used).<br />
Basic Operations<br />
RQT6912<br />
17
Basic Operations<br />
RQT6912<br />
18<br />
Playing <strong>SD</strong> cards <strong>SD</strong><br />
You can play the following types of data recorded on an <strong>SD</strong> Memory Card:<br />
Still pictures [PICTURE]<br />
JPEG files taken on digital cameras conforming to DCF<br />
standards (set down by the Japan Electronics and<br />
Information Technology Industries Association).<br />
Moving pictures [MPEG4]<br />
MPEG4 files (ASF format) taken on a digital video camera<br />
or <strong>SD</strong> Multi AV Device.<br />
Music [MUSIC]<br />
MP3 and AAC audio files recorded with “Panasonic Media<br />
Manager” or “<strong>SD</strong>-Jukebox”, software included with<br />
Panasonic <strong>SD</strong> Multi AV Device and <strong>SD</strong> Audio <strong>Player</strong>.<br />
Voice [VOICE]<br />
G.726 files recorded on a digital video camera or<br />
<strong>SD</strong> Multi AV Device.<br />
Some files are not compatible with this unit and cannot be played back. For example:<br />
–Moving picture files recorded using a digital still camera with moving picture function<br />
–IC recorder voice files etc<br />
LOCK<br />
<strong>SD</strong> Memory Card
Basic Operations<br />
RQT6912<br />
22<br />
PICTURE MODE<br />
CHG<br />
Playing the programs or play lists on <strong>DVD</strong>-RAM [RAM]<br />
MONITOR MODE<br />
A.SURROUND<br />
<strong>DVD</strong>/<strong>SD</strong>/AUX<br />
OPEN<br />
Selecting programs to play<br />
—DIRECT NAVIGATOR<br />
1 Press [TOP MENU].<br />
DIRECT NAVIGATOR<br />
No<br />
1<br />
2<br />
3<br />
4<br />
5<br />
Date CH On Program Title Contents<br />
12/23(SAT) 10 21:02 Saturday feature<br />
12/26(TUE) 4 14:35 Auto action<br />
1/12(FRI) 2 20:00 Sunday Cinema<br />
1/24(WED) 5 19:30 Music<br />
2/20(TUE) 12 19:05 Baseball<br />
0 9 SELECT<br />
SELECT<br />
NUMBER ENTER RETURN<br />
OFF<br />
TOP MENU DISPLAY VOL<br />
MENU RETURN<br />
TOP MENU<br />
MENU<br />
RETURN<br />
2 Use [3, 4] to select the<br />
program.<br />
The selected program plays in the<br />
background.<br />
3 Press [ENTER].<br />
Playing a play list<br />
ON<br />
ENTER<br />
SEARCH<br />
<strong>SD</strong> CARD : PUSH RELEASE<br />
AUDIO<br />
VIDEO OPTOUT<br />
3421<br />
ENTER<br />
You can play a group of scenes, a play list,<br />
created on other equipment such as a <strong>DVD</strong><br />
video recorder.<br />
1 Press [MENU].<br />
PLAYLIST<br />
0 9<br />
SELECT<br />
NUMBER<br />
SELECT<br />
ENTER RETURN<br />
1 2 3<br />
4<br />
5<br />
6<br />
No Date Length Title Contents<br />
1 10/17 0:46:35<br />
2 10/24 0:09:15<br />
3 11/29 0:12:32<br />
4 12/22 0:07:30<br />
2 Use [3, 4] to select the play<br />
list.<br />
3 Press [ENTER].<br />
Playing specific scenes<br />
1. Select the play list and move the cursor<br />
jockey [1].<br />
2. Use [3, 4] to select “Scene List” and press<br />
[ENTER].<br />
PLAYLIST 1 10/17 0:46:35 028<br />
0 9<br />
SELECT<br />
NUMBER<br />
SELECT<br />
ENTER RETURN<br />
1 0:00:19 2 3<br />
4<br />
7<br />
Prev 001/004<br />
Next<br />
Page/Total pages<br />
3. Use [3, 4, 2, 1] to select a scene and<br />
press [ENTER].<br />
3. ≥If there are more than 9 scenes, use [3,<br />
4, 2, 1] to select “Next” and press<br />
[ENTER]. Select “Prev” to move back.<br />
≥You can also select items with the remote<br />
control’s numbered buttons.<br />
≥Select an item to start play<br />
≥Programs and play lists: Press the numbered<br />
buttons.<br />
≥To select a two-digit number:<br />
≥ e.g. “25”: [S10]>[2]>[5]<br />
≥Scene list pages: Press the numbered buttons<br />
then press [ENTER].<br />
≥ e.g. “25”: [2]>[5]>[ENTER]<br />
To display information about a program or<br />
play list<br />
1. Select the program or play list and move the<br />
cursor jockey [1].<br />
2. (For play lists) Use [3, 4] to select<br />
“Contents” and press [ENTER].<br />
Use [2, 1] to show other programs or play<br />
lists.<br />
To clear the list<br />
DIRECT NAVIGATOR: Press [TOP MENU].<br />
Play list: Press [MENU].<br />
(The unit returns to the condition it was in before<br />
you called up the list.)<br />
To return to the previous screen<br />
Press [RETURN].<br />
Note<br />
≥Titles appear only if you have entered them.<br />
≥You cannot change titles.<br />
5<br />
8<br />
6<br />
9
PICTURE MODE<br />
CHG<br />
WMA/MP3, <strong>CD</strong> text and JPEG navigation menus<br />
MONITOR MODE<br />
A.SURROUND<br />
<strong>DVD</strong>/<strong>SD</strong>/AUX<br />
OPEN<br />
: 9<br />
JPEG ALBUM Group: 001 Penguins Picture: filename00..<br />
G 1<br />
P 1<br />
Total 1<br />
1 2 3<br />
0 9<br />
SELECT<br />
NUMBER<br />
SELECT<br />
ENTER RETURN<br />
4<br />
7<br />
5<br />
8<br />
Prev Tree<br />
OFF<br />
MENU RETURN<br />
6<br />
9<br />
TOP MENU DISPLAY VOL<br />
TOP MENU RETURN<br />
ON<br />
Next<br />
ENTER<br />
SEARCH<br />
<strong>SD</strong> CARD : PUSH RELEASE<br />
AUDIO<br />
VIDEO OPTOUT<br />
3421<br />
ENTER<br />
[WMA] [MP3] [<strong>CD</strong>] (<strong>CD</strong> text only) [JPEG]<br />
If the disc contains both audio data (WMA<br />
and MP3) and JPEG<br />
Check “Mixed Disc-Audio&Stills” setting in the<br />
SETUP menu (➡ page 42). Select “Stills<br />
(JPEG)” or “Audio (MP3/WMA)”, then open and<br />
close the lid so the unit reads the disc again.<br />
1 Press [TOP MENU].<br />
WMA/MP3 Audio navigation menu<br />
MENU<br />
G 1<br />
T 1<br />
Total 1<br />
0 9<br />
SELECT<br />
NUMBER<br />
SELECT<br />
ENTER RETURN<br />
JPEG Album display<br />
2 Use [3, 4] to select the track<br />
or [3, 4, 2, 1] to select the<br />
picture, and press [ENTER].<br />
To show other pages, use [3, 4, 2, 1]<br />
to select “Prev” or “Next” and press<br />
[ENTER].<br />
≥“0” indicates the track currently playing.<br />
To exit the menu<br />
Press [TOP MENU].<br />
No Group: 001 My Favorite Tree<br />
1<br />
2<br />
3<br />
4<br />
5<br />
6<br />
7<br />
8<br />
9<br />
10<br />
Prev<br />
001 Both Ends Freezing<br />
002 Lady Starfish<br />
003 Life on Jupiter<br />
004 Metal Glue<br />
005 Paint It Yellow<br />
006 Pyjamamama<br />
007 Shrimps from Mars<br />
008 Starperson<br />
009 Velvet Cuppermine<br />
010 Ziggy Starfish<br />
Find Next<br />
Track title search<br />
[WMA] [MP3] [<strong>CD</strong>] (<strong>CD</strong> text only)<br />
Example: finding a track including the word<br />
“LOVE”.<br />
1 While the menu is displayed<br />
Use [3, 4] to select “Find”<br />
and press [ENTER].<br />
0 9<br />
SELECT<br />
NUMBER<br />
SELECT<br />
ENTER RETURN<br />
6<br />
7<br />
8<br />
9<br />
10<br />
Prev<br />
Another Pineapple<br />
Board The Golden Ship<br />
Fall In The Frozen<br />
Violet Sky<br />
Pink Island<br />
A Find Find Next<br />
2 Use [3, 4] to select “L” and<br />
press [ENTER].<br />
Only uppercase appear but the search<br />
also includes lower case. Characters<br />
change in alphanumeric order each time<br />
you press [3].<br />
≥Press [:, 9] to skip between A, E,<br />
I, O and U.<br />
≥Use [2] to erase a character.<br />
≥You can enter numbers with the<br />
numbered buttons.<br />
Repeat this step to enter “O”, “V”, and “E”.<br />
3 Use [1] to select “Find” and<br />
press [ENTER].<br />
The search results screen appears.<br />
4 Use [3, 4] to select the track<br />
and press [ENTER].<br />
≥You can erase the asterisk (¢) to search for<br />
the first word in a title.<br />
To return to the menu<br />
Press [RETURN].<br />
Basic Operations<br />
RQT6912<br />
23
Basic Operations<br />
RQT6912<br />
24<br />
PICTURE MODE<br />
CHG<br />
WMA/MP3, <strong>CD</strong> text and JPEG navigation menus<br />
MONITOR MODE<br />
A.SURROUND<br />
<strong>DVD</strong>/<strong>SD</strong>/AUX<br />
OPEN<br />
OFF<br />
TOP MENU DISPLAY VOL<br />
MENU RETURN<br />
TOP MENU 3421<br />
MENU ENTER<br />
RETURN<br />
DISPLAY<br />
ON<br />
ENTER<br />
SEARCH<br />
<strong>SD</strong> CARD : PUSH RELEASE<br />
AUDIO<br />
VIDEO OPTOUT<br />
To use the contents screen<br />
to find a track [<strong>CD</strong>] (<strong>CD</strong> text only)<br />
You can use the text information recorded on<br />
these discs to find a track to play.<br />
1 While the menu is displayed<br />
Use [1] while a track is<br />
highlighted to display the<br />
contents screen.<br />
MENU<br />
T 10 /14<br />
SELECT<br />
ENTER RETURN<br />
Contents<br />
Disc Title/Artist<br />
SHIPWRECKED<br />
ORIGINAL SOUNDTRACK<br />
Track 10 Title/Artist<br />
Pink Island<br />
Long John Platinum<br />
2 Use [2, 1] to move through<br />
the tracks and press [ENTER].<br />
To use the tree screen to find<br />
a group [WMA] [MP3] [JPEG]<br />
1 While the menu is displayed<br />
[WMA] [MP3]<br />
Use [1] while a track is<br />
highlighted to display a tree<br />
screen.<br />
[JPEG]<br />
Use [3, 4, 2, 1] to select<br />
“Tree” and press [ENTER].<br />
MENU<br />
G 8<br />
T 14<br />
Total 123<br />
0 9<br />
SELECT<br />
NUMBER<br />
SELECT<br />
ENTER RETURN<br />
Tree<br />
MP3 music<br />
001 My favorite<br />
001 Brazilian pops<br />
002 Chinese pops<br />
003 Czech pops<br />
004 Hungarian pops<br />
005 Liner notes<br />
006 Japanese pops<br />
007 Mexican pops<br />
008 Philippine pops<br />
009 Swedish pops<br />
001 Momoko<br />
002 Standard number<br />
001 Piano solo<br />
002 Vocal<br />
G 8/16<br />
You cannot select groups that<br />
contain no compatible files.<br />
2 Use [3, 4] to select a group<br />
and press [ENTER].<br />
The audio navigation menu/album display<br />
for the group appears.<br />
To return to the menu<br />
Press [RETURN].<br />
Note<br />
[WMA]<br />
≥You cannot play WMA files that are copy<br />
protected.<br />
≥WMA files must have the extension “.WMA” or<br />
“.wma”.<br />
[MP3]<br />
≥This unit is not compatible with ID3 tags.<br />
≥If you play an MP3 track that includes still<br />
picture data, it will take some time before the<br />
music itself starts playing and the elapsed time<br />
will not be displayed during this time. Even<br />
after the track starts, the correct play time will<br />
not be displayed.<br />
≥MP3 files must have the extension “.MP3” or<br />
“.mp3”.<br />
[JPEG]<br />
≥To view JPEG files on this unit:<br />
≥– Take them on a digital camera that meets<br />
the DCF (Design rule for Camera File<br />
system) standard. Some digital cameras<br />
have functions that are not supported by the<br />
DCF standard like automatic picture rotation<br />
which may render a picture un-viewable.<br />
≥– Do not alter the files in any way or save<br />
them under a different name.<br />
≥– Ensure they have the extension “.JPG”,<br />
“.jpg”, “.JPEG”, or “.jpeg”.<br />
≥This unit cannot display moving pictures,<br />
MOTION JPEG and other such formats, still<br />
pictures other than JPEG (e.g. TIFF) or play<br />
associated sound.<br />
[WMA] [MP3] [JPEG]<br />
≥Discs must conform to ISO9660 level 1 or 2<br />
(except for extended formats).<br />
≥This unit is compatible with multi-session but if<br />
there are a lot of sessions it takes more time<br />
for play to start. Keep the number of sessions<br />
to a minimum to avoid this.
Naming folders and files<br />
At the time of<br />
recording, prefix<br />
e.g. MP3<br />
folder and file root 001 group<br />
names with 3-digit<br />
001<br />
numbers in the<br />
order you want to<br />
play them (this may<br />
not work at times).<br />
001 track.mp3<br />
002 track.mp3<br />
003 track.mp3<br />
002 group<br />
003 group<br />
001 track.mp3<br />
002 track.mp3<br />
003 track.mp3<br />
Windows Media, and the Windows logo are<br />
trademarks, or registered trademarks of<br />
Microsoft Corporation in the United States<br />
and/or other countries.<br />
WMA is a compression format developed by<br />
Microsoft Corporation. It achieves the same<br />
sound quality as MP3 with a file size that is<br />
smaller than that of MP3.<br />
Playing HighMAT discs<br />
001 track.mp3<br />
002 track.mp3<br />
003 track.mp3<br />
004 track.mp3<br />
HighMAT (High performance Media Access<br />
Technology) is a new standard for storing audio,<br />
image, and video data files on <strong>CD</strong> media. When<br />
you create a HighMAT <strong>CD</strong> using compliant PC<br />
software, you can make playlist settings and<br />
also record text information such as titles and<br />
artist names. File searching is made easy using<br />
<strong>CD</strong>s recorded in HighMAT through use of a<br />
versatile navigation system. <strong>CD</strong>s recorded in<br />
HighMAT can also be played on your PC.<br />
This unit is compatible with HighMAT discs<br />
containing WMA, MP3, or JPEG data. There are<br />
some differences from other WMA/MP3/JPEG<br />
discs.<br />
A menu appears after you insert the disc.<br />
Press [3, 4, 2, 1] to select then<br />
press [ENTER].<br />
When you press [ENTER]:<br />
Menu: Takes you to the next menu<br />
which shows play lists or<br />
another menu<br />
Play list: Play starts<br />
≥To return to the menu screen<br />
≥Press [TOP MENU].<br />
≥To return to the menu above the current<br />
one<br />
≥Press [RETURN].<br />
≥To change the menu background<br />
≥Press [DISPLAY].<br />
≥The background changes to the one recorded<br />
on the disc.<br />
∫ Selecting from the lists<br />
1 While playing<br />
Press [MENU].<br />
Playing<br />
Playlist<br />
Group<br />
Content<br />
0 9<br />
SELECT<br />
All By Artist<br />
No Content title<br />
1<br />
2<br />
3<br />
4<br />
5<br />
Group 1<br />
Few times in summer<br />
Less and less<br />
And when I was born<br />
Quatre gymnopedies<br />
You've made me sad<br />
2 Use [2] then [3, 4] to switch<br />
between the play list, group<br />
and content lists.<br />
3 Use [1] then [3, 4] to select<br />
an item and press [ENTER].<br />
≥To exit the list screen<br />
≥Press [MENU].<br />
Note<br />
Disable HighMAT disc play to use random and<br />
program play.<br />
To use program/random play<br />
1. In the SETUP menu, set “HighMAT” to<br />
“Disable” (➡ page 42).<br />
2. Reinsert the disc and perform the necessary<br />
operations (➡ page 27).<br />
HighMAT and the HighMAT<br />
logo are either trademarks or<br />
registered trademarks of<br />
Microsoft Corporation in the<br />
United States and/or other<br />
countries.<br />
Basic Operations<br />
RQT6912<br />
25
Basic Operations<br />
[<strong>DVD</strong>-A]<br />
During play<br />
Press [PAGE].<br />
The page changes each time you press the<br />
button.<br />
26<br />
RQT6912<br />
6 5<br />
GROUP<br />
PAGE<br />
Convenient features<br />
Í<br />
∫ ; 1<br />
TOP MENU DISPLAY<br />
CANCEL<br />
1 2 3<br />
4 5 6 S10<br />
7 8 9 0<br />
6 5<br />
SETUP PLAY MODE <strong>DVD</strong>/<strong>SD</strong>/AUX<br />
MENU RETURN<br />
A.SURROUND AUDIO ANGLE<br />
: 9<br />
GROUP PAGE VOLUME<br />
s r<br />
SUB<br />
-TITLE<br />
Starting play from a<br />
selected program, title,<br />
track or picture<br />
[RAM] [<strong>DVD</strong>-A] [<strong>DVD</strong>-V] [V<strong>CD</strong>] [<strong>CD</strong>] [WMA] [MP3] [JPEG]<br />
Remote control only<br />
Press the numbered buttons to<br />
select the item ([WMA] [MP3] [JPEG] and<br />
press [ENTER]).<br />
Play starts from the selected item.<br />
To select a 2-digit number<br />
e.g. 25: [S10]>[2]>[5]<br />
e.g. 25: [WMA] [MP3] [JPEG]<br />
e.g. 25: [2]>[5]>[ENTER]<br />
If the on-screen menu icons are on the L<strong>CD</strong><br />
(➡ page 32)<br />
≥This works only when stopped with some<br />
discs.<br />
≥When playing <strong>DVD</strong>-Audio and you want to<br />
start play from a track in a different group,<br />
select the group first (➡ right).<br />
Selecting still pictures—<br />
Page Skip<br />
PLAY MODE<br />
1<br />
3421<br />
ENTER<br />
ANGLE<br />
CANCEL<br />
Numbered<br />
buttons<br />
Rotating pictures<br />
[JPEG]<br />
Remote control only<br />
While a picture is displayed<br />
1 Press [ANGLE].<br />
2 Use [3, 4] to select “Rotate<br />
right” or “Rotate left” and<br />
press [ENTER].<br />
The picture rotates ninety degrees each<br />
time you do this.<br />
≥The rotation is canceled when you open the<br />
disc lid, select another source, or switch the<br />
unit to standby.<br />
To clear the popup screen<br />
Press [ANGLE].<br />
Selecting groups to play<br />
[<strong>DVD</strong>-A] [WMA] [MP3] [JPEG]<br />
1 Press [GROUP].<br />
e.g. MP3<br />
1 1 1 18<br />
Group No. Track No. in disc<br />
Track No.<br />
in group<br />
Total No. of<br />
tracks on disc<br />
2 Use [3, 4] to select the group<br />
number and press [ENTER].<br />
3 Use [3, 4] to select the<br />
track/picture number and<br />
press [ENTER].<br />
≥You can also select the group and<br />
track/picture number with the numbered<br />
buttons.<br />
[<strong>DVD</strong>-A]<br />
≥Playing all the groups in succession<br />
(➡ page 27, All group play)<br />
≥Playing bonus groups<br />
Some discs contain bonus groups. If a<br />
password screen appears after selecting a<br />
group, enter the password with the numbered<br />
buttons. Refer also to the disc’s jacket.
Changing the play<br />
sequence<br />
[<strong>DVD</strong>-A] [<strong>DVD</strong>-V] [V<strong>CD</strong>] [<strong>CD</strong>] [WMA] [MP3]<br />
Remote control only<br />
While stopped<br />
Press [PLAY MODE].<br />
The display changes each time you press the<br />
button.<br />
[A] All group ([<strong>DVD</strong>-A])_)[B] Program<br />
^=OFF(=[C] Random(}<br />
[A]<br />
All group play<br />
[<strong>DVD</strong>-A]<br />
The unit plays tracks in all the groups on a disc.<br />
Press [1] (Play).<br />
[B]<br />
Program play<br />
You can select up to 32 items to play in the<br />
order you choose.<br />
1 [<strong>DVD</strong>-A] [<strong>DVD</strong>-V] [WMA] [MP3]<br />
Press the numbered buttons<br />
to select a group or a title.<br />
e.g. <strong>DVD</strong>-Video<br />
PROGRAM Choose a title and chapter, then press ENTER.<br />
0 9<br />
SELECT<br />
NUMBER<br />
SELECT<br />
ENTER RETURN<br />
No<br />
1<br />
T C Time<br />
Press PLAY to start<br />
Play<br />
Clear<br />
Clear all<br />
≥[<strong>DVD</strong>-V] Some items cannot be selected.<br />
≥[<strong>DVD</strong>-A] If you select bonus groups, you<br />
will have to enter a 4-digit password.<br />
2 Press the numbered buttons<br />
to select a track or a chapter<br />
([WMA] [MP3] and press [ENTER]).<br />
≥Repeat steps 1 and 2 to program other<br />
items.<br />
≥Times are not displayed when<br />
programming <strong>DVD</strong>-Video and<br />
WMA/MP3.<br />
3 Press [1] (Play).<br />
≥[<strong>DVD</strong>-V] Some items cannot be played<br />
even if you programmed them.<br />
To add, change, or clear items<br />
1 Use [3, 4] to select the program number<br />
(No).<br />
2 Do steps 1 and 2 to add or change items.<br />
Press [CANCEL] to clear an item (or use<br />
[3, 4, 2, 1] to select “Clear” and press<br />
[ENTER]).<br />
≥Press [6] or [5] to change pages.<br />
To clear the whole program<br />
Move to “Clear all” with [3, 4, 2, 1] and press<br />
[ENTER]. The whole program is also cleared<br />
when you open the disc lid, select another<br />
source, or switch the unit to standby.<br />
To select an item using the cursor jockey<br />
Press [ENTER] and [3, 4] to select an item,<br />
then press [ENTER] again to register the<br />
number. All the items on a disc, a title or a<br />
group are selected when you select “ALL”.<br />
[C]<br />
Random play<br />
1 [<strong>DVD</strong>-A] [<strong>DVD</strong>-V]<br />
Press the numbered buttons<br />
to select a group or a title.<br />
e.g. <strong>DVD</strong>-Video<br />
Random Playback<br />
Title 2<br />
Press PLAY to start<br />
[<strong>DVD</strong>-A]<br />
≥You can select more than one group.<br />
≥To enter all groups, select “All” using<br />
[2, 1] and press [ENTER].<br />
≥To deselect a group, press the<br />
numbered buttons corresponding to the<br />
group you want to clear.<br />
≥If you select bonus groups, you will have<br />
to enter a 4-digit password.<br />
2 Press [1] (Play).<br />
≥[<strong>DVD</strong>-V] Some titles cannot be selected.<br />
To exit the all group/program/random mode<br />
Press [PLAY MODE] while stopped until the all group/program/random play screen disappears.<br />
Basic Operations<br />
RQT6912<br />
27
Basic Operations<br />
RQT6912<br />
28<br />
Convenient features<br />
∫<br />
Í<br />
SETUP PLAY MODE <strong>DVD</strong>/<strong>SD</strong>/AUX<br />
∫ ; 1<br />
TOP MENU DISPLAY<br />
MENU RETURN<br />
A.SURROUND AUDIO ANGLE<br />
A-B Repeat<br />
SUB<br />
-TITLE<br />
CANCEL<br />
1 2 3<br />
4 5 6 S10<br />
7 8 9 0<br />
3421<br />
ENTER<br />
CANCEL<br />
Numbered<br />
buttons<br />
[RAM] [<strong>DVD</strong>-A] [<strong>DVD</strong>-V] [V<strong>CD</strong>] [<strong>CD</strong>] [WMA] [MP3]<br />
You can repeat a section between point A and<br />
point B within an item.<br />
During play<br />
1 Do steps 1 to 3 on page 32 to<br />
select “A-B Repeat”.<br />
Play Menu<br />
OFF<br />
A-B Repeat<br />
2 Press [ENTER] to specify start<br />
point A and end point B.<br />
Each time you press the button<br />
[-) Point A specified<br />
l ;<br />
l Point B specified (A-B repeat starts)<br />
l ;<br />
{= Normal play<br />
Note<br />
≥This feature works only within a program/track/<br />
title.<br />
≥The unit automatically determines the end of a<br />
program/track/title as point B when the end of<br />
the program/track/title is reached.<br />
≥Subtitles around point A or B may fail to<br />
appear.<br />
Repeat play<br />
[RAM] [<strong>DVD</strong>-A] [<strong>DVD</strong>-V] [V<strong>CD</strong>] [<strong>CD</strong>] [WMA] [MP3] [JPEG]<br />
During play<br />
Do steps 1 to 4 on page 32 to select the desired<br />
repeat play mode.<br />
Play Menu<br />
OFF<br />
[RAM]<br />
Program (PG)()Entire disc (A)()OFF<br />
^------------------------------------------------------------J<br />
During play list play<br />
Scene (S)()Play list (PL) §1 ()OFF<br />
^--------------------------------------------------------J<br />
[<strong>DVD</strong>-A] [WMA] [MP3]<br />
Track (T)()Group (G) §2 ()OFF<br />
^--------------------------------------------------J<br />
[<strong>DVD</strong>-V]<br />
Chapter (C)()Title (T) §2 Repeat Mode<br />
()OFF<br />
^-------------------------------------------------J<br />
[V<strong>CD</strong>] [<strong>CD</strong>]<br />
Track (T)()Entire disc (A)()OFF<br />
^------------------------------------------------------J<br />
[JPEG]<br />
Group (G)()OFF<br />
§1 “PL” is not displayed while playing a specific<br />
play list scene.<br />
§2 “All (A)” during all group, program and<br />
random play.<br />
≥You can also repeat play of content (“C”) and<br />
group (“G”) on HighMAT discs.<br />
If the Video <strong>CD</strong> has playback control<br />
1. Press [∫].<br />
2. Press the numbered buttons to select a track<br />
to start play (➡ page 26).<br />
3. Select the repeat mode (➡ above).<br />
Note<br />
≥This only works if the disc’s elapsed play time<br />
is shown in the on-screen menu icons<br />
(➡ page 33).<br />
≥You cannot use repeat play to repeat an entire<br />
<strong>DVD</strong>-Video, an entire WMA/MP3/JPEG disc or<br />
all the play lists on a <strong>DVD</strong>-RAM.<br />
∫ To repeat only your favorite<br />
tracks/chapters<br />
[<strong>DVD</strong>-A] [<strong>DVD</strong>-V] [V<strong>CD</strong>] [<strong>CD</strong>] [WMA] [MP3]<br />
Start program play (➡ page 27) and select “A”<br />
(➡ above).
Basic Operations<br />
30<br />
RQT6912<br />
Changing soundtracks,<br />
subtitle languages and angles<br />
Some discs have multiple soundtracks, subtitle<br />
languages and camera angles, and you can<br />
change these during play.<br />
≥“–” or “––” is displayed instead of the language<br />
number in circumstances such as when no<br />
language is recorded on the disc.<br />
[V<strong>CD</strong>] (SV<strong>CD</strong> only)<br />
Soundtrack and subtitle numbers may change even<br />
if corresponding soundtracks are not recorded.<br />
[RAM] [<strong>DVD</strong>-A] [<strong>DVD</strong>-V] [V<strong>CD</strong>]<br />
During play<br />
Press [AUDIO].<br />
[<strong>DVD</strong>-V]<br />
The number changes each time you press the<br />
button.<br />
Digital<br />
1 English 3/2.1 ch<br />
[<strong>DVD</strong>-A]<br />
Increasing your enjoyment of movies<br />
AUDIO<br />
Í<br />
∫ ; 1<br />
TOP MENU DISPLAY<br />
CANCEL<br />
1 2 3<br />
4 5 6 S10<br />
Soundtrack playing<br />
1<br />
1<br />
SETUP PLAY MODE <strong>DVD</strong>/<strong>SD</strong>/AUX<br />
MENU RETURN<br />
A.SURROUND AUDIO ANGLE<br />
Soundtracks<br />
SUB<br />
-TITLE<br />
LPCM<br />
192k24b 2ch<br />
3421<br />
ENTER<br />
SUBTITLE<br />
ANGLE<br />
Sound track selected<br />
[RAM] [V<strong>CD</strong>]<br />
Each time you press the button:<br />
LR>L>R<br />
^-------------}<br />
≥You can also use this button to turn the vocals<br />
on and off on karaoke discs. Read the disc’s<br />
instructions for details.<br />
≥Play restarts from the beginning of the<br />
soundtrack when playing <strong>DVD</strong>-Audio and<br />
<strong>DVD</strong>-RAM soundtracks that are accompanied<br />
by still pictures.<br />
≥Even if a second soundtrack isn’t recorded on<br />
a <strong>DVD</strong>-Audio, two soundtrack numbers will<br />
normally be shown when you press [AUDIO].<br />
The soundtrack currently playing is number 1.<br />
≥Refer to [B] on page 33 for audio signal type<br />
details.<br />
Subtitles<br />
[<strong>DVD</strong>-A] (Moving picture part) [<strong>DVD</strong>-V]<br />
[V<strong>CD</strong>] (SV<strong>CD</strong> only):<br />
You can change the subtitle number and turn<br />
the subtitles on and off.<br />
[RAM]: You can turn the subtitles on and off.<br />
During play<br />
Press [SUBTITLE].<br />
The number changes each time you press the<br />
button.<br />
≥In some cases, the subtitle language is not<br />
changed to the selected one immediately.<br />
≥If the subtitles overlap closed captions<br />
recorded on discs, turn the subtitles off.<br />
To clear/display the subtitles<br />
1. Press [SUBTITLE].<br />
2. Press [1]. ([<strong>DVD</strong>-A] [<strong>DVD</strong>-V] [V<strong>CD</strong>])<br />
3. Press [3, 4] to select “ON” or “OFF”.<br />
∫ Changing the position and<br />
brightness of the subtitles<br />
[<strong>DVD</strong>-A] [<strong>DVD</strong>-V]<br />
1. While the subtitle icon is on the<br />
screen, use [2, 1] to highlight<br />
“Subtitle Position” or “Subtitle 0 0<br />
Brightness”. Subtitle Position<br />
2. Use [3, 4] to adjust. Subtitle Brightness<br />
≥Adjust position between 0 and j60 in 2 unit<br />
steps.<br />
≥For brightness, select “Auto” so the brightness<br />
adjusts automatically against the background,<br />
or a level between 0 and j9.<br />
Angles<br />
1<br />
1<br />
ON<br />
English<br />
[<strong>DVD</strong>-A] [<strong>DVD</strong>-V]<br />
During play<br />
Press [ANGLE].<br />
The number changes each time you press the<br />
button.
Changing the monitor settings<br />
MONITOR MODE<br />
PICTURE MODE<br />
CHG<br />
MONITOR MODE<br />
A.SURROUND<br />
<strong>DVD</strong>/<strong>SD</strong>/AUX<br />
OPEN<br />
PICTURE MODE<br />
Í indicator<br />
Changing the size of the<br />
picture<br />
Select how to show 4:3-aspect pictures on the<br />
L<strong>CD</strong>.<br />
Press [MONITOR MODE].<br />
Each time you press the button:<br />
NORMAL_-)FULL_-)ZOOM_-]<br />
^-OFF (no picture)
Advanced Operations<br />
RQT6912<br />
32<br />
Using On-Screen Menu Icons<br />
PICTURE MODE<br />
CHG<br />
MONITOR MODE<br />
A.SURROUND<br />
<strong>DVD</strong>/<strong>SD</strong>/AUX<br />
OPEN<br />
On-Screen Menu Icons contain information<br />
about the disc or unit. These menus allow you<br />
to perform operations by changing this<br />
information.<br />
Common procedures<br />
1 Press [DISPLAY].<br />
Each time you press the button:<br />
Disc information > Progress indicator<br />
: ;<br />
Original display < Unit information<br />
(➡ step 2)<br />
2 [Unit\information\only]<br />
While the leftmost icon is highlighted<br />
Use [3, 4] to select the menu.<br />
Each time you use the cursor jockey:<br />
Play menu () Picture menu<br />
e e<br />
u u<br />
Display menu () Audio menu<br />
3 Use [2, 1] to select the item.<br />
4 Use [3, 4] to select the<br />
setting.<br />
≥Items with “3” or “4” above and below<br />
can be changed by [3, 4].<br />
≥Press [ENTER] if the setting does not<br />
change after using [3, 4].<br />
≥Some items require different operations.<br />
Read the explanations on the following<br />
pages.<br />
OFF<br />
TOP MENU DISPLAY VOL<br />
MENU RETURN<br />
DISPLAY<br />
RETURN<br />
1<br />
ON<br />
ENTER<br />
SEARCH<br />
<strong>SD</strong> CARD : PUSH RELEASE<br />
AUDIO<br />
VIDEO OPTOUT<br />
3421<br />
ENTER<br />
For your reference<br />
≥Depending on the condition of the unit<br />
(playing, stopped, etc.) and the type of<br />
software, there are some items you cannot<br />
select or change.<br />
≥When numbers are displayed (e.g.title No.),<br />
the numbered buttons (remote control) are<br />
also effective for setting. After entering<br />
numbers, press [ENTER] to register the<br />
setting.<br />
To clear the icons<br />
Press [RETURN] until they clear.<br />
∫ To change the position of the icons<br />
1. Use [2, 1] to select the Bar position<br />
icon.<br />
2. Use [3, 4] to move the icons.<br />
2. (There are 5 positions.)<br />
Progress indicator<br />
Indicates how far you have played through an<br />
item.<br />
e.g. [<strong>DVD</strong>-V]<br />
a Current position<br />
b Condition–play, pause, or slow/search<br />
c Changing the time display<br />
[RAM] [<strong>DVD</strong>-A] [<strong>DVD</strong>-V] [V<strong>CD</strong>] [<strong>CD</strong>]<br />
≥Use [3, 4] to show the elapsed play time<br />
or remaining time.<br />
Elapsed play time<br />
[V<strong>CD</strong>] (SV<strong>CD</strong> only) [WMA] [MP3]<br />
For display only, cannot be changed.<br />
Changing play speed<br />
[<strong>DVD</strong>-A] (Moving picture part) [<strong>DVD</strong>-V]<br />
(Dolby Digital only)<br />
You can slow down or speed up play.<br />
Use [2] (slower) or [1] (faster).<br />
There are five speeds:<br />
k0.8,.k0.9,.k1.0 (normal speed),.k1.2,.k1.4<br />
≥After you change the speed:<br />
≥–Output is in stereo.<br />
≥–You cannot use Advanced Surround.<br />
≥–Digital output switches to PCM.<br />
≥–Sound is stereo as long as “k1.0” is orange.<br />
To return to normal play<br />
Press [1] (Play).
Disc information<br />
12 18<br />
128kbps<br />
44.1kHz<br />
a PG: Program number [RAM]<br />
PL: Playlist number [RAM]<br />
T: Title number [<strong>DVD</strong>-V]<br />
T: Track number [V<strong>CD</strong>] [<strong>CD</strong>]<br />
G: Group number<br />
[<strong>DVD</strong>-A] [WMA] [MP3] [JPEG]<br />
b C: Chapter number [<strong>DVD</strong>-V]<br />
T: Track number [<strong>DVD</strong>-A] [WMA] [MP3]<br />
P: Picture number [JPEG]<br />
c Time [RAM] [<strong>DVD</strong>-A] [<strong>DVD</strong>-V] [V<strong>CD</strong>] [<strong>CD</strong>]<br />
≥Use [3, 4] to show the elapsed play time<br />
or remaining time.<br />
[<strong>DVD</strong>-A] [V<strong>CD</strong>] [<strong>CD</strong>]<br />
[)Elapsed play time<br />
l :;<br />
l Remaining time for the track<br />
l :;<br />
{)Remaining time for the disc/group<br />
[RAM] [<strong>DVD</strong>-A] [<strong>DVD</strong>-V]<br />
≥Select a position to start play by specifying<br />
a time with the numbered buttons and<br />
press [ENTER].<br />
Elapsed play time<br />
[V<strong>CD</strong>] (SV<strong>CD</strong> only) [WMA] [MP3]<br />
For display only, cannot be changed.<br />
d Soundtrack language<br />
(See [A] right for language abbreviations.)<br />
Audio signal type<br />
(See [B] right for details.)<br />
Audio Mode (➡ page 30, Soundtracks)<br />
Karaoke vocal on/off (Karaoke <strong>DVD</strong> only)<br />
[<strong>DVD</strong>-V]<br />
Solo: OFF or ON<br />
Duet: OFF, V1iV2, V1 or V2<br />
Current bitrate [WMA] [MP3]<br />
Current sampling frequency [WMA] [MP3]<br />
e Subtitle language<br />
(See [A] right for language abbreviations.)<br />
Subtitles on/off<br />
[RAM] [<strong>DVD</strong>-A] [<strong>DVD</strong>-V] [V<strong>CD</strong>] (SV<strong>CD</strong> only)<br />
ON()OFF<br />
Track Information on/off<br />
[WMA] [MP3] [<strong>CD</strong>] (<strong>CD</strong> text only)<br />
ON()OFF<br />
Picture information [JPEG]<br />
Date()Full()OFF<br />
^=======J<br />
Page<br />
1<br />
h c d e<br />
i<br />
d<br />
g<br />
Slideshow<br />
ON 5 sec<br />
f Angle number (➡ page 30)<br />
g Menu play [V<strong>CD</strong>]<br />
Indicates whether menu play (playback<br />
control) is on or off.<br />
h Track/picture number in disc<br />
Total number of tracks/pictures on disc<br />
[WMA] [MP3] [JPEG]<br />
i Still picture number [<strong>DVD</strong>-A]<br />
Selected picture is shown during play.<br />
j Slideshow setting [JPEG]<br />
ON()OFF<br />
Slideshow timing [JPEG]<br />
0 sec–30 sec<br />
j<br />
[A] Audio/Subtitle language<br />
ENG: English POR: Portuguese<br />
FRA: French RUS: Russian<br />
DEU: German JPN: Japanese<br />
ITA: Italian CHI: Chinese<br />
ESP: Spanish KOR: Korean<br />
NLD: Dutch MAL: Malay<br />
SVE: Swedish VIE: Vietnamese<br />
NOR: Norwegian THA: Thai<br />
DAN: Danish ¢: Others<br />
[B] Signal type/data<br />
LPCM/PPCM/ÎDigital/DTS/MPEG:<br />
Signal type<br />
k (kHz): Sampling frequency<br />
b (bit): Number of bits<br />
ch (channel): Number of channels<br />
e.g.: 3/2 .1ch<br />
.1: Low frequency effect<br />
(not displayed if there is no<br />
signal)<br />
.0: No surround<br />
.1: Mono surround<br />
.2: Stereo surround (left/right)<br />
.1: Center<br />
.2: Front leftiFront right<br />
.3: Front leftiFront<br />
rightiCenter<br />
Advanced Operations<br />
RQT6912<br />
33
Advanced Operations<br />
RQT6912<br />
34<br />
Using On-Screen Menu Icons<br />
Unit information<br />
Play menu Display menu<br />
a A-B Repeat (➡ page 28)<br />
b Repeat Mode (➡ page 28)<br />
c Play mode display<br />
[<strong>DVD</strong>-A] [<strong>DVD</strong>-V] [V<strong>CD</strong>] [<strong>CD</strong>] [WMA] [MP3]<br />
---: Normal play<br />
PGM: Program play<br />
RND: Random play<br />
ALL: All group play ([<strong>DVD</strong>-A])<br />
d Marker (➡ page 29)<br />
Picture menu<br />
N 480P Auto1<br />
a b c<br />
a Picture Mode<br />
[RAM] [<strong>DVD</strong>-A] [<strong>DVD</strong>-V] [V<strong>CD</strong>] [JPEG]<br />
N: Normal mode<br />
C1: Mellows images and enhances detail in<br />
dark scenes.<br />
C2: Sharpens images and enhances detail<br />
in dark scenes<br />
b Video output mode<br />
[RAM] [<strong>DVD</strong>-A] [<strong>DVD</strong>-V] [V<strong>CD</strong>] [JPEG]<br />
480I: Interlace video<br />
480P: Progressive video<br />
≥You can change the video output mode only<br />
when “Progressive Out (Component)” in the<br />
SETUP menu is set to “Enable” (➡ page 39).<br />
≥When progressive output is on, closed<br />
captions will not be displayed.<br />
c Transfer mode [RAM] [<strong>DVD</strong>-A] [<strong>DVD</strong>-V] [V<strong>CD</strong>]<br />
Select the method of conversion for progressive<br />
output to suit the type of material being played<br />
(Film and video ➡ page 46, Glossary).<br />
Auto1 (normal): for viewing film material<br />
Auto2: for viewing film material (the same as<br />
Auto1, but able to convert 30-frameper-second<br />
progressive video)<br />
Video: for video material<br />
Audio menu<br />
a Advanced Surround (➡ page 29)<br />
b Dialogue Enhancer [<strong>DVD</strong>-V]<br />
(Dolby Digital/DTS, 3-channel or over only)<br />
ON()OFF<br />
The volume of the dialogue from the center<br />
channel is raised when you select “ON”.<br />
Normal t1.00<br />
0<br />
a b c<br />
a 4:3 Aspect<br />
[RAM] [<strong>DVD</strong>-A] [<strong>DVD</strong>-V] [V<strong>CD</strong>] [JPEG]<br />
Select how to show images made for 4:3<br />
aspect screens on a 16:9 aspect television.<br />
Normal: laterally stretches images made<br />
for a 4:3 screen.<br />
Auto: expands suitable 4:3 letterbox<br />
images to fill more of the screen.<br />
Other images appear in full in the<br />
center of the screen.<br />
Shrink: images appear in the center of the<br />
screen.<br />
Zoom: expands all images to fill the<br />
screen.<br />
≥If your television has a similar feature, use<br />
it instead for a better effect.<br />
b Zoom [RAM] [<strong>DVD</strong>-A] (Moving picture part)<br />
[<strong>DVD</strong>-V] [V<strong>CD</strong>]<br />
Change the zoom ratio so the picture<br />
expands to the optimum size to fill the<br />
screen.<br />
To select the aspect ratio:<br />
[ENTER]>[2, 1]>[ENTER]<br />
[>4:3 Standard()European Vista( ----]<br />
u v<br />
Cinemascope2 16:9 Standard<br />
e f<br />
{>Cinemascope1()American Vista(-}<br />
To make fine adjustments to the zoom<br />
ratio: [3, 4]<br />
k1.00–k2.00<br />
c Subtitle Position/Brightness (➡ page 30)<br />
d Bitrate Display [RAM] [<strong>DVD</strong>-A] [<strong>DVD</strong>-V] [V<strong>CD</strong>]<br />
ON()OFF<br />
During play: Shows the average bitrate<br />
(approximate values) of the<br />
video being played<br />
While paused: Shows the data volume of<br />
the frame and type of<br />
picture (I/P/B ➡ page 46,<br />
Glossary)<br />
To change the bitrate display:<br />
9.438 Mbps<br />
f [2, 1]<br />
v<br />
Bitrate<br />
Cur. 7.507 Mbps<br />
Ave. 6.730 Mbps<br />
Current bitrate A record of bitrates for<br />
Average bitrate a sampling period.<br />
0<br />
d<br />
5.0<br />
Mbps
Enjoying more powerful sound<br />
Enjoy the powerful movie theater and hall-like sound available with multiple channel audio found on<br />
<strong>DVD</strong>s by connecting an amplifier and speakers.<br />
Note<br />
≥The equipment connections described are examples.<br />
≥Peripheral equipment and optional cables sold separately unless otherwise indicated.<br />
≥Before connection, turn off all equipment and read the appropriate operating instructions.<br />
VIDEO<br />
OUT<br />
Using this unit with other equipment<br />
Connecting to a receiver or amplifier with 5.1 audio input terminals<br />
(Analog connection)<br />
Change “Speaker Setting” (➡ page 40).<br />
≥Use this connection to enjoy multi channel LPCM <strong>DVD</strong>-Audio.<br />
Multi cradle<br />
SUB<br />
AUDIO OUT 5.1ch<br />
2ch (MIX)<br />
VIDEO<br />
OUT<br />
WOOFER CENTER SORROUND<br />
FRONT<br />
R L R L<br />
Connecting to a receiver or<br />
amplifier with built in<br />
decoders (Digital connection)<br />
+<br />
SPEAKER<br />
HAUT<br />
PARLEUR<br />
4≠<br />
- L<br />
SUB- CENTER SURROUND FRONT<br />
WOOFER (R) (L) (R) (L)<br />
Change the settings in “Audio” (➡ page 40).<br />
To enjoy stereo or Dolby Pro Logic<br />
Connect a digital amplifier or system component<br />
and change the settings in “Audio” (➡ page 40).<br />
This unit (Right side)<br />
Audio cable<br />
Speakers (Example)<br />
You can enjoy surround sound by<br />
connecting three or more speakers.<br />
OPTICAL<br />
Amplifier<br />
Optical fiber cable<br />
Do not bend sharply.<br />
AUDIO, OPT OUT<br />
Note<br />
≥You can only use DTS Digital Surround decoders that are compatible with <strong>DVD</strong>.<br />
≥ <strong>SD</strong><br />
There is no audio output when using a digital connection.<br />
Advanced Operations<br />
RQT6912<br />
35
Advanced Operations<br />
RQT6912<br />
36<br />
Using this unit with other equipment<br />
Using this unit with a television<br />
Before connecting, turn off all equipment and read the appropriate operating instructions.<br />
Do not connect the player through your video cassette recorder. The picture may not be played<br />
back correctly due to the copy guard.<br />
Connecting the multi cradle<br />
AUDIO OUT 5.1ch<br />
2ch (MIX)<br />
VIDEO<br />
OUT<br />
SORROUND<br />
FRONT<br />
L R L<br />
red white yellow<br />
Audio/video cable<br />
(not included)<br />
Connecting the player<br />
Right side<br />
black<br />
yellow<br />
+<br />
SPEAKER<br />
HAUT<br />
PARLEUR<br />
4≠<br />
- L<br />
yellow<br />
white<br />
red<br />
Television<br />
VIDEO IN<br />
AUDIO IN<br />
L<br />
Note<br />
≥The speakers do not have magnetic shielding. Do not place near televisions, personal computers,<br />
magnetized cards (bank cards, commuter passes, etc.) or other devices easily influenced by<br />
magnetism.<br />
≥Volume may be lower when playing <strong>DVD</strong>s than when playing other discs or during TV broadcasts.<br />
If you turn the volume up, reduce it again so that a sudden increase in output does not occur.<br />
R<br />
red white yellow<br />
Enjoying higher<br />
picture quality<br />
Audio/video cable (included)<br />
You can connect the<br />
audio cable to the<br />
2-channel audio input<br />
terminals of an analog<br />
amplifier or system<br />
component to enjoy<br />
stereo or Dolby Pro<br />
Logic.
Television’s<br />
COMPONENT<br />
VIDEO IN<br />
terminals<br />
Multi cradle<br />
This unit (Right side)<br />
SPEAKER<br />
HAUT<br />
PARLEUR<br />
R 4≠<br />
-<br />
Video cable (not included)<br />
COMPONENT VIDEO OUT S VIDEO<br />
OUT<br />
(480P/480I)<br />
Y PB PR<br />
COMPONENT VIDEO OUT terminal<br />
These terminals can be used for either interlace or<br />
progressive output and provide a purer picture than the S<br />
VIDEO OUT terminal. Connection using these terminals<br />
outputs the color difference signals (PB/PR) and luminance<br />
signal (Y) separately in order to achieve high fidelity in<br />
reproducing colors. The description of the component video<br />
input terminals depends on the television or monitor (e.g.<br />
Y/PB/PR, Y/B-Y/R-Y, Y/CB/CR). Connect to terminals of the<br />
same color.<br />
≥After making this connection, change the black level for a<br />
better picture (➡ page 39, Video—Black Level Control)<br />
+<br />
SUB<br />
AUDIO OUT 5.1ch<br />
2ch (MIX)<br />
VIDEO<br />
OUT<br />
WOOFER CENTER SORROUND<br />
FRONT<br />
R L R L<br />
S video cable (not included)<br />
Audio/video cable<br />
(included)<br />
yellow<br />
yellow<br />
black white<br />
red<br />
Video camera<br />
Television’s<br />
S VIDEO IN<br />
terminal<br />
S VIDEO OUT terminal<br />
The S video terminal achieves a<br />
more vivid picture than the VIDEO<br />
OUT terminal by separating the<br />
chrominance (C) and luminance<br />
(Y) signals. (Actual results depend<br />
on the television.)<br />
When making this connection, ensure you connect the audio cables to the corresponding audio input<br />
terminals on the television.<br />
Note<br />
<strong>SD</strong> There is no video output when connected with the COMPONENT VIDEO OUT terminal.<br />
To enjoy progressive video<br />
1. Connect to the component video input terminals on a 480P compatible television. (Video will not<br />
be displayed correctly if connected to an incompatible television.)<br />
2. In SETUP menu, set “Progressive Out (Component)” to “Enable” (➡ page 39).<br />
3. Change “Video output mode” to “480P” (➡ page 34).<br />
≥All televisions manufactured by Panasonic and that have 480P input connectors are compatible.<br />
Consult the manufacturer if you have another brand of television.<br />
≥If the unit is connected to the television through VIDEO OUT or S VIDEO OUT, output will be<br />
interlace, irrespective of the settings.<br />
Watching video from a video camera<br />
Press [<strong>DVD</strong>/<strong>SD</strong>/AUX] to select “AUX”.<br />
Control play on the camera.<br />
Auto standby function (➡ page 17) does not work while the “AUX” mode is on. Turn the unit off when<br />
you have finished using it.<br />
Advanced Operations<br />
RQT6912<br />
37
Advanced Operations<br />
RQT6912<br />
38<br />
Using this unit with<br />
other equipment<br />
Recording to digital<br />
recording equipment or<br />
cassette tapes<br />
≥Digital recording<br />
You can record the digital signal directly to<br />
digital recording equipment.<br />
Connect the recording equipment with an optical<br />
fiber cable (➡ page 35).<br />
Note<br />
≥With <strong>DVD</strong>, the following conditions must be<br />
met: a the disc doesn’t have protection<br />
preventing digital recording, and b the<br />
recording equipment can handle signals with a<br />
sampling frequency of 48 kHz.<br />
≥You cannot record WMA/MP3.<br />
When recording <strong>DVD</strong>s, make the following<br />
settings.<br />
Advanced Surround: OFF (➡ page 29)<br />
PCM Down Conversion: Yes (➡ page 40)<br />
Dolby Digital/DTS Digital Surround: PCM<br />
(➡ page 40)<br />
≥Analog recording<br />
You can record to a cassette deck or other<br />
recording equipment. There are no limitations<br />
on recording analog signals as there are with<br />
digital signals.<br />
Connect the recording equipment to<br />
AUDIO, OPT OUT on the player with the<br />
audio/video cable (included) (➡ page 36)<br />
Or<br />
FRONT L R [2ch (MIX)] on the multi-cradle<br />
(➡ page 36).<br />
[In the SETUP menu, set “Speaker Setting” to<br />
“2-channel” (➡ page 40).]<br />
RETURN<br />
Changing settings<br />
Í<br />
∫ ; 1<br />
TOP MENU DISPLAY<br />
CANCEL<br />
1 2 3<br />
4 5 6 S10<br />
7 8 9 0<br />
6 5<br />
SETUP PLAY MODE <strong>DVD</strong>/<strong>SD</strong>/AUX<br />
MENU RETURN<br />
A.SURROUND AUDIO ANGLE<br />
: 9<br />
SUB<br />
-TITLE<br />
SETUP<br />
3421<br />
ENTER<br />
CANCEL<br />
Numbered<br />
buttons<br />
Common procedures<br />
1 Press [SETUP] to show the<br />
menus.<br />
SETUP<br />
SELECT<br />
TAB<br />
Disc<br />
Audio<br />
Subtitle<br />
Menus<br />
Ratings<br />
English<br />
Automatic<br />
English<br />
Level 8<br />
2 Press [2, 1] to select the<br />
menu’s tab.<br />
The screen changes to display the menu.<br />
Disc()Video()Audio<br />
eu<br />
eu Others(===)Display<br />
3 Press [3, 4] to select the<br />
item and press [ENTER].<br />
4 Press [3, 4] to select the<br />
option and press [ENTER].<br />
The screen now shows the menu again.<br />
To return to the previous screen<br />
Press [RETURN].<br />
When you are finished<br />
Press [SETUP].<br />
For your reference<br />
Press [MENU] on the main unit to access the<br />
SETUP menus while stopped (unless a<br />
<strong>DVD</strong>-RAM is loaded).
Advanced Operations<br />
RQT6912<br />
40<br />
Menus<br />
Audio<br />
Changing settings<br />
Display<br />
Items<br />
Speaker Setting (Analog connection)<br />
Choose the settings to suit your audio system and the listening environment.<br />
Multi-channel: when 3 or more speakers are connected (➡ right).<br />
2-channel: when 2 speakers or an amplifier with a Dolby Pro Logic decoder is<br />
connected.<br />
PCM Down Conversion (Digital connection)<br />
Select how to output audio with a sampling frequency of 96 kHz or 88.2 kHz.<br />
Select “Yes” if the equipment you connect cannot process signals with a sampling<br />
frequency of 96 kHz or 88.2 kHz.<br />
No: Output as 96 kHz or 88.2 kHz.<br />
Yes: Converted to 48 kHz or 44.1 kHz.<br />
≥Signals are converted to either 48 kHz or 44.1 kHz despite the above settings if the<br />
signals have a sampling frequency of over 96 kHz, or the disc has copy protection.<br />
≥Some equipment cannot handle sampling frequencies of 88.2 kHz, even if they can<br />
handle 96 kHz. Read your equipment’s operating instructions for details.<br />
Dolby Digital (Digital connection)<br />
Select “Bitstream” if the equipment can decode the signal.<br />
Bitstream PCM<br />
DTS Digital Surround (Digital connection)<br />
Select “Bitstream” if the equipment can decode the signal.<br />
PCM Bitstream<br />
IMPORTANT (Dolby Digital/DTS Digital Surround)<br />
If the equipment cannot decode the signal, the setting must be changed to<br />
PCM. If not, signals the equipment cannot process will be output, causing<br />
high levels of noise which can damage your hearing and the speakers.<br />
Dynamic Range Compression (Dolby Digital Only)<br />
Change the dynamic range for late night viewing.<br />
Off On<br />
Audio during Search §<br />
Choose whether to have sound during search.<br />
On Off<br />
§ Audio will be heard when playing some <strong>DVD</strong>-Audio despite the settings you make<br />
here.<br />
Menu Language<br />
Choose the preferred language for these menus and the on-screen messages.<br />
English Français Español<br />
On-Screen Messages<br />
Choose whether to show on-screen messages or not.<br />
On Off
Advanced Operations<br />
Reference<br />
RQT6912<br />
42<br />
Menus<br />
Others<br />
Changing settings<br />
Language code list<br />
6566: Abkhazian<br />
6565: Afar<br />
6570: Afrikaans<br />
8381: Albanian<br />
6577: Ameharic<br />
6582: Arabic<br />
7289: Armenian<br />
6583: Assamese<br />
6588: Aymara<br />
6590: Azerbaijani<br />
6665: Bashkir<br />
6985: Basque<br />
6678: Bengali; Bangla<br />
6890: Bhutani<br />
6672: Bihari<br />
6682: Breton<br />
6671: Bulgarian<br />
7789: Burmese<br />
6669: Byelorussian<br />
7577: Cambodian<br />
6765: Catalan<br />
9072: Chinese<br />
6779: Corsican<br />
7282: Croatian<br />
6783: Czech<br />
6865: Danish<br />
7876: Dutch<br />
6978: English<br />
6979: Esperanto<br />
6984: Estonian<br />
7079: Faroese<br />
Maintenance<br />
7074: Fiji<br />
7073: Finnish<br />
7082: French<br />
7089: Frisian<br />
7176: Galician<br />
7565: Georgian<br />
6869: German<br />
6976: Greek<br />
7576: Greenlandic<br />
7178: Guarani<br />
7185: Gujarati<br />
7265: Hausa<br />
7387: Hebrew<br />
7273: Hindi<br />
7285: Hungarian<br />
7383: Icelandic<br />
7378: Indonesian<br />
7365: Interlingua<br />
7165: Irish<br />
7384: Italian<br />
7465: Japanese<br />
7487: Javanese<br />
7578: Kannada<br />
7583: Kashmiri<br />
7575: Kazakh<br />
7589: Kirghiz<br />
7579: Korean<br />
7585: Kurdish<br />
7679: Laotian<br />
7665: Latin<br />
7686: Latvian, Lettish<br />
∫ To clean this unit, wipe with a<br />
soft, dry cloth.<br />
≥Use eyeglass cleaner to remove stubborn dirt<br />
from the L<strong>CD</strong>.<br />
Items<br />
HighMAT<br />
Play HighMAT discs as HighMAT discs, or as regular WMA/MP3/JPEG discs.<br />
(Reload the disc for the setting to be effective.)<br />
Enable: Play HighMAT discs as HighMAT discs.<br />
Disable: Play HighMAT discs as regular WMA/MP3/JPEG discs.<br />
Mixed Disc-Audio&Stills<br />
Select the type of file played on discs containing both JPEG and WMA/MP3. (Reload<br />
the disc for the setting to be effective.)<br />
Audio (MP3/WMA) Stills (JPEG)<br />
<strong>DVD</strong>-Video mode<br />
Select how to play pictures contained on some <strong>DVD</strong>-Audio.<br />
The setting returns to “Off” when you remove the disc or turn the unit off.<br />
Off: <strong>DVD</strong>-Audio are played as <strong>DVD</strong>-Audio.<br />
On: You can play <strong>DVD</strong>-Video content on <strong>DVD</strong>-Audio.<br />
Demo<br />
A demonstration of the unit’s on-screen displays starts when you select “On”.<br />
The demonstration stops and the setting reverts to “Off” when you press a button<br />
(except [MONITOR MODE], [PICTURE MODE], and [OPEN]).<br />
Off On<br />
≥Never use alcohol, paint thinner or benzine to<br />
clean this unit.<br />
7678: Lingala<br />
7684: Lithuanian<br />
7775: Macedonian<br />
7771: Malagasy<br />
7783: Malay<br />
7776: Malayalam<br />
7784: Maltese<br />
7773: Maori<br />
7782: Marathi<br />
7779: Moldavian<br />
7778: Mongolian<br />
7865: Nauru<br />
7869: Nepali<br />
7879: Norwegian<br />
7982: Oriya<br />
8083: Pashto, Pushto<br />
7065: Persian<br />
8076: Polish<br />
8084: Portuguese<br />
8065: Punjabi<br />
8185: Quechua<br />
8277: Rhaeto-Romance<br />
8279: Romanian<br />
8285: Russian<br />
8377: Samoan<br />
8365: Sanskrit<br />
7168: Scots Gaelic<br />
8382: Serbian<br />
8372: Serbo-Croatian<br />
8378: Shona<br />
8368: Sindhi<br />
8373: Singhalese<br />
8375: Slovak<br />
8376: Slovenian<br />
8379: Somali<br />
6983: Spanish<br />
8385: Sundanese<br />
8387: Swahili<br />
8386: Swedish<br />
8476: Tagalog<br />
8471: Tajik<br />
8465: Tamil<br />
8484: Tatar<br />
8469: Telugu<br />
8472: Thai<br />
6679: Tibetan<br />
8473: Tigrinya<br />
8479: Tonga<br />
8482: Turkish<br />
8475: Turkmen<br />
8487: Twi<br />
8575: Ukrainian<br />
8582: Urdu<br />
8590: Uzbek<br />
8673: Vietnamese<br />
8679: Volapük<br />
6789: Welsh<br />
8779: Wolof<br />
8872: Xhosa<br />
7473: Yiddish<br />
8979: Yoruba<br />
9085: Zulu<br />
∫ Maintenance of the lens<br />
≥Remove dust carefully with an air blower for<br />
camera lenses (optional).<br />
≥Recommended product:<br />
≥≥Lens cleaner kit (SZZP1038C)<br />
≥≥(Available from Panasonic dealers.)<br />
≥Be careful not to touch the lens with your fingers.
Troubleshooting Guide<br />
Before requesting service, make the following checks. If you are in doubt about some of the check<br />
points, or if the remedies indicated in the chart do not solve the problem:<br />
In the U.S.A., contact the Panasonic Customer Call Center at 1-800-211-7262, or<br />
e-mail consumerproducts@panasonic.com, or the website (http://www. panasonic.com).<br />
In Canada, contact the Panasonic Canada Inc. Customer Care Centre at 1-800-561-5505,<br />
or visit the website (www.panasonic.ca), or an authorized Servicentre closest to you.<br />
Reference pages are shown as black circled numbers <br />
≥You cannot turn on the unit with the remote control if the unit is<br />
powered by the battery pack.<br />
≥The unit turns off after it has been stopped for about 15 minutes<br />
(5 minutes when the unit is powered by the battery pack) to<br />
conserve power. Turn the unit on again.<br />
≥The unit and battery pack have protection circuitry that activate if they<br />
become too hot or too cold. They will not work if this occurs. Use the<br />
unit and battery pack between 5 oC (41 oF) and 35 oC (95 oF).<br />
≥The battery pack can only be recharged when the unit is off.<br />
≥The charging time increases when the temperature is too hot or too<br />
cold, and charging may not be possible under some circumstances.<br />
≥Check connection to the AC adaptor. <<br />
≥The battery pack has reached the end of its service life (it can be<br />
recharged about 300 times).<br />
≥Some discs prohibit certain operations.<br />
≥If there is no response at all, the unit may have been affected by<br />
lightning or static electricity. Try turning the unit off and on again.<br />
Alternatively, turn the unit off, disconnect the power source (AC or<br />
battery pack) reconnect the power and turn the unit on again.<br />
≥Condensation may have formed in the unit.<br />
Wait 1 or 2 hours for it to clear.<br />
≥This unit cannot play discs other than those specified. 8<br />
≥Clean the disc. 9<br />
≥Ensure the disc is inserted correctly. @<br />
≥Check that the disc has something recorded on it.<br />
≥Some files are not compatible with this unit and cannot be played<br />
back. For example:<br />
–Moving picture files recorded using a digital still camera with<br />
moving picture function<br />
≥–IC recorder voice files etc<br />
≥Check that the battery is inserted correctly. ?<br />
≥Replace the battery if it is drained. ?<br />
≥Aim the remote control at the remote control signal sensor. ?<br />
≥This function is dependent on software availability.<br />
≥Some <strong>DVD</strong>s require you to change the languages through menus.<br />
≥This function is dependent on software availability.<br />
≥Turn the subtitles on. N<br />
≥Subtitle position is wrong. Adjust the position. N<br />
≥This function is dependent on software availability.<br />
There may be parts of multi-angle <strong>DVD</strong>s where different angles are not recorded.<br />
≥Do the following to reset the unit to its original factory settings (<strong>SD</strong> settings<br />
are unaffected). While the unit is stopped, press and hold [;], [:]<br />
(backward), and [1, ON] on the main unit for about 3 seconds until the<br />
message “Initialized” disappears from the display, then turn the unit off.<br />
Reference<br />
RQT6912<br />
43
Reference<br />
RQT6912<br />
44<br />
Troubleshooting Guide<br />
Operation<br />
The unit doesn’t play the<br />
data type (WMA/MP3 or<br />
JPEG) selected in the<br />
“Mixed Disc-Audio&Stills”<br />
in the SETUP menu.<br />
Sound<br />
There is a lot of noise.<br />
No sound from the<br />
unit’s speaker.<br />
No sound from other<br />
speakers.<br />
Distorted sound.<br />
Sound effects do not<br />
work.<br />
Picture<br />
The L<strong>CD</strong> is dark.<br />
Picture distorted.<br />
Menus not displayed<br />
correctly.<br />
No picture on the L<strong>CD</strong><br />
Picture from another<br />
unit not shown on the<br />
L<strong>CD</strong>.<br />
Picture doesn’t appear<br />
on the television (or<br />
the size of the picture<br />
seems wrong).<br />
There is ghosting<br />
when progressive<br />
output is on.<br />
L<strong>CD</strong> pixels turn black<br />
or radiate different<br />
colors.<br />
Reload the disc for the setting to be effective. Open and close the<br />
disc lid, then press [1] (Play) to start play.<br />
≥Move unit away from mobile phones.<br />
≥The speaker is off if the L<strong>CD</strong> is closed or headphones are connected.<br />
≥Turn up the volume. @<br />
≥Check all connections and settings. S–U, X, Y<br />
≥Check input mode of the other equipment.<br />
≥Advanced Surround may cause distortion with some discs.<br />
Turn Advanced Surround off if this occurs. M<br />
≥Output from this unit will be in stereo (two channels) when Advanced Surround<br />
is on. Turn Advanced Surround off if you are using three or more speakers. M<br />
≥Some <strong>DVD</strong>-Audio specify the number of channels to be played and prohibit<br />
down-mixing to 2 channels. Read the disc’s instructions for details.<br />
≥Press [1] (Play) to restore normal play after changing the speed. P<br />
≥Noise may occur when playing WMA files.<br />
≥ <strong>SD</strong> There may be some noise output when playing MPEG4 and<br />
VOICE files, but this is normal.<br />
≥Dialogue Enhancer and Advanced Surround do not work when the<br />
unit is outputting bitstream signals.<br />
≥Advanced Surround does not work if you have changed the play speed. P<br />
≥Adjust the brightness. O<br />
≥Some disruption is normal during SEARCH.<br />
≥ <strong>SD</strong> Picture quality may worsen or some frames may be skipped<br />
when viewing MPEG4, but this is normal.<br />
≥Restore the zoom ratio to k1.00. R<br />
≥Set the subtitle position to 0. N<br />
≥Set “4:3 Aspect” to “Normal”. R<br />
≥Select a picture mode other than “OFF” (no picture). O<br />
≥Check connections. U<br />
≥Ensure the input setting is correct. U<br />
≥Ensure the power of the connected equipment is on.<br />
≥Check connections. T, U<br />
≥Check that the television is on.<br />
≥Check that the input mode on the television is correct.<br />
≥Check the settings in “Video—TV Aspect”. W<br />
≥Use the television to change the aspect to the correct one. If your<br />
television cannot change the aspect when input is progressive,<br />
try changing 4:3 Aspect with the on-screen menu icons. R<br />
≥Turn off the zooming feature of your television if you are using Variable Zoom. R<br />
≥Ensure that the unit is connected directly to the television, and is not<br />
connected through a video cassette recorder. T<br />
≥Change “Video output mode” to “480I”. This problem is caused by<br />
the editing method or material used on <strong>DVD</strong>-Video, but should be<br />
corrected if you use interlace output. R<br />
≥The L<strong>CD</strong> is constructed with precision technology so 99.99 % of the pixels<br />
are active, but of the remaining of 0.01 %, there are pixels that may be<br />
black or emit light constantly. This phenomenon is not a malfunction.
Displays<br />
On-Screen Menu Icons<br />
are cut off.<br />
No On-Screen display.<br />
“Check the disc.”<br />
“The progressive out is<br />
set to “Disable””<br />
“X”<br />
“CHECK CARD”<br />
“NO FILE”<br />
“PLEASE<br />
RE-OPERATE”<br />
“ ERROR 01”<br />
“ ERROR 02”<br />
“ ERROR 03”<br />
“H ∑∑”<br />
∑∑ stands for a<br />
number.<br />
“U11”<br />
The [Í] indicator<br />
flashes rapidly.<br />
The [Í] indicator<br />
flashes slowly.<br />
The [CHG] indicator<br />
flashes rapidly.<br />
The [CHG] indicator<br />
flashes slowly.<br />
≥Use [3, 4] while the Bar position icon is highlighted to move them<br />
down. P<br />
≥Go to the Display menu in the SETUP screen, and select “On” for<br />
“On-Screen Messages”. X<br />
≥Clean the disc. 9<br />
≥Go to Video in the SETUP menus, and select “Enable” in<br />
“Progressive Out (Component)”. W<br />
≥You are trying to play incompatible or corrupted data. This data<br />
cannot be played.<br />
≥The card cannot be played.<br />
≥Data the unit can play is not recorded on the card.<br />
≥Turn the unit off and on again. Alternatively, turn the unit off,<br />
disconnect the power source (AC or battery pack) reconnect the<br />
power and turn the unit on again.<br />
≥A problem has occurred with the battery pack. Consult your dealer.<br />
≥The battery pack has been recharging for 12 hours but has failed to<br />
recharge for some reason. Recharge again.<br />
≥You are recharging in a location that is too hot or too cold.<br />
Recharge at normal temperature.<br />
≥Trouble has occurred. The number appearing after H depends on<br />
the problem. Turn the unit off and on again. Alternatively, turn the<br />
unit off, disconnect the power source (AC or battery pack) reconnect<br />
the power and turn the unit on again.<br />
If the service numbers fail to clear, note the service number and<br />
contact a qualified service person.<br />
[Í] and [CHG] indicators<br />
≥The unit has malfunctioned. Consult your dealer.<br />
≥The unit is on and the L<strong>CD</strong> is closed or the display mode is set to<br />
“OFF” (no picture). Turn the unit off when you have finished.<br />
≥There is a problem with the battery pack. Turn the unit on and check<br />
the message on the L<strong>CD</strong> (see above).<br />
≥Battery pack charge is low. The unit will turn off automatically after a<br />
few minutes. =<br />
Note<br />
The following do not indicate malfunction.<br />
≥Sound from the AC adaptor during recharging.<br />
≥The battery pack warming up when recharging or during use.<br />
≥The surface and area around the card slot becoming warm when used over long periods.<br />
Reference<br />
RQT6912<br />
45
Reference<br />
RQT6912<br />
46<br />
Glossary<br />
Bitstream<br />
The digital form of multi-channel data (e.g.,<br />
5.1 channel) before decording.<br />
Decoder<br />
A decoder restores the coded audio signals on<br />
<strong>DVD</strong>s to normal. This is called decoding.<br />
Dolby Digital<br />
This is a method of coding digital signals<br />
developed by Dolby Laboratories. Apart from<br />
stereo (2-channel) audio, these signals can also<br />
be multi-channel audio. A large amount of audio<br />
information can be recorded on the disc using<br />
this method.<br />
Dolby Pro Logic<br />
A surround system where a 4-channel audio<br />
track is recorded as 2 channels and then is<br />
restored to 4 channels for play. The surround<br />
channel is monaural and can reproduce up to<br />
7 kHz.<br />
DTS (Digital Theater Systems)<br />
This surround system is used in many movie<br />
theaters around the world. There is good<br />
separation between the channels, so realistic<br />
sound effects are possible.<br />
Dynamic range<br />
Dynamic range is the difference between the<br />
lowest level of sound that can be heard above<br />
the noise of the equipment and the highest level<br />
of sound before distortion occurs.<br />
Film and video<br />
<strong>DVD</strong>-Videos are recorded using either film or<br />
video. Usually, film is recorded at 24 frames per<br />
second, the rate movies are filmed at, while<br />
video is recorded at 30 frames per second.<br />
Product Service<br />
Frame still and field still<br />
Frames are the still pictures that make moving<br />
pictures. About thirty are shown each second. A<br />
frame still may appear blurred but overall quality<br />
is high.<br />
Two fields appear alternately to make up one<br />
frame. A field still is not blurred but picture<br />
quality is lower.<br />
Interlace and progressive output<br />
NTSC, the video signal standard, has 480<br />
interlaced (I) scan lines, whereas progressive<br />
scanning uses twice the number of scan lines.<br />
This is called 480P.<br />
I/P/B<br />
MPEG 2, the video compression standard<br />
adopted for use with <strong>DVD</strong>-Video, codes frames<br />
using these 3 picture types.<br />
I: Intra coded picture<br />
This picture has the best quality and is the<br />
best to use when adjusting the picture.<br />
P: Predictive coded picture<br />
This picture is calculated based on past I or<br />
P-pictures.<br />
B: Bidirectionally-predictive coded picture<br />
This picture is calculated by comparing past<br />
and future I and P-pictures so it has the<br />
lowest volume of information.<br />
Linear PCM (pulse code modulation)<br />
These are uncompressed digital signals, similar<br />
to those found on <strong>CD</strong>s.<br />
Playback control (PBC)<br />
If a Video <strong>CD</strong> has playback control, you can<br />
select scenes and information with menus.<br />
1. Damage requiring service—The unit should be serviced by qualified service personnel if:<br />
1. (a) The AC power supply cord or AC adaptor has been damaged; or<br />
1. (b) Objects or liquids have gotten into the unit; or<br />
1. (c) The unit has been exposed to rain; or<br />
1. (d) The unit does not operate normally or exhibits a marked change in performance; or<br />
1. (e) The unit has been dropped or the cabinet damaged.<br />
2. Servicing—Do not attempt to service the unit beyond that described in these operating<br />
instructions. Refer all other servicing to authorized servicing personnel.<br />
3. Replacement parts—When parts need replacing ensure the servicer uses parts specified by the<br />
manufacturer or parts that have the same characteristics as the original parts. Unauthorized<br />
substitutes may result in fire, electric shock, or other hazards.<br />
4. Safety check—After repairs or service, ask the servicer to perform safety checks to confirm that<br />
the unit is in proper working condition.<br />
Product information<br />
For product information or assistance with product operation:<br />
In the U.S.A., contact the Panasonic Customer Call Center at 1-800-211-7262, or<br />
e-mail consumerproducts@panasonic.com, or the website (http://www.panasonic.com).<br />
In Canada, contact the Panasonic Canada Inc. Customer Care Centre at 1-800-561-5505,<br />
or visit the website (www.panasonic.ca), or an authorized Servicentre closest to you.
Specifications<br />
∫ Main unit<br />
Discs played: <strong>DVD</strong>-RAM (<strong>DVD</strong>-VR format)<br />
<strong>DVD</strong>-Video, <strong>DVD</strong>-Audio<br />
Music <strong>CD</strong> [<strong>CD</strong>-DA (<strong>CD</strong>-TEXT compatible)]<br />
Video <strong>CD</strong><br />
<strong>CD</strong>-R/<strong>CD</strong>-RW [<strong>CD</strong>-DA (<strong>CD</strong>-TEXT compatible),<br />
Video <strong>CD</strong>, MP3, WMA, JPEG,<br />
HighMAT Level 2 (Audio and Image)]<br />
<strong>DVD</strong>-R (finalized as <strong>DVD</strong>-Video)<br />
<strong>SD</strong> played:<br />
Media: <strong>SD</strong> Memory Card<br />
Image: JPEG<br />
Video: MPEG4<br />
Voice: G.726<br />
Audio: MPEG2-AAC, MP3<br />
(Sampling frequency:<br />
32 kHz, 44.1 kHz, 48 kHz)<br />
Signal system: NTSC<br />
L<strong>CD</strong> screen: 9q α-Si, TFT wide-screen L<strong>CD</strong><br />
(VGA 800k480kRGB pixels)<br />
Composite-video output/input:<br />
Output/input level: 1 Vp-p (75 ≠)<br />
Output/input terminal: Mini-jack<br />
Number of terminals: 1 system (output/input)<br />
Audio output/input:<br />
Output/input level: 1.5 Vrms<br />
(1 kHz, 0 dB, 10 k≠)<br />
Output/input terminal: Stereo mini-jack<br />
Number of terminals: 1 system (output/input)<br />
Audio performance:<br />
(1) Frequency response:<br />
(1) ≥<strong>DVD</strong> (linear audio):<br />
4 Hz–22 kHz (48 kHz sampling)<br />
4 Hz–44 kHz (96 kHz sampling)<br />
(1) ≥<strong>DVD</strong>-Audio:<br />
4Hz–88 kHz (192 kHz sampling)<br />
(1) ≥<strong>CD</strong> audio: 4 Hz–20 kHz<br />
(2) S/N:<br />
(1) ≥<strong>CD</strong> audio: 115 dB<br />
(3) Dynamic range:<br />
(1) ≥<strong>DVD</strong> (linear audio): 98 dB<br />
(1) ≥<strong>CD</strong> audio: 97 dB<br />
(4) Total harmonic distortion:<br />
(1) ≥<strong>CD</strong> audio: 0.008 %<br />
Digital audio output:<br />
Output terminal: Mini optical terminal<br />
Number of terminals: 1 system<br />
(also used for audio output/input)<br />
Built-in speakers: 1Wi1 W stereo output<br />
Pickup:<br />
Wave length: 658 nm/790 nm<br />
Laser power: CLASS II/CLASS I<br />
Power supply: DC 9 V (DC IN terminal)/<br />
DC 7.2 V (Battery terminal)<br />
Power consumption<br />
(using included AC adaptor):<br />
17 W (Unit only: 13 W)<br />
Recharging 13 W<br />
Battery pack CGR-H604 (lithium ion):<br />
Voltage: 7.2 V<br />
Capacity: 3000 mAh<br />
Dimensions (excluding protrusions):<br />
232 (W)k173.5 (D)k30.7 § (H) mm<br />
[92 ⁄16q (W)k627 ⁄32q (D)k17 ⁄32q (H)]<br />
§ 31 24.6 mm ( ⁄32q) at lowest point<br />
Mass: 1200 g (42.3 oz.)<br />
∫ Multi cradle<br />
Composite-video output:<br />
Output level: 1 Vp-p (75 ≠)<br />
Output terminal: RCA pin-jack<br />
Number of terminals: 1 system<br />
S-video output:<br />
Y output level: 1 Vp-p (75 ≠)<br />
C output level: 0.286 Vp-p (75 ≠)<br />
Output terminal: S-video jack<br />
Number of terminals: 1 system<br />
Component-video output<br />
(Progressive compatible):<br />
Y output level: 1 Vp-p (75 ≠)<br />
PB output level: 0.525 Vp-p (75 ≠)<br />
PR output level: 0.525 Vp-p (75 ≠)<br />
Output terminal: RCA pin-jack<br />
Number of terminals: 1 system<br />
Audio output:<br />
Output level: 1.5 Vrms (1 kHz, 0 dB, 10 k≠)<br />
Output terminal: RCA pin-jack<br />
Number of terminals: 5.1 ch discreet output<br />
1 system<br />
Included speakers: 2Wi2 W stereo output<br />
Power supply: DC 9 V (DC IN terminal)<br />
Power consumption<br />
(using included AC adaptor):<br />
27 W (when connected<br />
to main unit and playing)<br />
Dimensions (excluding protrusions):<br />
238 (W)k182 (D)k38 (H) mm<br />
[96 ⁄16q (W)k73 ⁄16q (D)k11 ⁄2q (H)]<br />
Mass: 680 g (24.0 oz)<br />
∫ Common<br />
Operating temperature range:<br />
i5 to i35 oC (i41 to i95 oF)<br />
Operating humidity range:<br />
10–80 % RH (no condensation)<br />
AC adaptor:<br />
Power source: AC 100–240 V, 50/60 Hz<br />
Power consumption: 38 W<br />
DC output: 9 V, 2500 mA<br />
Note<br />
Specifications are subject to change without<br />
notice.<br />
Mass and dimensions are approximate.<br />
Power consumption in standby mode<br />
(using included AC adaptor):<br />
Main unit: 0.8 W<br />
Multi cradle: 0.9 W (when connected<br />
to main unit)<br />
Reference<br />
RQT6912<br />
47
Reference<br />
RQT6912<br />
48<br />
Limited Warranty (ONLY FOR U.S.A.)<br />
Panasonic Consumer Electronics Company,<br />
Division of Matsushita Electric Corporation<br />
of America<br />
One Panasonic Way Secaucus, New Jersey<br />
07094<br />
Panasonic Sales Company, Division of<br />
Matsushita Electric of Puerto Rico, Inc.<br />
Ave. 65 de Infantería, Km. 9.5<br />
San Gabriel Industrial Park, Carolina, Puerto<br />
Rico 00985<br />
Panasonic <strong>DVD</strong> <strong>Player</strong>/Recorder<br />
Limited Warranty<br />
Limited Warranty Coverage<br />
If your product does not work properly because of a<br />
defect in materials or workmanship, Panasonic<br />
Consumer Electronics Company or Panasonic Sales<br />
Company (collectively referred to as “the warrantor”)<br />
will, for the length of the period indicated on the chart<br />
below, which starts with the date of original purchase<br />
(“warranty period”), at its option either (a) repair your<br />
product with new or refurbished parts, or (b) replace it<br />
with a new or a refurbished product. The decision to<br />
repair or replace will be made by the warrantor.<br />
Product or<br />
Part Name<br />
<strong>DVD</strong> <strong>Player</strong><br />
<strong>DVD</strong> Recorder<br />
Rechargeable<br />
Batteries,<br />
<strong>DVD</strong>-RAM Disc<br />
(in exchange for<br />
defective item)<br />
Parts<br />
One (1) Year<br />
One (1) Year<br />
Ten (10) Days<br />
Labor<br />
Ninety (90) Days<br />
One (1) Year<br />
Not Applicable<br />
During the “Labor” warranty period there will be no<br />
charge for labor. During the “Parts” warranty period,<br />
there will be no charge for parts. You must carry-in or<br />
mail-in your product during the warranty period. If<br />
non-rechargeable batteries are included, they are not<br />
warranted. This warranty only applies to products<br />
purchased and serviced in the United States or Puerto<br />
Rico. This warranty is extended only to the original<br />
purchaser of a new product which was not sold “as is”.<br />
A purchase receipt or other proof of the original<br />
purchase date is required for warranty service.<br />
Carry-In or Mail-In Service<br />
For Carry-In or Mail-In Service in the United States call<br />
1-800-211-PANA (7262) or visit Panasonic Web Site:<br />
http://www.panasonic.com<br />
For assistance in Puerto Rico call Panasonic Sales<br />
Company (787)-750-4300 or fax (787)-768-2910.<br />
Limited Warranty Limits And Exclusions<br />
This warranty ONLY COVERS failures due to defects in<br />
materials or workmanship, and DOES NOT COVER<br />
normal wear and tear or cosmetic damage. The<br />
warranty ALSO DOES NOT COVER damages which<br />
occurred in shipment, or failures which are caused by<br />
products not supplied by the warrantor, or failures which<br />
result from accidents, misuse, abuse, neglect,<br />
mishandling, misapplication, alteration, faulty<br />
installation, set-up adjustments, misadjustment of<br />
consumer controls, improper maintenance, power line<br />
surge, lightning damage, modification, or commercial<br />
use (such as in a hotel, office, restaurant, or other<br />
business), rental use of the product, service by anyone<br />
other than a Factory Servicenter or other Authorized<br />
Servicer, or damage that is attributable to acts of God.<br />
THERE ARE NO EXPRESS WARRANTIES EXCEPT<br />
AS LISTED UNDER “LIMITED WARRANTY<br />
COVERAGE”. THE WARRANTOR IS NOT LIABLE<br />
FOR INCIDENTAL OR CONSEQUENTIAL DAMAGES<br />
RESULTING FROM THE USE OF THIS PRODUCT,<br />
OR ARISING OUT OF ANY BREACH OF THIS<br />
WARRANTY. (As examples, this excludes damages for<br />
lost time, travel to and from the servicer, loss of media<br />
or images, data or other recorded content. The items<br />
listed are not exclusive, but are for illustration only.) ALL<br />
EXPRESS AND IMPLIED WARRANTIES, INCLUDING<br />
THE WARRANTY OF MERCHANTABILITY, ARE<br />
LIMITED TO THE PERIOD OF THE LIMITED<br />
WARRANTY.<br />
Some states do not allow the exclusion or limitation of<br />
incidental or consequential damages, or limitations on<br />
how long an implied warranty lasts, so the exclusions<br />
may not apply to you.<br />
This warranty gives you specific legal rights and you<br />
may also have other rights which vary from state to<br />
state. If a problem with this product develops during or<br />
after the warranty period, you may contact your dealer<br />
or Servicenter. If the problem is not handled to your<br />
satisfaction, then write to the warrantor’s Consumer<br />
Affairs Department at the addresses listed for the<br />
warrantor.<br />
PARTS AND SERVICE WHICH ARE NOT COVERED<br />
BY THIS LIMITED WARRANTY ARE YOUR<br />
RESPONSIBILITY.
Customer Services Directory<br />
For Product Information, Operating Assistance, Literature Request, Dealer<br />
Locations, and all Customer Service inquiries please contact:<br />
1-800-211-PANA (7262), Monday–Friday 9 am–9 pm;<br />
Saturday–Sunday 9 am–7 pm, EST.<br />
or send e-mail:<br />
consumerproducts@panasonic.com<br />
For hearing or speech impaired TTY users, TTY: 1-877-833-8855<br />
Web Site: http://www.panasonic.com<br />
You can purchase parts, accessories or locate your<br />
nearest servicenter by visiting our Web Site.<br />
Accessory Purchases:<br />
1-800-332-5368 (Customer Orders Only)<br />
For hearing or speech impaired TTY users, TTY: 1-866-605-1277<br />
Panasonic Services Company 20421 84th Avenue South, Kent, WA 98032<br />
(6 am to 5 pm Monday–Friday; 6 am to 10:30 am Saturday; PST)<br />
(Visa, MasterCard, Discover Card, American Express, Check)<br />
Service in Puerto Rico<br />
Matsushita Electric of Puerto Rico, Inc. Panasonic Sales Company/Factory Servicenter:<br />
Ave. 65 de Infanteria, Km. 9.5, San Gabriel Industrial Park, Carolina, Puerto Rico 00985<br />
Phone (787) 750-4300 Fax (787) 768-2910<br />
Panasonic Consumer Electronics Company,<br />
Division of Matsushita Electric Corporation of America<br />
One Panasonic Way Secaucus, New Jersey 07094<br />
http://www.panasonic.com<br />
Panasonic Sales Company, Division of Matsushita Electric of Puerto Rico, Inc. (“PSC”)<br />
Ave. 65 de Infantería, Km. 9.5 San Gabriel Industrial Park, Carolina, Puerto Rico 00985<br />
Panasonic Canada Inc.<br />
5770 Ambler Drive, Mississauga, Ontario L4W 2T3<br />
www.panasonic.ca<br />
C 2003 Matsushita Electric Industrial Co., Ltd.<br />
Printed in Japan<br />
Reference<br />
RQT6912<br />
49