teaching - Earth Science Teachers' Association
teaching - Earth Science Teachers' Association
teaching - Earth Science Teachers' Association

Create successful ePaper yourself
Turn your PDF publications into a flip-book with our unique Google optimized e-Paper software.
TEACHING EARTH SCIENCES ● Volume 26 ● Number 3, 2001<br />
Exercises<br />
The students are asked to download and complete the<br />
workbook. Some of the exercises require short textual<br />
answers, such as:<br />
● Explaining which of several methods of data recording<br />
is the best<br />
● Assessing the quality of examples of work from field<br />
notebooks by listing good and bad points<br />
● Listing the important features of an outcrop from a<br />
photograph.<br />
However, most of the exercises require students to produce<br />
a labelled diagram from a photograph. The aim of<br />
the task is not simply to copy the photograph: the diagram<br />
must be labelled, and it must contain information<br />
such as the direction of movement on a fault or the<br />
way-up of sedimentary structures. The students are<br />
therefore being asked not only to make observations<br />
but also to interpret them.<br />
A common problem when students are asked to produce<br />
field sketches is that they have no confidence in<br />
their drawing ability: they believe that they cannot draw.<br />
While there is no doubt that some people have a talent for<br />
drawing and others do not, many of the problems with<br />
student field sketches are the result of a lack of observation<br />
and care, rather than a lack of drawing ability. To<br />
overcome these problems, the students are taken<br />
through a sequence of steps, beginning with the decision<br />
whether or not a field sketch is necessary. It they decide<br />
to proceed with a field sketch, they have to identify its<br />
purposes (what the sketch is meant to show) before they<br />
begin to draw. They are then taken through the steps of<br />
adding labels, details, orientation and scale. In all cases,<br />
examples are given to illustrate the points being made.<br />
There are also tips such as how to record angles or proportions<br />
by first imagining a grid over the outcrop.<br />
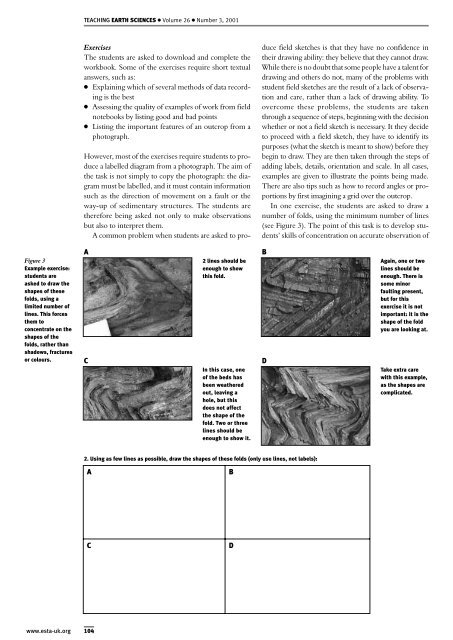
In one exercise, the students are asked to draw a<br />
number of folds, using the minimum number of lines<br />
(see Figure 3). The point of this task is to develop students’<br />
skills of concentration on accurate observation of<br />
Figure 3<br />
Example exercise:<br />
students are<br />
asked to draw the<br />
shapes of these<br />
folds, using a<br />
limited number of<br />
lines. This forces<br />
them to<br />
concentrate on the<br />
shapes of the<br />
folds, rather than<br />
shadows, fractures<br />
or colours.<br />
A<br />
C<br />
2 lines should be<br />
enough to show<br />
this fold.<br />
In this case, one<br />
of the beds has<br />
been weathered<br />
out, leaving a<br />
hole, but this<br />
does not affect<br />
the shape of the<br />
fold. Two or three<br />
lines should be<br />
enough to show it.<br />
B<br />
D<br />
Again, one or two<br />
lines should be<br />
enough. There is<br />
some minor<br />
faulting present,<br />
but for this<br />
exercise it is not<br />
important: it is the<br />
shape of the fold<br />
you are looking at.<br />
Take extra care<br />
with this example,<br />
as the shapes are<br />
complicated.<br />
2. Using as few lines as possible, draw the shapes of these folds (only use lines, not labels):<br />
A<br />
B<br />
C<br />
D<br />
www.esta-uk.org<br />
104