TEACHING EARTH SCIENCES ● Volume 26 ● Number 3, 2001 <strong>Earth</strong> <strong>Science</strong> Activities and Demonstrations: Sedimentary Rocks MIKE TUKE Editor’s Note: The following extracts are reproduced, with minor editing, from “<strong>Earth</strong> <strong>Science</strong> Activities and Demonstrations” by Mike Tuke, published by John Murray, with the kind permission of author and publisher. Three items are given here: Frost Shattering; Making Rock; and Making Layers. All worksheets may be reproduced for non-commercial class use provided due acknowledgement is made. Frost Shattering Purpose To show how the expansion of water when it freezes may break up rocks. Requirements Per group: ● Small glass jar with screw-on lid (plastic containers often stretch rather than break) ● Clear polythene bag ● Access to a freezer Notes (refer to worksheet) This activity is a useful one for pupils to do at home, although some parents may object. Several methods for finding the amount of expansion of ice are given below. The change in volume is about 9%. 1. Seal off the needle end of a syringe with quick-glue or sealant such as Araldite. Half fill the syringe with water and note the position of the plunger. To get the air out of the syringe insert a wire down the side of the plunger before pushing it in. Then place the syringe in the freezer, and when the water has frozen note how far the plunger has moved out. 2. Fill a balloon with water, tie its top and measure its circumference. Freeze it, and when it is solid measure its circumference again. 3. Place a plastic measuring cylinder threequarters full of water in the freezer. When frozen the top of the ice will be uneven but an average level can be found. Q2 Water gets into the cracks in rocks, freezes and expands. This widens the crack and eventually breaks the rock apart. Q5 The scree (or talus deposits) which covers many the hillsides in the Lake District is formed in this way. Q6 Rocks shattered by frost will be found at the top of mountains, where lowest temperatures occur Making Rock Purpose To show how sediments are turned into rock. Requirements Per pupil: ● Bunsen burner ● Old dessert spoon ● Concentrated sugar solution ● Level dessert spoon of sand ● Teat pipette Notes (refer to worksheet) There are three methods for making rock. Only this one can be completed in a lesson but the following are in some ways better. Method 1. Take a bucket and nearly fill it up with builders’ sand. Saturate the sand with water and leave for several days. This works well in hard water areas such as southeast England. You can part-bury a penny in the sand to show that the rock is artificial. This is the most effective method because it uses normal water and produces large lumps of rock, but it is the least reliable. Method 2. Fill a margarine container with sand and a concentrated solution of common salt. Leave it to evaporate. The top surface will become quite hard. Q1 Common salt is soluble, so would be dissolved away by rainwater. Q2 Precipitation differs from evaporation in that the water is not driven off; the chemical compound ceases to be in solution but the water is still present. Q3 No-one has yet observed sugar solutions in the <strong>Earth</strong>, but solutions containing calcium carbonate and iron compounds are common. The compounds may be precipitated between the sand grains to cement’ the grains together to form rock. Making Layers Purpose To show why sedimentary rocks are layered. Requirements Per group often pupils: ● Several types of sand and pebbles, some rounded and some angular, of various sizes and colours, in separate containers (see Notes) ● Coffee jar one third full of water and with a layer of sand in it (see Notes) ● Cups or bottle tops with a capacity of about 30 ml Notes (refer to worksheet) This is a very important concept to get over to pupils, but it is also fairly easy to understand. This activity is often best done as a demonstration but is also useful as an activity for low ability children. It is best to choose pebbles that can easily be separated again, unless you have sieves. About ten cupfuls of sediment are sufficient in one coffee jar. Take care that the water in the jar does not overflow and that pupils do not all choose the same sediment. Both of these problems can be avoided by having cups already filled with sediment which pupils can just tip in. In this case the amount in each cup can be varied to give different thicknesses of sediment. Sand should be the first layer and if it is used to make another layer it should be put onto pebbles about 2 mm across, to stop it sinking down and obliterating the lower layers. Q1 (a) and (b) would have taken many years, (c), (d) and (e) days. (f) months. Q2 Sediments found: peat (top and latest layer), shells, volcanic ash, pebbles, mud, sand, mud, sand, mud, sand (lowest and oldest layer). www.esta-uk.org 106
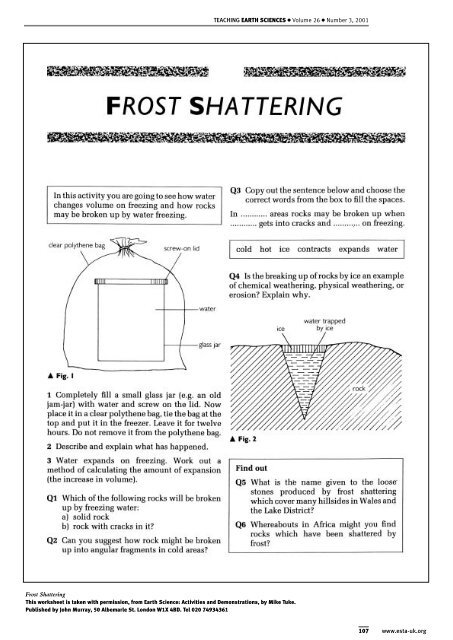
TEACHING EARTH SCIENCES ● Volume 26 ● Number 3, 2001 Frost Shattering This worksheet is taken with permission, from <strong>Earth</strong> <strong>Science</strong>: Activities and Demonstrations, by Mike Tuke. Published by John Murray, 50 Albemarle St. London W1X 4BD. Tel 020 74934361 107 www.esta-uk.org