Display Function - Marine Autopilots, Engine Controls and Instruments
Display Function - Marine Autopilots, Engine Controls and Instruments
Display Function - Marine Autopilots, Engine Controls and Instruments

You also want an ePaper? Increase the reach of your titles
YUMPU automatically turns print PDFs into web optimized ePapers that Google loves.
Tiller button (Autopilot<br />
ON-OFF switch):<br />
A separate pushbutton can be connected<br />
to the Drivebox at the AUX-2 connector (on<br />
older Driveboxes the button is connected to<br />
the rudder sensor cable).<br />
Briefly pressing this button disengages<br />
the autopilot <strong>and</strong> the Fly-By-Wire Servo-<br />
Wheel.<br />
By holding the button for 3 seconds, the<br />
autopilot engages in HDG mode, similar to the<br />
application of the HDG button on the AP display,<br />
or to the AP button of the Fly-By-Wire<br />
Station.<br />
Installation of the ON-OFF button at the<br />
tiller tip is recommended for yachts with tiller<br />
steering. Otherwise install this button within<br />
easy reach of the manual helm.<br />
Additional Autopilot<br />
<strong>Function</strong>s for Yachts:<br />
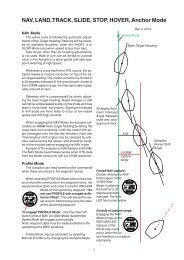
Wind Modes<br />
The Wind Modes require a wind sensor <strong>and</strong><br />
a gyro in the system. A wind display is not needed.<br />
The TRUE Wind Mode is the preferred mode<br />
for stable steering. It requires boat speed data<br />
or Ground Speed data available (with Ground<br />
Speed substituting water speed, the calculated<br />
relative true wind angle will become less accurate<br />
with increasing set).<br />
HDG<br />
WIND<br />
AP-OFF<br />
NAV<br />
<br />
Press the WIND-button<br />
briefly: The left<br />
WIND-LED comes on for<br />
the apparent (A) autopilot<br />
wind mode. Press<br />
the button again <strong>and</strong><br />
the right WIND-LED<br />
comes on for the true<br />
(t) wind mode. The<br />
present wind angle<br />
(apparent or true) is<br />
taken as target wind<br />
angle. It can be altered<br />
as needed with the left or<br />
right arrow buttons.<br />
Tacks <strong>and</strong> Jibes:<br />
Pressing both arrow<br />
buttons simultaneously will trigger a tack,<br />
when the target wind angle was smaller than<br />
90 degrees. A jibe will be started, if the target<br />
wind angle was greater than 90 degrees.<br />
Note: a tack or a jibe may be stopped any<br />
time by briefly pressing the HDG-button (if the<br />
Heading-Mode is available).<br />
100-degrees tack<br />
in Compass Mode:<br />
This function is useful<br />
on Sailing Yachts with no wind<br />
instruments. Press <strong>and</strong><br />
hold HDG-button for<br />
three seconds, until<br />
the HDG-LED changes<br />
from yellow into red.<br />
HDG WIND NAV<br />
The autopilot is now<br />
AP-OFF<br />
armed for tacking. A<br />
100-degrees heading<br />
change can be triggered<br />
with the left or right<br />
arrow button. The HDG-LED<br />
starts blinking (yellow) until the new target heading<br />
has been reached.<br />
The heading change may be stopped any<br />
time by briefly pressing the HDG-button. Actual<br />
heading (or track) will then be followed.<br />
<br />
Warnings:<br />
Sensor Warning<br />
Dashes on the<br />
display are an indication<br />
for the absence<br />
HDG WIND NAV<br />
of valid data from the<br />
AP-OFF<br />
required sensor.<br />
Make sure that<br />
the configuration of<br />
the display corresponds<br />
with the physically<br />
connected sensor (verify correct values of<br />
SE: <strong>and</strong> n0:).<br />
<br />
Settings:<br />
Illumination<br />
If you have a dimmer installed in the system,<br />
use only the dimmer. Otherwise use the push<br />
buttons for illumination<br />
control:<br />
1. Press <strong>and</strong> hold all<br />
three buttons.<br />
2. Release<br />
SELECT button first,<br />
SELECT<br />
then the others.<br />
3. Adjust brightness<br />
with left or right button.<br />
All other displays with the<br />
same group number will follow<br />
in brightness.<br />
<br />
Do not use buttons on an autopilot display<br />
in Wind Mode! Either use other display<br />
unit for illumination or select head-<br />
!<br />
ing or NAV mode, for example.<br />
21