- Page 1 and 2: DS-90 DS-35 USER’S GUIDE
- Page 3 and 4: Adjusting the HCDF Side Guides.....
- Page 5 and 6: Introduction.......................
- Page 8 and 9: 1 Warning Read this First 1 About t
- Page 10 and 11: Safety Precautions • Only compete
- Page 12 and 13: End of Life The objectives of the E
- Page 14 and 15: 2 English The figure shows an overv
- Page 16 and 17: Operating Controls 2 English A - ca
- Page 18 and 19: Installing the Document Feed Trays
- Page 20 and 21: Home Menu 2 When you start up the s
- Page 22 and 23: • A picture of the system with sy
- Page 24 and 25: Document Orientation 2 English In c
- Page 26 and 27: Loading Envelopes Before you load t
- Page 28 and 29: 2. Fill the reservoir A to the "Max
- Page 30 and 31: Adjusting the MaxiFeeder Side Guide
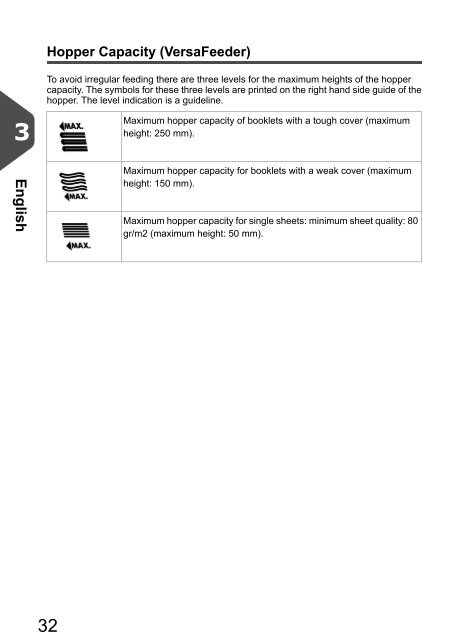
- Page 32 and 33: Feeding documents (MaxiFeeder) To f
- Page 34 and 35: 3. Rotate wheel E. The space betwee
- Page 36 and 37: Installing the VersaFeeder When ins
- Page 40 and 41: Support for Curved Reply Envelopes
- Page 42 and 43: High Capacity Envelope Hopper (EF-4
- Page 44 and 45: High Capacity Conveyor Belt (CS-2)
- Page 46 and 47: insert'n Frank / insert'n Mail If t
- Page 48 and 49: 4 Processing Mail Sets Introduction
- Page 50 and 51: Processing a mail set with BRE or i
- Page 52 and 53: Adjustment of the Document Stoppers
- Page 54 and 55: 8. When finished with Daily Mail, p
- Page 56 and 57: Verifying the Insert Position To ma
- Page 58 and 59: 2. Press [Manual] to create a new j
- Page 60 and 61: 2. Select the job you want to use.
- Page 62 and 63: Using a job If you want to use an e
- Page 64 and 65: 3. Press the [Job] menu button. The
- Page 66 and 67: 4. Press the [Delete job] button. T
- Page 68 and 69: Document settings In the ‘documen
- Page 70 and 71: When a feeder is selected for readi
- Page 72 and 73: • Stop on misread: define if the
- Page 74 and 75: Job name It is possible to store th
- Page 76 and 77: • Select the button if you want t
- Page 78 and 79: • Select the button if you want t
- Page 80 and 81: Mail Piece Production Control setti
- Page 82 and 83: • System info (see Viewing System
- Page 84 and 85: Viewing System info and Software ve
- Page 86 and 87: Activating an option To add a licen
- Page 88 and 89:
3. In the Hardware test menu, press
- Page 90 and 91:
2. Use the arrows next to "Flap Clo
- Page 92 and 93:
2. Use the arrows next to "Document
- Page 94 and 95:
7 Reading Introduction The reading
- Page 96 and 97:
Document Orientation Switch on the
- Page 98 and 99:
BCR basic license For the BCR basic
- Page 100 and 101:
4. In the BCR settings screen, conf
- Page 102 and 103:
OMR Code Description Position of th
- Page 104 and 105:
OMR advanced license For the OMR ad
- Page 106 and 107:
An Example of OMR Code In the figur
- Page 108 and 109:
2-track OMR 2-track OMR uses two OM
- Page 110 and 111:
Start-up Online Services To start-u
- Page 112 and 113:
2. Press the button to view details
- Page 114 and 115:
4. In case of a new job: Press the
- Page 116 and 117:
Selecting the country To select a c
- Page 118 and 119:
9 Operator Maintenance Maintenance
- Page 120 and 121:
Resetting Photocells To calibrate a
- Page 122 and 123:
Clearing Stoppages Stoppages can oc
- Page 124 and 125:
4. Release lever A. 5. Make sure th
- Page 126 and 127:
flexFeed When a stoppage occurs in
- Page 128 and 129:
4. Close the feed unit: - Place you
- Page 130 and 131:
System stops while inserting (stopp
- Page 132 and 133:
11Specifications Technical Specific
- Page 134 and 135:
Envelope sizes Envelope quality Sta
- Page 136 and 137:
versaFeeder Specifications Model Ty
- Page 138 and 139:
High Capacity Conveyor Belt Specifi
- Page 140 and 141:
C-fold Fold type in which a documen
- Page 142 and 143:
Flexcode OMR flexFeed High Capacity
- Page 144 and 145:
V-fold A V-fold implies the documen
- Page 146 and 147:
Note: this equipment has been teste
- Page 148 and 149:
Note: this equipment has been teste
- Page 150 and 151:
Note: this equipment has been teste