Version 14.00 - Patterson Software Installation Guide
Version 14.00 - Patterson Software Installation Guide
Version 14.00 - Patterson Software Installation Guide

You also want an ePaper? Increase the reach of your titles
YUMPU automatically turns print PDFs into web optimized ePapers that Google loves.
<strong>Patterson</strong> <strong>Software</strong><br />
<strong>Installation</strong> <strong>Guide</strong>
© Copyright 2007, <strong>Patterson</strong> Dental Supply, Inc. All rights reserved.<br />
Microsoft is a registered trademark and Windows XP and Windows 2000 are trademarks of Microsoft Corporation.<br />
2202 Althoff Drive<br />
PO Box 1267<br />
Effingham, IL 62401<br />
Corporate (217) 347–5964<br />
Sales (800) 294–8504<br />
Fax (217) 342–6950<br />
Technical Support (800) 475–5036<br />
Technical Support Fax (217) 342–4571
Contents<br />
Introduction 1<br />
Using This <strong>Installation</strong> <strong>Guide</strong>....................................................................................................1<br />
Requirements 2<br />
Minimum System Requirements................................................................................................2<br />
Operating System ........................................................................................................2<br />
Minimum Requirements..............................................................................................2<br />
Recommended Hardware Requirements .....................................................................3<br />
Hardware and <strong>Software</strong> to Avoid ..............................................................................................3<br />
Configurations Not Supported.....................................................................................3<br />
Determining Your Server Machine 4<br />
Additional Server Requirements................................................................................................4<br />
Performance Tuning 5<br />
Multi-User Only ........................................................................................................................5<br />
Packet and Cache Size.................................................................................................5<br />
Database Options.......................................................................................................................6<br />
Multi-User <strong>Guide</strong> 7<br />
A Brief Overview ......................................................................................................................7<br />
What is a Network .....................................................................................................7<br />
Definitions...................................................................................................................7<br />
Components of a LAN ................................................................................................7<br />
Components of a WLAN.............................................................................................8<br />
Server and Workstation...............................................................................................8<br />
Network Adapter .........................................................................................................9<br />
Wireless Network Adapter ..........................................................................................9<br />
Cabling ........................................................................................................................9<br />
Network Operating System .........................................................................................9<br />
Network Protocols.......................................................................................................9<br />
Network Protocol ......................................................................................................10<br />
Network Application .................................................................................................10<br />
Network Cables 11<br />
Connecting Your Computer to the LAN .................................................................................11<br />
Connecting Your Computer to the WLAN..............................................................................12<br />
Network Configuration 13<br />
Introduction .............................................................................................................................13<br />
<strong>Patterson</strong> <strong>Software</strong> <strong>Installation</strong> <strong>Guide</strong><br />
Contents • i
Windows 2000 Network Setup For TCP/IP ............................................................................13<br />
To Review and Confirm Windows 2000 Configuration ...........................................13<br />
Network Components................................................................................................14<br />
Network Settings using Windows XP .....................................................................................15<br />
To Review and Confirm Windows XP Configuration ..............................................15<br />
Network Settings using Windows Vista ..................................................................................17<br />
To Review and Confirm Windows Vista Configuration ...........................................18<br />
<strong>Installation</strong> 21<br />
EagleSoft <strong>Installation</strong> Instructions...........................................................................................21<br />
SINGLE USERS: Skip to the Next Step ...................................................................23<br />
<strong>Patterson</strong> Imaging <strong>Installation</strong> Instructions .............................................................................25<br />
<strong>Patterson</strong> Imaging Bridge – New Clients Only .........................................................28<br />
<strong>Patterson</strong> Digital Integration Users............................................................................28<br />
Sharing the CD-ROM Drive......................................................................................28<br />
Upon Completion of <strong>Installation</strong> ...............................................................................29<br />
Startup/Shutdown Procedures 30<br />
What You Need to Know ........................................................................................................30<br />
Multi-User .................................................................................................................30<br />
Single-User................................................................................................................31<br />
Making Backups 32<br />
Backups....................................................................................................................................32<br />
Making Backups – EagleSoft ....................................................................................32<br />
Making Backups – <strong>Patterson</strong> Imaging.......................................................................33<br />
When to Make Backups.............................................................................................33<br />
Auto Backup..............................................................................................................33<br />
More Tips On Your Backups ....................................................................................34<br />
Multi-User Image Storage 35<br />
Storing Images Using a Multi-User Setup ...............................................................................35<br />
Step 1: Locate Where Your Files Are Stored ...........................................................35<br />
Step 2: Share That Data Directory With All Workstations ......................................35<br />
Step 3: Identify the Shared Directory Through <strong>Patterson</strong> <strong>Software</strong>.........................35<br />
Setting Up The Share in Preferences .......................................................................................36<br />
Steps for Moving the Location of the Server...........................................................................37<br />
Appendix 38<br />
Checklist For Multi-User <strong>Installation</strong>s.....................................................................................38<br />
Technical Bulletins ..................................................................................................................39<br />
Disabling the Power Saver Option...........................................................................................39<br />
In Windows 2000 ......................................................................................................39<br />
In Windows XP .........................................................................................................41<br />
In Windows Vista......................................................................................................42<br />
An Office’s Responsibility to its Hardware.............................................................................45<br />
ii • Contents<br />
<strong>Patterson</strong> <strong>Software</strong> <strong>Installation</strong> <strong>Guide</strong>
Introduction<br />
Using This <strong>Installation</strong> <strong>Guide</strong><br />
Welcome to the <strong>Patterson</strong> <strong>Software</strong> installation guide. This guide is designed to<br />
assist individuals with the installation of <strong>Patterson</strong> software. The intent is to<br />
document all past research and findings to facilitate a quality installation of software<br />
and hardware.<br />
This guide was developed to help acquaint you with the installation process and to<br />
provide you with the information on the procedures involved. Before installing the<br />
<strong>Patterson</strong> software, we encourage you to read the entire manual.<br />
For more information on the various features of <strong>Patterson</strong>, please review the<br />
corresponding <strong>Patterson</strong> User’s <strong>Guide</strong>.<br />
Below is an outline of the manual:<br />
• Hardware Requirements<br />
• Multi-User Section<br />
• Troubleshooting Steps and Technical Bulletins<br />
• Installing Multi-User and Single-User<br />
• Backups and Storing Files<br />
<strong>Patterson</strong> <strong>Software</strong> <strong>Installation</strong> <strong>Guide</strong> Introduction • 1
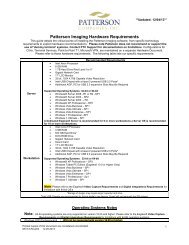
Requirements<br />
Minimum System Requirements<br />
Power User rights are required on all machines for all Windows ® users.<br />
The Server requirements only<br />
apply to multi-user.<br />
64 bit Operating Systems are not<br />
supported.<br />
Windows XP Home is not<br />
supported.<br />
Operating System<br />
Server<br />
• Windows 2000 Server<br />
• Windows 2003 Server<br />
• Windows 2000 Professional<br />
• Windows XP Professional<br />
• Windows Vista Business, Ultimate and Enterprise<br />
We recommend using a dedicated server with a network of<br />
six or more workstations.<br />
Workstations<br />
• Windows 2000 Professional<br />
• Windows XP Professional<br />
• Windows Vista Business, Ultimate and Enterprise<br />
These minimum requirements<br />
are for all <strong>Patterson</strong><br />
<strong>Software</strong> users.<br />
Minimum Requirements<br />
For more information, read the <strong>Patterson</strong> Hardware Requirements sheet.<br />
• Dedicated Server – IBM-compatible Pentium IV 1 GHz; 512MB of<br />
RAM, 40GB hard drive; backup device<br />
• Server/Workstation – IBM-compatible Pentium IV 1 GHz; 512MB<br />
of RAM, 40GB hard drive, backup device<br />
• Workstation – IBM-compatible Pentium IV 1 GHz; 256MB of RAM;<br />
20GB hard drive<br />
• Monitor – Super VGA color monitor; 1024x768, 32-bit color<br />
• Input Devices – mouse, keyboard<br />
• CD-ROM drive<br />
2 • Requirements <strong>Patterson</strong> <strong>Software</strong> <strong>Installation</strong> <strong>Guide</strong>
Recommended Hardware Requirements<br />
Hardware and <strong>Software</strong> to Avoid<br />
For the most up-to-date information on Hardware Requirements visit us online at<br />
http://patterson.eaglesoft.net. Select the Customer Care tab and select Hardware<br />
Requirements.<br />
This section details items known to perform poorly with <strong>Patterson</strong> <strong>Software</strong>. To<br />
ensure a stable installation and efficient support, we recommend that these be<br />
avoided.<br />
If these are encountered while a support specialist is troubleshooting an area of<br />
concern, this area cannot be serviced until these items are removed.<br />
Configurations Not Supported<br />
• Compressed hard drives<br />
• “Dummy” Terminals<br />
• Novell, LANtastic, or other non-Windows networks<br />
• Energy Star compliant system power saver setup will disconnect a<br />
workstation from the <strong>Patterson</strong> <strong>Software</strong> database<br />
• Certain antivirus programs that have been known to cause issues such<br />
as McAfee, Panda and Spy Doctor.<br />
<strong>Patterson</strong> <strong>Software</strong> <strong>Installation</strong> <strong>Guide</strong> Requirements • 3
Determining Your Server Machine<br />
Additional Server Requirements<br />
Before beginning the software installation, it is necessary to decide which machine<br />
on your network should be designated as the server. Because all other workstations<br />
will be connecting to and accessing this machine for data, the server machine has<br />
additional specifications.<br />
With this in mind, we have provided some recommendations:<br />
• Do not attach a printer to the server<br />
Attaching a printer to the server on a large network will slow down<br />
your overall performance. Since there is a lot of network traffic to and<br />
from the server, a printer on the server could create even more<br />
congestion.<br />
• The server must be the least used machine on the network<br />
If the server is a regularly used workstation, the network performance<br />
will be affected. Most of the server’s processing power is already<br />
spent transmitting data back and forth between workstations, so using<br />
the server as a workstation on a large network could increase<br />
performance problems.<br />
• Install the backup device on the server<br />
Installing the backup device on the server enables you to make the<br />
backup process quicker and more convenient. If the backup device is<br />
installed on a workstation, you will have to back up across the network,<br />
which is time-consuming and often difficult.<br />
For more information, see the <strong>Patterson</strong> <strong>Software</strong> Hardware<br />
Requirements sheet at www.eaglesoft.net.<br />
4 • Determining Your Server Machine <strong>Patterson</strong> <strong>Software</strong> <strong>Installation</strong> <strong>Guide</strong>
Performance Tuning<br />
Multi-User Only<br />
Packet and Cache Size<br />
The packet size setting is used to establish the size of the data packets being sent<br />
across the network.<br />
The packet and cache sizes are automatically established on your server. To view<br />
the setting, click on Start and select Programs | <strong>Patterson</strong> <strong>Software</strong> | Technical<br />
Reference.<br />
It is important to note that the<br />
settings of the network<br />
packets and/or cache size will<br />
only have an effect on<br />
<strong>Patterson</strong> <strong>Software</strong><br />
products. These changes will<br />
not affect network<br />
performance in other<br />
applications.<br />
Once the Technical Support Aid window has appeared, click Database Setup.<br />
<strong>Patterson</strong> <strong>Software</strong> <strong>Installation</strong> <strong>Guide</strong> Performance Tuning • 5
Database Options<br />
Packet Size<br />
The packet size will appear as (AUTO). This means that the software will adjust the<br />
packet size according to the function being processed, processor speed and available<br />
RAM.<br />
Cache Size<br />
The cache size will appear as (AUTO). This means that the software will adjust the<br />
cache size according to the function being processed, processor speed and available<br />
RAM.<br />
Note: The Assistant<br />
Database cannot be set<br />
to start as a Windows<br />
Service.<br />
This feature will enable the <strong>Patterson</strong> <strong>Software</strong> Database Server and Messenger<br />
Server to start as a Windows ® service.<br />
Select Start | Programs |<strong>Patterson</strong> <strong>Software</strong> |Technical Reference. From here,<br />
select the Database Set up button. In the Database Set up window, select the check<br />
box Start <strong>Patterson</strong> <strong>Software</strong> Database Server as a Windows Service. Select<br />
OK.<br />
By selecting this preference, the Start <strong>Patterson</strong> <strong>Software</strong> Server and Stop<br />
<strong>Patterson</strong> Server icons will still start and stop the database service and the<br />
Messenger service. Deselect this preference for the Database Server to function as<br />
they do currently.<br />
Prior to restarting the computer or the server, you need to remove the preference<br />
Start <strong>Patterson</strong> Database Server on Startup.<br />
When using this feature, the Server icon will no longer appear in the task bar.<br />
The Stop and Start Server icons will function exactly as they do now.<br />
Administrative rights may be needed to enable this function.<br />
6 • Performance Tuning <strong>Patterson</strong> <strong>Software</strong> <strong>Installation</strong> <strong>Guide</strong>
Multi-User <strong>Guide</strong><br />
A Brief Overview<br />
What is a Network<br />
Networks consist of two or more computers connected and running software<br />
allowing them to communicate with one another.<br />
Users on a network can share computer resources, such as hard drives, printers,<br />
modems, CD-ROM drives and even processors. The efficient sharing of resources<br />
saves time in transferring data from one computer to another. It also saves money by<br />
sharing expensive equipment such as printers. This all leads to increased<br />
productivity for your office.<br />
When the computers connected to the network are all close together, such as in the<br />
same building, the network is called a Local Area Network (LAN) or a Wireless<br />
Local Area Network (WLAN)<br />
Definitions<br />
Workstation – A computer that utilizes <strong>Patterson</strong> <strong>Software</strong>. Also referred to as<br />
a Client.<br />
Server – The computer that stores the database accessed by all workstations. On<br />
smaller networks, one computer can serve as both a workstation and a server.<br />
Switch/Hub – The hardware component used to connect all the computers on the<br />
network. These can be both wired or wireless.<br />
Access Point – A hardware device that acts as a communication hub for users of a<br />
wireless network.<br />
Wireless Network Interface Card (NIC) – Provides a hardware interface<br />
between the computer and wireless network.<br />
Site Survey – A program used in conjunction with a wireless network card to<br />
determine the coverage area of a wireless network.<br />
Router – A device that forwards packets between networks. The forwarding<br />
decision is based on network layer information and routing tables, often<br />
constructed by routing protocols.<br />
Components of a LAN<br />
The minimum hardware components required to build a LAN include:<br />
<strong>Patterson</strong> <strong>Software</strong> <strong>Installation</strong> <strong>Guide</strong> Multi-User <strong>Guide</strong> • 7
• At least one computer that can act as a server to share its resources<br />
• At least one computer, also known as a workstation or client, that will<br />
access the shared resources<br />
• A network adapter (card) for each computer<br />
• Cabling to connect the two computers<br />
• A hub/switch that allows the computers to communicate with each<br />
other<br />
The minimum software components required to build a LAN include:<br />
• A network operating system or a network-aware operating system<br />
Note: Operating systems in their beta test phases are not supported.<br />
• Appropriate network protocol drivers<br />
• Network-aware applications (any application that has the ability to<br />
accept data or send data across the network is considered networkaware)<br />
Components of a WLAN<br />
The minimum hardware components required to build a WLAN include:<br />
• At least one computer that can act as a server to share its resources<br />
• At least one computer, also known as a workstation or client, that will<br />
access the shared resources<br />
• A network adapter (card) for each computer<br />
• Access point that allows the computers to communicate with each other<br />
• Server computer must be on a wired network<br />
The minimum software components required to build a WLAN include:<br />
• A network operating system or a network-aware operating system<br />
Note: Operating systems in their beta test phases are not supported.<br />
• Appropriate network protocol drivers<br />
• Network-aware applications (any application that has the ability to<br />
accept data or send data across the network is considered networkaware)<br />
Server and Workstation<br />
In any network configuration, at least one of the computers on the network is<br />
configured to share resources. Computers that make resources available to other<br />
machines on the network are called servers. The process of making a resource<br />
available to other computers is called sharing the resource.<br />
In terms of <strong>Patterson</strong> <strong>Software</strong>, the resource being shared is the data that is<br />
contained in the Data Folder including: DENTAL.DB, DENTAL.LOG, AUDIO,<br />
CUSTOM DRAWTYPES, DOCUMENTS, IMAGES, VOICE, INDICATORS, XML and<br />
METAFILES. Contrary to many File-Server/Slave network configurations, it is<br />
8 • Multi-User <strong>Guide</strong> <strong>Patterson</strong> <strong>Software</strong> <strong>Installation</strong> <strong>Guide</strong>
not necessary to share hard drives or map network drives for the workstation<br />
to connect to the database.<br />
With Practice Management and Clinical, these files are normally stored in<br />
C:\EagleSoft\Data. With <strong>Patterson</strong> Imaging, these files are normally stored in<br />
C:\<strong>Patterson</strong> Imaging\Data.<br />
Network Adapter<br />
Network adapter cards are installed into each computer on the LAN. These cards do<br />
the actual work of moving data from computer to computer over the network. This<br />
happens through translation of digital personal computer signals into electrical and<br />
optical signals for the network’s cables. The cards also assemble data into packets<br />
for transmission and verify source-to-destination transmissions.<br />
A twisted-pair Ethernet network (10BaseT or 100BaseT) connection uses an RJ-45<br />
connector. The RJ-45 connector is similar to an RJ-11 telephone connector but has<br />
more conductors.<br />
Wireless Network Adapter<br />
Wireless network adapters are installed into each computer on the WLAN. These<br />
cards provide a hardware interface between the computer and the wireless network.<br />
These cards do the actual work of moving data from computer to computer over the<br />
wireless network. This happens by using an access point (AP) to centralize wireless<br />
communication and bridge wireless network cards to wired network segments<br />
through the wireless/wired network cards.<br />
Cabling<br />
Unshielded twisted-pair<br />
Shielded twisted-pair<br />
Twisted-Pair Cable<br />
Twisted-pair cable consists of two insulated strands of copper wire twisted together.<br />
Twisted-pair wires are often grouped together and enclosed in a protective sheath to<br />
form a cable.<br />
Unshielded twisted-pair cable is commonly used for telephone systems and is<br />
already installed in most office buildings.<br />
A shielded twisted-pair cable is less susceptible to electrical interference and<br />
supports higher transmission rates over longer distances than unshielded twisted-pair<br />
cable. This cable medium can carry a signal for 100 meters (about 328 feet).<br />
Network Operating System<br />
When setting up your multi-user network for use with the <strong>Patterson</strong> <strong>Software</strong><br />
system, you are required to set up one of the previously listed operating systems<br />
(depending on the size of the network) as the operating system on the server.<br />
If you have ten or more workstations, a Microsoft Server Operating System is<br />
required.<br />
Network Protocols<br />
A protocol is a set of rules governing communications between two stations. Just as<br />
two people need to understand the same language in order to speak to each other,<br />
<strong>Patterson</strong> <strong>Software</strong> <strong>Installation</strong> <strong>Guide</strong> Multi-User <strong>Guide</strong> • 9
workstations need to be running the same protocol driver in order to communicate<br />
on the same network. A network protocol, or protocol driver, is generally<br />
responsible for the packaging and routing of data and application messages on the<br />
network.<br />
Network Protocol<br />
TCP/IP<br />
This protocol is an industry-standard protocol providing communications<br />
between dissimilar end systems.<br />
<strong>Patterson</strong> <strong>Software</strong> requires this protocol for all networks.<br />
Network Application<br />
The main network application you will be using is <strong>Patterson</strong> <strong>Software</strong> .<br />
10 • Multi-User <strong>Guide</strong> <strong>Patterson</strong> <strong>Software</strong> <strong>Installation</strong> <strong>Guide</strong>
Network Cables<br />
Connecting Your Computer to the LAN<br />
When you are finished installing and configuring your network card, the next step is<br />
to connect the cables that link your computer to the other computers on your<br />
network. The following section describes twisted-pair networking.<br />
Twisted-Pair Ethernet<br />
The advantages of a twisted-pair Ethernet system are that the cable is generally less<br />
expensive than thick Ethernet systems, and it is also relatively easy to install and<br />
maintain.<br />
The following table describes the hardware components.<br />
Item<br />
Description<br />
Network card with RJ-45 connector port The connector port on the back of your<br />
network card connects the card to the<br />
network cable.<br />
RJ-45 connector<br />
Hub/Switch<br />
An RJ-45 connector is located at each<br />
end of the twisted-pair cable. To<br />
connect the cable to the card, align the<br />
connector so the small plastic tab is in<br />
line with the slot in the receptacle. Push<br />
in the connector until you hear a click.<br />
(The connector is similar to the plastic<br />
plug used to connect a telephone cord to<br />
a wall outlet.)<br />
The computers on a twisted-pair system<br />
are connected to each other by using a<br />
hub/switch. The cable from each<br />
computer is plugged into a socket in the<br />
hub.<br />
<strong>Patterson</strong> <strong>Software</strong> <strong>Installation</strong> <strong>Guide</strong> Network Cables • 11
Connecting Your Computer to the WLAN<br />
When you are finished installing and configuring your access point, the next step is<br />
to link your computer to the other computers on your network.<br />
Access Point<br />
Configure your Access Point<br />
Site Survey<br />
Complete your Site Survey<br />
Wireless Client<br />
Configure your wireless clients<br />
(workstations)<br />
12 • <strong>Patterson</strong> <strong>Software</strong> <strong>Installation</strong> <strong>Guide</strong>
Network Configuration<br />
Introduction<br />
After the network hardware components are in place, it is necessary to configure the<br />
network for your operating system. There is one network configuration we have<br />
fully tested and support: TCP/IP protocol.<br />
It is necessary to use this network configuration according to your operating system.<br />
If this configuration is not followed, <strong>Patterson</strong> <strong>Software</strong> will not support any<br />
performance problems that may occur with your program.<br />
This chapter will explain in detail how to set up the following:<br />
• Windows 2000 Professional Setup<br />
• Windows 2000 Server Setup<br />
• Windows XP Network Setup<br />
• Windows Vista Network Setup<br />
Windows 2000 Network Setup For TCP/IP<br />
Changing the Computer Name or<br />
Workgroup name requires the<br />
computer to be rebooted before<br />
the changes can take effect.<br />
For offices NOT using <strong>Patterson</strong> Branded Hardware, we recommend a<br />
professional trained in installation and maintenance of a Windows 2000<br />
system be employed to set up machines running Windows 2000 server<br />
or Windows 2000 workstation. TCP/IP network setup is required on<br />
Windows 2000.<br />
To Review and Confirm Windows 2000<br />
Configuration<br />
1. Go to Start | Settings | Control Panel and double click on the<br />
Network and Dial-up Connections icon.<br />
2. If your Ethernet network card is installed and configured properly, a<br />
Local Area Connection icon will appear.<br />
To Change the Identification of the Server/Workstation<br />
1. From the Control Panel, double-click System icon.<br />
2. Click the Network Identification tab and click Properties.<br />
3. Click in the Computer Name box to edit the computer name.<br />
<strong>Patterson</strong> <strong>Software</strong> <strong>Installation</strong> <strong>Guide</strong> Network Configuration • 13
4. Select the Workgroup radio button. Click in the Workgroup box to<br />
edit the Workgroup name.<br />
Network Components<br />
When the Ethernet card is installed, all network components should automatically be<br />
configured by Windows 2000 (see the following image).<br />
1. Go to Start | Settings | Control Panel and double click on the Network<br />
and Dial-up Connections icon.<br />
2. Right click on Local Area Connection and choose Properties.<br />
Editing a Protocol<br />
1. To edit the TCP/IP protocol, select the protocol.<br />
2. Click the Properties button.<br />
3. From the IP Address window, select the Specify an IP Address radio button.<br />
4. Enter the IP Address and subnet mask.<br />
Requirements for IP Addresses and subnet masks<br />
• Specific IP addresses (see example below)<br />
• Subnet mask should be 255.255.255.0 (same for all computers)<br />
• A unique IP address for each computer<br />
A static IP address is<br />
recommended but not<br />
required.<br />
An example of an IP address setup for 3 workstations and a server:<br />
• Server: 10.0.0.1<br />
14 • Network Configuration <strong>Patterson</strong> <strong>Software</strong> <strong>Installation</strong> <strong>Guide</strong>
• Workstation 1: 10.0.0.2<br />
• Workstation 2: 10.0.0.3<br />
• Workstation 3: 10.0.0.4<br />
The IP Address window is displayed below (see the following image).<br />
5. Click OK when finished.<br />
Network Settings using Windows XP<br />
For offices NOT using <strong>Patterson</strong> branded hardware, we recommend a<br />
professional trained in installation and maintenance of a Windows XP<br />
system be employed to set up machines running a Windows XP<br />
Professional server or a Windows XP Professional workstation. TCP/IP<br />
network setup is required on Windows XP.<br />
To Review and Confirm Windows XP Configuration<br />
1. Go to Start | Settings | Control Panel or Start | Control Panel and<br />
double click on the Network Connections icon.<br />
2. If your Ethernet network card is installed and configured properly, a<br />
Local Area Connection icon will appear.<br />
To Change the Identification of the Server/Workstation<br />
1. From the Control Panel, double-click System icon.<br />
2. Click the Computer Name tab and click Change.<br />
3. Click in the Computer Name box to edit the computer name.<br />
<strong>Patterson</strong> <strong>Software</strong> <strong>Installation</strong> <strong>Guide</strong> Network Configuration • 15
4. Select the Workgroup radio button. Click in the Workgroup box to<br />
edit the Workgroup name.<br />
Computer names should be<br />
limited to no more than 15<br />
characters. Avoid using<br />
spaces, asterisks, hash<br />
marks, punctuation marks<br />
and ampersands.<br />
5. Select OK. You will be prompted to restart your computer.<br />
6. Once you have restarted your computer, you can check your network<br />
connection by going to Network Connections, double click on Entire<br />
Network | Microsoft Windows Network | Workgroup Name.<br />
Network Components<br />
1. Go to Start | Settings | Control Panel and double click on<br />
Network Connections.<br />
2. Right click Local Area Connection and choose Properties.<br />
3. You will be able to add your Adapter, Client, Services and Protocols<br />
from this screen.<br />
4. Hit OK when you are finished.<br />
16 • Network Configuration <strong>Patterson</strong> <strong>Software</strong> <strong>Installation</strong> <strong>Guide</strong>
Editing a Protocol<br />
1. To edit the TCP/IP protocol, select the protocol.<br />
2. Click the Properties button.<br />
3. From the IP Address window, select the Specify an IP Address radio<br />
button.<br />
4. Enter the IP Address and subnet mask.<br />
Requirements for IP Addresses and subnet masks:<br />
• Unique IP addresses (Note: Static IP addresses are recommended<br />
but not required.)<br />
• Subnet mask should be 255.255.255.0 (same for all computers)<br />
An example of an IP Address setup for three workstations and a server<br />
• Server: 10.0.0.1<br />
• Workstation 1: 10.0.0.2<br />
• Workstation 2: 10.0.0.3<br />
• Workstation 3: 10.0.0.4<br />
The IP Address window is displayed below (see the following image).<br />
5. Click OK when finished.<br />
Network Settings using Windows Vista<br />
For offices NOT using <strong>Patterson</strong> branded hardware, we recommend a<br />
professional trained in installation and maintenance of a Windows Vista<br />
system be employed to set up machines running a Windows Vista<br />
server or a Windows Vista workstation. TCP/IP network setup is<br />
required on Windows Vista.<br />
<strong>Patterson</strong> <strong>Software</strong> <strong>Installation</strong> <strong>Guide</strong> Network Configuration • 17
To Review and Confirm Windows Vista<br />
Configuration<br />
1. Go to Start | Settings | Control Panel or Start | Control Panel and<br />
double click on the Network and Sharing Center icon.<br />
2. On the left hand side of the screen, click on Manage Network<br />
Connections.<br />
3. If your Ethernet network card is installed and configured properly, a<br />
Local Area Connection icon will appear.<br />
To Change the Identification of the Server/Workstation<br />
1. From the Control Panel, double-click System icon.<br />
2. On the right hand side of the screen, click on Change Settings.<br />
3. Click in the Computer Name box to edit the computer name.<br />
4. To change Workgroup name, select Change.<br />
18 • Network Configuration <strong>Patterson</strong> <strong>Software</strong> <strong>Installation</strong> <strong>Guide</strong>
5. Select the Workgroup radio button. Click in the Workgroup box to<br />
edit the Workgroup name.<br />
Computer names should be<br />
limited to no more than 15<br />
characters. Avoid using spaces,<br />
asterisks, hash marks,<br />
punctuation marks and<br />
ampersands.<br />
6. Select OK. You will be prompted to restart your computer.<br />
7. Once you have restarted your computer, you can check your network<br />
connection by going to Network. Any and all other computers in the<br />
same workgroup will be listed.<br />
Network Components<br />
1. Go to Start | Settings | Control Panel or Start | Control Panel and<br />
double click on the Network and Sharing Center icon.<br />
2. On the left hand side of the screen, click on Manage Network<br />
Connections.<br />
3. Right click Local Area Connection and choose Properties.<br />
<strong>Patterson</strong> <strong>Software</strong> <strong>Installation</strong> <strong>Guide</strong> Network Configuration • 19
4. You will be able to add your Adapter, Client, Services and Protocols<br />
from this screen.<br />
5. Hit OK when you are finished.<br />
Editing a Protocol<br />
1. To edit the TCP/IPv4 protocol, select the protocol.<br />
2. Click the Properties button.<br />
3. From the IP Address window, select the Specify an IP Address radio<br />
button.<br />
4. Enter the IP Address and subnet mask.<br />
Requirements for IP Addresses and subnet masks:<br />
• Unique IP addresses (Note: Static IP addresses are recommended<br />
but not required.)<br />
• Subnet mask should be 255.255.255.0 (same for all computers)<br />
An example of an IP Address setup for three workstations and a server<br />
• Server: 10.0.0.1<br />
• Workstation 1: 10.0.0.2<br />
• Workstation 2: 10.0.0.3<br />
• Workstation 3: 10.0.0.4<br />
The IP Address window is displayed below (see the following image).<br />
5. Click OK when finished.<br />
20 • Network Configuration <strong>Patterson</strong> <strong>Software</strong> <strong>Installation</strong> <strong>Guide</strong>
<strong>Installation</strong><br />
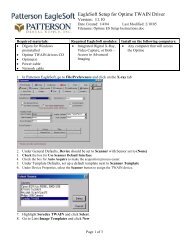
EagleSoft <strong>Installation</strong> Instructions<br />
Local Administration rights are required for installing <strong>Patterson</strong> <strong>Software</strong>.<br />
Install <strong>Patterson</strong> EagleSoft <strong>Version</strong> <strong>14.00</strong> on all machines including the server.<br />
1. Please review all installation instructions before beginning the installation. You should have one (1)<br />
compact disc labeled <strong>Patterson</strong> EagleSoft <strong>Version</strong> <strong>14.00</strong>.<br />
2. Close all running programs.<br />
3. Make a backup (same as daily backup).<br />
4. Insert the compact disc into the CD-ROM drive. The following <strong>Patterson</strong> EagleSoft <strong>Installation</strong> screen will<br />
automatically appear. If not, click on Start and choose Run. Type “D:\essetup.exe” in the open field. (If the<br />
CD-ROM drive on your computer is represented by a letter other than ‘D’, substitute the appropriate letter) and<br />
click OK.<br />
5. Please be patient. The estimated time for installing this product is between 5 and 15 minutes depending upon<br />
the speed of your computer.<br />
6. Select Install EagleSoft.<br />
<strong>Patterson</strong> <strong>Software</strong> <strong>Installation</strong> <strong>Guide</strong> <strong>Installation</strong> • 21
7. Click Next.<br />
8. Read the License Agreement. If you agree to<br />
the terms, select the radio button I accept the<br />
terms in the license agreement.<br />
9. Click Next.<br />
NEW CUSTOMER INSTALLATIONS: Skip to<br />
the next step.<br />
(This screen will not appear)<br />
10. Click Yes. Click No to cancel installation.<br />
Enter the Licensing Number that appears on the<br />
back of the Compact Disc wallet.<br />
11. Click Next.<br />
22 • <strong>Installation</strong> <strong>Patterson</strong> <strong>Software</strong> <strong>Installation</strong> <strong>Guide</strong>
SINGLE USERS: Skip to the Next Step<br />
(This screen will not appear)<br />
Workstation Only – this machine functions only as<br />
a workstation and does not store your data.<br />
Server and Workstation – this machine functions<br />
as a workstation and server, which stores your data.<br />
Server Only – this machine is only used to store<br />
your data.<br />
Select the checkbox to Startup Server at boot to<br />
start the server automatically at startup (optional).<br />
This step applies to the Server machine only.<br />
Select the check box Install Fast CheckIn to install<br />
the Fast CheckIn patient kiosk on this computer.<br />
(optional)<br />
12. Click Next.<br />
Select additional components if desired and click<br />
Next.<br />
Use the Change button to browse to a new location<br />
for installation.<br />
13. Click Next.<br />
Verify the Summary information.<br />
14. Click Next.<br />
<strong>Patterson</strong> <strong>Software</strong> <strong>Installation</strong> <strong>Guide</strong> <strong>Installation</strong> • 23
15. Click Install.<br />
16. Click Finish.<br />
17. Click OK.<br />
MULTI USERS: Repeat steps 4-17 for each machine on your network.<br />
Once the installation has been completed on the Server machine, you may start the EagleSoft Server to allow the<br />
database to upgrade. A status bar will appear to show your database is being upgraded.<br />
*** Remember, do not start EagleSoft until the database upgrade has completed and the new version of <strong>Patterson</strong><br />
EagleSoft has been installed on this machine.<br />
NOTE: THE DATABASE UPGRADE MAY TAKE 15 MINUTES TO 3 HOURS TO COMPLETE DEPENDING<br />
ON THE SIZE OF YOUR DATABASE AND THE SPEED OF YOUR COMPUTER.<br />
24 • <strong>Installation</strong> <strong>Patterson</strong> <strong>Software</strong> <strong>Installation</strong> <strong>Guide</strong>
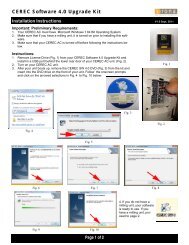
<strong>Patterson</strong> Imaging <strong>Installation</strong> Instructions<br />
1. Please review all installation instructions before beginning the installation. You should have<br />
one (1) compact disc labeled <strong>Patterson</strong> Imaging<br />
2. Close all running programs.<br />
3. Make a backup (same as daily backup). Before loading any new software, backup important office<br />
data.<br />
4. Insert the compact disc into the CD-ROM drive. The following <strong>Installation</strong> screen will automatically<br />
appear. If not, click on Start and choose Run. Type “D:\pi.exe” in the open field. (If the CD-ROM<br />
drive on your computer is represented by a letter other than ‘D’, substitute the appropriate letter), and<br />
click OK.<br />
Select the Install <strong>Patterson</strong> Imaging.<br />
Click on Next.<br />
<strong>Patterson</strong> <strong>Software</strong> <strong>Installation</strong> <strong>Guide</strong> <strong>Installation</strong> • 25
Click the radio button to Accept the Terms. Click<br />
Next.<br />
Enter your license number exactly as it appears.<br />
Click Next. The license number is located on the<br />
back of your CD holder.<br />
**Select the checkbox Install <strong>Patterson</strong> Imaging<br />
Bridge and have it run at startup if you are using<br />
the <strong>Patterson</strong> Imaging Bridge.<br />
Select this checkbox on the Server machine ONLY.<br />
Setting up the Bridge on the workstations is a separate<br />
process and the checkbox should NOT be selected during<br />
the installation of <strong>Patterson</strong> Imaging.<br />
Select the Change button to install <strong>Patterson</strong><br />
Imaging in a location other than the default<br />
** New Clients ONLY. Existing <strong>Patterson</strong> Imaging users who are upgrading to the current version do<br />
not need to select this option.<br />
Select the applicable workstation configuration.<br />
If desired, select the checkbox to Startup Server at<br />
Boot to automatically start the server engine on<br />
logon. Click Next.<br />
26 • <strong>Installation</strong> <strong>Patterson</strong> <strong>Software</strong> <strong>Installation</strong> <strong>Guide</strong>
Verify the Summary Report and click Next.<br />
Click Install.<br />
Click Finish. You will be prompted to reboot your<br />
computer prior to using <strong>Patterson</strong> Imaging.<br />
<strong>Patterson</strong> <strong>Software</strong> <strong>Installation</strong> <strong>Guide</strong> <strong>Installation</strong> • 27
<strong>Patterson</strong> Imaging Bridge – New Clients Only<br />
After the reboot, the following screen should appear<br />
to install the <strong>Patterson</strong> Bridge. Contact <strong>Patterson</strong><br />
Customer Support to continue this process. Call<br />
800.475.5036 for assistance.<br />
For information on purchasing the <strong>Patterson</strong><br />
Imaging Bridge, please call 800.475.5036.<br />
<strong>Patterson</strong> Digital Integration Users<br />
To install your digital integration option, select<br />
Start ⏐Run. Type “D:\setup.exe” in the open field.<br />
(If the CD-ROM drive on your computer is<br />
represented by a letter other than ‘D’, substitute the<br />
appropriate letter), and select OK.<br />
*ScanX integration is loaded automatically during<br />
the <strong>Patterson</strong> Imaging <strong>Installation</strong>.<br />
Select the appropriate button. Follow the <strong>Patterson</strong><br />
Digital instructions included in this packet.<br />
Sharing the CD-ROM Drive<br />
If you need to install the program on a computer that does not have a CD-<br />
ROM drive, you will need to share the CD-ROM of a computer in the<br />
office that has a CD-ROM. To do this, use the following instructions:<br />
Do not put the <strong>Patterson</strong> <strong>Software</strong> compact disk in the CD-ROM drive<br />
yet.<br />
1. On the computer with the CD-ROM drive, double-click the My<br />
Computer icon. A window similar to the one below will appear:<br />
28 • <strong>Installation</strong> <strong>Patterson</strong> <strong>Software</strong> <strong>Installation</strong> <strong>Guide</strong>
2. Click one time on the CD-ROM drive so that it is highlighted. Then,<br />
click File | Sharing.<br />
3. Click the Shared As radio button. Leave the share name as it is. It<br />
will most likely match your CD-ROM drive letter.<br />
4. Select the Permissions button.<br />
5. Under Access Type, select Full. Do not enter a password.<br />
6. Click the Apply button at the bottom of the window. Click OK.<br />
7. The CD-ROM drive is now shared and the icon for your CD-ROM<br />
drive should now have a picture of a hand under it.<br />
Upon Completion of <strong>Installation</strong><br />
Upon completion of installation, please do the following:<br />
• Store new program compact disk(s) and CD wallet containing your<br />
license number in a safe place at the office.<br />
• Read the product documentation to gain better understanding of the<br />
many features and benefits available to you.<br />
<strong>Patterson</strong> <strong>Software</strong> <strong>Installation</strong> <strong>Guide</strong> <strong>Installation</strong> • 29
Startup/Shutdown Procedures<br />
What You Need to Know<br />
Multi-User<br />
When installing the multi-user software, you were offered the option to load the<br />
server upon startup of your computer system. If you do this, the database will be<br />
accessible to all other workstations once the server is turned on and logged into your<br />
Windows network. If this is the case, please disregard the rest of this section.<br />
To view the available <strong>Patterson</strong> <strong>Software</strong> modules, click on Start | Programs |<br />
<strong>Patterson</strong> <strong>Software</strong>. A box similar to the one below will display the available<br />
options.<br />
If you chose not to start the <strong>Patterson</strong> <strong>Software</strong> database engine upon startup of<br />
your server computer, you will need to go through the daily process of starting the<br />
server before any workstation will be able to access the data.<br />
Included in the example shown above is the highlighted option called Start<br />
<strong>Patterson</strong> <strong>Software</strong> Server. After selecting this option, the database server will be<br />
started and all workstations on the network will be able to access the data contained<br />
within the <strong>Patterson</strong> <strong>Software</strong> database. This process must be performed before<br />
starting <strong>Patterson</strong> <strong>Software</strong> on any workstation.<br />
To Start the Server<br />
From the Windows XP or 2000 desktop, click on Start | Programs | <strong>Patterson</strong><br />
<strong>Software</strong> | Start <strong>Patterson</strong> <strong>Software</strong> Server. An icon, normally labeled as<br />
<strong>Patterson</strong> <strong>Software</strong>, will appear in the system tray once the engine has started<br />
successfully. This indicates your practice database is now available for all<br />
workstations. At this time, you can start <strong>Patterson</strong> <strong>Software</strong> from any<br />
workstation.<br />
30 • Startup/Shutdown Procedures <strong>Patterson</strong> <strong>Software</strong> <strong>Installation</strong> <strong>Guide</strong>
Note: The <strong>Patterson</strong> <strong>Software</strong> Server icon (SQL) should always appear in the<br />
system tray when you’re using <strong>Patterson</strong> <strong>Software</strong>. It should not be closed.<br />
To Shut Down the Server<br />
Once you have finished your work for the day, you will want to make sure all<br />
computer workstations are properly shut down and turned off. Also, you will want<br />
to go through the process of shutting down the server. To shut down the server, do<br />
the following:<br />
1. Exit from <strong>Patterson</strong> <strong>Software</strong> on all workstations.<br />
2. From the Windows XP or 2000 desktop on the server, click on Start |<br />
Programs | <strong>Patterson</strong> <strong>Software</strong> | Stop <strong>Patterson</strong> <strong>Software</strong> Server.<br />
To verify that the database engine is shut down, make sure that there is<br />
not a <strong>Patterson</strong> <strong>Software</strong> icon in the system tray.<br />
Note: Backups should be made after shutting down the server, not before.<br />
Failure to shut down the <strong>Patterson</strong> <strong>Software</strong> server will result in<br />
corruption of backed-up data.<br />
Single-User<br />
Shutting down a single-user version of <strong>Patterson</strong> <strong>Software</strong> is the same as above,<br />
except there is no server to shut down. To start <strong>Patterson</strong> <strong>Software</strong>, simply go to<br />
Start | Programs | <strong>Patterson</strong> <strong>Software</strong> and click <strong>Patterson</strong> <strong>Software</strong> .<br />
To shut the program down, click on File and Exit. Click Yes if you want to exit the<br />
program.<br />
Note: Make sure you have exited <strong>Patterson</strong> <strong>Software</strong> before making backups.<br />
<strong>Patterson</strong> <strong>Software</strong> <strong>Installation</strong> <strong>Guide</strong> Startup/Shutdown Procedures • 31
Making Backups<br />
Backups<br />
If you are having<br />
problems making backups,<br />
verify the path.<br />
Making a backup is one of the most important things you can do for your office.<br />
Backups are a form of insurance against fire, power outages, theft and other<br />
misfortunes. If you lose all of your data in a fire, but you have a recent backup, you<br />
have just saved your office staff time and money. This section provides information<br />
on what to back up, how often to back up and where to store a backup.<br />
Both single- and multi-user backup procedures involve backing up the same files<br />
and folders: the Data folder containing – custom draw types, dental.db,<br />
dental.log, documents, audio, images, indicators and metafiles. Single users,<br />
however, will backup at the same computer they use to do all their work. They also<br />
need to exit <strong>Patterson</strong> <strong>Software</strong>.<br />
The backup process for a multi-user involves a few more steps. Since the data on<br />
your multi-user system is located on your server machine, it is necessary to perform<br />
your daily data backups from your server machine.<br />
Remember: This process can only occur once you have completed the<br />
shutdown procedures explained in the previous section.<br />
Making Backups – EagleSoft<br />
The log file in the program directory is auto-archived when necessary. The archived<br />
file is renamed to reflect the date of archiving and appear in the data directory as<br />
such:<br />
• 9-12-2002.log<br />
It is important that ALL pertinent data is backed up including these archived files.<br />
If you are using Clinical along with Practice Management, there are six<br />
subdirectories that should be backed up along with the aforementioned files.<br />
Starting with version <strong>14.00</strong>, the files are located in C:\ EagleSoft\Data \<br />
(seen in the example). Earlier installations are located in the following path:<br />
c:\Eaglsoft… or C:\Program Files\EagleSoft… If you are having problems making<br />
backups, verify that your path is set up correctly.<br />
The default paths are:<br />
• C:\ EagleSoft\Data \Audio<br />
32 • Making Backups <strong>Patterson</strong> <strong>Software</strong> <strong>Installation</strong> <strong>Guide</strong>
• C:\ EagleSoft\Data \Images<br />
• C:\ EagleSoft\Data \Metafile<br />
• C:\ EagleSoft\Data \Custom draw types<br />
• C:\ EagleSoft\Data \Documents<br />
• C:\EagleSoft\Data\Indicators<br />
• C:\ EagleSoft\Data \Data2*<br />
*Note: This path is for offices that have purchased the Dual Database<br />
module.<br />
* IMPORTANT NOTE *<br />
The <strong>Patterson</strong> database engine must be shut down before a successful<br />
backup can be performed. Failure to shut down the <strong>Patterson</strong> server<br />
will result in corruption of backed-up data. If you are unsure of these<br />
steps, please refer to the Shutdown Procedure section.<br />
Making Backups – <strong>Patterson</strong> Imaging<br />
There are subdirectories that should be backed up along with the aforementioned<br />
files. Starting with version <strong>14.00</strong>, the files are located in C:\ <strong>Patterson</strong><br />
Imaging\Data \ (seen in the example). Earlier installations are located in the<br />
following path: C:\Program Files\<strong>Patterson</strong> Imaging… If you are having problems<br />
making backups, verify that your path is set up correctly.<br />
The default paths are:<br />
• C:\ <strong>Patterson</strong> Imaging\Data \Image<br />
• C:\ <strong>Patterson</strong> Imaging\Data \Documents<br />
* IMPORTANT NOTE *<br />
The <strong>Patterson</strong> database engine must be shut down before a successful<br />
backup can be performed. Failure to shut down the <strong>Patterson</strong> server<br />
will result in corruption of backed-up data. If you are unsure of these<br />
steps, please refer to the Shutdown Procedure section.<br />
When to Make Backups<br />
It is the office’s responsibility to make backups consistently. The more backups<br />
your office makes, the more your data is protected and insured against catastrophe.<br />
We recommend the following for backup frequency:<br />
1. Daily backup – a separate tape or drive should be used for each day the<br />
office is open and rotated weekly<br />
2. Monthly backups<br />
3. Yearly backups<br />
Note: A separate tape should be used for each type of backup.<br />
Auto Backup<br />
This feature enables <strong>Patterson</strong> <strong>Software</strong> to automatically create local backups of<br />
the database at startup. This should be used as a fail-safe backup and not relied upon<br />
IMPORTANT<br />
This option will not replace<br />
<strong>Patterson</strong> your daily, <strong>Software</strong> monthly or <strong>Installation</strong> annual <strong>Guide</strong> Making Backups • 33<br />
backup. Auto Backup will<br />
not:
as your sole means of backing up data. This can be setup through Technical<br />
Reference. The backups will consist of a zip file containing the dental.db and<br />
dental.log files at the time of the execution.<br />
Select Start | Programs | <strong>Patterson</strong> <strong>Software</strong> | Technical Reference. From here,<br />
select the Database Setup button. Select the Auto Backup button.<br />
To use the Auto Backup, select the check box Use Auto Backup. Enter the number<br />
of days between Server startup that you wish to perform an automatic backup. Enter<br />
the highest number of backup files you wish to keep at any given time.<br />
Use the button to browse to the auto backup folder if this hasn’t been done prior.<br />
Note: This system should not be relied upon as the sole means for data backup.<br />
<strong>Patterson</strong> recommends using an additional process as your primary data backup.<br />
More Tips On Your Backups<br />
Where to Store Backups<br />
It is a good idea to store your backups in a safe, fire/waterproof location, such as a<br />
safe deposit box. More importantly, keep your backups at an off-site location.<br />
Make Sure You are Making a Correct Backup<br />
To verify that you are making the backup correctly, restore it at least once a month.<br />
If you have questions on this procedure or need assistance, contact your hardware<br />
provider. <strong>Patterson</strong> Hardware users can call the <strong>Patterson</strong> Technology Center for<br />
assistance. The <strong>Patterson</strong> Technology Center can verify backups for a fee. For more<br />
information, contact the <strong>Patterson</strong> Technology Center.<br />
34 • Making Backups <strong>Patterson</strong> <strong>Software</strong> <strong>Installation</strong> <strong>Guide</strong>
Multi-User Image Storage<br />
Storing Images Using a Multi-User Setup<br />
The purpose of this section is to detail the steps involved with saving and accessing<br />
images from all workstations in your network. Please make sure that your backup<br />
procedure includes backing up your images, audio, indicators, custom draw types,<br />
documents and metafile directories.<br />
The following are steps required to have your network configured properly.<br />
Voice Users will have seven<br />
subfolders to backup.<br />
All Users must be given full<br />
access to the Data folder.<br />
Step 1: Locate Where Your Files Are Stored<br />
When <strong>Patterson</strong> <strong>Software</strong> is installed as a server or server/workstation, it creates<br />
six folders within the C:\ EagleSoft\Data directory: audio, images, metafile,<br />
custom draw types, documents and indicators or C:\<strong>Patterson</strong> Imaging\Data<br />
directory: images, custom draw types, documents.<br />
Step 2: Share That Data Directory With All<br />
Workstations<br />
The Data directory must be shared to all <strong>Patterson</strong> <strong>Software</strong> users.<br />
Share this directory with all stations on the network. Refer to your operating system<br />
manual for more information.<br />
Step 3: Identify the Shared Directory Through<br />
<strong>Patterson</strong> <strong>Software</strong><br />
After you have shared your data directory, start the <strong>Patterson</strong> <strong>Software</strong> program<br />
on one of the workstations. A window similar to the following will appear.<br />
<strong>Patterson</strong> <strong>Software</strong> <strong>Installation</strong> <strong>Guide</strong> Multi-User Image Storage • 35
Browse the network to find the data directory.<br />
Once you have found the data directory, highlight and click OK.<br />
Your images will now be stored in the data directory from all workstations.<br />
Setting Up The Share in Preferences<br />
Under the File menu, select Preferences to set up the share path to the Data folder.<br />
In the General tab, select the Browse button to locate the Server. Select the Data<br />
folder and select OK. Select OK in General Preferences to save your share path.<br />
36 • Multi-User Image Storage <strong>Patterson</strong> <strong>Software</strong> <strong>Installation</strong> <strong>Guide</strong>
Steps for Moving the Location of the Server<br />
1. Make a backup of the Data directory including dental.db and<br />
dental.log files, as well as the images, audio, custom draw types,<br />
documents, metafile, indicators and voice directories.<br />
2. Set up the new hardware and make sure the network is functioning<br />
properly.<br />
3. Install the <strong>Patterson</strong> <strong>Software</strong> as a server or a server/workstation<br />
on the new machine.<br />
4. Restore your backup to the correct directories on the new computer and<br />
verify that the database engine starts successfully. The database engine<br />
must start with your database successfully before you proceed with #5.<br />
5. Use the uninstall feature and then delete all dental.db, dental.log,<br />
audio, images, metafile and voice directories or files on the old server.<br />
Remove any shortcuts for <strong>Patterson</strong> <strong>Software</strong> programs.<br />
6. Share the Data folder with full access.<br />
7. Under File | Preferences | General, set up the Share by browsing to<br />
the new server location.<br />
8. Confirm that all workstations can access the current shared files such<br />
as images and documents.<br />
9. Reinstall <strong>Patterson</strong> <strong>Software</strong> as a workstation only on the old<br />
server.<br />
10. Redirect your backup system to the new server.<br />
<strong>Patterson</strong> <strong>Software</strong> <strong>Installation</strong> <strong>Guide</strong> Multi-User Image Storage • 37
Appendix<br />
Checklist For Multi-User <strong>Installation</strong>s<br />
To Ensure a Quality <strong>Installation</strong><br />
Please use the following checklist to ensure a quality multi-user installation:<br />
The majority of the printing should be done from the workstations and not the<br />
server machine.<br />
The backup device has been installed on the server.<br />
If the network has more than six workstations, a machine has been dedicated to<br />
operate only as the database server.<br />
All <strong>Patterson</strong> <strong>Software</strong> client programs have been installed onto each<br />
workstation.<br />
The program eagleSoft.exe or pi.exe is being executed from each local<br />
machine. It is not being executed by accessing a shared drive on the network.<br />
Each workstation on the network is using the same workgroup.<br />
Each workstation on the network has a unique computer name.<br />
The computer name and any shared printer names do not contain any spaces or<br />
periods. Unsupported hardware or configurations are not being utilized. See<br />
section on hardware and software to avoid.<br />
The server machine is not operating on a compressed hard drive.<br />
The Startup and Shutdown procedures within this manual have been read and<br />
understood. The underlying principles have also been communicated to the<br />
office staff.<br />
An initial backup of files dental.db and dental.log, including the indicators,<br />
images, documents, audio, voice and metafile directories, has been completed<br />
with no errors.<br />
See the Backup section for more information.<br />
The TCP/IP protocol has been established for each computer on the network.<br />
No additional network (for example, Novell, LANtastic) has been included on<br />
this Windows network.<br />
Coaxial cable is not being used.<br />
Data folder has been shared with Full Access and each workstation has browsed<br />
to the shared folder.<br />
38 • Appendix <strong>Patterson</strong> <strong>Software</strong> <strong>Installation</strong> <strong>Guide</strong>
Technical Bulletins<br />
Before Troubleshooting Networking Concerns<br />
Before proceeding with any troubleshooting steps, consider the following:<br />
• Has this configuration ever worked before, or did this just start<br />
happening If it just started, what has changed between the time this<br />
configuration was working and the time it stopped working<br />
• Has new hardware, cabling or software been added If this new<br />
addition is removed, does the problem go away<br />
• Have any new Windows Updates been installed<br />
Disabling the Power Saver Option<br />
• Is this problem occurring on one computer, several or all of them<br />
• Is the connection to the computer active Is there a light on the<br />
hub/switch that corresponds to the computer that you are<br />
troubleshooting<br />
• Do any error messages appear when the computer is booting up<br />
• Can you see the other computers through My Network<br />
Places/Network<br />
• It may be necessary to reroute network cabling away from sources of<br />
electrical interference (such as fluorescent lights)<br />
• Add permissions for <strong>Patterson</strong> <strong>Software</strong> (must be a power-user)<br />
In Windows 2000<br />
Here are the steps for disabling power management in Windows 2000.<br />
1. Go to Start | Settings | Control Panel and double click on the Power<br />
Options icon.<br />
<strong>Patterson</strong> <strong>Software</strong> <strong>Installation</strong> <strong>Guide</strong> Appendix • 39
2. Set the following areas to Never:<br />
• Turn off monitor<br />
• Turn off hard disks<br />
• System standby<br />
3. Click OK to save your changes.<br />
To disable the standby function when shutting off your computer, follow these<br />
instructions.<br />
1. From the Power Option Properties window, click the Advanced tab.<br />
2. Make sure the drop-down list box under When I press the power<br />
button on my computer is set to Power Off.<br />
3. Click OK to save your changes and exit.<br />
To disable the Hibernate support function, follow these instructions:<br />
40 • Appendix <strong>Patterson</strong> <strong>Software</strong> <strong>Installation</strong> <strong>Guide</strong>
1. From the Power Option Properties window, click the Hibernate tab.<br />
2. If checked, deselect the Enable hibernate support check box.<br />
3. Click OK to save your changes and exit.<br />
In Windows XP<br />
To disable the Power Management feature in Windows XP:<br />
1. Go to Start | Settings | Control Panel and double click on the Power<br />
Options icon.<br />
2. Set the following areas to Never:<br />
• Turn off monitor<br />
• Turn off hard disks<br />
• System standby<br />
<strong>Patterson</strong> <strong>Software</strong> <strong>Installation</strong> <strong>Guide</strong> Appendix • 41
• System hibernates<br />
3. Click OK to save your changes.<br />
To disable the standby function when shutting off your computer, follow these<br />
instructions.<br />
1. From the Power Option Properties window, click the Advanced tab.<br />
2. Make sure the drop-down list box under When I press the power<br />
button on my computer is set to Shut down.<br />
3. Click OK to save your changes and exit.<br />
To disable the Hibernate support function, follow these instructions:<br />
1. From the Power Options Properties window, click the Hibernate tab.<br />
2. If checked, deselect the Enable hibernate support check box.<br />
3. Click OK to save your changes and exit.<br />
In Windows Vista<br />
To disable the Power Management feature in Windows Vista:<br />
1. Go to Start | Settings | Control Panel or Start | Control Panel and<br />
double click on the Power Options icon.<br />
42 • Appendix <strong>Patterson</strong> <strong>Software</strong> <strong>Installation</strong> <strong>Guide</strong>
2. Click on either Choose when to turn off the display OR Change<br />
when the computer sleeps.<br />
3. Set the following areas to Never:<br />
• Turn off the display<br />
• Put the computer to sleep<br />
4. Click Save Changes to save your changes.<br />
To disable the standby function when shutting off your computer, follow these<br />
instructions.<br />
<strong>Patterson</strong> <strong>Software</strong> <strong>Installation</strong> <strong>Guide</strong> Appendix • 43
1. From the Power Options window, click the Choose what the power<br />
buttons do.<br />
2. Make sure the drop-down list box for When I press the power button<br />
is set to Shut down and the drop-down list box for When I press the<br />
sleep button is set to Do Nothing.<br />
3. Click Save Changes to save your changes and exit.<br />
To disable the Hibernate support function, follow these instructions:<br />
44 • Appendix <strong>Patterson</strong> <strong>Software</strong> <strong>Installation</strong> <strong>Guide</strong>
1. From the Power Options Plan Settings window, click on Change<br />
advanced power settings.<br />
2. Click the plus signs next to Sleep | Hibernate after and then click on<br />
the current setting.<br />
3. Use the down scroll arrow until Never is selected.<br />
4. Click OK to save your changes and exit.<br />
An Office’s Responsibility to its Hardware<br />
A network requires routine maintenance in the same manner that an automobile<br />
does. In fact, automobiles and networks are analogous in several important ways.<br />
For example, an automobile needs an oil change every 3,000 miles, and the tires<br />
must be rotated and balanced every 10,000 miles. It might even get washed once or<br />
twice a week. This type of tight maintenance schedule is also important to a<br />
computer network. If an automobile owner never changed the oil, could he blame<br />
<strong>Patterson</strong> <strong>Software</strong> <strong>Installation</strong> <strong>Guide</strong> Appendix • 45
The importance of a backup.<br />
his mechanic if his engine burned up Certainly not. The driver is responsible for<br />
the maintenance of his own automobile.<br />
The same is true of computer networks. Having a hardware technician inspect a<br />
network does cost money, but it is necessary and should be considered part of<br />
normal maintenance. Many computer problems can be avoided by a good<br />
maintenance regimen. Think of it not as an unnecessary or frivolous expense, but as<br />
a prophy for your network.<br />
There are several points that might be covered by such an inspection. General<br />
system performance and reliability might be discussed and weighed against<br />
installing updated drivers for system devices such as printers or network cards.<br />
Often, hardware manufacturers rewrite drivers as part of their own problemresolution<br />
process. In most cases, they post their updated drivers on the Internet.<br />
You should also have the hardware tech delete any unnecessary files. Uninstalling<br />
old or unused programs is part of this process. This helps to speed up the following<br />
maintenance chore: DEFRAG. Fewer programs and files to scan or defragment will<br />
speed the process of running those utilities. Heavy use over a long period of time<br />
may sometimes lead to deterioration of both the storage surfaces themselves and the<br />
mechanical portions of the drive as well.<br />
Running DEFRAG will help your computer run more efficiently in some cases.<br />
When files are deleted, or programs are installed or uninstalled, files become<br />
fragmented. That means that instead of being arranged on the disk drive in a<br />
contiguous, consecutive manner, files are scattered about piecemeal, or in fragments.<br />
This slows down the hard drive because it must now make several passes in order to<br />
get an entire file that it might need.<br />
Avoid potential viruses and spyware. These programs are insidious and will affect<br />
every aspect of your system. Virus protection software and Spyware blockers will<br />
help you detect, detain and destroy potential hazards. This is one area where you<br />
can never be too careful.<br />
One of the most important responsibilities in maintaining your hardware is<br />
examining your backup process. A hardware professional can watch the procedure<br />
and verify that a good, restorable backup tape is being produced every night.<br />
Backups are important for two reasons. First, and most importantly, a backup can be<br />
restored in the event of theft, natural disaster or data corruption. Secondly, in unique<br />
support situations, a backup tape could be restored by a <strong>Patterson</strong> <strong>Software</strong><br />
support specialist for further data analysis.<br />
A computer network requires at least yearly inspections by a local hardware expert,<br />
just as a vehicle merits an occasional tune up. Observing a strict maintenance<br />
schedule will benefit a dental office many times over in network stability and<br />
reliability, and furthermore could avert an untimely breakdown in the future.<br />
46 • Appendix <strong>Patterson</strong> <strong>Software</strong> <strong>Installation</strong> <strong>Guide</strong>
<strong>Patterson</strong> <strong>Software</strong> <strong>Installation</strong> <strong>Guide</strong> Appendix • 47