SAE MAGAZINE - SAE Alumni Association - SAE Institute
SAE MAGAZINE - SAE Alumni Association - SAE Institute
SAE MAGAZINE - SAE Alumni Association - SAE Institute

Create successful ePaper yourself
Turn your PDF publications into a flip-book with our unique Google optimized e-Paper software.
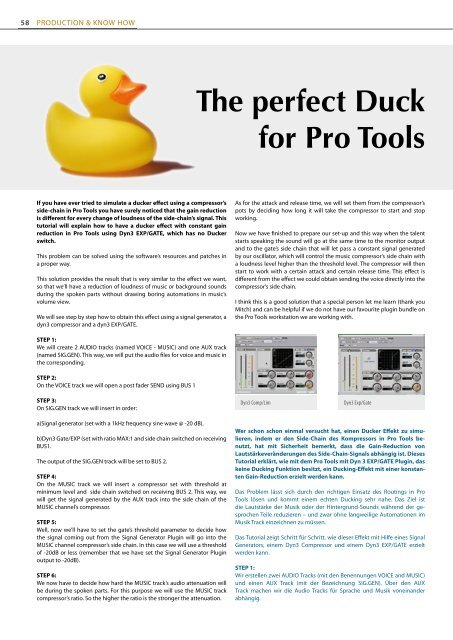
58 ProdUction & Know How<br />
If you have ever tried to simulate a ducker effect using a compressor’s<br />
side-chain in Pro Tools you have surely noticed that the gain reduction<br />
is different for every change of loudness of the side-chain’s signal. This<br />
tutorial will explain how to have a ducker effect with constant gain<br />
reduction in Pro Tools using Dyn3 EXP/GATE, which has no Ducker<br />
switch.<br />
This problem can be solved using the software’s resources and patches in<br />
a proper way.<br />
This solution provides the result that is very similar to the effect we want,<br />
so that we’ll have a reduction of loudness of music or background sounds<br />
during the spoken parts without drawing boring automations in music’s<br />
volume view.<br />
We will see step by step how to obtain this effect using a signal generator, a<br />
dyn3 compressor and a dyn3 ExP/GATE.<br />
STEP 1:<br />
We will create 2 AUDIO tracks (named VOICE - MUSIC) and one AUx track<br />
(named SIG.GEN). This way, we will put the audio files for voice and music in<br />
the corresponding.<br />
STEP 2:<br />
On the VOICE track we will open a post fader SEND using BUS 1<br />
STEP 3:<br />
On SIG.GEN track we will insert in order:<br />
a)Signal generator (set with a 1kHz frequency sine wave @ -20 dB).<br />
b)Dyn3 Gate/ExP (set with ratio MAx:1 and side chain switched on receiving<br />
BUS1.<br />
The output of the SIG.GEN track will be set to BUS 2.<br />
STEP 4:<br />
On the MUSIC track we will insert a compressor set with threshold at<br />
minimum level and side chain switched on receiving BUS 2. This way, we<br />
will get the signal generated by the AUx track into the side chain of the<br />
MUSIC channel’s compressor.<br />
STEP 5:<br />
Well, now we’ll have to set the gate’s threshold parameter to decide how<br />
the signal coming out from the Signal Generator Plugin will go into the<br />
MUSIC channel compressor’s side chain. In this case we will use a threshold<br />
of -20dB or less (remember that we have set the Signal Generator Plugin<br />
output to -20dB).<br />
STEP 6:<br />
We now have to decide how hard the MUSIC track’s audio attenuation will<br />
be during the spoken parts. For this purpose we will use the MUSIC track<br />
compressor’s ratio. So the higher the ratio is the stronger the attenuation.<br />
The perfect Duck<br />
for Pro Tools<br />
As for the attack and release time, we will set them from the compressor’s<br />
pots by deciding how long it will take the compressor to start and stop<br />
working.<br />
Now we have finished to prepare our set-up and this way when the talent<br />
starts speaking the sound will go at the same time to the monitor output<br />
and to the gate’s side chain that will let pass a constant signal generated<br />
by our oscillator, which will control the music compressor’s side chain with<br />
a loudness level higher than the threshold level. The compressor will then<br />
start to work with a certain attack and certain release time. This effect is<br />
different from the effect we could obtain sending the voice directly into the<br />
compressor’s side chain.<br />
I think this is a good solution that a special person let me learn (thank you<br />
Mitch) and can be helpful if we do not have our favourite plugin bundle on<br />
the Pro Tools workstation we are working with.<br />
Dyn3 Comp/Lim Dyn3 Exp/Gate<br />
Wer schon schon einmal versucht hat, einen Ducker Effekt zu simulieren,<br />
indem er den Side-Chain des Kompressors in Pro Tools benutzt,<br />
hat mit Sicherheit bemerkt, dass die Gain-Reduction von<br />
Lautstärkeveränderungen des Side-Chain-Signals abhängig ist. Dieses<br />
Tutorial erklärt, wie mit dem Pro Tools mit Dyn 3 EXP/GATE Plugin, das<br />
keine Ducking Funktion besitzt, ein Ducking-Effekt mit einer konstanten<br />
Gain-Reduction erzielt werden kann.<br />
Das Problem lässt sich durch den richtigen Einsatz des Routings in Pro<br />
Tools lösen und kommt einem echten Ducking sehr nahe. Das Ziel ist<br />
die Lautstärke der Musik oder der Hintergrund-Sounds während der gesprochen<br />
Teile reduzieren – und zwar ohne langweilige Automationen im<br />
Musik Track einzeichnen zu müssen.<br />
Das Tutorial zeigt Schritt für Schritt, wie dieser Effekt mit Hilfe eines Signal<br />
Generators, einem Dyn3 Compressor und einem Dyn3 ExP/GATE erzielt<br />
werden kann.<br />
STEP 1:<br />
Wir erstellen zwei AUDIO Tracks (mit den Benennungen VOICE and MUSIC)<br />
und einen AUx Track (mit der Bezeichnung SIG.GEN). Über den AUx<br />
Track machen wir die Audio Tracks für Sprache und Musik voneinander<br />
abhängig.