1969 Camaro Firebird - Classic Auto Air
1969 Camaro Firebird - Classic Auto Air
1969 Camaro Firebird - Classic Auto Air
You also want an ePaper? Increase the reach of your titles
YUMPU automatically turns print PDFs into web optimized ePapers that Google loves.
PAGE<br />
13<br />
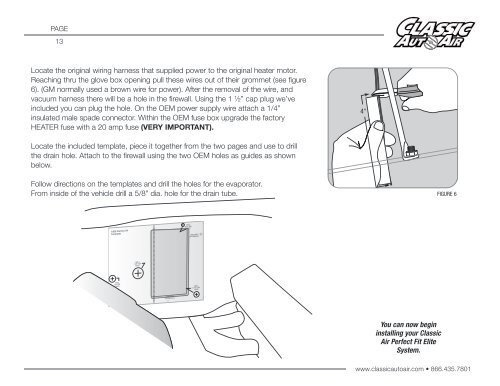
Locate the original wiring harness that supplied power to the original heater motor.<br />
Reaching thru the glove box opening pull these wires out of their grommet (see figure<br />
6). (GM normally used a brown wire for power). After the removal of the wire, and<br />
vacuum harness there will be a hole in the firewall. Using the 1 ½” cap plug we’ve<br />
included you can plug the hole. On the OEM power supply wire attach a 1/4”<br />
insulated male spade connector. Within the OEM fuse box upgrade the factory<br />
HEATER fuse with a 20 amp fuse (VERY IMPORTANT).<br />
4"<br />
Locate the included template, piece it together from the two pages and use to drill<br />
the drain hole. Attach to the firewall using the two OEM holes as guides as shown<br />
below.<br />
Follow directions on the templates and drill the holes for the evaporator.<br />
From inside of the vehicle drill a 5/8” dia. hole for the drain tube. FIGURE 6<br />
You can now begin<br />
installing your <strong>Classic</strong><br />
<strong>Air</strong> Perfect Fit Elite<br />
System.<br />
www.classicautoair.com • 866.435.7801


