

1969 Camaro Firebird - Classic Auto Air
1969 Camaro Firebird - Classic Auto Air
1969 Camaro Firebird - Classic Auto Air

Create successful ePaper yourself
Turn your PDF publications into a flip-book with our unique Google optimized e-Paper software.
PAGE<br />
19<br />
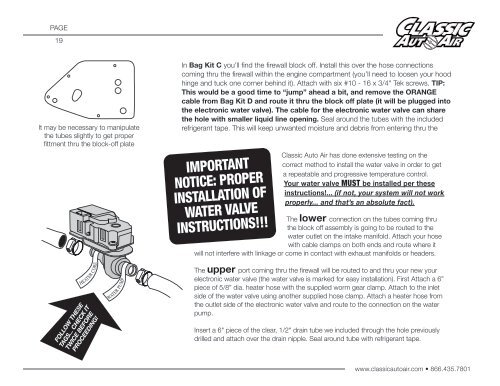
It may be necessary to manipulate<br />
the tubes slightly to get proper<br />
fittment thru the block-off plate<br />
In Bag Kit C you’ll find the firewall block off. Install this over the hose connections<br />
coming thru the firewall within the engine compartment (you’ll need to loosen your hood<br />
hinge and tuck one corner behind it). Attach with six #10 - 16 x 3/4" Tek screws. TIP:<br />
This would be a good time to “jump” ahead a bit, and remove the ORANGE<br />
cable from Bag Kit D and route it thru the block off plate (it will be plugged into<br />
the electronic water valve). The cable for the electronic water valve can share<br />
the hole with smaller liquid line opening. Seal around the tubes with the included<br />
refrigerant tape. This will keep unwanted moisture and debris from entering thru the<br />
IMPORTANT<br />
NOTICE: PROPER<br />
INSTALLATION OF<br />
WATER VALVE<br />
INSTRUCTIONS!!!<br />
<strong>Classic</strong> <strong>Auto</strong> <strong>Air</strong> has done extensive testing on the<br />
correct method to install the water valve in order to get<br />
a repeatable and progressive temperature control.<br />
Your water valve MUST be installed per these<br />
instructions!... (if not, your system will not work<br />
properly... and that’s an absolute fact).<br />
The lower connection on the tubes coming thru<br />
the block off assembly is going to be routed to the<br />
water outlet on the intake manifold. Attach your hose<br />
with cable clamps on both ends and route where it<br />
will not interfere with linkage or come in contact with exhaust manifolds or headers.<br />
HEATER CORE<br />
FOLLOW THESE<br />
TAGS... CHECK IT<br />
TWICE BEFORE<br />
PROCEEDING!<br />
WATER PUMP<br />
The upper port coming thru the firewall will be routed to and thru your new your<br />
electronic water valve (the water valve is marked for easy installation). First Attach a 6”<br />
piece of 5/8” dia. heater hose with the supplied worm gear clamp. Attach to the inlet<br />
side of the water valve using another supplied hose clamp. Attach a heater hose from<br />
the outlet side of the electronic water valve and route to the connection on the water<br />
pump.<br />
Insert a 6" piece of the clear, 1/2" drain tube we included through the hole previously<br />
drilled and attach over the drain nipple. Seal around tube with refrigerant tape.<br />
www.classicautoair.com • 866.435.7801


