

1969 Camaro Firebird - Classic Auto Air
1969 Camaro Firebird - Classic Auto Air
1969 Camaro Firebird - Classic Auto Air

Create successful ePaper yourself
Turn your PDF publications into a flip-book with our unique Google optimized e-Paper software.
PAGE<br />
21<br />
We’ve included enough wire length to allow you to mount the ECU in<br />
a variety of places. It is very important that you mount this in a place<br />
where it will stay dry and that vibration is at a minimum. Also make<br />
sure that where ever you mount it does not interfere with any moving<br />
controls or cables. We recommend mounting it just above the right<br />
hand side of the main unit using the included tek-screws.<br />
IMPORTANT! DON’T MOUNT THE ECU PERMANENTLY JUST<br />
YET. THAT CAN BE DONE AFTER YOU CALIBRATE THE UNIT.<br />
In Bag Kit D you will find three wiring harnesses with connections at<br />
each end. Plug the harness with YELLOW band into the YELLOW<br />
ECU port and the other end into the servo motor on the main unit<br />
(motor is marked with YELLOW INDICATOR). Repeat this process<br />
for the other two harnesses, following the color coding indicated on<br />
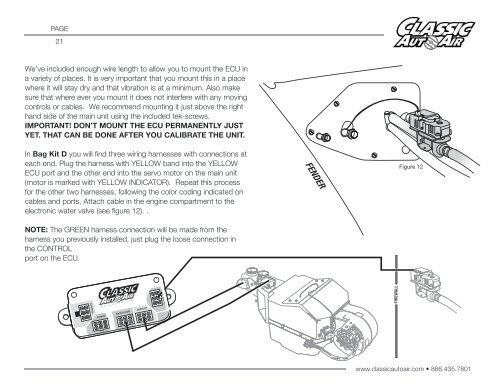
cables and ports. Attach cable in the engine compartment to the<br />
electronic water valve (see figure 12). .<br />
NOTE: The GREEN harness connection will be made from the<br />
harness you previously installed, just plug the loose connection in<br />
the CONTROL<br />
port on the ECU.<br />
FENDER<br />
Figure 12<br />
FIREWALL<br />
WATER VALVE<br />
CONTROL<br />
POWER<br />
FACE/FLOOR<br />
DEFROST<br />
www.classicautoair.com • 866.435.7801


