

1969 Camaro Firebird - Classic Auto Air
1969 Camaro Firebird - Classic Auto Air
1969 Camaro Firebird - Classic Auto Air

Create successful ePaper yourself
Turn your PDF publications into a flip-book with our unique Google optimized e-Paper software.
PAGE<br />
37<br />
New A/C System Preparation... A MUST READ!<br />
Please read thru these procedures before completing this new A/C system charging operation.<br />
A licensed A/C technician should be utilized for these procedures to insure<br />
that your new system will perform at it’s peak, and that your compressor will<br />
not be damaged.<br />
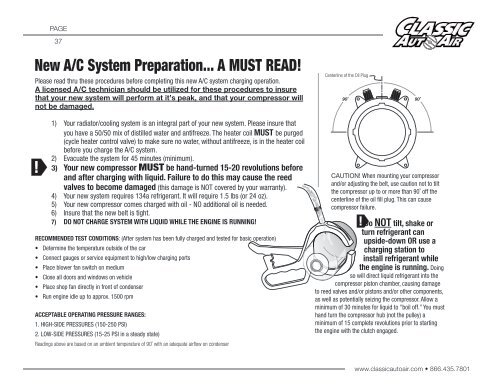
Centerline of the Oil Plug<br />
90˚<br />
90˚<br />
!<br />
1) Your radiator/cooling system is an integral part of your new system. Please insure that<br />
you have a 50/50 mix of distilled water and antifreeze. The heater coil MUST be purged<br />
(cycle heater control valve) to make sure no water, without antifreeze, is in the heater coil<br />
before you charge the A/C system.<br />
2) Evacuate the system for 45 minutes (minimum).<br />
3) Your new compressor MUST be hand-turned 15-20 revolutions before<br />
and after charging with liquid. Failure to do this may cause the reed<br />
valves to become damaged (this damage is NOT covered by your warranty).<br />
4) Your new system requires 134a refrigerant. It will require 1.5 lbs (or 24 oz).<br />
5) Your new compressor comes charged with oil - NO additional oil is needed.<br />
6) Insure that the new belt is tight.<br />
7) DO NOT CHARGE SYSTEM WITH LIQUID WHILE THE ENGINE IS RUNNING!<br />
RECOMMENDED TEST CONDITIONS: (After system has been fully charged and tested for basic operation)<br />
• Determine the temperature outside of the car<br />
• Connect gauges or service equipment to high/low charging ports<br />
• Place blower fan switch on medium<br />
• Close all doors and windows on vehicle<br />
• Place shop fan directly in front of condenser<br />
• Run engine idle up to approx. 1500 rpm<br />
ACCEPTABLE OPERATING PRESSURE RANGES:<br />
1. HIGH-SIDE PRESSURES (150-250 PSI)<br />
2. LOW-SIDE PRESSURES (15-25 PSI in a steady state)<br />
Readings above are based on an ambient temperature of 90˚ with an adequate airflow on condenser<br />
CAUTION! When mounting your compressor<br />
and/or adjusting the belt, use caution not to tilt<br />
the compressor up to or more than 90˚ off the<br />
centerline of the oil fill plug. This can cause<br />
compressor failure.<br />
!<br />
Do NOT tilt, shake or<br />
turn refrigerant can<br />
upside-down OR use a<br />
charging station to<br />
install refrigerant while<br />
the engine is running. Doing<br />
so will direct liquid refrigerant into the<br />
compressor piston chamber, causing damage<br />
to reed valves and/or pistons and/or other components,<br />
as well as potentially seizing the compressor. Allow a<br />
minimum of 30 minutes for liquid to "boil off.” You must<br />
hand turn the compressor hub (not the pulley) a<br />
minimum of 15 complete revolutions prior to starting<br />
the engine with the clutch engaged.<br />
www.classicautoair.com • 866.435.7801


