

1969 Camaro Firebird - Classic Auto Air
1969 Camaro Firebird - Classic Auto Air
1969 Camaro Firebird - Classic Auto Air

You also want an ePaper? Increase the reach of your titles
YUMPU automatically turns print PDFs into web optimized ePapers that Google loves.
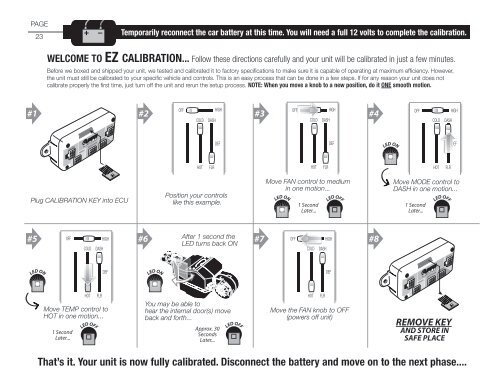
PAGE<br />
23<br />
Temporarily reconnect the car battery at this time. You will need a full 12 volts to complete the calibration.<br />
WELCOME TO EZ CALIBRATION... Follow these directions carefully and your unit will be calibrated in just a few minutes.<br />
Before we boxed and shipped your unit, we tested and calibrated it to factory specifications to make sure it is capable of operating at maximum efficiency. However,<br />
the unit must still be calibrated to your specific vehicle and controls. This is an easy process that can be done in a few steps. If for any reason your unit does not<br />
calibrate properly the first time, just turn off the unit and rerun the setup process. NOTE: When you move a knob to a new position, do it ONE smooth motion.<br />
OFF<br />
HIGH<br />
OFF<br />
HIGH<br />
#1 #2<br />
#3 #4<br />
WATER VALVE<br />
COLD<br />
DASH<br />
COLD<br />
DASH<br />
OFF<br />
COLD<br />
DASH<br />
HIGH<br />
CONTROL<br />
POWER FACE/FLOOR DEFROST<br />
DEF<br />
DEF<br />
LED ON<br />
DEF<br />
HOT<br />
FLR<br />
HOT<br />
FLR<br />
HOT<br />
FLR<br />
Calibration Key<br />
Plug CALIBRATION KEY into ECU<br />
Position your controls<br />
like this example.<br />
Move FAN control to medium<br />
in one motion...<br />
LED ON<br />
1 Second<br />
Later...<br />
LED OFF<br />
Move MODE control to<br />
DASH in one motion...<br />
1 Second<br />
Later...<br />
LED OFF<br />
#5 OFF HIGH #6<br />
After 1 second the<br />
#7 OFF HIGH<br />
#8<br />
COLD DASH<br />
LED turns back ON<br />
COLD DASH<br />
WATER VALVE<br />
LED ON<br />
DEF<br />
LED ON<br />
DEF<br />
CONTROL<br />
POWER FACE/FLOOR DEFROST<br />
Move TEMP control to<br />
HOT in one motion...<br />
1 Second<br />
Later...<br />
HOT<br />
LED OFF<br />
FLR<br />
You may be able to<br />
hear the internal door(s) move<br />
back and forth...<br />
Approx. 30<br />
Seconds<br />
Later...<br />
LED OFF<br />
HOT<br />
FLR<br />
Move the FAN knob to OFF<br />
(powers off unit)<br />
REMOVE KEY<br />
AND STORE IN<br />
SAFE PLACE<br />
Calibration Key<br />
That’s it. Your unit is now fully calibrated. Disconnect the battery and move on to the next phase....


