

1969 Camaro Firebird - Classic Auto Air
1969 Camaro Firebird - Classic Auto Air
1969 Camaro Firebird - Classic Auto Air

You also want an ePaper? Increase the reach of your titles
YUMPU automatically turns print PDFs into web optimized ePapers that Google loves.
PAGE<br />
7<br />
INTERIOR<br />
COMPARTMENT<br />
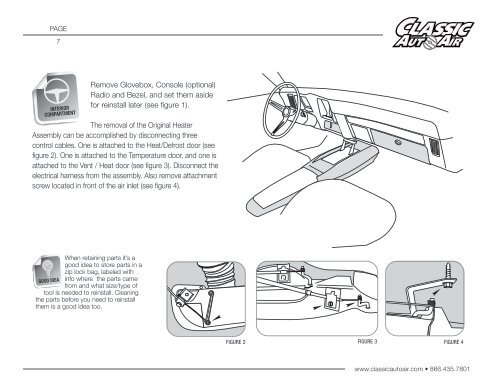
Remove Glovebox, Console (optional)<br />
Radio and Bezel, and set them aside<br />
for reinstall later (see figure 1).<br />
The removal of the Original Heater<br />
Assembly can be accomplished by disconnecting three<br />
control cables. One is attached to the Heat/Defrost door (see<br />
figure 2). One is attached to the Temperature door, and one is<br />
attached to the Vent / Heat door (see figure 3). Disconnect the<br />
electrical harness from the assembly. Also remove attachment<br />
screw located in front of the air inlet (see figure 4).<br />
When retaining parts it’s a<br />
good idea to store parts in a<br />
zip lock bag, labeled with<br />
info where the parts came<br />
from and what size/type of<br />
tool is needed to reinstall. Cleaning<br />
the parts before you need to reinstall<br />
them is a good idea too.<br />
GOOD IDEA<br />
FIGURE 2<br />
FIGURE 3<br />
FIGURE 4<br />
www.classicautoair.com • 866.435.7801


