

1969 Camaro Firebird - Classic Auto Air
1969 Camaro Firebird - Classic Auto Air
1969 Camaro Firebird - Classic Auto Air

You also want an ePaper? Increase the reach of your titles
YUMPU automatically turns print PDFs into web optimized ePapers that Google loves.
PAGE<br />
34<br />
Time to install the compressor kit. Included in your box is a premium<br />
compressor kit with all the parts you’ll need to install the compressor. This kit<br />
includes instructions specifically written for your engine. Once you’ve installed<br />
the complete compressor kit, continue on to connecting the hoses.<br />
#6 Hose<br />
#8 Hose<br />
#10 Hose<br />
COMPLETE<br />
COMPRESSOR<br />
KIT<br />
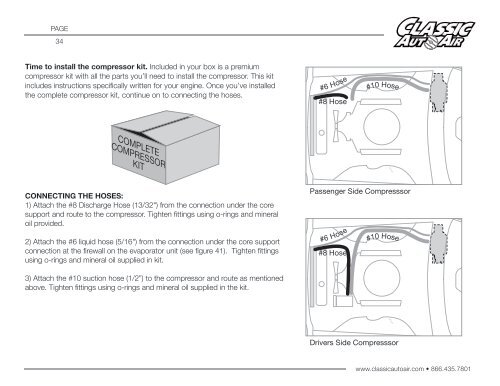
CONNECTING THE HOSES:<br />
1) Attach the #8 Discharge Hose (13/32") from the connection under the core<br />
support and route to the compressor. Tighten fittings using o-rings and mineral<br />
oil provided.<br />
2) Attach the #6 liquid hose (5/16") from the connection under the core support<br />
connection at the firewall on the evaporator unit (see figure 41). Tighten fittings<br />
using o-rings and mineral oil supplied in kit.<br />
Passenger Side Compresssor<br />
#6 Hose<br />
#8 Hose<br />
#10 Hose<br />
3) Attach the #10 suction hose (1/2”) to the compressor and route as mentioned<br />
above. Tighten fittings using o-rings and mineral oil supplied in the kit.<br />
Drivers Side Compresssor<br />
www.classicautoair.com • 866.435.7801


