Datasheet - PMCCatalogue
Datasheet - PMCCatalogue
Datasheet - PMCCatalogue

Create successful ePaper yourself
Turn your PDF publications into a flip-book with our unique Google optimized e-Paper software.
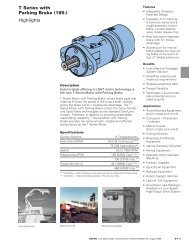
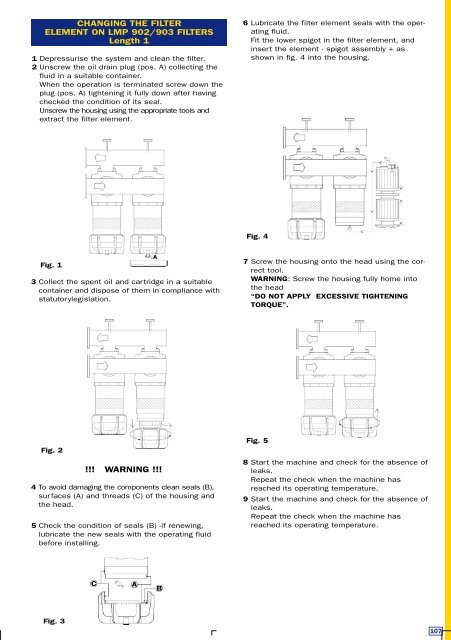
CHANGING THE FILTER<br />
ELEMENT ON LMP 902/903 FILTERS<br />
Length 1<br />
1 Depressurise the system and clean the filter.<br />
2 Unscrew the oil drain plug (pos. A) collecting the<br />
fluid in a suitable container.<br />
When the operation is terminated screw down the<br />
plug (pos. A) tightening it fully down after having<br />
checked the condition of its seal.<br />
U n s c rew the housing using the appropriate tools and<br />
extract the filter element.<br />
6 Lubricate the filter element seals with the operating<br />
fluid.<br />
Fit the lower spigot in the filter element, and<br />
insert the element - spigot assembly + as<br />
shown in fig. 4 into the housing.<br />
Fig. 4<br />
Fig. 1<br />
3 Collect the spent oil and cartridge in a suitable<br />
container and dispose of them in compliance with<br />
s t a t u t o r ylegislation.<br />
A<br />
7 Screw the housing onto the head using the correct<br />
tool.<br />
WARNING: Screw the housing fully home into<br />
the head<br />
“DO NOT APPLY EXCESSIVE TIGHTENING<br />
TORQUE”.<br />
Fig. 2<br />
!!! WARNING !!!<br />
4 To avoid damaging the components clean seals (B),<br />
surfaces (A) and threads (C) of the housing and<br />
the head.<br />
5 Check the condition of seals (B) -if renewing,<br />
lubricate the new seals with the operating fluid<br />
before installing.<br />
Fig. 5<br />
8 Start the machine and check for the absence of<br />
leaks.<br />
Repeat the check when the machine has<br />
reached its operating temperature.<br />
9 Start the machine and check for the absence of<br />
leaks.<br />
Repeat the check when the machine has<br />
reached its operating temperature.<br />
C<br />
A<br />
B<br />
Fig. 3<br />
1 0 7