Datasheet - PMCCatalogue
Datasheet - PMCCatalogue
Datasheet - PMCCatalogue

Create successful ePaper yourself
Turn your PDF publications into a flip-book with our unique Google optimized e-Paper software.
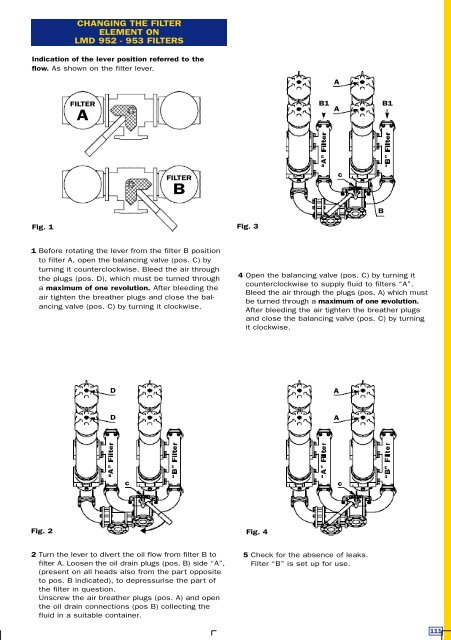
CHANGING THE FILTER<br />
ELEMENT ON<br />
LMD 952 - 953 FILTERS<br />
Indication of the lever position referred to the<br />
flow. As shown on the filter lever.<br />
A<br />
FILTER<br />
A<br />
B1<br />
A<br />
B1<br />
FILTER<br />
B<br />
c<br />
B<br />
Fig. 1<br />
Fig. 3<br />
1 Before rotating the lever from the filter B position<br />
to filter A, open the balancing valve (pos. C) by<br />
turning it counterclockwise. Bleed the air through<br />
the plugs (pos. D), which must be turned through<br />
a maximum of one revolution. After bleeding the<br />
air tighten the breather plugs and close the balancing<br />
valve (pos. C) by turning it clockwise.<br />
4 Open the balancing valve (pos. C) by turning it<br />
counterclockwise to supply fluid to filters “A”.<br />
Bleed the air through the plugs (pos. A) which must<br />
be turned through a maximum of one re v o l u t i o n.<br />
After bleeding the air tighten the breather plugs<br />
and close the balancing valve (pos. C) by turning<br />
it clockwise.<br />
D<br />
A<br />
D<br />
A<br />
c<br />
c<br />
Fig. 2<br />
Fig. 4<br />
2 Tu rn the lever to divert the oil flow from filter B to<br />
filter A. Loosen the oil drain plugs (pos. B) side “A”,<br />
(present on all heads also from the part opposite<br />
to pos. B indicated), to depressurise the part of<br />
the filter in question.<br />
Unscrew the air breather plugs (pos. A) and open<br />
the oil drain connections (pos B) collecting the<br />
fluid in a suitable container.<br />
5 Check for the absence of leaks.<br />
Filter “B” is set up for use.<br />
1 1 1