

Curlin PainSmart User Manual - Med-E-Quip Locators
Curlin PainSmart User Manual - Med-E-Quip Locators
Curlin PainSmart User Manual - Med-E-Quip Locators

You also want an ePaper? Increase the reach of your titles
YUMPU automatically turns print PDFs into web optimized ePapers that Google loves.
<strong>User</strong> <strong>Manual</strong><br />
for use with the<br />
<strong>PainSmart</strong> IOD<br />
Ambulatory Infusion System<br />
Moog <strong>Med</strong>ical Devices Group<br />
tf 800.970.2337<br />
ph 801.264.1001<br />
fx 801.264.1051<br />
www.moog.com/medical
Important Safety Note<br />
4 When using a <strong>Curlin</strong> Infusion Pump in a life sustaining situation,<br />
use AC Adapter, and provide an extra set of “C” cell batteries<br />
in addition to the batteries that are installed in the pump.<br />
4 Check pump between patient use per procedure (see<br />
maintenance chapter).<br />
4 Prior to Programming Load Dose, refer to Important<br />
Information in the appropriate Therapy chapters.
CURLIN MEDICAL<br />
<strong>User</strong> <strong>Manual</strong><br />
for use with the<br />
<strong>PainSmart</strong> TM IOD<br />
Ambulatory Infusion System<br />
Manufactured by<br />
ZEVEX, Inc.<br />
4314 ZEVEX Park Lane<br />
Salt Lake City, UT 84123 USA<br />
Phone 801.264.1001<br />
Fax 801.264.1051<br />
www.moog.com/medical<br />
<strong>Med</strong>ical Device & QA Services<br />
76 Stockport Road, Timperley<br />
Cheshire WA15 7SN<br />
United Kingdom<br />
0123<br />
For 24-hour Clinical or Technical Support call toll free:<br />
1-800-970-2337<br />
Covered by U.S. Patents 5,575,631 5,683,233 5,791,881 5,924,852 6,164,921 6,371,732 B1<br />
Des. 408,911 Des. 437,547 S. Other U.S. and Foreign Patents Pending<br />
Copyright © 2000/2004 Moog, Inc. All Rights Reserved<br />
Revision C<br />
Reorder Number 360-9043
TABLE OF CONTENTS<br />
INTRODUCTION ..................... 1<br />
Delivery Mode and Routes .............. 1<br />
Indications for Use .......................... 1<br />
Special Features of the<br />
<strong>PainSmart</strong> IOD Pump ................ 2<br />
Regulatory Agency Approvals ......... 3<br />
Warnings, Cautions, Notices ........... 4<br />
List of Abbreviations ........................ 8<br />
FEATURES OF THE PUMP<br />
AND ADMINISTRATION<br />
SETS .......................................... 11<br />
Pump Illustrations and Features .... 11<br />
Disposable Administration Set<br />
Illustrations and Features .............. 13<br />
Preparing <strong>Med</strong>ication for<br />
Infusion/Changing IV Bags .......... 14<br />
Opening and Closing the Pump<br />
Door ............................................... 16<br />
Choosing and Installing the<br />
<strong>Curlin</strong> <strong>Med</strong>ical Administration<br />
Set ................................................... 17<br />
Gravity Priming Set and Filter ....... 17<br />
Steps in Installing Administration<br />
Set into <strong>Curlin</strong> Infusion Pumps ..... 18<br />
Up Stream Occlusion Alarm<br />
Feature ........................................... 19<br />
Installing the Batteries and Using<br />
External Power ............................... 20<br />
<strong>Curlin</strong> Pump Battery<br />
Replacement .................................. 22<br />
External Power Sources ................. 25<br />
Battery Pack ................................... 25<br />
AC Adapter/Charger ..................... 31<br />
Bolus Cord Use .............................. 32<br />
LEARNING PUMP<br />
FEATURES .............................. 33<br />
Keypad Function ........................... 34<br />
Description of the Info-On-<br />
Demand (IOD) Feature of the<br />
Moog <strong>Curlin</strong> Infusion<br />
<strong>PainSmart</strong> IOD Pump .............. 35<br />
Info-On-Demand (IOD) Key<br />
Functions ....................................... 36<br />
Description of the Custom<br />
Features ......................................... 39<br />
Improved Pump Display ............... 40<br />
LED Light Indicators ..................... 41<br />
Audio Indicator .............................. 41<br />
Display Screen ................................ 41<br />
BASICS OF<br />
PROGRAMMING ................... 43<br />
Types of Display Screens .............. 43<br />
Sample of an Action Field Screen ... 43<br />
Sample of a Selection List Field ...... 43<br />
Sample of a Data Entry Screen ....... 44<br />
Sample of a Run Screen .................... 44<br />
Sample of <strong>User</strong> Notification<br />
Screen .................................................. 44<br />
Using “Help” ................................ 45<br />
Starting the Pump .......................... 45<br />
Welcome Screen ................................ 45<br />
Power Status Screen .......................... 46<br />
Preventive Maintenance Screen ....... 46<br />
Select Program or Bio-<strong>Med</strong> Setup<br />
Screen .................................................. 46<br />
Access Code ................................... 47<br />
Clinician Access Code Screen .......... 47<br />
Bio<strong>Med</strong> Setup ................................ 47<br />
Bio <strong>Med</strong> Setup Menu ........................ 47<br />
Enable Therapy Menu ...................... 49<br />
Patient History Log ....................... 49<br />
History Event Log ............................. 50<br />
I
TABLE OF CONTENTS<br />
Clearing the History Log ............... 51<br />
Clearing Patient Information ......... 51<br />
Changing Date and Time .............. 52<br />
Change Date and Time Screen ........52<br />
Program ......................................... 53<br />
Program/Bio<strong>Med</strong> Setup Menu ........53<br />
Resume/Repeat Rx/New<br />
Program Menu ...................................53<br />
Resuming a Therapy ..................... 54<br />
Repeating a Pre-Programmed<br />
Therapy .......................................... 54<br />
How to Go to “New Program” ...... 55<br />
Entering or Changing Data<br />
Fields .............................................. 55<br />
Programming <strong>PainSmart</strong> pump<br />
with Protocol Library Safety<br />
System ............................................ 55<br />
PCA IV THERAPY .................. 60<br />
Prescription Menus ........................ 60<br />
PCA-IV Pre-Prescription Menu<br />
Screen ..................................................60<br />
Administration Routes ......................61<br />
PCA medLIMITS Setup Screen ..62<br />
PCA Prescription Menu ....................63<br />
Run Options Screen ..........................64<br />
Prime .............................................. 64<br />
Prime Direction Screen .....................65<br />
Options .......................................... 60<br />
PCA Options Menu ..........................60<br />
Clinician Dose Menu .........................61<br />
Clinician Dose Run Screen ...............61<br />
Shift Totals Screens ...........................61<br />
Hourly Totals Screen .........................62<br />
Clear Hourly Totals Screen ..............69<br />
PCA Titrate medLIMITS<br />
Screen ..................................................69<br />
Air-In-Line Sensor Off Message<br />
Screen ..................................................64<br />
Pump Will Sense 2ml Alert<br />
Screen ..................................................70<br />
Reviewing or Changing the<br />
Program .......................................... 71<br />
Starting the Infusion ....................... 71<br />
PCA Run Screen ................................ 71<br />
PCA Information Screens ................ 72<br />
Interrupting an Infusion ................ 72<br />
Pause Menu Screen ........................... 73<br />
Resuming the Current Container .. 73<br />
Run Options Screen .......................... 73<br />
Hanging a New Container ............ 73<br />
Entering a New Program .............. 74<br />
Infusion Complete ......................... 75<br />
PCA Infusion Complete ................... 75<br />
Stopping the Infusion .................... 75<br />
Pause Menu Screen ........................... 75<br />
PCA EPIDURAL THERAPY .. 72<br />
Prescription Menus ....................... 72<br />
EPI Pre-Prescription Menu<br />
Screen .................................................. 72<br />
Administration Routes ...................... 73<br />
EPI medLIMITS Setup Screen ....... 79<br />
EPI Prescription Menu ..................... 80<br />
Run Options Screen .......................... 81<br />
Prime .............................................. 81<br />
Prime Direction Screen .................... 82<br />
Options .......................................... 83<br />
EPI Options Menu ............................ 83<br />
Clinician Dose Menu ........................ 84<br />
Clinician Dose Run Screen............... 84<br />
Shift Totals Screens ........................... 84<br />
Hourly Totals Screen ........................ 80<br />
Clear Hourly Totals Screen .............. 80<br />
EPI Titrate <strong>Med</strong>LIMITS<br />
Screen .................................................. 81<br />
Air-In-Line Sensor Off Message<br />
Screen .................................................. 82<br />
Pump Will Sense 2ml Alert<br />
Screen .................................................. 82<br />
Reviewing or Changing the<br />
Program ......................................... 88<br />
II
TABLE OF CONTENTS<br />
Starting the Infusion ...................... 88<br />
EPI Run Screen .................................88<br />
EPI Information Screens ..................89<br />
Interrupting an Infusion ................ 85<br />
Pause Menu Screen ............................90<br />
Resuming the Current Container .. 90<br />
Run Options Screen ..........................85<br />
Hanging a New Container ............ 90<br />
Entering a New Program............... 91<br />
Infusion Complete ......................... 92<br />
PCA Infusion Complete ...................92<br />
Stopping the Infusion .................... 92<br />
Pause Menu Screen ............................92<br />
TROUBLESHOOTING ......... 90<br />
Alerts, Alarms, and Error Codes .... 90<br />
ACCESSORIES ....................... 114<br />
Detachable Pole Clamps ............... 114<br />
Remote Bolus Cord (350-2026) ..... 115<br />
Lockable Safety Shells .................. 116<br />
Pump Holster (340-0111) ............... 117<br />
Keypad Covers .............................. 118<br />
CLEANING,<br />
ENVIRONMENTAL<br />
CONDITIONS, AND<br />
MAINTENANCE ................... 119<br />
Cleaning ........................................ 119<br />
Transport and Storage .................. 120<br />
Operating Environment ................ 120<br />
Maintenance ................................. 120<br />
Limited Warranty .......................... 120<br />
Procedure for Checking Pumps<br />
Between Patients .......................... 122<br />
TECHNICAL<br />
SPECIFICATIONS ................. 126<br />
CLINICIAN<br />
INFORMATION AND<br />
ACCESS CODE ...................... 134<br />
Clinician Access Code ..................... 134<br />
Lock Setting Table ....................... 135<br />
PAINSMART TM IOD<br />
CATALOG NUMBERS .......... 136<br />
III
TABLE OF FIGURES<br />
Figure 2.1 <strong>Curlin</strong> Infusion Ambulatory Pump<br />
– Front, Top and Left View ................. 11<br />
Figure 2.2 <strong>Curlin</strong> Infusion Ambulatory<br />
Pump – Back, Bottom, and Right View12<br />
Figure 2.3 Sample of <strong>Curlin</strong> Infusion<br />
Administration Sets ..............................13<br />
Figure 2.4 Spiking the Fluid Container,<br />
Gravity Priming the Set and Using the<br />
Slide Clamp to Close the Tubing .........14<br />
Figure 2.5 <strong>Curlin</strong> Infusion Administration<br />
Set “Integral Flow-Stop” with<br />
Breakaway Tab ....................................15<br />
Figure 2.6 Intentionally Opening the<br />
“Integral Flow-Stop” ...........................15<br />
Figure 5.1 PCA Administration Route<br />
Default Settings ................................... 57<br />
Figure 6.1 PCA Administration Route<br />
Default Settings ................................... 74<br />
Figure 8.1 Detachable Pole Clamp ........... 109<br />
Figure 8.2 Remote Bolus Cord .................. 110<br />
Figure 8.3 Safety Shells .............................. 111<br />
Figure 8.4 Pole Clamp and Safety Shell<br />
Installation.......................................... 112<br />
Figure 8.5 Pump “Holster”........................ 112<br />
Figure 8.6 Keypad Covers .......................... 113<br />
Figure 2.7 Opening the Pump Door ...........16<br />
Figure 2.8 Closing the Pump Door .............16<br />
Figure 2.9 Proper Installation of the <strong>Curlin</strong><br />
Infusion Administration Set into the<br />
Pump ....................................................18<br />
Figure 2.10 Top Cutaway View of the <strong>Curlin</strong><br />
Infusion Pump with <strong>Curlin</strong> Infusion<br />
Administration Set in Proper<br />
Installation Position .............................19<br />
Figure 2.11 <strong>Curlin</strong> Pump Battery<br />
Replacement ........................................21<br />
Figure 2.15 Attaching and Removing the<br />
Remote Bolus Cord ............................. 32<br />
Figure 3.1 <strong>Curlin</strong> Pump Features ............... 33<br />
Figure 3.2 6000 CMS <strong>PainSmart</strong> TM IOD<br />
Keypad with Info-On-Demand<br />
Feature ................................................ 33<br />
Figure 3.3 Sample of Display Screen .......... 42<br />
Figure 4.1 History Event Log ..................... 50<br />
IV
C h a p t e r<br />
1<br />
I n t r o d u c t i o n<br />
L e t u s f i r s t r e v i e w t h e<br />
C u r l I i n f u s . i o n P u m p s<br />
et’s begin by introducing you to the <strong>Curlin</strong> Infusion pump, an easy-to-use,<br />
ambulatory or pole mounted infusion device designed to meet the needs of the<br />
hospital or alternate site patient. It operates accurately in any position, has a low rate<br />
resolution of 2 microliters, and its small, compact, lightweight design allows mobility<br />
for ambulatory patients.<br />
The <strong>Curlin</strong> Infusion pump can be carried in any of the four convenient carryall soft-packs, pole<br />
mounted, placed into the locked “safety shells,” or set on a suitable surface for use.<br />
Delivery Mode and Routes<br />
<strong>PainSmart</strong> IOD is a PCA or Patient Controlled Analgesia pump designed for therapies that<br />
require a continuous rate of infusion, patient-controlled demand boluses, or both. Three<br />
Administration Routes, namely intravenous (IV), epidural (EPI) and subcutaneous (SQ); and<br />
three Units of delivery, namely milligrams (mg), micrograms (mcg) and milliliters (ml) are<br />
available. With the help of a software program purchased from Moog, an institution can<br />
configure the Administration Route to be fixed as IV, EPI or SQ. If any Administration Route is<br />
selected as “Fixed,” it is the only Route available to the user (other Routes will not be displayed)<br />
and cannot be re-enabled in the Biomed Setup menu. Similarly, the Units of delivery can be fixed<br />
as mg, mcg or ml. If any Unit of delivery is selected as “Fixed,” it cannot be modified by the<br />
clinician/user in the Biomed Setup menu.<br />
Indications for Use<br />
The <strong>Curlin</strong> Infusion pump can be used for intravenous, epidural, or subcutaneous therapies. If<br />
Epidural is selected, the Therapy Identifier bar in the Prescription Menu will display EPI instead<br />
of PCA. It can be used to deliver medications from the specially designed <strong>Curlin</strong> Infusion<br />
medication reservoir, syringes 1 or from IV bags. A physician or a certified, licensed, healthcare<br />
practitioner must oversee any therapy. Patients and caregivers using the <strong>Curlin</strong> Infusion pump<br />
should be instructed in its use by a qualified clinician and demonstrate an adequate level of<br />
proficiency in the use of the pump.<br />
1 Some syringes are not qualified for use. Please call Moog for details.<br />
d e l i v e r y m o d e s a n d r o u t e s , i n d i c a t i o n s<br />
w a r n i n g s , c a u t i o n s a n d n o t i c e s r e l a t i n g t<br />
L<br />
1<br />
Introduction
Special Features of the P a i n S m a r t I O D P u m p<br />
• Small, accurate, ambulatory, volumetric infusion pump that provides reliable and safe delivery<br />
of infusion therapies.<br />
• The Info-On-Demand feature of the <strong>Curlin</strong> Infusion <strong>PainSmart</strong> IOD pump safely<br />
provides additional information to the user when the pump is in the “RUN” mode.<br />
• Customized Maximum Basal Rate Limit.<br />
• Customized Maximum Bolus and Dose Limits.<br />
• Customized Lock Level setting.<br />
• Large screen with Tallman Lettering.<br />
• Larger font, single information display.<br />
• Patient side (downstream) “Line Pressure” displayed.<br />
• medLIMITS features.<br />
• PCA dose and medLIMITS schedules that can be maintained on Repeat.<br />
• Pump will not permit the user to enter any programming value that is outside of its<br />
predetermined default range, or further restricted through medLIMITS.<br />
• Ability, at the institution level, to configure the pump for specific Administration Route or<br />
Units of Measure:<br />
° Units (Factory, ml, mg, mcg, ml fixed, mg fixed or mcg fixed);<br />
° Route (Intravenous, Epidural, Subcutaneous, Intravenous fixed, Epidural fixed or<br />
Subcutaneous fixed).<br />
• Patient and therapy specific programming features via the <strong>Curlin</strong> Infusion BIOMED<br />
SETUP and Options Menus (when not limited by the institution).<br />
• Selection by user from three units of delivery, milliliters, milligrams, and micrograms (when<br />
not limited by the institution).<br />
• Choice of five or nine digits Clinician Access Code.<br />
• Maintenance Due Date that is automatically set, the first time, after 12 hours of use.<br />
• Shift Totals that can be greater than 24 hours.<br />
• Hourly Totals.<br />
• Automatic scrolling of the programmed prescription with “quick-repeat” function.<br />
• Cost effective, safe and easy-to-load disposable <strong>Curlin</strong> Infusion administration sets featuring<br />
a unique, spring-activated, self-clamping, set-based “Integral Flow-Stop” device that<br />
automatically clamps the tubing when the door of the pump is opened and prevents<br />
inadvertent fluid flow.<br />
• <strong>User</strong>-friendly, easy-to-teach programming that shortens staff inservice time and patient<br />
teaching time.<br />
• “Helpful” help screens and display messages.<br />
• Three tamper-resistant lock settings to assist in maintaining patient compliance and safety.<br />
• Retention of programmed infusion settings until cleared by the clinician, thus eliminating the<br />
2
need to reprogram before each use.<br />
• Mandatory requirement of two independent key press actions before a running pump can be<br />
turned off, thus minimizing the accidental interruption of a therapy in progress.<br />
• Powered by two readily available, cost-effective “C” size alkaline batteries.<br />
I M P O R T A N T<br />
I N F O R M A T I O N<br />
disabled.<br />
• Attractive yet robust design that is impact resistant and water resistant.<br />
• Audio alarms that can be adjusted from 1 (very quiet) to 9 (loudest) to<br />
meet specific patient and clinical setting needs but that cannot be totally<br />
• Four sizes of convenient carry packs to assist the ambulatory patient in maintaining<br />
independence of lifestyle.<br />
• Retained memory features that allow the pump to easily resume a therapy exactly from where<br />
it left off when it is interrupted before completion or to repeat a therapy using the same<br />
programmed prescription.<br />
• Compact, lockable safety shells that provide additional security when needed and that are<br />
designed to be free standing, pole mounted, or placed in the convenient, soft, carry case.<br />
Introduction<br />
• Backlit illumination for display screen. Backlight remains on continuously if AC Adapter is in<br />
use.<br />
• Integral Up as well as Down Occlusion alarms to notify user if an occlusion is present on<br />
either side of the pumping chamber.<br />
• Integral High Upstream pressure alarm to notify user of excessive upstream pressure.<br />
• Integral Air-In-Line alarm to notify user of presence of air in the tubing.<br />
• Adjustable Down Occlusion settings of “High” and “Low” to customize the pump’s down<br />
pressure requirements.<br />
Regulatory Agency Approvals<br />
INFUSION PUMP<br />
W ITH RESPECT TO ELECTRIC SHOCK, FIRE<br />
AND MECHANICAL HAZARDS ONLY<br />
IN ACCORDANCE W ITH UL60601-1/CAN/CSA C22.2 NO. 601.1<br />
70TK<br />
• Underwriters Laboratories has evaluated the <strong>Curlin</strong> Infusion Pump with International AC<br />
Adapters (360-2022KIT) to UL 60601-1 and CSA C22.2 No. 601-1 for General Standards of<br />
Safety for <strong>Med</strong>ical Equipment and found the <strong>Curlin</strong> Infusion Pump to be compliant.<br />
• Underwriters Laboratories has evaluated the <strong>Curlin</strong> Infusion Pumps with accessory<br />
equipments Battery Pack (350-9262) and the International AC Adapters (360-2022KIT)to<br />
IEC 60601-2-24. Particular requirements for safety of infusion pumps and controllers and<br />
they were found to be compliant.<br />
• Underwriters Laboratories has evaluated the <strong>Curlin</strong> Infusion Pump and the AC Adapter<br />
(360-2022KIT) for Electromagnetic Compatibility, to regulations EN 60601-1-1-2/1993 and<br />
3
EN 60601-2-24/1994 and both were found to be compliant.<br />
The indicator shown at the left appears throughout this manual to emphasize important<br />
information in the operation of the <strong>Curlin</strong> Infusion Pump. Please read these sections<br />
carefully.<br />
Warnings, Cautions, Notices<br />
EXPLANATION FOR SYMBOLS on the <strong>Curlin</strong> Infusion Pump with the Classified UL<br />
60601-1 and CSA C22.2 No. 601-1 Label.<br />
The meanings for the symbols on the pump are as follows:<br />
Attention, consult ACCOMPANYING DOCUMENTS.<br />
♥ Type CF Equipment<br />
IPX1 Protected against dripping water.<br />
INFUSION PUMP<br />
W ITH RESPECT TO ELECTRIC SHOCK, FIRE<br />
AND MECHANICAL HAZARDS ONLY<br />
IN ACCORDANCE W ITH UL60601-1/CAN/CSA C22.2 NO. 601.1<br />
70TK<br />
INTERNALLY POWERED OR FOR USE WITH AC ADAPTER<br />
340-2022/360-2022 and 340-2026/360-2026<br />
DEFIBRILLIATION PROOF TYPE CF APPLIED PARTS<br />
EQUIPMENT PROTECTED AGAINST DRIPPING WATER, IPX1<br />
EQUIPMENT NOT SUITABLE FOR USE IN THE PRESENCE OF A FLAMMABLE<br />
ANESTHETIC MIXTURE WITH AIR OR WITH OXYGEN OR NITROUS OXIDE<br />
MODE OF OPERATION CONTINUOUS<br />
WARNINGS<br />
• Prevent direct exposure to radiations. Secure an essential infusion pump outside of the<br />
radiation field using extension tubing if required.<br />
• Use only <strong>Curlin</strong> Infusion administration sets in your <strong>Curlin</strong> Infusion pump. Use of<br />
nonproprietary administration sets may alter accuracy in delivery of fluids and could result<br />
in over or under infusions, leading to possible patient injury or death.<br />
• Visually inspect the pump, pumping chamber and administration set before use. Do not<br />
use any pump or administration set that appears to be damaged or tampered with or if<br />
there is any indication of improper function.<br />
• Do not use this pump with a pressure cuff applied to the IV bag or medication reservoir<br />
bag, and do not unduly squeeze or compress the bag during a running infusion.<br />
• Remove all air from the administration set and IV bag or reservoir before connecting it to<br />
a patient’s access site.<br />
4
• Damage to the pump due to dropping or impact while the door is open can cause<br />
intermittent free flow conditions and loss of pump accuracy, but may not be visible through<br />
inspection. Volumetric testing is the only method to confirm proper function.<br />
NOTE: Anti-siphon Valve (ASV) administration sets can be used to provide<br />
additional free-flow protection.<br />
• Do NOT prime the administration set while it is connected to the patient’s access device.<br />
Doing so could result in overdosing the patient and could cause injury or death.<br />
• Do not attempt to open the pump’s housing. All service problems should be referred to<br />
an appropriate service technician.<br />
• Danger: Risk of explosion if used in the presence of flammable anesthetic or explosive<br />
gasses.<br />
Introduction<br />
CAUTIONS<br />
• U.S. federal law restricts this device to sale by or on the order of a physician or other<br />
licensed practitioner.<br />
• Keep the pumping surfaces clean, dry, and free of fluid spillage at all times.<br />
• This pump is fluid resistant and can withstand fluid spillage. It is not, however, designed<br />
for total submersion as moisture buildup within the case could cause damage to the<br />
operating components. Do not use the pump in the shower, sauna, or steam bath, and<br />
do not position the pump where it could accidentally be dropped into a container of fluid<br />
(e.g., basin, tub, or toilet). Avoid fluid contact with the power port and data port of the<br />
pump.<br />
• Do not try to insert foreign objects into any of the pump connectors, as such objects may<br />
damage the pump.<br />
• Use only <strong>Curlin</strong> Infusion external power sources to power the <strong>Curlin</strong> Infusion pump.<br />
Using other power sources may result in circuitry or microprocessor damage.<br />
• When using the AC Adapter, connect the plug only into a grounded AC outlet.<br />
• Use only non-rigid, non-vented IV fluid containers unless an air vent adapter is in place<br />
and the container is suspended from an IV pole.<br />
• Do not unduly stretch the tubing of the administration set or leave the tubing in the<br />
pump for more than twenty-four hours when the pump is not running.<br />
• Use <strong>Curlin</strong> Infusion administration sets with appropriate air-in-line filters any time the<br />
Air-In-Line Sensor of the pump is disabled.<br />
• If any signs or symptoms of infiltration or inflammation are noted at the infusion site,<br />
stop the infusion and report it to the appropriate healthcare provider.<br />
• Always use the slide clamp on the administration set as an additional precaution to<br />
occlude the tubing before opening the door of the pump.<br />
5
N OTICES<br />
• The <strong>Curlin</strong> Infusion pump is not intended for the administration of blood or cellular<br />
blood products.<br />
• Dispose of all used administration sets in accordance with all applicable regulatory and<br />
institutional policies.<br />
• Teach users to check all tubing sites for proper aseptic connections and to check the<br />
administration sets for air leaks before and during the infusion.<br />
• To minimize the potential hazard of air bubble formation or “out-gassing,” administer all<br />
medications at the proper temperatures, and remove medications from refrigerators as<br />
specified by the healthcare provider or pharmaceutical manufacturer.<br />
• Follow local governing ordinances and recycling plans regarding disposal or recycling of<br />
device components. When the “C” size batteries are to be discarded, do not incinerate<br />
them. Dispose of all used administration sets in accordance with all applicable regulatory<br />
and institutional policies and directions.<br />
• Adhere to any warnings, precautions, or recommendations stated by drug manufacturers<br />
regarding the use of infusion pumps and disposable administration sets in the<br />
administration of their specific products.<br />
• Administer all drugs selected for epidural administration in accordance with the<br />
indications included in the manufacturer’s package insert accompanying the drugs.<br />
• Note that the administration of medications into the epidural space is limited to delivery<br />
via specially designed indwelling catheters inserted by a qualified physician. Any patients<br />
receiving epidural infusions should be managed and monitored by medical professionals<br />
familiar with epidural administrations and their clinical management. Moog offers<br />
administration sets specifically designed for epidural infusions with 0.22 micron filters, no<br />
injection ports, and yellow striping to clearly identify the set for epidural use. Any<br />
administration set being used for epidural infusions should be clearly labeled as such.<br />
• Clean the pump, remote bolus cord, AC adapter, and battery pack with a soft, clean cloth<br />
dampened in any of the following:<br />
1 Warm soapy water (do not submerse)<br />
2 Isopropyl alcohol<br />
3 Household bleach, diluted 9:1 with water<br />
4 Commercial disinfectant<br />
When clean, dry pump and other items with a soft, clean, dry cloth.<br />
• The soft carry packs are intended for single patient use. They may be cleaned in the<br />
gentle cycle of a washing machine using cold water, no chlorine bleach, and line dried.<br />
(They cannot be dried in a clothes dryer.)<br />
6
• The Bolus/Data connector is to be used by the patient only for the connection of the<br />
bolus cord with remote switch. Other accessory equipment connected to this digital<br />
interface must be certified to the respective IEC/EN standards (i.e. IEC 950 for data<br />
processing equipment and EN 60601-1 for medical equipment.) Furthermore, all<br />
configurations shall comply with the system standard EN 60601-1. Anyone who<br />
connects additional equipment to the signal input part or signal output part configures a<br />
medical system, and is therefore, responsible that the system complies with the<br />
requirements of the system standard EN 60601-1. If in doubt, consult the technical<br />
services department or your local Moog representative.<br />
• The <strong>Curlin</strong> Infusion Pump has been tested and found to comply with the European<br />
Standard EN 60601-1-2:1993 and EN 60601-2-24:1994. These limits are designed to<br />
provide reasonable protection against harmful interference in a typical medical<br />
installation.<br />
• This equipment generates, uses, and can radiate radio frequency energy and, if not<br />
installed and used in accordance with the instructions, may cause harmful interference to<br />
other devices in the vicinity. However, there is no guarantee that interference will not<br />
occur in a particular installation. If this equipment does cause harmful interference to<br />
other devices, which can be determined by turning the equipment off and on, the user is<br />
encouraged to try to correct the interference by one of more of the following measures:<br />
1 Reorient or relocate the receiving device.<br />
2 Increase the separation between the equipment.<br />
3 Connect the equipment into an outlet on a circuit different from that to which the<br />
other device(s) are connected.<br />
4 Consult the manufacturer or field service technician for help.<br />
Introduction<br />
Note: For information regarding the clinician access code, read the chapter entitled, “Clinician<br />
Information and Access Code.” When entered correctly, the access code allows a user to<br />
change the lock settings of the pump and thereby change the settings of the pump.<br />
I M P O R T A N T<br />
I N F O R M A T I O N<br />
Because the chapter entitled, “Clinician Information and Access<br />
Code” contains access code information, the entire chapter should be<br />
removed before initial patient teaching and should not be left in the<br />
manual while in the patient setting. Doing so could jeopardize the<br />
security levels intended only for clinician use and access.<br />
7
List of Abbreviations<br />
#BOLS/hr = Number of Bolus Doses per hour<br />
In Patient controlled analgesia the number of boluses allowed per hour 0-15<br />
∆ RATE = Amount rate may be changed<br />
∆ TIME = Interval until rate may be changed<br />
AMT = Amount<br />
AMT = Amount to be infused<br />
TBI<br />
BA = Bolus attempted<br />
Options hourly screen shows amount of bolus doses attempted<br />
BASL = Basal<br />
Basal rate or continuous basal infusion maximum varies by route of infusion,<br />
intravenous, epidural or subcutaneous<br />
BG = Bolus given<br />
Options hourly screen shows amount of bolus doses infused<br />
BOL INT = Bolus Interval<br />
Allows clinician to enter RX amount of time 0-60 min between patient-activated bolus<br />
dosing for pain management<br />
CLIN = Clinician<br />
Clinician dose is the option to give an additional prescribed dose by a clinician<br />
CLRHRLY = Clear hourly<br />
Option to clear hourly totals of amount infused<br />
CONCEN = Concentration<br />
Concentration is the amount of milligrams or micrograms per milliliter of solution<br />
dd = Day<br />
To set date enter 2 digit day<br />
DN Occlu = Down Occlusion<br />
Occlusion pressure in the line between the pump and the patient access site, as a kink<br />
in tubing, blockage in access site (infiltration) or clamp on<br />
EPI = Epidural<br />
To inject anesthetic into the spinal canal<br />
HH:MM = Hours and Minutes<br />
To set time enter Military 24 hour or AM/PM 12 hour<br />
HX = History<br />
The patient history log is a cumulative record of the last 6,000 events that have<br />
occurred in the pump<br />
INF = Infusion<br />
Fluid or medication pumping into the patient via intravenous, subcutaneous, or<br />
epidural routes<br />
IV = Intravenous<br />
To give fluids or medication directly into the venous circulation via peripheral or<br />
central circulation<br />
KVO = Keep vein open<br />
To infuse a very small amount of fluid to keep vein patent<br />
LPRES = Line Pressure<br />
I n CM S-enabled pumps shows downstream pressure to patient in millimeter of<br />
mercury<br />
MAX = Maximum<br />
MCG = Microgram<br />
m ed LMTS = Sets soft limits for medication being infused<br />
MG = Milligram<br />
MIN = Minimum<br />
Minimum amount of time between patient boluses<br />
ML = Milliliter<br />
Introduction<br />
8
A unit of liquid measure 1/1000 of a liter<br />
mm = Month<br />
To set date enter 2 digit month<br />
MX = Maximum<br />
Upper limit of a bolus or patient demand dose, or infusion rate<br />
OPT = Options<br />
Once prescription is programmed, this key provides customizing features as locking<br />
programs from changes, alarm volume, battery level, amount of air detection, adjust<br />
occlusion alarm, hourly totals, shift totals, clinician dosing<br />
PCA = Patient controlled analgesia<br />
Pain control by continuous rate of infusion with options for patient controlled demand<br />
boluses<br />
PT = Patient<br />
Person receiving infusion<br />
RX = P r es cr iption<br />
Written order for medication with instructions of how to administer as time, dose,<br />
amount, limits, and route<br />
SENS = Sensor<br />
Air in line sensor will detect the amount of air in the tubing<br />
SQ = Subcutaneous<br />
To give fluids or medication just below the skin, also (SC)<br />
VOL = Volume<br />
Amount of fluid in intravenous bag, medication reservoir or syringe<br />
yy = Year<br />
To set date enter 2 digit year<br />
Introduction<br />
9
F e a t u r e s o f t u h m e p P a n d<br />
A d m i n i s t r a t S e i ts o n<br />
T<br />
T h e C u r l i n I P n f a u s i M<br />
I o n O DP S u m s m p h a v e e r n b t d e s i g n n e m i d n d w i a t n d h h t a v h e t u h s<br />
f r i e n d -t l -l o y e , a r s n i m p t l e c h n o l o g y t o a l l o w f a s t a n d e a s y a c<br />
a n d t r a i n i n g , a n o p e r p u a m t p s o r t o w i d e l i v q e u r i c t h k e l y t h b e r e<br />
Pump Illustrations and Features<br />
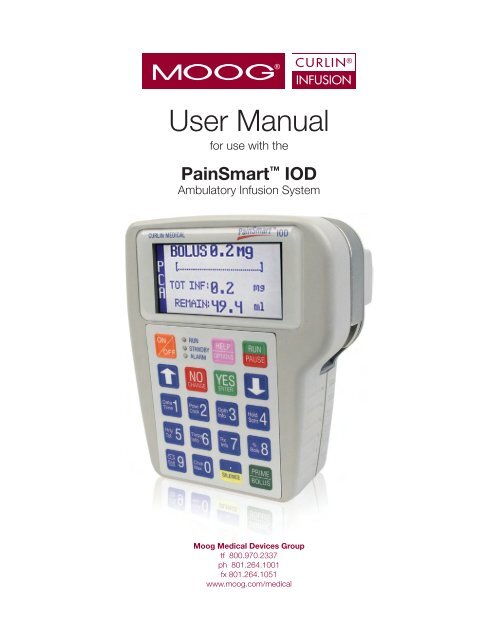
Pump Door<br />
C h a p t e r<br />
2<br />
Pump & Set Features<br />
LED Status<br />
Indicator<br />
Display Screen<br />
Pump Door<br />
Instruction Label<br />
Door Latch<br />
Run/Pause Key<br />
On /Off Key<br />
Data Interface/<br />
Bolus Cord Port<br />
Data/Bolus Port<br />
Unique Keyhole<br />
Help/Option Key<br />
Down Arrow<br />
Yes/Enter Key<br />
Prime/Bolus Key<br />
Up Arrow<br />
No/Change Key<br />
Decimal Point/<br />
Silence Key<br />
Numeric Keys<br />
Figure 2.1 <strong>Curlin</strong> Infusion Ambulatory Pump – Front, Top, and Left View<br />
11
Serial Number Label<br />
Battery Compartment Door<br />
with Caution Label<br />
Recessed release Pin for<br />
Battery Door<br />
Right View Pump Door<br />
Power Jack’s<br />
Unique Keyhole<br />
External Power Jack Port<br />
(2 Pin Port)<br />
Figure 2.2 <strong>Curlin</strong> Infusion Ambulatory Pump – Back, Bottom, and Right View<br />
12
Disposable Administration Set Illustrations and Features<br />
Male Luer<br />
Lock<br />
Slide Clamp<br />
Integral Flow-<br />
Stop with<br />
breakaway tab<br />
These drawings are<br />
NOT to scale.<br />
Tubing Guide<br />
Bag Spike<br />
Note: An important feature of the <strong>Curlin</strong> <strong>Med</strong>ical administration set is the unique<br />
design of the set-based “Integral Flow-Stop.” When the set is new, the “Integral<br />
Flow-Stop” has a breakaway tab that keeps the “Integral Flow-Stop” open and allows<br />
the tubing to be gravity primed. When you are ready to load the administration set<br />
into the pump, remove this tab, and the “Integral Flow-Stop” will automatically clamp<br />
the tubing. The <strong>Curlin</strong> <strong>Med</strong>ical “Integral Flow-Stop” prevents inadvertent flow of<br />
medication to the patient whenever the door of the pump is opened because the<br />
“Integral Flow-Stop” automatically reacts to clamp the tubing. The “Integral Flow-<br />
Stop” can, however, be opened after the tab is broken away by intentionally squeezing<br />
down on the movable spring action section of the “Integral Flow-Stop.” See Figure<br />
2.6 for an illustration of how to intentionally open the “Integral Flow-Stop.” For a<br />
complete listing of all available administration sets, see the <strong>Curlin</strong> <strong>Med</strong>ical Product<br />
Catalog.<br />
Note: Administration sets with anti-siphon valve protection can also be used for<br />
additional free-flow protection.<br />
Pump & Set Features<br />
CAUTION: USE ONLY CURLIN INFUSION ADMINISTRATION SETS<br />
WITH THIS PUMP<br />
CURLIN<br />
MEDICAL<br />
Male Luer<br />
Lock<br />
Slide Clamp<br />
Integral Flow-<br />
Stop with<br />
breakaway tab<br />
Tubing Guide<br />
<strong>Med</strong>ication<br />
Reservoir<br />
Figure 2.3 Sample of <strong>Curlin</strong> Infusion Administration Sets<br />
13
Preparing <strong>Med</strong>ication for Infusion/Changing IV Bags<br />
When using an IV bag, grasp the bag<br />
spike firmly in one hand and the IV bag<br />
spike-port in the other, and insert the<br />
spike completely into the port using<br />
aseptic technique.<br />
Holding the bag with<br />
fill ports down allows<br />
fluid to fill tubing and<br />
displace the air in the<br />
line. Be sure all air has<br />
been removed from the<br />
IV bag as well.<br />
Air in the line moves down through<br />
the tubing as the fluid fills.<br />
OPEN<br />
CLOSED<br />
In these illustrations,<br />
the slide clamps are<br />
shown in their open and<br />
closed states.<br />
Notice the breakaway tab on the<br />
“Integral Flow-Stop” has been<br />
removed. The set can be gravity<br />
primed by intentionally squeezing<br />
the “Integral Flow-Stop” and thus<br />
releasing the clamping action. ( See<br />
Figures 2.5 & 2.6 )<br />
Figure 2.4 Spiking the Fluid Container, Gravity Priming the Set, and Using the Slide<br />
Clamp to Close the Tubing<br />
14
Twist and remove<br />
breakaway tab from<br />
“Integral Flow-Stop”<br />
Figure 2.5 <strong>Curlin</strong> Infusion Administration Set “Integral Flow-Stop” with Breakaway Tab<br />
Pump & Set Features<br />
Squeeze “Integral Flow-Stop”<br />
between thumb and forefinger<br />
as shown to allow fluid to flow<br />
through tubing after the<br />
breakaway tab has been<br />
removed.<br />
Figure 2.6 Intentionally Opening the “Integral Flow-Stop”<br />
15
Opening and Closing the Pump Door<br />
The pump door, located on the top of the <strong>Curlin</strong> Infusion pump, has a sturdy “over center”<br />
latching mechanism, which assists in securely closing the door. Review the following illustrations:<br />
Door Latch<br />
(Lift to open)<br />
2 1<br />
Latch Hook<br />
Latch Pins<br />
To open the pump door:<br />
1 Pull the door latch up, releasing<br />
the latch hooks from the latch<br />
pins.<br />
2 Grasp the door latch and pull<br />
upwards and to the right to open<br />
the entire door mechanism.<br />
Full range access is now available<br />
for installing the <strong>Curlin</strong> <strong>Med</strong>ical<br />
Administration set. (See figures<br />
2.9 and 2.10).<br />
Figure 2.7 Opening the Pump Door<br />
Push Down<br />
To close the pump door properly,<br />
move the entire door assembly to the<br />
left and push downward until it is in<br />
its closed position. Then push the<br />
door latch down until it locks. The<br />
“over-center” latching mechanism<br />
assures that the door closes easily and<br />
securely.<br />
Figure 2.8 Closing the Pump Door<br />
16
Choosing and Installing the <strong>Curlin</strong> Infusion Administration Set<br />
A number of distinctively designed <strong>Curlin</strong> Infusion administration sets are available to deliver<br />
each prescription accurately. (See <strong>Curlin</strong> Infusion “Product Catalog.”) Each set is designed to<br />
meet the requirements of specific therapies, therefore, if a basic bag-spike set or a set with a<br />
medication reservoir is needed, with or without air eliminating filters, etc., there are several<br />
configurations from which to choose. Follow the healthcare provider’s protocols for preparing<br />
the medication and the administration set before loading the set into the pump, remembering the<br />
following basic rules:<br />
1 Examine the packaging and the administration set before use to assure the package integrity.<br />
Do not use the set if the protective caps are dislodged or if the package integrity is breached,<br />
as fluid path sterility cannot be guaranteed under those circumstances.<br />
2 Notice that there is an instructional insert included in the administration set package. This<br />
insert includes written and graphic instructions for proper installation of the administration<br />
set into the pump. It also lists the “fill volume” of the administration set. Allow for the<br />
amount of the fill volume when determining the final IV bag volume.<br />
Gravity Priming Set and Filter<br />
1 To gravity prime the administration set, twist and remove the breakaway tab from the<br />
“Integral Flow-Stop”, then spike the IV bag. Squeeze the “Integral Flow-Stop” between<br />
your thumb and forefinger to allow fluid to flow through the tubing until all air is removed<br />
from the IV bag and administration set. (See figures 2.5 and 2.6.) Release the “Integral Flow-<br />
Stop” to automatically clamp the tubing. To correctly prime a filtered set, hold the filter<br />
in a vertical position with the flow downwards allowing the filter to completely fill<br />
with fluid.<br />
Note: Administration sets with integral anti-siphon valves cannot be gravity primed.<br />
2 Close the slide clamp on the administration set before the door of the pump is opened. This<br />
step along with the automatic clamping properties of the “Integral Flow-Stop” prevents<br />
inadvertent fluid flow.<br />
3 Use an administration set with an air-eliminating filter whenever the Air-In-Line Sensor is<br />
disabled or set to “OFF.”<br />
4 Follow CDC guidelines or Intravenous Nursing Standards of Practice Guidelines regarding<br />
the frequency of changing the administration sets.<br />
5 Use aseptic technique and universal precautions as directed by the policies of your healthcare<br />
facility or institution.<br />
6 Use only <strong>Curlin</strong> Infusion administration sets with the <strong>Curlin</strong> Infusion pump.<br />
7 Dispose of administration sets in accordance with all applicable regulatory and institutional<br />
policies and directions.<br />
Pump & Set Features<br />
17
Air Detector<br />
Note: Open the<br />
slide clamp<br />
before closing<br />
the pump door<br />
Flow Stop<br />
Receptacle<br />
Flow Stop<br />
Handle<br />
(Yellow)<br />
Administration Set<br />
Tubing<br />
Guide (Blue)<br />
Pumping Fingers<br />
Note: The<br />
Administration<br />
Set tubing is<br />
always placed in<br />
front of the door<br />
hinge<br />
Tubing Guide<br />
Receptacle<br />
Figure 1.9 shows the<br />
<strong>Curlin</strong> <strong>Med</strong>ical pump<br />
with a cut-away of the<br />
display screen allowing<br />
you to visualize the<br />
receptacles for the<br />
small blue “Tubing<br />
Guide” on the right<br />
side of the pump and<br />
the larger yellow<br />
“Integral Flow-Stop”<br />
on the left side of the<br />
pump. The arrows, in<br />
corresponding colors,<br />
are visible on the<br />
background surface of<br />
the pump head and<br />
indicate the proper<br />
direction for placing<br />
these locators into their<br />
receptacles. Also, note<br />
that the breakaway tab<br />
has been removed from<br />
the “Integral Flow-<br />
Stop”, allowing the<br />
administration set to be<br />
placed into the pump<br />
correctly.<br />
Figure 2.9 Proper Installation of the <strong>Curlin</strong> Infusion Administration Set into the Pump<br />
Steps in Installing Administration Set into <strong>Curlin</strong> Infusion Pumps<br />
1 Fully open the door of the pump.<br />
2 Close the slide-clamp on the administration set.<br />
3 Activate the Integral Flow-Stop by twisting and removing the breakaway tab.<br />
4 Insert the blue tubing guide into the receptacle on right side of pump in the direction of the<br />
blue arrow, positioning the tubing in front of the door hinge.<br />
5 Center the tubing in the middle of the pumping fingers.<br />
6 Holding the yellow Integral Flow-Stop by the handle (see Figure 2.9), insert it on an angle into<br />
the receptacle on the left side of the pump in the direction of the yellow arrow. CAUTION:<br />
Do not press down on the top of the Integral Flow-Stop when inserting it into the<br />
receptacle. This action could inadvertently open the Integral Flow-Stop and allow<br />
fluid to flow through the tubing.<br />
7 Push the tubing slightly into the black Air Detector slot.<br />
8 Open the slide-clamp on the administration set.<br />
9 Fully close the door of the pump and latch it securely.<br />
10 If the set is not primed, prime the set according to prime section in the relevant therapy<br />
chapter.<br />
11 Attach the primed set to the patient’s venous access device per agency protocols.<br />
12 Dispose of used administration sets in accordance with all applicable regulatory and<br />
institutional policies and directions.<br />
18
“Flow-Stop”<br />
handle<br />
Air Detector<br />
Slot<br />
1 Insert blue “Tubing Guide” on right<br />
side of pump with tubing in front of<br />
the door. The Blue arrow on the<br />
background surface of the pump head<br />
indicates direction and location for the<br />
blue Tubing Guide.<br />
2 Important: Center the tubing<br />
horizontally over the pumping fingers<br />
covering the yellow dot.<br />
3 Insert yellow “Integral Flow-Stop”<br />
on the left side of the pump. The<br />
yellow arrow on the background<br />
surface of the pump head indicates the<br />
direction and location for the “Integral<br />
Flow-Stop.”<br />
CAUTION: Hold the “Flow-Stop<br />
by the small handle. DO NOT<br />
press down on the top of the<br />
“Integral Flow-Stop” when<br />
inserting it into the receptacle.<br />
This action could inadvertently<br />
open the “Integral Flow-Stop” and<br />
allow fluid to flow through the<br />
tubing.<br />
4 Press the tubing into the air detector<br />
slot gently with index finger.<br />
Pump & Set Features<br />
Figure 2.10 Top Cutaway View of the <strong>Curlin</strong> Infusion Pump with <strong>Curlin</strong> Infusion<br />
Administration Set in Proper Installation Position<br />
Up Stream Occlusion Alarm Feature<br />
The <strong>Curlin</strong> Infusion pump has an Up Stream Occlusion alarm feature, e.g., it detects low upstream<br />
pressure. This feature notifies you if an occlusion is present between the IV container and<br />
the pump. If this alarm occurs, the display will read, “ALARM –UP OCCLUSION,” the alarm<br />
will sound, the red LED light will blink, and the infusion will stop. This situation requires that you<br />
press the “Pause” key, examine the administration set from the IV container to the pump for<br />
potential causes of the occlusion. If a clamp is in place, open, or remove it; if the administration<br />
set is kinked, straighten it. If indicated, close the slide clamp on the administration set and open<br />
the door of the pump to verify that the set is correctly placed. Close the pump’s door and reopen<br />
the slide clamp. When ready to begin infusing, select “RESUME” and then press the “RUN”<br />
key.<br />
The pump also detects excessive up stream pressure (pressure on the IV bag). The display will<br />
read “ALARM – HIGH UP PRESSURE,” the alarm will sound, the red LED light will blink, and<br />
the infusion will stop. If this situation occurs, relieve the source of excessive pressure on the IV<br />
bag and when ready to begin infusing, select “RESUME” and then press the “RUN” key.<br />
Note: The up stream occlusion detection is disabled during priming.<br />
19
Installing the Batteries and Using External Power<br />
The <strong>Curlin</strong> Infusion pump can be powered solely with the use of two “C” size alkaline batteries<br />
installed into the pump as shown in Figure 2.11. “C” size batteries are readily available at most<br />
retail facilities that carry alkaline batteries. A second alternative for power is the portable,<br />
rechargeable Battery Pack.. The third alternative for power is to use the AC Adapter, allowing the<br />
pump to be connected to any approved, three-prong electrical wall outlet.<br />
The “C” size batteries will last approximately 30 hours at a rate of 125 ml/hour and over 85 hours<br />
at rates of 2 ml/hr or less. Factors that influence battery life are the number of times the screen is<br />
illuminated with a key press, the viscosity of the fluid being delivered, the age and temperature at<br />
which the batteries have been stored. To extend the life of the batteries, patients can use the AC<br />
adapter whenever they are stationary, e.g., at night.<br />
The pump has a “low battery” alert that beeps periodically with a message appearing to tell you<br />
when the power is low in the “C” size batteries. This alert gives you a window of time to be sure<br />
you have back-up power (e.g. extra batteries, AC adapter, or a recharged battery pack.) At a<br />
continuous infusion rate of 25 ml per hour, you can expect at least a 30 minute warning before<br />
your pump can no longer operate due to empty batteries. At higher infusion rates your advance<br />
warning will be less.<br />
The user should be taught that whenever the “low battery” alert appears, to pause the therapy,<br />
turn the pump off, and to replace both “C” size batteries. Then, turn the pump back on, select<br />
resume to continue the therapy.<br />
When the “empty battery” alarm occurs the pump will go into an alarm state and the infusion will<br />
stop. If this occurs, turn the pump off, replace both of the “C” size batteries, turn the pump on,<br />
and go to the “Resume” function to continue the therapy. All programming information is<br />
retained. If the “C” size batteries are empty and you want to connect the AC adapter to power<br />
the pump, turn the pump off first, plug in the AC adapter and then turn the pump back on.<br />
Note: If you are operating the pump solely on the battery pack or the AC Adapter (no “C” size<br />
batteries installed) and the power source is disconnected from the pump, the alarm will<br />
sound, the infusion will stop, and the display screen will be blank. Turn the pump off,<br />
reconnect the power source, turn the pump on, and resume the therapy. All programmed<br />
information is retained. However, as there is no low battery alarm for the external battery<br />
pack, the external battery pack should always be used with charged “C” cell batteries<br />
should batteries.<br />
When replacing batteries, pause any infusion in progress by pressing the “PAUSE” key,<br />
and then turn the pump off. Replace the batteries, and, when the pump is turned back on,<br />
select “RESUME” to continue the therapy from the point at which it was interrupted.<br />
20
Figure 2.11 Cur lin Pump Batter y Replacement<br />
21
Battery Replacement, Alternate Battery Door<br />
• The battery door compartment is<br />
located on the back of the pump.<br />
• To open the door, depress the recessed<br />
release pin. (Use a small coin such as a<br />
penny to depress the pin.)<br />
• Do not use a screwdriver or other<br />
sharp objects to open battery<br />
compartment door.<br />
• Slide the battery door down and remove<br />
it from the pump.<br />
• If your pump contains a plastic tab<br />
between the batteries, pull up on the tab<br />
until the batteries can be removed.<br />
Otherwise:<br />
• Using the small coin (Penny) pry up<br />
and out on the top (+) edge of the<br />
battery to cause the battery to pop out.<br />
• Use the same technique on the second<br />
battery.<br />
• Do not use a screwdriver or other<br />
sharp objects to pry batteries out of<br />
the pump.<br />
• Install two new “C” size batteries by<br />
depressing the coil spring with bottom<br />
(–) end of the battery and sliding the top<br />
of the battery into place.<br />
• Please note: Both positive poles are at<br />
the top of the battery compartment. To<br />
depress the coil spring, insert the battery<br />
at a slight angle.<br />
Pump & Set Features<br />
• Slide the battery door compartment<br />
back to its closed position until the<br />
recessed pin locks into place.<br />
To check battery** levels while<br />
the pump is running;<br />
• Press the Help/Options keys<br />
• Scroll down to PWR Ck?<br />
• Press no to change to ON.<br />
• Press yes to view battery level<br />
• Press Yes to Accept OPT? to exit options<br />
CAUTION: If batteries are removed<br />
from the bottom (–) end first, damage to<br />
the springs<br />
in the bottom of the battery case can<br />
occur. Damaged springs can create a<br />
situation in which the<br />
battery overheats. If the battery or the<br />
23
menu<br />
pump becomes excessively warm to the<br />
touch, do not attempt<br />
to remove the batteries. Set the pump<br />
aside and contact your home infusion<br />
pharmacy.<br />
* It is recommended to use Duracell ® Procell ® 1 Batteries in <strong>Curlin</strong> Pumps<br />
** “C” cell batteries only, this function will not check external battery pump power levels.<br />
1 Duracell and Procell are registered trademarks of Proctor & Gamble.<br />
24
External Power Sources<br />
Rechargeable Lithium Ion (Li-Ion) Battery Pack (360-2030)<br />
Overview<br />
The Li-Ion Battery Pack (pictured below) is designed to be used with 2 fully charged C-cell<br />
batteries to power a model 2000, 4000, 6000 or <strong>PainSmart</strong> infusion pump for an extended<br />
period of time without being connected to a power outlet. The battery pack allows the user<br />
to operate the pump for a minimum of 24 hours (at 125ml/hr) in addition to the run-time<br />
supplied by the disposable C cells in the pump. To ensure an adequate low battery warning<br />
period, the battery pack should always be used with 2 fully charged C-cell batteries installed<br />
in the pump.<br />
25
The battery pack provides 5.2V with a capacity of 6000 mA-hrs. It is connected to<br />
the same port connector that the AC adaptor uses to power the pump. When the<br />
battery pack power is fully exhausted the pump will automatically revert to the<br />
internal C batteries. Having new C cell batteries in the pump is crucial to ensure an<br />
adequate low battery warning period and to ensure infusion continuity if the battery<br />
pack is accidently disconnected. The Red Low Battery LED on the battery pack will<br />
illuminate prior to the the external battery running out of power. The pump will<br />
provide at least 30 minutes of audible and visual warning prior to the internal C cell<br />
batteries running out power.<br />
The battery pack is recharged by connecting it to an AC adaptor. Fully recharging the<br />
battery takes approximately 15 hours. While charging, the LED indicator will be<br />
yellow. When the battery is fully charged, the LED will be green. If a fault is<br />
encountered in the battery pack the LED will either flash yellow or not illuminate.<br />
Warnings<br />
• The external battery pack should be used with new C cell batteries in the pump to<br />
avoid interruption of the infusion if the cord between the pump and battery pack<br />
becomes disconnected and to ensure proper operation of the pump’s low battery<br />
alarm.<br />
• Do not use this battery pack with the POWDEC AC Adaptor WM10-6.9V (<strong>Curlin</strong><br />
p/n 340-2022) as the combination may exceed the allowable limits for emitted<br />
electromagnetic interference.<br />
• Battery pack cable utilizes an attached cable. This can be a tripping or chocking<br />
hazard, avoid use that may lead to entanglement around the neck or feet.<br />
Cautions<br />
• This battery pack is fluid resistant, but it is not designed to be water tight. Care should<br />
be taken to avoid any unnecessary contact with water or other fluids. Do not use the<br />
battery pack where it might fall into water.<br />
• The power gauge located on the pump screen (pictured below) does not reflect the<br />
remaining charge in the battery pack. The displayed capacity on the pump will always<br />
show empty when a battery pack (with remaining capacity) is attached (see image<br />
below):<br />
26
• Refer to the LED indicators on the pump to determine if the battery pack has<br />
been fully charged or is in a low battery condition.<br />
• The battery pack should be unplugged from the pump when recharging. The AC adaptor<br />
cannot simultaneously power the pump and charge the battery pack. If AC operation is<br />
desired, connect the adaptor directly to the pump.<br />
Notice<br />
The Rechargeable Battery Pack DFU is a supplement to the Moog <strong>Med</strong>ical Devices<br />
Group Pump <strong>User</strong>'s <strong>Manual</strong>. All other applicable WARNINGS, CAUTIONS and<br />
NOTICES are found in the <strong>User</strong>'s <strong>Manual</strong> and should be referred to when using this<br />
DFU.<br />
Environmental<br />
Storage Temperature -20ºC to 65ºC, Atmospheric pressure 500hPa to 1060hPa,<br />
Humidity 10% to 90%<br />
Operational Temperature 5ºC to 40ºC, Atmospheric pressure 650hPa to 1020hPa,<br />
Humidity 10% to 90%<br />
Directions for Use<br />
Charging the Battery Pack<br />
The <strong>Curlin</strong> 360-2022 (Globtek GTM41076-0609-1.5), <strong>Curlin</strong> 340-2022 (Globtek<br />
GTM41076-0609-1.5), <strong>Curlin</strong> 360-2026 (Globtek GTM341-7.5-800) or <strong>Curlin</strong> 340-<br />
2026 (Globtek GTM341-7.5-800). AC adapters can be used to recharge the battery.<br />
A fully discharged battery will recharge in less than 15 hours.<br />
• If connected, disconnect the battery pack from the pump.<br />
• Connect the AC adapter to the power port of the battery pack.<br />
27
Connect AC adaptor<br />
here<br />
• The charge LED will illuminate yellow if the battery needs to be recharged. See<br />
below:<br />
• Charge the battery pack for 15 hours or until the LED turns Green indicating the<br />
battery is fully charged.<br />
28
• Disconnect the battery from the AC adaptor.<br />
Note: If there is a fault detected while charging the battery, the LED will either flash<br />
yellow or not illuminate. Most faults are due to either the AC adapter becoming<br />
unplugged from the power outlet or the battery pack being at a location where the<br />
temperature is not between 5 and 40 degrees Centigrade. If the fault condition<br />
persists, then the battery pack should be returned to Moog <strong>Med</strong>ical Devices Group<br />
for replacement of the battery.<br />
Using the Battery Pack to Power the Pump<br />
• Make sure fully charged C cell batteries are loaded in the pump.<br />
• Connect the battery pack to the AC adapter port on the pump.<br />
Connect Battery Pack<br />
here<br />
• Operate the pump in the desired infusion mode.<br />
29
• Do not use the pump’s display (see cautions) to predict external battery life.<br />
• When the external battery pack is nearly depleted, the red LED indicator will be<br />
illuminated.<br />
• The pump may continue to be used until the disposable C cells are depleted.<br />
• Disconnect battery pack from pump prior to recharging the battery pack.<br />
Maintenance<br />
• There is no need to fully discharge the batteries periodically since Li-Ion batteries do not<br />
have a memory effect. The battery pack enclosure may be cleaned with a mild soap or<br />
disinfectant.<br />
End of Life Determination<br />
The battery in the battery pack degrades with charge cycles and time since manufacture.<br />
When the batteries are no longer holding their charge for a sufficient length of time, the<br />
battery pack should be replaced.<br />
30
AC Adapter/Charger<br />
This accessory becomes the external power source when plugged directly into the <strong>Curlin</strong><br />
Infusion pump. The AC Adapter can also be used to recharge the portable battery pack by<br />
plugging the connecting cable into the recharging port on the battery pack.<br />
There are two AC Adapters:<br />
• The US Domestic AC Adapter (P/N: 360-2026)has a three-prong plug to be plugged into<br />
a standard three-prong, grounded wall receptacle and a six-foot cable which plugs into the<br />
power outlet on the bottom of the pump. The two-pin connector plugs into the<br />
receptacle by aligning the red dots on each.<br />
• The International AC Adapter (P/N: 360-2022Kit) available for international use. The<br />
two-pin connector plugs into the receptacle by aligning the key on the connector.<br />
Figure 2.13 AC Adapters<br />
Note: Pause the pump and then turn it off before connecting the AC Adapter.<br />
Note: The connector is keyed with a “notch” at this red-dot location to guide alignment. To<br />
remove, pull back on the locking sleeve to unlock and then pull gently to remove the<br />
connector from the battery pack or pump’s port.<br />
International AC Adapter<br />
Figure 2.13 Universal AC Adapter<br />
Two-Pin Adapter plugs into port on bottom of the pump for AC power or can be used<br />
to recharge the battery pack by plugging into the recharging port on the battery pack.<br />
To remove, pull back on the locking sleeve.<br />
31
Bolus Cord U s e<br />
When the PCA therapy is used, patient bolus dosing can be programmed. To facilitate ease of<br />
patient self-dosing, the patient can use the Bolus key or the Remote Bolus Access Cord. When a<br />
bolus dose is requested one beep will sound to indicate that the dose has started. If a bolus dose is<br />
requested and denied, two beeps will sound. When a bolus dose is completed, no beep will occur.<br />
The cord is five feet long and has a patient access button at the top of the remote cord. The fourpin<br />
adapter with the unique key plugs into the four-hole port with the matching keyhole on the<br />
left side of the pump (see Figure 2.14 below). This port may be covered with a plastic plug. If<br />
so, remove the plug to access the port. To remove the cord, pull back on the soft, green locking<br />
sleeve and disengage the cord from the pump by pulling it straight out of the access port.<br />
Bolus/Data<br />
Port on Left<br />
side of Pump<br />
Bolus/Data<br />
Port Unique<br />
Keyhole<br />
Remote bolus<br />
access port<br />
Pump & Set Features<br />
Unique Key<br />
Locking Sleeve<br />
Four-pronged adapter<br />
with unique key plugs<br />
into access port on left<br />
side of pump as shown.<br />
To remove bolus cord, pull back on<br />
locking sleeve and pull cord straight out of<br />
access port.<br />
Figure 2.15 Attaching and Removing the Remote Bolus Cord<br />
32
C h a p t e r<br />
3<br />
L e a r n i n g P u m p F e a t u r e s<br />
L e a n r g n i t o o C u p r e l r i a n t e I n p f u t u m s h p i e o r n e q u i r e s a f e w b a s i c p o i n t s o f u<br />
i n e v e r y t h e r a p y . I t m a y b e h e l p f u l t o r e a d t h r<br />
C u r l i n p I n u f m s p i . o n<br />
F<br />
irst, examine the key pad and the functions of the individual keys. Knowing how the<br />
keys, especially the dual function keys, work will allow you to give commands to the<br />
pump.<br />
Display Screen<br />
LED Indicators<br />
1<br />
3<br />
2 4<br />
7<br />
6<br />
5<br />
9<br />
Learning Pump<br />
Data Interface/<br />
Bolus Cord Port<br />
8<br />
Data/Bolus Port<br />
Unique Keyhole<br />
10<br />
External Power Jack<br />
Unique Keyhole<br />
External Power<br />
Jack Port<br />
Figure 3.1 <strong>Curlin</strong> Pump Features<br />
33
Keypad Function<br />
1 ON/OFF: Used to turn the pump on and off. When the pump is running, however, the<br />
“PAUSE” key must be used to stop the infusion first and then the “OFF” key can be pressed<br />
to turn the pump off. This requirement prevents the interruption of an infusion by a single<br />
accidental press of the “OFF” key.<br />
2 RUN/PAUSE: Used to start or pause the motor of the pump, which, in turn, starts or<br />
pauses fluid delivery. When the pump is running, pressing this key will pause the pump.<br />
When the pump is paused, pressing this key during the “Run Options” menu will start the<br />
pump. This key is also used to terminate a pump alarm.<br />
Note: If the cause of the alarm is not resolved when the pump is “Resumed,” the alarm will<br />
recur.<br />
3 ⇑ Up arrow: Used to scroll the highlight bar or field cursor up on the display screen.<br />
Note: The Up arrow will not accept a selection which must be made with a YES/ENTER<br />
or NO/CHANGE key.<br />
4 ⇓ Down arrow: Used to sc rol lthe highlight bar or field cursor down on the display screen.<br />
Note: The Down arrow will not accept a selection which must be made with a<br />
YES/ENTER or NO/CHANGE key.<br />
5 NO/CHANGE: Used to respond “NO” to data or questions presented or to reject or to<br />
change highlighted data.<br />
Note: The <strong>Curlin</strong> Infusion pump requires you to actively change a selection. The Up arrow<br />
or Down arrow will not change a selection.<br />
6 YES/ENTER: Used to respond “YES/ENTER” to data or questions presented or to<br />
“accept” highlighted data when prompted to press “enter” key.<br />
Note: The <strong>Curlin</strong> Infusion pump requires you to affirmatively accept a selection. The Up<br />
arrow or Down arrow will not accept a selection.<br />
7 HELP/OPTIONS: Used to request a help screen when the pump is paused or is at the<br />
“Infusion Complete Screen.” It is also used to access the options screen when the pump is<br />
running. When the options screen is displayed, help is again available with this key. When in<br />
a help screen, use the arrow keys to scroll through the help message, and then press the help<br />
key again to exit help.<br />
8 ./SILENCE: Used as a decimal point when programming numeric data. Used also to<br />
temporarily silence the alarm (for one-minute intervals).<br />
9 PRIME/BOLUS: Used to prime fluid through the tubing to clear it of air or to administer<br />
a patient demand bolus dose of medication in PCA therapy.<br />
10 0 - 9 Numeric keys: - Used for data entry and the display of Info-On-Demand functions<br />
when the pump is in the “RUN” mode.<br />
34
Description of the Info-O n -De ma nd (IOD) Feature of the <strong>Curlin</strong> Infusion<br />
<strong>PainSmart</strong> IOD Pump<br />
Figure 3.2. <strong>PainSmart</strong> IOD Keypad with Info-On-Demand Feature<br />
To view any of the Info-On-Demand screens on the pump display, press the related key<br />
while the pump is in the “RUN” mode, i.e., running a therapy. The information requested<br />
will be displayed for 6 seconds and then the display will return to the previous infusion<br />
screen. Exception is the “CLRShft /9” key.<br />
The information for the “CLRShft/9” key will be displayed for 11 seconds and it will allow<br />
the user to “CLEAR” or “EXIT” within the 11 seconds or the screen will revert to the<br />
“RUN” screen automatically.<br />
Learning Pump<br />
35
In fo -O n -Demand (IOD) Key Functions<br />
Designation and functionality of the ten numeric keys of the Info-On-Demand keyboard:<br />
1 Date and Time (DateTime): The Date and Time screen displays the current date<br />
and time according to the pump. Changes to this screen are not allowed.<br />
2 Power Check (PowrChck): The Power Check screen displays the active power<br />
source of the pump, whether internal (batteries) or external. If the active source is<br />
the C-size batteries, a bar graph will indicate the amount of power remaining in the<br />
batteries. This graph is only an approximation of the charge left in the batteries and<br />
not intended to give specific representation of the battery life. Furthermore, the bar<br />
graph should NOT be used to check the state of the external NiMH Battery Pack,<br />
because it will not provide with accurate results.<br />
3 Option Info (OptnInfo): This screen provides information on selected options.<br />
The information displayed here includes the status of the Lock Level, Down<br />
Occlusion, Air Sensors, and the Audio Level. Changes to this screen are not allowed.<br />
4 Hold Screen (HoldScrn): Pressing the Hold Scrn/4 key will hold the current Run<br />
screen information for an additional six seconds and then the pump will return to<br />
the normal running screen. Changes to this screen are not allowed.<br />
36
5 Hourly Total (HrlyTot): The information displayed here includes the hourly<br />
Volume (amount) Infused, the number of Bolus Given and the number of Bolus<br />
Asked. Within the allocated 6 seconds, the user can scroll up or down the screen.<br />
Changes to this screen are not allowed.<br />
6 Therapy Information (ThrpyInfo): The information displayed in this screen is<br />
from the pre-prescription menu and includes Units, Concentration, Administration<br />
Route and Load Dose. Changes to this screen are not allowed.<br />
7 Rx Information (RxInfo): This screen provides prescription menu information<br />
such as Basal Rate, Patient Bolus, Bolus Interval, and Number of Bolus per Hour.<br />
Changes to this screen are not allowed.<br />
Learning Pump<br />
37
8 Percent Bolus (%Bols): This screen provides Bolus Volume as percentage of Total<br />
Volume. TBOL is the total volume infused through bolus, TVOL is the total volume<br />
infused, and % BOLS is the percentage of TBOL over TVOL. Changes to this<br />
screen are not allowed.<br />
9 Clear Shift Total (CLRShft): Two SHIFT TOTAL screens are displayed for 11<br />
seconds when this key is pressed. This key allows the user to view or CLEAR the<br />
SHIFT TOTALS (this action does not interfere with the operation of the pump).<br />
To CLEAR the SHIFT TOTAL information to zero, press the CLRShft/9 IOD<br />
key, and then press the YES/ENTER button in response to the “DONE? CLEAR”<br />
question and the pump will go back to the running screen. Press the CLRShft/9<br />
IOD key again to verify that the values are reset or cleared.<br />
To EXIT the SHIFT TOTAL screens without clearing, press NO/CHANGE for<br />
the “DONE? CLEAR” question and then YES/ENTER for “DONE? EXIT” and<br />
return to the running screen. The pump will return to the running screen<br />
automatically after 11 seconds have elapsed since the pressing of the CLRShft/9<br />
IOD key, even if no key is pressed.<br />
10 Check Maximum Infusion (ChckMax): The information displayed here is the<br />
maximum (rate or amount) that can be infused hypothetically, given the prescription<br />
parameters. This “Maximum Infusion per Hour” serves as a “sanity check,” after the<br />
pump has begun infusing. Changes to this screen are not allowed.<br />
38
Description of the Custom Features<br />
A customized <strong>Curlin</strong> Infusion <strong>PainSmart</strong> IOD pump may have Maximum Basal Rate<br />
Limit and Maximum Bolus and Dose Limits values that are different from previous default<br />
maximum values for all administrative routes (IV, EPI, and SQ), and a different Lock Level<br />
other than the default value OFF. These values, once programmed at the factory, can not be<br />
changed unless the pump is initialized or a new setting is programmed, both of which must<br />
be performed by <strong>Curlin</strong> or factory trained biomedical professionals.<br />
1 Customized Maximum Basal Rate Limit<br />
A customized <strong>Curlin</strong> Infusion <strong>PainSmart</strong> IOD pump may come with a Maximum Basal<br />
Rate Limit value set in the factory that is different from the default maximum value.<br />
An alert will be displayed if a value greater than the factory set Maximum Basal Rate Limit<br />
value is entered in BASL RATE, <strong>Med</strong>LMTS Mx Rate, and <strong>Med</strong>LMTS Delta Rate.<br />
For example, while programming a PCA (IV) therapy in a customized <strong>Curlin</strong> Infusion<br />
<strong>PainSmart</strong> IOD pump, where the Maximum Basal Rate Limit is factory set to be 9.9 for<br />
IV administration route, if you enter 21 for BASL RATE, an alert message will appear:<br />
“GREATER THAN MAX. FIELD LIMIT MAX=9.9”<br />
The values you are allowed to enter in this example, for BASL RATE, are between 0.1 and<br />
9.9, with an increment of 0.1. Same limit will apply to <strong>Med</strong>LMTS Mx Rate, and <strong>Med</strong>LMTS<br />
Delta Rate also, if the therapy calls for them.<br />
Learning Pump<br />
39
2 Customized Maximum Bolus and Dose Limits<br />
A customized <strong>Curlin</strong> Infusion <strong>PainSmart</strong> IOD pump may come with a Maximum Bolus<br />
and Dose Limits value set in the factory.<br />
An alert will be displayed if a value greater than the factory set value is entered in Load<br />
Dose, Clinician Dose, Pt. Bolus, and <strong>Med</strong>LMTS Pt. Bolus.<br />
For example, while programming a PCA (EPI) therapy in a customized <strong>Curlin</strong> Infusion<br />
<strong>PainSmart</strong> IOD pump, where the Maximum Bolus Dose Limit is factory set to be 9.9 for<br />
EPI administration route, if you enter 10 for LOAD DOSE, an alert message will appear:<br />
“GREATER THAN MAX. FIELD LIMIT MAX=9.9”<br />
The values you are allowed to enter in this example, for LOAD DOSE, are between 0.1 and<br />
9.9, with an increment of 0.1. Same limit will apply to Clinician Dose, Pt. Bolus, and<br />
<strong>Med</strong>LMTS Pt. Bolus also, if the therapy calls for them.<br />
3 Customized Lock Level setting<br />
A customized <strong>Curlin</strong> Infusion <strong>PainSmart</strong> IOD pump may have a certain Lock Level<br />
value set in the factory which is not the default, OFF. It can be any one of these values:<br />
Lock Level 1, Lock Level 2, or Lock Level 3.<br />
The pump user is not allowed to change the customized factory programmed Lock Level<br />
setting. If you attempt to change the customized Lock Level, the pump will display an alert<br />
“MODIFICATIONS NOT ALLOWED.”<br />
Improved Pump Display<br />
In addition to the above custom features, Tallman Lettering is implemented in this new<br />
version of the <strong>PainSmart</strong> IOD pump for better safety.<br />
The <strong>PainSmart</strong> IOD pump displays smaller numerical fonts to the right of the decimal in<br />
the PCA therapy programming menus and in the RUN screen menus where the data is<br />
displayed. Trailing zeros are dropped, i.e., if a decimal value is 0, then the 0 after the decimal<br />
is not displayed. Also, the unit for milliliters is displayed as “mL”, instead of “ml.” For<br />
example, the value ten milliliters is displayed as 10 mL (not 10.0 ml) and the value 10.2<br />
milliliters is displayed as 10.2 mL (not 10.2 ml).<br />
40
LED Light Indicators<br />
This “three-light” feature gives the user feed back on the current status of the pump.<br />
1 Green indicates a RUNNING status of the pump and blinks approximately once every three<br />
seconds when a therapy is in progress.<br />
2 Yellow indicates a STANDBY status of the pump and blinks while the pump is paused.<br />
3 Red indicates a STOPPED or ALARM status of the pump and blinks whenever an alarm<br />
status exists.<br />
4 Green and Red indicates an “Infusion Complete Alarm” status with KVO or a Down<br />
Occlusion Alarm with automatic restart.<br />
5 Yellow and Green indicates a “Standby” status with automatic start. This occurs when a “0”<br />
basal rate and bolus only is programmed.<br />
Audio Indicator<br />
An audible alarm or “beep” is used to alert you to a change in the status of the pump or a<br />
situation requiring user action or notification. A message will appear on the display screen<br />
describing the situation. The rate, number of beeps, and volume further specify status. This<br />
pump offers nine different volume levels from which to select for the audio feature; however, the<br />
“beep” cannot be totally disabled. The audio “beep” can be silenced for one-minute intervals by<br />
pressing the “SILENCE” key except during an “Error Code,” at which time the alarm continues<br />
and the pump must be turned off. The chapter of this manual entitled, Troubleshooting includes<br />
tables with the alerts, alarms, and error codes, the conditions causing them, the message displayed<br />
on the screen, and the actions required for resolution. If an alert or alarm occurs, please refer to<br />
these tables.<br />
Display Screen<br />
The display screen provides a maximum of four lines of text, or fields, at any one time for<br />
feedback regarding the pump status and data entry. It notifies the user with prompts or messages<br />
when necessary. The screen has backlighting that remains:<br />
• on if connected to an AC outlet;<br />
• lit for 15 seconds if using batteries or during any key press sequences,<br />
• on with alert/alarm messages.<br />
When no keys are pressed for 15 seconds, the light goes off to conserve battery power.<br />
Backlighting is resumed with any key press.<br />
Learning Pump<br />
In most displays, a “Therapy Identifier” Bar appears at the far left of the screen, indicating which<br />
therapy is running or which programming screen is being considered. This identifier also has<br />
another function, and that is to alert you when more text exists either above the top line or below<br />
the bottom line on the display screen. The identifier bar will have an arrow configuration either<br />
pointing up or down or both whenever there is more text, or it will appear as a squared-off block<br />
if no further text exists.<br />
41
The screen also has a cursor or highlight bar to tell you which field is being considered. Use the<br />
up and down arrow keys to move the cursor. When the pump is running, a specially designed<br />
“running screen” appears to provide information regarding the status of that particular infusion.<br />
In the following chapters, each display screen will be explained.<br />
Identifier bar with<br />
down arrow indicator.<br />
Text field with highlight<br />
bar or cursor appearing on<br />
first field.<br />
Figure 3.3 Sample of Display Screen<br />
42
C h a p t e r<br />
4<br />
B a si c s o f P r o g r a m m i n g<br />
T h e C u r l i n I n p f u m s p i o n a l l o w s t h e o p e r a t o r t o c u s t o m i z e t h<br />
i n d i v i d u a l p a t i e n t . T h i s c h a p t e r w i l l e x<br />
P<br />
rogramming the <strong>Curlin</strong> Infusion pump requires initial orientation and training, but the<br />
programming steps have been designed to be user friendly and self-prompting to<br />
minimize training time.<br />
Several different types of screens and fields may appear on the displays. Each of the<br />
different types of screens is explained below. Whenever you are required to interact with<br />
the pump, a highlight bar or cursor will be present on the screen.<br />
Types of Display Screens<br />
1 An “action field screen” allows you to select a pump action from the menu.<br />
S a m p l e o f a n A c t i o n F i e l d S c r e e n<br />
In this sample, the<br />
highlight bar is resting on<br />
the “RESUME” field.<br />
To select a field other than the one highlighted, use the arrow keys to move the cursor up or<br />
down to the desired field. When the cursor is highlighting the correct field and you press the<br />
“YES/ENTER” key, the pump accepts the selection and executes that action. In the<br />
example above, the pump would proceed with steps to resume the therapy.<br />
2 A “Selection List” field allows you to select from a predetermined list of values:<br />
S a m p l e o f a S e l e c t i o n L i s t F i e l d<br />
Basics Programming<br />
The above example allows you to select which unit to use in programming—e.g., Units: ml,<br />
mg or mcg. Only one selection is displayed at a time. When the cursor blinks it is indicating<br />
that no selection has yet been accepted. The selection displayed on the screen changes each<br />
time you press the “NO/CHANGE” key. Pressing the “YES/ENTER” key accepts the<br />
selection displayed and moves the cursor to the next field.<br />
43
3 “Data entry screens” are used to specify prescription parameters.<br />
S a m p l e o f a D a t a E n t r y S c r e e n<br />
In the above example, the cursor rests on a field requiring numeric data entry for specific<br />
prescription information, e.g., the volume in the IV bag. The operator enters the correct<br />
information using the numeric keys and decimal point key. When the correct data is<br />
displayed and the “YES/ENTER” key is pressed, the pump accepts the selection if it is a<br />
valid entry value and moves the cursor down to the next field. If the down arrow key is used<br />
to move to the next field, the value reverts back to default or the last programmed value.<br />
4 “Run screens” display information to the operator about the progress of the specific infusion<br />
while the pump is running:<br />
S a m p l e o f a R u n S c r e e n<br />
The standard “run screen” displays the Mode Identifier, the rate of pumping, a graphical bar that<br />
indicates the progress of the infusion, the volume already infused, and the time remaining for the<br />
infusion. No action is required on a run screen, therefore, no highlight bar appears. In some<br />
therapies a field may toggle to give the operator more information, i.e. the “REMAIN” field may<br />
change from HH:MM (time remaining) to ml to tell you how much volume is remaining as well.<br />
The information on the run screen will alternate between a four-line display and a large font<br />
display of each line of information on the screen.<br />
5 “<strong>User</strong> Notification Screens” are messages displayed to the user for information.<br />
S a m p l e o f U s e r N o t i f i c a t i o n S c r e e n<br />
Words representing “keys” are displayed in reverse video (shown in this manual as bold text).<br />
The action requested by a notification screen is either to press a specified key or to resolve an<br />
alert, alarm, or error code.<br />
For all events such as alerts, alarms, or error codes, specific notification screens will also be<br />
displayed. (See chapter entitled, “Troubleshooting” for specific alert, alarm, and error code<br />
messages and how to resolve them). The audio alarm also beeps and the LEDs blink<br />
whenever an alarm or error code occurs. In the event of an error code, user directions will be<br />
44
displayed on the screen, most often, this will require turning the pump off and back on again.<br />
U s i n g “ H e l p ”<br />
Help screens are available for data entry/selection screens, during “action field” screens, and at<br />
the “infusion complete” screen. To access help, press the “HELP” key. Use the arrow keys to<br />
scroll through the help message, and then press the “HELP” key again to exit help. When a<br />
help screen is displayed and there is more text to read which is not currently on the screen, a small<br />
up ( ) or down ( ) arrow indicator will appear to let you know you can scroll up or down to<br />
read the complete help message.<br />
Starting the Pump<br />
Start the pump by pushing the blue “ON” key. The following screen displays:<br />
W e l c o m e S c r e e n<br />
The above “Welcome” screen gives the date, time, and a message that the pump is performing a<br />
self-diagnostic test. If the numbers on the date field are displayed as zeros, the system clock will<br />
need to be set using the BIOMED Set Up. (See “BIOMED SETUP” section.) The display also<br />
lists the software revision number for this pump.<br />
During this test, you will hear three beeps as each of the LED indicators blink. If any one of the<br />
green, yellow, or red LED lights fails to light or to blink, return the pump for service. If the selftest<br />
fails, the alarm will sound, and a new screen will appear stating: “ERROR CODE:#” or<br />
“SYSTEM ERR:#” (See “Troubleshooting” chapter for a list of error notices and how to resolve<br />
them). The error notice will include a numeric code. At any error notice, the only user option is<br />
to turn the pump OFF.<br />
I M P O R T A N T<br />
I N F O R M A T I O N<br />
If, at any time, there is indication of pump damage, error code, or<br />
messages requiring the pump to be turned off, call the healthcare<br />
agency or facility as directed to report the condition.<br />
Note: If an error notice appears, turn the pump off and back on again. If the pump passes its<br />
start-up diagnostics tests, you can safely resume the therapy. If the error notice recurs,<br />
however, turn the pump off and notify the healthcare agency responsible for monitoring<br />
the pump. Some error notices may reset the pump back to its default settings and<br />
therefore will require reprogramming.<br />
Basics Programming<br />
45
When the <strong>Curlin</strong> Infusion pump successfully passes it’s self-test, a brief message of “System<br />
OK” appears, and the display moves to the next screen:<br />
P o w e r S t a t u s S c r e e n<br />
This screen displays the active power source of the pump, whether internal (batteries) or external<br />
power. If the active source is the C-size batteries, a bar graph will indicate the amount of power<br />
remaining in the batteries. This graph is only an approximation of the charge left and is not<br />
intended to give a specific representation of battery life. The display will again automatically move<br />
to the next screen:<br />
P r e v e n t i v e M a i n t e n a n c e S c r e e n<br />
The above alert screen will appear after the Welcome Screen only when the Maintenance Due<br />
date has arrived and will continue to appear until the date has been reset during the actual<br />
maintenance performance. The pump may continue to be used after the maintenance due date<br />
but should be returned for its routine maintenance at the earliest opportunity.<br />
S e l e c t P r o g r a m o r B i o - M e d S e t u p S c r e e n<br />
This screen is the first requiring you to act. It gives two selections from which to choose,<br />
“PROGRAM” or “BIOMED SETUP.” Using the up or down arrows, move the cursor to the<br />
desired field and then press the ENTER key.<br />
Selecting “PROGRAM” allows you to proceed with choosing features and entering data required<br />
for the pump to deliver a prescribed therapy.<br />
Selecting “BIOMED SETUP” allows the pump to be programmed and customized by the<br />
clinician to perform a number of special functions including setting the system clock. (See<br />
“BIOMED SETUP”) Accessing “BIOMED SETUP” requires you to enter a clinician access<br />
code. (Refer to the chapter entitled, Clinician Information and Access Code, of this manual.)<br />
46
Access Code<br />
C l i n i c i a n A c c e s s C o d e S c r e e n<br />
Depending on the configuration of your pump, the clinician enters a five-digit access code; or a<br />
four-digit personal identification number followed by the five-digit access code; and, if the code is<br />
valid, the display will automatically move to the requested screen or field. The four-digit personal<br />
identification number appears on the screen but the access code numbers do not; instead five<br />
asterisks appear. If the “four-five” configuration is selected, the personal identification<br />
number is recorded in the history file for the purpose of providing an audit trail. If an<br />
invalid code is accidentally entered, a message displays: “Invalid Code” and the clinician can<br />
reenter the correct code.<br />
Note: After entering the access code, DO NOT press the “YES/ENTER” key. The pump will<br />
automatically recognize the correct code and give you access to the secured section.<br />
I M P O R T A N T<br />
I N F O R M A T I O N<br />
If an access code screen displays and the access code is not known,<br />
use the down arrow to move the cursor to the “EXIT?” field. Press<br />
the “YES/ENTER” key at this field to return to the previous screen<br />
and make another selection. Also, remember that the “HELP” key is<br />
available when the pump is paused.<br />
Look first at the BIOMED SETUP menu and its special customization features:<br />
Bio<strong>Med</strong> Setup<br />
B i o M e d S e t u p M e n u<br />
Basics Programming<br />
The BIOMED SETUP menu lists special optional customization and performance functions<br />
of the pump:<br />
47
I M P O R T A N T<br />
I N F O R M A T I O N<br />
You may skip any of these functions by using the down arrow to move<br />
the cursor to only the desired selection. When the desired selection is<br />
highlighted, press the “YES/ENTER” key. A secondary screen will<br />
be displayed. When all BIOMED SETUP functions are completed,<br />
move the cursor to the last field, “DONE? YES,” and press the<br />
“YES/ENTER” key to exit this menu.<br />
1 PREVENTIVE MAINTENANCE DATE: The first field displays the date the pump<br />
requires its annual routine preventive maintenance check.<br />
Note: You cannot change this date; it is changed only when a factory technician performs the<br />
routine pump maintenance.<br />
The clinician that initially programs the pump for a patient should note the maintenance date.<br />
Once this date arrives, a “Perform Routine Maintenance” message will briefly appear after the<br />
welcome screen. If the “Maintenance Due” date will occur during the time the patient will be<br />
on service, the clinician may wish to select another <strong>Curlin</strong> Infusion pump for this patient.<br />
This action will avoid any undue concern on the patient’s part at the notice of “maintenance<br />
due” and eliminate the need to recall a pump in service for maintenance. The pump,<br />
however, can continue to be used without disrupting service when this message appears, but<br />
should be returned for service as quickly as possible.<br />
2 PROGRAMMER ID: This feature gives the programmer the option to use the numeric<br />
keypad to enter his or her assigned ID number (up to ten digits). If this option is not to be<br />
used, it can be left blank and skipped, using the down arrow to scroll to the next field. When<br />
the PROGRAMMER ID number is satisfactory, press the “YES/ENTER” key at the<br />
“ACCEPT? YES/NO” field and the number will be stored in the pump history log.<br />
3 PATIENT ID: This feature gives the programmer the option to use the numeric keypad to<br />
enter a patient ID number (up to ten digits). If this option is not to be used, it can be left<br />
blank and skipped, using the down arrow to scroll to the next field. When the PATIENT ID<br />
number is satisfactory, press the “YES/ENTER” key at the “ACCEPT? YES/NO” field and<br />
the number will be stored in the pump history log.<br />
4 Rx NUMBER: This feature gives the programmer the option to use the numeric keypad to<br />
enter a prescription number (up to ten digits). If this option is not to be used, it can be left<br />
blank and skipped, using the down arrow to scroll to the next field. When the Rx NUMBER<br />
is satisfactory, press the “YES/ENTER” key at the “ACCEPT? YES/NO” field and the<br />
number will be stored in the pump history log.<br />
5 INVOICE NUMBER: This feature gives the programmer the option to use the numeric<br />
keypad to enter an invoice number (up to ten digits). If this option is not to be used, it can be<br />
left blank and skipped, using the down arrow to scroll to the next field. When the INVOICE<br />
NUMBER is satisfactory, press the “YES/ENTER” key at the “ACCEPT? YES/NO” field<br />
and the number will be stored in the pump history log.<br />
6 CHANGE LOCK: This selection allows the clinician to change the lock setting of the pump.<br />
This feature is also available under the OPTIONS menu of each therapy. There are four<br />
choices in this field: OFF, 1, 2, or 3. When the lock is set to “OFF, ” the clinician has access<br />
to all pump functions. Each level higher limits the options available to the patient or<br />
48
caregiver (see each lock option screen in the individual therapy sections and/or the lock level<br />
table in the chapter entitled Clinician Information and Access Code.) If the desired lock does not<br />
appear on the display, press the “NO/CHANGE” key until the correct lock does appear.<br />
Then, press the “YES/ENTER” key to accept and move the cursor to the next field.<br />
7 ENABLE THERAPY: This field is used to customize the <strong>Curlin</strong> Infusion pump to the<br />
specific therapy ordered for the patient. When you select this function by pressing the<br />
“YES/ENTER” key, the menu below appears, listing all five of the possible therapies. The<br />
pump’s default setting is to enable PCA and disable all other therapies.<br />
E n a b l e T h e r a p y M e n u<br />
You will not be allowed to change the default setting. If you attempt to enable a therapy, the<br />
following prompt will appear of this fact.<br />
Patient History Log<br />
The patient history log is a cumulative record of the approximately last 6,000 events that have<br />
occurred in the pump. Example: When prescription information is saved using the<br />
“YES/ENTER” key at the “DONE” or “ACCEPT” fields, a copy of the information also<br />
gets ‘date and time stamped’ and is recorded in the patient history log. Alarms, error codes,<br />
certain alerts, and certain key press events also get logged when they occur. The patient<br />
history log can be printed using the <strong>Curlin</strong> Infusion print package and by selecting the “Print<br />
Pt. Hx” option. Selecting the “Clear Hx Log” option will erase the patient history log. When<br />
the history log is full, it will overwrite on a “first-in, first-out” basis.<br />
Note: The patient history log should be printed before clearing occurs if a hard copy record is<br />
required. The history log, when printed, lists the most recent event first. Clearing the<br />
history log does not affect the saved patient information.<br />
When printed, the patient history log includes a heading at its beginning and a footer at its end.<br />
The heading includes the pump serial number, the patient history log title and revision number<br />
information of the software and hardware of the pump. The footer contains information about<br />
how much of the history log has been used. The information is printed with the most recent<br />
event first, and organized for easy transfer to a spreadsheet for sorting and reporting. A partial<br />
sample of a history log is given on the following page:<br />
Basics Programming<br />
49
H i s t o r y E v e n t L o g<br />
Figure 4.1 History Event Log<br />
8 PRINT PATIENT HISTORY: To print the patient history log, connect the Data Interface<br />
Cable to the communication port on left side of the pump before selecting this command.<br />
(FOLLOW DIRECTIONS THAT ACCOMPANY THE DATA INTERFACE CABLE.)<br />
The pump will display:<br />
When you select “YES,” the display will read “Printing Patient History Record.” When the<br />
printing is completed, the pump display returns to the BIOMED SETUP Menu. To abort<br />
50
the printing process, press the “NO/CHANGE” key on the pump’s keypad, and the display<br />
will return to the BIOMED SETUP Menu. If the Patient History Log stops before all data is<br />
transferred, exit and restart the “Print Pt. Hx” command.<br />
Note: To utilize the print feature of the <strong>Curlin</strong> Infusion pump, you must have a PC running<br />
the Hyperterminal program within MS Windows, and use the <strong>Curlin</strong> Infusion Data<br />
Interface Cable which is purchased separately. Detailed user instructions are provided<br />
with the cable.<br />
Clearing the History Log<br />
9 CLEAR Hx LOG: This feature is used to clear the patient history log from the pump. When<br />
you select “YES/ENTER,” the pump displays:<br />
When you select “YES,” the history log is cleared and the display returns to the BIOMED<br />
SETUP Menu. Selecting “NO” aborts the feature and also returns to the menu.<br />
Clearing Patient Information<br />
10 CLEAR Rx: When this command is selected, prescription information for all currently<br />
programmed therapies is cleared; however, the patient data is retained. When you select<br />
“YES/ENTER” the pump displays:<br />
When you select “YES,” all prescription programs are cleared, and the display returns to the<br />
BIOMED SETUP Menu. Selecting “NO” aborts the feature and also returns to the menu.<br />
11 CLEAR Pt. DATA/RX: Selecting this feature clears all data programmed and resets<br />
the pump to its default settings. The history log is NOT cleared. When you select<br />
“YES/ENTER” at this field, the following screen displays:<br />
Basics Programming<br />
When you select “YES,” all patient data clears and the display returns to the BIOMED<br />
SETUP Menu. Selecting “NO” aborts the feature and also returns to the menu.<br />
12 CHANGE CONTRAST: The contrast on the display screen is automatically optimized and<br />
is no longer changeable with this option.<br />
51
Changing Date and Time<br />
13 CHANGE DATE AND TIME: When this field is selected, the screen on the left appears:<br />
C h a n g e D a t e a n d T i m e S c r e e n<br />
This screen is used to set the system Real Time Clock in the pump and will change the date<br />
and time displayed on the Welcome screen.<br />
Note: The time must be reset to accommodate Daylight Savings Time changes and also at any<br />
time the pump is moved into a different time zone.<br />
a. Time Format: You have the option of selecting twelve-hour or twenty-four-hour time<br />
format. Press the “NO” key until the correct selection appears on the field and then<br />
press the “YES/ENTER” key to accept the selection and move the cursor to the next<br />
field.<br />
b. AM/PM: The second field allows you to select AM or PM when the twelve-hour time<br />
format is selected in the previous field. If the twenty-four-hour format was selected, this<br />
field will not appear. Press the “NO” key until the correct selection appears on the field,<br />
and then press the “YES/ENTER” key to choose the selection and move the cursor to<br />
the next field.<br />
c. Time: Use the numeric keys to enter the correct time and then press the “YES/ENTER”<br />
key to accept and move the cursor to the next field.<br />
d. Using the numeric keys, enter the correct mm/dd/yy, using two digits for each (e.g., if the<br />
month is January, enter 01; if it is a single digit date, use the number preceded by a 0 and<br />
then enter the last two digits of the year code, 00, 01, etc.). When the date is correct,<br />
press the “YES/ENTER” key to accept and move to the next field.<br />
52
e. A final prompt will be given to “ACCEPT? YES/NO.” If any data needs to be<br />
corrected, use the arrow keys to locate the correct field, press “NO” to change the data,<br />
enter the correction(s), and then press “YES/ENTER” again to accept the correction.<br />
Move the cursor back to the “ACCEPT? YES” field and press “YES/ENTER”. This<br />
action enters the new time and date and moves to the next field in the BIOMED SETUP<br />
Menu. Pressing the “NO” key on this field aborts the change date and time selection and<br />
returns to the BIOMED SETUP Menu.<br />
I M P O R T A N T<br />
I N F O R M A T I O N<br />
If a therapy is in progress, the date and time changing functions will not be<br />
accessible until the therapy is complete.<br />
14 When BIOMED SETUP is complete, move the cursor to the DONE? Field and press the<br />
“YES/ENTER” key to return to the Program or Set-Up Menu Screen.<br />
Program<br />
P r o g r a m / B i o M e d S e t u p M e n u<br />
To select “PROGRAM,” use the arrow keys to move the cursor to the “PROGRAM” field and<br />
press the “YES/ENTER” key. If no therapy is already programmed, a “Select Therapy Screen”<br />
appears prompting you to select a therapy. If a therapy has been programmed, the following<br />
screen appears:<br />
R e s u m e / R e p e a t R x / N e w P r o g r a m M e n u<br />
There are three different ways that you can start a therapy:<br />
• RESUME: Should be used if a therapy is interrupted. The pump picks up where it<br />
left off, and continues the therapy.<br />
• REPEAT Rx: Should be used to hang a new bag and repeat the same therapy over<br />
again. The infusion history displayed is reset (volume infused, boluses requested,<br />
boluses received, etc). Shift Totals and Hourly Totals continue to accrue.<br />
• NEW PROGRAM: Should be used to program a totally new Rx. All the therapy<br />
parameters in the pump are set to factory default and must be re-entered by the<br />
clinician.<br />
The judicious choice of the option can help speed up programming. This screen gives you all<br />
three options:<br />
Basics Programming<br />
53
Resuming a Therapy<br />
1 RESUME—If a therapy is interrupted and the pump is turned off or paused before<br />
completion of the infusion, you may select “RESUME” by moving the cursor to this field<br />
and pressing the “YES/ENTER” key. A notification screen displays, and a prompt is given<br />
to run the pump. At this time, you can continue to infuse the prescription from the exact<br />
point at which it was interrupted.<br />
Note: Patients should be taught proper time frames or limitations for leaving their IV bags or<br />
medication reservoirs “hanging” during an interrupted state and, if indicated, to change to<br />
a new bag according to the healthcare provider’s policies and drug manufacturer’s<br />
instructions.<br />
Repeating a Pre-Programmed Therapy<br />
2 REPEAT Rx—Use this feature if an infusion is complete and you wish to repeat the same<br />
prescription over again or if a therapy is programmed and the pump is turned off before the<br />
infusion is started. Select this field by moving the cursor to “REPEAT Rx,” and press the<br />
“YES/ENTER” key.<br />
If the pump has been programmed for more than one therapy and you wish to select a<br />
therapy at this time, move the cursor to “REPEAT Rx,” and press the “YES/ENTER” key.<br />
This action will take you to the “Select Therapy Screen” and allow you to choose which of the<br />
programs you now wish to repeat.<br />
Note: If you are choosing a therapy that is different than the last one selected, “Shift Totals”<br />
and “Hourly Totals” will be cleared.<br />
If only one therapy is programmed and REPEAT Rx is selected, the cursor will automatically<br />
advance through the prescription menus. You can stop the auto-advance function by pressing<br />
any key (except ON/OFF) and then complete the confirmation of the prescription by<br />
pressing the “YES” key at the remaining fields.<br />
Note: REPEAT Rx does not allow any changes to the Pre-Prescription Menu. If changes<br />
need to be made in Pre-Prescription selections (units, concentration, etc.) select “New<br />
Program” and reenter the entire prescription.<br />
The lock settings affect the use of “REPEAT Rx”. Lock 1 allows REPEAT with changes to<br />
the prescription screen only. Lock 2 allows REPEAT but does NOT allow the user to make<br />
changes in the prescription. Lock 3 does not allow REPEAT. (See lock setting table).<br />
If a therapy has not completed and the REPEAT Rx function is selected, the following screen<br />
will display:<br />
Basics Programming<br />
If the current infusion is to continue, press “NO,” and you will be prompted to resume the<br />
54
therapy.<br />
If the current infusion is to be discontinued and a new IV bag started, press “YES/ENTER”<br />
to repeat. The following screen will then appear, asking whether or not you wish to maintain<br />
the current Bolus or <strong>Med</strong>LIMITS schedule.<br />
Pressing “YES” will maintain the current schedules and continue with the programming of<br />
the pump. Answering “NO” will display the following screen, asking you to confirm the<br />
clearing of the schedules.<br />
Pressing “YES” will clear the current schedules and continue with the programming of the<br />
pump. Answering “NO” will return you to the prior screen.<br />
H o w t o Go to “New Program”<br />
NEW PROGRAM—If the cursor is moved to this field and the ‘“YES/ENTER” key is<br />
pressed, the display will automatically move to the first screen for a new programming.<br />
Entering or Changing Data Fields<br />
When prescription data fields appear, use the numeric keys to enter specific patient prescription<br />
information and, when correct, press the “YES/ENTER” key to accept. If a field on the menu is<br />
not “accepted” by the program, a context sensitive “Alert” prompt will appear and the cursor<br />
returns you back to the fields that require the change, to help you resolve the problem.<br />
The following screen is the general alert prompt:<br />
55
P r o g r a m m i n g a P a i n S m a r t p u m p w i<br />
P r o t o c o L l i b r a r y S a f e t y S y s t e m p r o g r a m<br />
T h e i n f o r m a d t d i e o d n e d s u i c m n r i t b e h i s s h o w t o p r o g r a m a p u m p w i t h a d r u<br />
S a f e t y C u r S l y i s n t P a e I i m n f S m u o a s ( r f i P t C o A n a o I n l f y u ) s i t o h n a P t u m p h a . s t h i s p r o g<br />
REQUIRED EQUIPMENT<br />
The following equipment is required to service the pump:<br />
• Data Interface Cable for PC (<strong>Curlin</strong> P/N: 340-2011)<br />
• Personal Computer with Microsoft Windows: 2000, XP or Vista<br />
• Protocol Library Safety System Software (<strong>Curlin</strong> P/N 360-7039)<br />
• <strong>PainSmart</strong> IOD Ambulatory Infusion System with Protocol Library Safety System<br />
Note: Electrostatic-Sensitive Devices, observe handling precautions.<br />
Download Protocols from the Protocol Library Safety System<br />
Software into the Protocol Library-enabled Painsmart pump<br />
56
How to navigate to the Download Management screen<br />
Step 1: Click on “Protocol Library” from the top navigation bar.<br />
Step 2: Click on “Download Management” from the left navigation bar.<br />
How to connect the device to be downloaded<br />
Step 1: Connect the data cable proper end to the device.<br />
Step 2: Connect the RS232 end of the data cable to an available serial port on the desired<br />
PC.<br />
How to download a library to the connected device<br />
Step 1: Select the desired managed device from the “Managed Device” drop down.<br />
Step 2: Select the proper comm. port from the “Managed Device Comm. Port” drop down<br />
menu.<br />
Step 3: Select the desired library to download.<br />
Step 4: Click on “Download Library” to start the download process.<br />
Step 5: Immediately turn on the device that is connected to the PC.<br />
Step 6: View the Download Status memo box to obtain the status of the download.<br />
How to view or print the download history<br />
Step 1: Click on “View Download Log” in order to view the download log.<br />
Step 2: [Optional] Click on “Print Download Log” to print the log to the desired printer.<br />
Step 3: Click on “Close Download Library” to revert to original screen.<br />
57
P r o g r a m m i n g a P u m p t h a t h a s D o w n l o a d e d P r o<br />
YES key is used to verify or enter<br />
NO key is used to change, erase or leave screen<br />
Turn the Pump on, watch self test and power source bar.<br />
Sets must be installed for pump to run.<br />
Press the ⇑ and ⇓ keys to scroll through the menu, and press the YES key to<br />
accept/confirm a field entry and the NO key to reject/change a field entry.<br />
1. Press ⇓ to scroll down to the LIBRARY function.<br />
2. Highlight LIBRARY, and then press YES.<br />
3. If Category/Care Area is not already listed on the first screen select YES to the right of<br />
“Page Down”. This will bring up additional screen(s) with additional choices.<br />
4. If Category/Care Area is already listed on first screen press ⇓ to scroll down to choice<br />
you wish to select.<br />
5. When the Category/Care Area that you wish to choose is highlighted, press YES to<br />
select that option.<br />
6. If the Drug Therapy is not already listed on the first screen select YES to the right of<br />
“Page Down”. This will bring up additional screen(s) with additional choices.<br />
7. If the Drug Therapy is already listed on first screen press ⇓ to scroll down to choice you<br />
wish to select.<br />
8. When the Drug Therapy that you wish to choose is highlighted, press YES to select that<br />
option.<br />
9. Press YES again to ACCEPT this Drug Therapy selection.<br />
10. To use the drug Therapy as pre-programmed in the pump, select YES in each<br />
highlighted area to accept the information. To change any of the preselected drug<br />
therapy options when highlighted, press NO and enter correct information.<br />
Note: Some options may be “hard locked” so that changes cannot be made or there may<br />
be preset med limits that cannot be exceeded for safety.<br />
58
Note: YES must be selected after each field when flashing to be accepted, if YES is not<br />
pressed after each field the pump will say: ALERT FIELD NOT ACCEPTED and will<br />
not allow you to continue programming.<br />
Continue through each field until the RUN TO START screen appears after selecting<br />
done.<br />
11. In the RUN TO START screen, you have three options:<br />
RUN TO START - to begin the infusion<br />
NO TO REVIEW - to check orders and make changes<br />
PRIME - to prime the tubing via the pump<br />
12. In the RUN TO START screen choose NO to review, to validate therapy with another<br />
clinician. Press YES at each highlighted field to confirm choices, NO to change.<br />
(Note this should be done prior to priming tubing on the pump)<br />
13. When you reach the RUN TO START screen for the second time you can now prime<br />
the tubing.<br />
To prime the tubing via the pump Press the PRIME button at the bottom of the pump,<br />
follow on screen instructions and hold the prime key down. Keep the button depressed<br />
until you are finished priming. Release the prime button to stop and press YES TO<br />
EXIT to return to the RUN screen.<br />
14. You can now Begin your infusion by pressing RUN TO START.<br />
59
P C A I VT h e r a p y<br />
C h a p t e r<br />
5<br />
PCA IV Therapy<br />
P C A o r P a t i e n t C o n t r o l l e d A n a l i g n e u s o i u a s i r s a t d e s i o g f n e d i<br />
c o n t r o l l e d d e m a T n h d i s b o l c u h s a C e u p s t r , e l r i o r n p c u o m b I v p o s t e n h r f . s u p s e c i o f n i c a l l - y p r o g r a m<br />
In t r a v t e h n e o r u a s p i e s .<br />
W<br />
hen you begin programming a PCA-IV Therapy, the following display screen will<br />
appear, requiring you to enter information needed to program this therapy.<br />
Prescription Menus<br />
P C A - I V P r e - P r e s c r i p t i o n M e n u S c r e e n<br />
These menu items allow you to customize the program to match each individual prescription. The<br />
pump’s default settings are listed in the left screen. Each field is individually explained below.<br />
Note: Some of the lines are abbreviated to fit on the display screen; the full descriptions appear<br />
below.<br />
1 UNITS: Allows you to select from units of mg, mcg, or ml depending on how the<br />
prescription is written. In the PCA-IV therapy, the pump will allow rates as defined in figure<br />
5.1; therefore, if mg or mcg is selected, the concentration requested in the next field will<br />
determine the upper and lower programming limits for mg and mcg. Use the<br />
“NO/CHANGE” key until the desired “units” appears on the display, and then press the<br />
“YES/ENTER” key to accept and move to the next field.<br />
2 CONCEN (Concentration): This field is active whenever mg or mcg is selected in the<br />
“units” field and requires data entry of the concentration of mg or mcg per ml. When the<br />
correct data is entered, press “YES/ENTER” to accept, and move the cursor to the next<br />
field. If ml is chosen in the “units” field, this line will not display. The range for this field is<br />
0.1 to 999.<br />
60
3 ADMIN Rt (Administration Route): Allows a selection from three routes of administration:<br />
the default setting of IV (intravenous), EPI (epidural), and SQ (subcutaneous). If Epidural is<br />
selected, the Therapy Identifier bar in the Prescription Menu will display EPI instead of PCA.<br />
Each of the routes has defined settings as illustrated in the following table:<br />
Administration<br />
Route<br />
Occlusion Setting<br />
mmHg (psi)<br />
A d m i n i s t r a t i o n R o u t e s<br />
Maximum<br />
Basal Rate<br />
(ml/hr)<br />
Rate During<br />
Bolus<br />
(ml/hr)<br />
Maximum<br />
Bolus Dose<br />
(ml)<br />
Maximum<br />
Load Dose<br />
(ml)<br />
Intravenous 900 or 400 (18 or 8) 9.9 125 9.9 9.9<br />
Epidural 900 or 400 (18 or 8) 25 90 25 25<br />
Subcutaneous 900 or 400 (18 or 8) 5 60 5 5<br />
Figure 5.1 PCA Administration Route Default Settings<br />
4 Load Dose (Loading Dose): Allows the clinician to program in a pre-infusion loading dose if<br />
it is prescribed. If a loading dose is not ordered, select the default setting of “0” by pressing<br />
“YES/ENTER”. If it is ordered, enter the dose in this field, and press the “YES/ENTER”<br />
key to accept and move to the next field. The maximum load dose is determined by the<br />
administration route (refer to Figure 5.1 above).<br />
I M P O R T A N T<br />
I N F O R M A T I O N<br />
The amount of drug infused during the “loading dose” depends on<br />
the units chosen which may be in ml’s, mg, or mcg. A loading dose<br />
of 5 mg will infuse 50 ml if the concentration is 0.1 mg/ml.<br />
Note:<br />
The “units” will correspond to the choice previously selected.<br />
The loading dose will be delivered at the fixed bolus delivery rate when the “RUN” key is<br />
pressed to start the PCA infusion. The amount of the loading dose is included in the<br />
displayed “amount infused” and is logged into the history file. The bolus lockout time is set<br />
from the end of the loading dose. Because the loading dose is only used on initial start up of<br />
an infusion, it will revert to a value of “0” whenever the “REPEAT Rx” function is selected.<br />
I M P O R T A N T<br />
I N F O R M A T I O N<br />
To terminate a loading dose in progress but save the rest of the<br />
prescription, pause the pump and select “REPEAT Rx.” When the<br />
“RUN” key is pressed, the prescription will restart without the<br />
loading dose.<br />
5 medLMTS Setup: Allows the clinician to setup soft (clinician or institutional) limits on any<br />
medication that is being infused with the pump. If there is no request or mandate to set soft<br />
limits, select “OFF,” and press “YES/ENTER” to accept the factory defaults (see Figure<br />
5.1). If a specific medication limit is requested or mandated, press “YES/ENTER” to turn<br />
ON the medLIMITS and the following screen will appear. Enter the appropriate soft limits<br />
for each field:<br />
61
P C A m e d L I M I T S S e t u p S c r e e n<br />
PCA IV Therapy<br />
a. MxRATE (Maximum Rate) limits: Use the numeric keys to enter the upper limits of the<br />
infusion rate. When the correct maximum medLIMIT rate is entered, press<br />
“YES/ENTER” and the cursor will move to the next field. The minimum rate is 0, and<br />
the maximum rate must be equal to or less than maximum Basal Rate listed in Figure 5.1<br />
Administration Routes table.<br />
b. ∆Rate (Delta Rate): Some prescriptions include incremental levels or delta limitations (e.g.,<br />
“Do not raise the rate more than 1 ml in 12 hours”). If the prescription has these<br />
components, use the ∆Rate field and the ∆ Time field to enter those limits. Example:<br />
Enter the incremental medLIMIT amount level of 1 ml on this field, and press<br />
“YES/ENTER” to move to the next field.<br />
c. ∆Time (Delta Time): Enter the incremental or delta time limit. (Example: Enter 12:00<br />
hours.) If there are no incremental or delta level components to the prescription, leave<br />
these fields (∆Rate and ∆Time) set at their default settings of “0” and press<br />
“YES/ENTER” to move to the next field.<br />
d. Max BOLS (Maximum Bolus Dose): Use this field to set the upper limit of the Patient<br />
Bolus or Patient Demand dose. If there is no bolus dose, enter “0.” If a value is given<br />
for the Bolus Dose, use the numeric keys to enter it on this field, press the<br />
“YES/ENTER” key to accept, and move to the next field. The value entered for this<br />
field must be equal to or less than maximum Bolus Dose listed in Figure 5.1<br />
Administration Routes table.<br />
e. MinINT (Minimum Bolus Interval): Use this field to set the minimum amount of time<br />
allowed between patient bolus doses. When the correct time is entered, press the<br />
“YES/ENTER” key to accept, and move to the next field.<br />
f. #BOLS/hr (Number of Boluses allowed per hour): Use this field to enter the maximum<br />
patient bolus/hr. When correct, press the “YES/ENTER” key to accept, and move to<br />
the next field.<br />
g. ACCEPT? If there are any changes to be made, use the up or down arrows to move to<br />
that field, use the numeric keys to enter the corrected data, and press “YES/ENTER” to<br />
accept the new values. Move the cursor back to the “ACCEPT?” field and press<br />
“YES/ENTER”. The medLIMITS are now entered and the display returns to the Pre-<br />
Prescription screen. If the entire medLIMITS Setup Screen is to be aborted, press “NO”<br />
to return to the Pre-Prescription screen.<br />
6 NEXT? If any field is not satisfactory, use the arrow keys to locate the field to be changed,<br />
enter the changes, press the “YES/ENTER” key to accept the new values and then go back<br />
62
to the “NEXT?” field. When all fields are satisfied with correct settings, press the<br />
“YES/ENTER” key to exit this screen, and move on to the next PCA Programming Menu.<br />
At the following screen, the patient’s prescription information is entered to complete the<br />
programming of the pump for a PCA Therapy. Remember that there may be additional limits to<br />
rates and doses based on limits for the route of administration selected. (See Figure 5.1).<br />
Note that the screen Identifier gives the abbreviation “PCA” for Patient Controlled Analgesic<br />
Therapy (or EPI if Epidural route is selected) and has a down arrow configuration, which<br />
indicates that there are more than four fields of text or information to be considered.<br />
P C A P r e s c r i p t i o n M e n u<br />
Note: The PCA therapy can be programmed for Basal Rate (continuous infusion) only, for<br />
Patient Bolus (patient demand dose) only, or for both. At least one of these settings must<br />
be entered, though, before this menu can be accepted at the “DONE?” prompt.<br />
1 BAG Vol (IV Bag Volume): Using the numeric keys, enter the amount of fluid in the IV Bag<br />
or <strong>Med</strong>ication Reservoir (include the overfill volume).<br />
Note: The volume used for priming via the pump is deducted from the Bag Volume.<br />
Therefore, Bag Volume should be equal to or greater than the Amount To Be Infused to<br />
start the infusion.<br />
When the correct amount has been entered, press the “YES/ENTER” key to accept this<br />
field and move on to the next. The range for this field is 1 to 9999.<br />
2 BASL RATE (Basal Rate): The <strong>Curlin</strong> Infusion pump in PCA Intravenous Therapy can be<br />
set for a continuous basal infusion (see Figure 5.1). Use the numeric keys to enter the<br />
prescribed rate (the “units” chosen in the Pre-Prescription Menu will appear here).<br />
Note: If the rate falls out of the range of the pump (depending on the administration route<br />
selected), a beep will sound, and one of the following alert messages will appear:<br />
This field will not be accepted with the “YES/ENTER” key until the rate is adjusted to<br />
fall within pump’s range. When the rate is correct, use the “YES/ENTER” key to<br />
accept, and move to the next field.<br />
63
3 Pt. BOLUS (Patient Bolus Dose): Use the numeric keys to enter the prescribed bolus (patient<br />
demand dose) and when correct, press the “YES/ENTER” key to accept and move on to<br />
the next field. (see Figure 5.1).<br />
Note: If a bolus dose entered falls out of the range of the pump, the above “Greater than Max<br />
Field Limit” or “Less than Min Field Limit” alert will also appear and display the limit.<br />
4 BOLS INT (Patient Bolus Interval): This field allows the clinician to enter the minimum<br />
amount of time (from 0 to 60 min) prescribed between patient-activated bolus dosing. Enter<br />
the time using the numeric keys and, when correct, press the “YES/ENTER” key to accept<br />
and move the cursor to the next field.<br />
5 # BOLS/hr (Number of Patient Bolus Doses per hour): Using the numeric keys, enter the<br />
number (0 to 15) of boluses allowed per hour and, when correct, press the “YES/ENTER”<br />
key to accept and move to the last field.<br />
6 DONE?: If the programming is not done, use the up or down arrow keys to locate the field<br />
to be changed, use the numeric keys to enter the corrected information and press<br />
“YES/ENTER” to accept the new data. If all the fields are acceptable, at the “DONE?”<br />
prompt, press the “YES/ENTER” key to move on to the next screen.<br />
I M P O R T A N T<br />
I N F O R M A T I O N<br />
Before the infusion is started, it is important to consider a few<br />
remaining issues, such as checking the administration set to be sure<br />
it was primed or purged of all air, or perhaps the pump may need to<br />
be put into a security lock setting for additional safety.<br />
PCA IV Therapy<br />
The following screen offers you four choices:<br />
R u n O p t i o n s S c r e e n<br />
Note that you do not need to answer yes or no questions or enter data as previously requested.<br />
This screen requires only that you press the corresponding key on the keypad to begin the<br />
requested function. The following section explains each selection beginning with Prime:<br />
P r i m e<br />
The IV bag or syringe and administration set should be inspected and be free of all air and air<br />
bubbles before they are connected to the access site. Priming may have been done by gravity<br />
when the administration set was first connected to the bag (see Chapter 2). However, if it was not<br />
done then or if there are any remaining air bubbles to be removed, the pump’s “PRIME”<br />
function will assist in this process. To prime the set by using the pump, follow the directions<br />
below.<br />
Note: The lock setting may restrict the ability to prime using the pump.<br />
1 Press and release the “PRIME” key at the “Run Options” screen.<br />
2 The following screen appears:<br />
64
P r i m e D i r e c t i o n S c r e e n<br />
I M P O R T A N T<br />
I N F O R M A T I O N<br />
3 Disconnect the administration set from the patient’s access site using aseptic protocols.<br />
Priming with the set connected to the patient could result in overdose and may cause<br />
injury or even death to the patient.<br />
4 Release any clamps on the administration set.<br />
5 Press and hold the “PRIME” key. Fluid will be pumped at a rate of 300 ml/hr through the<br />
administration set as long as the PRIME key is pressed or until 6 ml is pumped. The pump<br />
will then beep once and require repressing and holding the “PRIME” key again until 6 more<br />
milliliters is delivered. Continue this process until all air has been purged from the IV bag and<br />
the administration set.<br />
Note:<br />
If the bag volume is depleted during priming, a subsequent priming event cannot be<br />
initiated.<br />
While the “PRIME” key is depressed, the following screen appears:<br />
The amount used for the prime session is accumulated and displayed on the bottom field of<br />
this screen.<br />
6 When priming is complete, release the “PRIME” key. The following screen will display:<br />
7 To continue priming, press the PRIME key again. If priming is complete, press<br />
“YES/ENTER” to exit and return to the Run Option screen. The total amount of solution<br />
used in this priming session displays on the bottom field.<br />
65
Note: The amount of fluid used in the priming process will be deducted from the Bag Volume<br />
Total but will NOT be counted in the amount infused because this amount is not to be<br />
delivered to the patient. The bag volume should still be equal to or greater than the<br />
Amount TBI before you can proceed with the infusion. If it is not, an alert will appear<br />
stating, “AMT TBI GREATER THAN BAG VOL”. You have the option to continue<br />
by pressing the “YES/ENTER” key or return to the “Run Options” screen by pressing<br />
the “NO” key.<br />
Options<br />
Once the prescription is programmed, there are more customizing features available for each<br />
therapy. Press the “OPTIONS” key from the Run Options screen to access these options. The<br />
OPTIONS menu can also be accessed while the pump is running.<br />
Note. After the infusion has started, any changes made through the OPTIONS menu involving:<br />
• “Clin DOSE”,<br />
• “SHFT TOT”<br />
• “HRLY TOT”, and<br />
• “CLR HRLY”<br />
will return you directly to the “ACCEPT OPT?” field.<br />
The following screen displays the PCA Therapy “Options” available. When you open this menu,<br />
use the up and down arrows to move the highlight bar to the desired option. Lock settings may<br />
require an access code before the option can be changed. Any new setting, except “CLEAR<br />
HOURLY” screen acceptance and “SHIFT TOTAL” clear screen acceptance becomes effective<br />
when the “Options” screen is exited by pressing “YES/ENTER” at the “ACCEPT OPT?” field.<br />
PCA IV Therapy<br />
P C A O p t i o n s M e n u<br />
Note: The pump’s default settings are indicated above in the left screen.<br />
1 LOCK: When the lock is set to “OFF,” the clinician has access to all of the pump functions.<br />
After the pump is completely programmed, change the lock to meet the security needs of this<br />
therapy. There are four choices: OFF, 1, 2, or 3. Each level higher limits the available<br />
options. To change the lock setting, press the “NO/CHANGE” key until the correct lock<br />
setting appears. Then, press “YES/ENTER” key to accept the new lock selection. Once the<br />
pump has been set into a locked condition, any subsequent request to change the lock will<br />
66
equire a clinician access code. (See “Clinical Information and Access Code” chapter for<br />
access code information, lock setting table and available features for each lock setting).<br />
2 ClinDOSE? (Clinician Dose): Allows an additional prescribed dose to be administered by a<br />
clinician at any time except during a Load Dose or Bolus Dose. The Maximum Clinician<br />
Dose is determined by the administration route (see Figure 5.1).<br />
C l i n i c i a n D o s e M e n u<br />
Note: If a lock setting of 1, 2 or 3 is selected, an access code will be requested. If you wish to<br />
give a clinician dose at this time, change OFF to ON and press YES key. Enter the<br />
amount of clinician dose to be delivered. Press YES to accept the clinician dose menu.<br />
The Clinician Dose will begin when the options screen is accepted and the pump is<br />
running. The following Run Screen will appear until it is completed:<br />
C l i n i c i a n D o s e R u n S c r e e n<br />
The graphic bar now depicts the clinician dose in progress and when this dose is complete,<br />
reverts back to reflecting the container in progress. This graphic bar will toggle with Line<br />
Pressure (“L Press”) which displays the current patient side (downstream) pressure<br />
in the administration set in millimeter of mercury (mmHg) units.<br />
The Volume Infused will toggle with Dose Infused if mg or mcg are the selected unit.<br />
Remaining dose time will toggle with remaining dose volume to infuse.<br />
I M P O R T A N T<br />
I N F O R M A T I O N<br />
When the clinician dose is complete, the pump will beep, return to the<br />
previous running rate, and resume the PCA therapy. The lockout<br />
time for bolus dosing will restart at the end of the clinician dose to<br />
prevent a bolus from being delivered too quickly after a clinician dose.<br />
Once the clinician dose is given, the clinician-dose field returns to its default of “0,” and any<br />
subsequent clinician doses will need to be reentered.<br />
3 SHFT TOT (Shift Totals): This feature allows the clinician to track the infusion for a selected<br />
period of time, such as an 8 or 12-hour shift. To access Shift Totals, press the<br />
“NO/CHANGE” key to change OFF to ON and then press “YES/ENTER.” The<br />
following screens will appear alternately:<br />
S h i f t T o t a l s S c r e e n s<br />
67
a. Cleared/ELAPSED: This field displays the date and time the shift total was last cleared.<br />
It toggles with the amount of time elapsed since that clearing.<br />
b. Vol INF/Amt INF (Volume/Amount Infused): This field displays the volume (ml) and<br />
amount (mg or mcg) infused since the shift total was cleared.<br />
c. BOLUS/Clin DOSE (Clinician Dose): This field displays the number of clinician doses<br />
given since the total was cleared. It toggles with the number of patient activated boluses<br />
received of those requested.<br />
d. To exit the shift total feature without clearing the totals, press the “YES” key at the<br />
highlighted EXIT field.<br />
e. To clear the Shift Totals, press the “NO” key at the EXIT field. The field will change to<br />
read “CLEAR”, press the “YES” key now to clear. A lock level 3 will require an access<br />
code entry before allowing the user to clear the Shift Totals.<br />
PCA IV Therapy<br />
4 HRLY TOT (Hourly Totals): To view hourly infusion totals press the “NO/CHANGE” key<br />
to change OFF to ON and then press “YES/ENTER.” Either of the following two screens<br />
will appear:<br />
H o u r l y T o t a l s S c r e e n<br />
or<br />
The screen displays hourly infusion delivery for each hour (00-23) of the last 24 hours of<br />
therapy in the unit selected.<br />
a. The highlighted field has a marker ◄ indicating the current hour in progress.<br />
b. Volume or Amount will show in the first column, BG (Bolus Given) in the second<br />
column and BA (Bolus Attempted) in the third column.<br />
c. Use the up arrow key to scroll back through the last 24 hours.<br />
d. If the infusion was not running, a series of ------ will appear for that hour.<br />
e. To exit this screen, press the NO/CHANGE key.<br />
68
5 CLR HRLY (Clear Hourly Totals): To clear Hourly Totals press the “NO/CHANGE” key<br />
to change OFF to ON and then press “YES/ENTER.” The following screen will appear:<br />
C l e a r H o u r l y T o t a l s S c r e e n<br />
a. To clear the Hourly Totals, press the “YES/ENTER” key. All Hourly Totals will be<br />
cleared and the cursor will return to the Options menu.<br />
b. To maintain the Hourly Totals, press the “NO/CHANGE” key. Hourly Totals will be<br />
maintained and the cursor will return to the Options menu.<br />
c. A lock level of 2 or 3 will require an access code entry before allowing “Hourly Totals”<br />
reset.<br />
6 medLMTS (<strong>Med</strong>ication Limits): If this feature was not selected in the Pre-Prescription<br />
Menu, it will not appear on the Options menu. If medLIMITS parameters were<br />
programmed previously, this field will appear; and if you want to titrate now, select “ON” and<br />
press the “YES/ENTER” key to go to the PCA Titrate medLIMITS menu:<br />
P C A T i t r a t e m e d L I M I T S S c r e e n<br />
This screen allows you to change the basal rate and/or the bolus parameters within the<br />
predefined prescription limits. Whenever any value is changed using the medLIMITS<br />
option, the new value will appear on the prescription menu when it is reviewed. If a delta<br />
time/rate limitation was previously programmed, the rate can be increased within those<br />
parameters up to 12 times during the delta time period. If a 13 th attempt is made an alert will<br />
display: “MAX CHANGES FOR PERIOD REACHED.”<br />
a. BASL RATE: Use the numeric keys to enter the new desired rate. When the correct rate<br />
has been entered, press the “YES/ENTER” key to accept the rate, and move to the next<br />
field. (see Figure 5.1).<br />
b. Pt. BOLUS: Use the numeric keys to enter the new patient bolus dose and, when correct,<br />
press “YES/ENTER” to accept and move to the next field. (see Figure 5.1).<br />
c. BOLS INT (Patient Bolus Interval): Use the numeric keys to enter the new patient bolus<br />
time interval and, when correct, press “YES/ENTER” to accept and move to next field.<br />
The range for this field is 0 to 60.<br />
d. #BOLS /hr (number of patient boluses per hour): Use the numeric keys to enter the new<br />
number of patient boluses per hour and, when correct, press “YES/ENTER” to move to<br />
the final step in the medLIMITS menu. The range for this field is 0 to 15.<br />
69
e. ACCEPT? YES/NO: If necessary, use the arrow keys to move to any field and change<br />
the data entered. To abort this screen entirely, press “NO” at this prompt. Any data<br />
entered on this display will be aborted and the display will return to the options menu . If<br />
the parameters entered are correct, press the “YES/ENTER” key, and the new rate or<br />
rates will be accepted. The display returns to the Options menu when this screen is<br />
exited.<br />
f. New values will be in effect when the Options menu is accepted.<br />
7 DN Occlu (Down Occlusion): This feature allows the pump to sense an occlusion pressure<br />
in the line between the pump and the access site, e.g., a kink in the tubing between the pump<br />
and the patient, a blockage in the access site, or a clamp left on the distal tubing. There are<br />
two options for this field: the “Low” setting triggers the alarm when it detects in-line<br />
pressures at 400 mmHg ±150 (8 ±3 psi “pounds per square inch”), or the “High” setting<br />
(default setting) alarms when it detects in-line pressures at 900 mmHg ±150 (18 ±3 psi).<br />
Press “NO” to change the selection. When the correct pressure setting appears, press the<br />
“YES/ENTER” key to accept it and move the cursor to the next field.<br />
8 AIR SENS (Air In Line Sensor): This feature allows you to select the amount of air the<br />
pump will detect in the administration set tubing before it goes into an alarm state. The<br />
choices are 0.1 ml, 0.5 ml (the default setting), 2.0 ml, and OFF. Press the “NO/CHANGE”<br />
key to change the options until the desired setting appears on the display, and then press<br />
“YES/ENTER” to select and move the cursor to the next line.<br />
I M P O R T A N T<br />
I N F O R M A T I O N<br />
Whenever the Air-In-Line Sensor is set to OFF, <strong>Curlin</strong> Infusion<br />
recommends the use of an air-eliminating filter.<br />
When the Air-In-Line Sensor is set to “OFF” and the “RUN” key is pressed at the Run<br />
Option screen, the alert message below will appear on the screen. It will also appear if the<br />
Air-In-Line is changed from the OPTIONS menu when an infusion is in progress and the<br />
AIR SENS field is accepted.<br />
PCA IV Therapy<br />
A i r - I n - L i n e S e n s o r O f f M e s s a g e S c r e e n<br />
This message alerts you to the Air-In-Line Sensor being set to “OFF.” The message will<br />
require answering “yes” or “no” to whether the administration set being used has an aireliminating<br />
filter. If you press the “YES” key to indicate that there is an air-eliminating filter in<br />
use, the Air-In-Line sensor will be completely disabled and the pump will start the infusion.<br />
If you press the “NO” key to indicate a filter is not in use, the Air-In-Line sensor will be set to<br />
detect the presence of any contiguous 2-milliliter air in the line. The alert message below will<br />
then briefly appear on the screen. If the alert occurred at the Run Options screen, the pump<br />
will start the infusion.<br />
P u m p W i l l S e n s e 2 m l A l e r t S c r e e n<br />
70
Also, when the Air-In-Line sensor is completely disabled and the infusion goes to an<br />
“Infusion Complete” or “Empty Bag” status, the Air Sensor setting will automatically change<br />
to 2.0 ml.<br />
9 AUDIO (Audio Volume): This feature allows you to adjust the audio volume of the pump’s<br />
alarm setting. You can enter a number from 9 (the loudest setting) to 1 (the quietest setting).<br />
When you select a number, the pump will beep at that audio level. Press the “NO” key and<br />
enter a new setting (1 – 9). Repeat until the desired setting is reached, and then press<br />
“YES/ENTER” to select and move the cursor to the next field.<br />
10 PWR CK? (Power Check): This feature allows you to periodically recheck the battery charge.<br />
It will display the active power source of the pump, whether internal batteries or external<br />
power. If the active source is the batteries, a graph will indicate approximately how much<br />
charge remains in the batteries. To access this information, select “ON” and press<br />
“YES/ENTER”. The Power Source Screen will display for five seconds and return to the<br />
Options Menu.<br />
11 ACCEPT OPT? If the changes made in the Options Menu are acceptable, press the<br />
“YES/ENTER” key. If the changes are not acceptable, cursor up to any field for corrections<br />
or abort all changes made in this menu by pressing the “NO” key, and return to the previous<br />
screen.<br />
There are two remaining selections to consider from the “Run Options Screen”, NO to<br />
REVIEW and RUN to START.<br />
Reviewing or Changing the Program<br />
To review or make any changes in the prescription programming, press the “NO/CHANGE”<br />
key at the Run Options screen, and the prescription screens will reappear (Changes may be<br />
inhibited by lock setting.) Changes to the prescription can be made before the start of the<br />
therapy; however, once a therapy has started, no changes can be made to the Pre-Prescription<br />
Screen. It will appear only for review purposes. Attempts to change the Pre-Prescription Menu<br />
during a new program review will cause an alert screen to be displayed, notifying the programmer<br />
that changes will require reprogramming of the prescription.<br />
Starting the Infusion<br />
RUN: When the programming is complete and the pump has been primed properly and<br />
connected to the access site, press the “RUN” key at the Run Option screen to start the therapy.<br />
The pump will begin infusing, and except when a LOAD DOSE or CLIN DOSE is<br />
programmed, the following screen will display data on the status of the therapy:<br />
P C A R u n S c r e e n<br />
71
I M P O R T A N T<br />
I N F O R M A T I O N<br />
The amount of drug infused during the “loading dose”<br />
depends on the units chosen which may be in ml’s, mg, or<br />
mcg. A loading dose of 5 mg will infuse 50 ml if the<br />
concentration is 0.1 mg/ml.<br />
This screen will continue to display as long as the infusion is running. Notice the information on<br />
each field:<br />
1 The first field displays the “RATE” of the infusion toggled with the programmed Patient<br />
Bolus Dose Amount. This field also displays “BOLUS xx (mg/ml/mcg)” whenever a bolus<br />
dose is being delivered. The programmed bolus amount displays and the BOLUS text flashes<br />
when the pump is delivering a patient bolus dose.<br />
2 The second field is a graphic bar representing the percentage of the completed infusion. The<br />
graphic bar will toggle with Line Pressure (“L Press”) which displays the current<br />
patient side (downstream) pressure in the administration set in millimeter of mercury<br />
(mmHg) units.<br />
3 The third line displays the total volume “TOT Vol” infused and, if mg or mcg is the selected<br />
unit, this field will toggle to display the total mg or mcg infused “TOT INF” as well.<br />
4 The fourth line displays the number of patient boluses delivered and number of boluses<br />
attempted per bag volume. If the patient attempts a bolus before the allowed amount of time<br />
set between boluses, an alert message will display “Bolus Requested,” and only the second<br />
number will increase. Also, toggling with number of boluses delivered/requested is the<br />
remaining volume left in the bag.<br />
5 In addition to the display screen, information on the status of the infusion is provided by the<br />
three LED lights. The green LED light blinks whenever the pump is infusing. If the Basal<br />
rate is set at “0”, the yellow LED light will blink along with the green light until the bolus is<br />
actually being delivered. While the bolus is infusing, only the green light will blink.<br />
The information on the run screen will alternate between a four-line display and a large font<br />
display of each individual line of information on the screen.<br />
PCA IV Therapy<br />
P C A I n f o r m a t i o n S c r e e n s<br />
Interrupting an Infusion<br />
72
The infusion can be paused at any time by pressing the “PAUSE” key. The yellow “Standby”<br />
LED light blinks, and the following screen displays:<br />
P a u s e M e n u S c r e e n<br />
The screen offers the user three options:<br />
Resuming the Current Container<br />
1 RESUME: To resume the therapy in progress from where it left off, press the<br />
“YES/ENTER” key at this field. The pump will return to the Run Options Screen, and you<br />
can resume the therapy.<br />
Note: If you wish to hang a new container, move the cursor to REPEAT Rx (see following<br />
section).<br />
R u n O p t i o n s S c r e e n<br />
a. Press the “RUN” key to resume the therapy.<br />
b. Press the “NO” key to go back to the programming screen to make changes in the<br />
therapy program (this feature may be blocked by a security lock, thus not allowing<br />
changes to the program unless an access code is given). Also, remember that no changes<br />
are allowed in the first prescription menu if an infusion is in progress.<br />
c. Press the “OPTIONS” or “PRIME” keys if either of these functions is desired at this<br />
time.<br />
Hanging a New Container<br />
2 REPEAT Rx: To repeat the present therapy and add another IV container with the same<br />
prescription, press the “YES/ENTER” key at this field. If more than one therapy is<br />
programmed, a “Select Therapy Screen” will list all preprogrammed therapies. Select which<br />
therapy to repeat by moving the cursor to the therapy of choice and pressing the<br />
“YES/ENTER” key.<br />
The pump will then display the program screen with the last programmed values of the<br />
therapy and the cursor will automatically advance through the prescription menus. You can<br />
stop the auto-advance function by pressing any key (except ON/OFF) and then complete the<br />
confirmation of the prescription manually by pressing the “YES” key at the remaining fields.<br />
73
When the program is accepted, the display returns to the above “Run Options Screen.” If the<br />
current therapy is still in progress when the “REPEAT Rx” function is selected, the following<br />
screen will appear:<br />
a. This screen is a reminder that the infusion is not complete. If the incomplete therapy is<br />
to be continued, press “NO/CHANGE” and the Pause Menu screen will be displayed,<br />
then press “YES/ENTER” and the Run Options screen will be displayed. To resume<br />
the unfinished therapy, press “RUN”.<br />
b. If the therapy is to be terminated and a new IV container added, press “YES/ENTER”<br />
to repeat the infusion. The following screen will then appear, asking whether or not you<br />
wish to maintain the current Bolus or <strong>Med</strong>LIMITS schedule.<br />
PCA IV Therapy<br />
Press “YES/ENTER” to maintain the current schedules and continue with the<br />
programming of the pump. Press “NO/CHANGE” to start a new schedule. The<br />
following screen will then appear asking you to confirm the clearing of the schedules.<br />
Press “YES/ENTER” to clear the current schedules and continue with the programming<br />
of the pump. Pressing “NO/CHANGE” will return you to the prior screen.<br />
Entering a New Program<br />
3 NEW PROGRAM: To program an entirely new prescription or different therapy, press the<br />
“YES/ENTER” key at this field (the ability to change these parameters may be controlled by<br />
the lock setting). The display will return to the “Pre-Prescription Screen.” If the current<br />
container has not completely infused, the following screen will appear:<br />
a. This screen is a reminder that the infusion is not complete. If you want to return to the<br />
current container and finish infusing it, press the “NO/CHANGE” key to return to the<br />
Pause Menu screen.<br />
74
. To abort the current container and enter a new program, press the “YES/ENTER” key.<br />
If a prescription has previously been entered for the therapy mode you wish to program,<br />
the following screen will appear:<br />
c. If you want to save the current prescription, press the “NO/CHANGE” key to return to<br />
the Pause Menu screen. If you wish to erase the current prescription and enter a new<br />
program, press the “YES/ENTER” key to proceed. All previous prescription values will<br />
be erased.<br />
Note: Selecting “NEW PROGRAM” will also reset the OPTIONS selected to their default<br />
settings except for the LOCK and AUDIO settings which must be changed manually.<br />
Infusion Complete<br />
When the infusion is complete, the audio alarm will beep, and the following screen will display:<br />
Note: To temporarily silence the alarm, press the “Silence” key.<br />
P C A I n f u s i o n C o m p l e t e<br />
This screen displays:<br />
1 “INFUSION COMPLETE.”<br />
2 A completely filled in bar graph indicating infusion complete.<br />
3 TOT Vol (Total Volume): If units are mg or mcg, this field will also toggle to give the Total<br />
Infused.<br />
4 Infusion Complete is considered an alarm status, and the audio alarm will beep periodically<br />
every three seconds to alert the user to this condition. Additionally, the red LED light blinks<br />
to indicate that the “Infusion Complete” alarm exists.<br />
Stopping the Infusion<br />
At “Infusion Complete”, press the “PAUSE” key and then choose to either:<br />
1 Turn off the pump by pressing the “OFF” key, or<br />
2 Select one of the options from the “Pause” screen:<br />
P a u s e M e n u S c r e e n<br />
75
a. REPEAT Rx: To repeat the present therapy and add another IV container with the<br />
same prescription, press the “YES/ENTER” key at this field. The following screen will<br />
then appear, asking whether or not you wish to maintain the current Bolus or<br />
<strong>Med</strong>LIMITS schedule.<br />
PCA IV Therapy<br />
Press “YES/ENTER” to maintain the current schedules and continue with the<br />
programming of the pump. Press “NO/CHANGE” to start a new schedule. The<br />
following screen will then appear asking you to confirm the clearing of the schedules.<br />
Press “YES/ENTER” to clear the current schedules and continue with the programming<br />
of the pump. Pressing “NO/CHANGE” will return you to the prior screen.<br />
The pump will then display the program screens with the last programmed values of the<br />
therapy and the cursor will automatically advance through the prescription menus. You<br />
can stop the auto-advance function by pressing any key (except ON/OFF) and then<br />
complete the confirmation of the prescription manually by pressing the “YES” key at the<br />
remaining fields.<br />
b. NEW PROGRAM: To program an entirely new prescription press the “YES/ENTER”<br />
key when this field is highlighted and the display will return to the “Select Therapy<br />
Screen.” (The lock setting can control access to this function.)<br />
Note: The therapy is complete; therefore, RESUME is not an option at this time and is not<br />
displayed.<br />
76
C h a p t e r<br />
6<br />
P C A E p i d u r a l T h e r a p y<br />
P C A o r P a t i e n t C o n t r o l l e d A n a l g e s i a i s d e s<br />
c o n t r o l l e u d s e d s e , m a n o d r b o b l o t h C . u r l i T h n i s I p u n m f c p h u s a p i s t o p n e r c i f c i o c v a e l r l s y p r o g<br />
P C A-E p i d u r a l t h e r a p i e s .<br />
W<br />
hen you begin programming a PCA-EPI Therapy, the following display screen will<br />
appear, requiring you to enter information needed to program this therapy.<br />
Prescription Menus<br />
E P I P r e - P r e s c r i p t i o n M e n u S c r e e n<br />
PCA EPI Therapy<br />
These menu items allow you to customize the program to match each individual prescription. The<br />
pump’s default settings are listed in the left screen. Each field is individually explained below.<br />
Note: Some of the lines are abbreviated to fit on the display screen; the full descriptions appear<br />
below.<br />
1 UNITS: Allows you to select from units of mg, mcg, or ml depending on how the<br />
prescription is written. In the PCA-EPI therapy, the pump will allow rates as defined in<br />
figure 5.1; therefore, if mg or mcg is selected, the concentration requested in the next field will<br />
determine the upper and lower programming limits for mg and mcg. Use the<br />
“NO/CHANGE” key until the desired “units” appears on the display, and then press the<br />
“YES/ENTER” key to accept and move to the next field.<br />
2 CONCEN (Concentration): This field is active whenever mg or mcg is selected in the<br />
“units” field and requires data entry of the concentration of mg or mcg per ml. When the<br />
correct data is entered, press “YES/ENTER” to accept, and move the cursor to the next<br />
field. If ml is chosen in the “units” field, this line will not display. The range for this field is<br />
0.1 to 999.<br />
77
3 ADMIN Rt (Administration Route): Allows a selection from three routes of administration:<br />
the default setting of EPI (epidural), IV (intravenous) and SQ (subcutaneous). If a route other<br />
than Epidural is selected, the Therapy Identifier bar in the Prescription Menu will display<br />
PCA instead of EPI. Each of the routes has defined settings as illustrated in the following<br />
table:<br />
Administration<br />
Route<br />
Occlusion Setting<br />
mmHg (psi)<br />
A d m i n i s t r a t i o n R o u t e s<br />
Maximum<br />
Basal Rate<br />
(ml/hr)<br />
Rate During<br />
Bolus<br />
(ml/hr)<br />
Maximum<br />
Bolus Dose<br />
(ml)<br />
Maximum<br />
Load Dose<br />
(ml)<br />
Epidural 900 or 400 (18 or 8) 25 90 25 25<br />
Intravenous 900 or 400 (18 or 8) 9.9 125 9.9 9.9<br />
Subcutaneous 900 or 400 (18 or 8) 5 60 5 5<br />
Figure 6.1 PCA Administration Route Default Settings<br />
4 Load Dose (Loading Dose): Allows the clinician to program in a pre-infusion loading dose if<br />
it is prescribed. If a loading dose is not ordered, select the default setting of “0” by pressing<br />
“YES/ENTER.” If it is ordered, enter the dose in this field, and press the “YES/ENTER”<br />
key to accept and move to the next field. The maximum load dose is determined by the<br />
administration route (refer to Figure 6.1 above).<br />
I M P O R T A N T<br />
I N F O R M A T I O N<br />
The amount of drug infused during the “loading dose” depends<br />
on the units chosen which may be in ml’s, mg, or mcg. A<br />
loading dose of 5 mg will infuse 50 ml if the concentration is 0.1<br />
mg/ml.<br />
Note: The “units” will correspond to the choice previously selected.<br />
The loading dose will be delivered at the fixed bolus delivery rate when the “RUN” key is<br />
pressed to start the PCA infusion. The amount of the loading dose is included in the<br />
displayed “amount infused” and is logged into the history file. The bolus lockout time is set<br />
from the end of the loading dose. Because the loading dose is only used on initial start up of<br />
an infusion, it will revert to a value of “0” whenever the “REPEAT Rx” function is selected.<br />
I M P O R T A N T<br />
I N F O R M A T I O N<br />
To terminate a loading dose in progress but save the rest of the<br />
prescription, pause the pump and select “REPEAT Rx.” When the<br />
“RUN” key is pressed, the prescription will restart without the<br />
loading dose.<br />
5 medLIMITS Setup: Allows the clinician to setup soft (clinician or institutional) limits on<br />
any medication that is being infused with the pump. If there is no request or mandate to set<br />
soft limits, select “OFF,” and press “YES/ENTER” to accept the factory defaults (see Figure<br />
6.1). If a specific medication limit is requested or mandated, press “YES/ENTER” to turn<br />
ON the medLIMITS and the following screen will appear. Enter the appropriate soft limits<br />
for each field:<br />
78
E P I m e d L I M I T S S e t u p S c r e e n<br />
a. MxRATE (Maximum Rate) limits: Use the numeric keys to enter the upper limits of the<br />
infusion rate. When the correct maximum medLIMIT rate is entered, press<br />
“YES/ENTER” and the cursor will move to the next field. The minimum rate is 0, and<br />
the maximum rate must be equal to or less than maximum Basal Rate listed in Figure 6.1<br />
Administration Route Default Settings table.<br />
b. ∆Rate (Delta Rate): Some prescriptions include incremental levels or delta limitations (e.g.,<br />
“Do not raise the rate more than 1 ml in 12 hours”). If the prescription has these<br />
components, use the ∆Rate field and the ∆ Time field to enter those limits. Example:<br />
Enter the incremental medLIMITS amount level of 1 ml on this field, and press<br />
“YES/ENTER” to move to the next field.<br />
c. ∆Time (Delta Time): Enter the incremental or delta time limit. (Example: Enter 12:00<br />
hours.) If there are no incremental or delta level components to the prescription, leave<br />
these fields (∆Rate and ∆Time) set at their default settings of “0” and press<br />
“YES/ENTER” to move to the next field.<br />
d. Max BOLS (Maximum Bolus Dose): Use this field to set the upper limit of the Patient<br />
Bolus or Patient Demand dose. If there is no bolus dose, enter “0.” If a value is given<br />
for the Bolus Dose, use the numeric keys to enter it on this field, press the<br />
“YES/ENTER” key to accept, and move to the next field. The value entered for this<br />
field must be equal to or less than maximum Bolus Dose listed in Figure 6.1<br />
Administration Route Default Setings table.<br />
e. MinINT (Minimum Bolus Interval): Use this field to set the minimum amount of time<br />
allowed between patient bolus doses. When the correct time is entered, press the<br />
“YES/ENTER” key to accept, and move to the next field.<br />
f. #BOLS/hr (Number of Boluses allowed per hour): Use this field to enter the maximum<br />
patient bolus/hr. When correct, press the “YES/ENTER” key to accept, and move to<br />
the next field.<br />
g. ACCEPT? If there are any changes to be made, use the up or down arrows to move to<br />
that field, use the numeric keys to enter the corrected data, and press “YES/ENTER” to<br />
accept the new values. Move the cursor back to the “ACCEPT?” field and press<br />
“YES/ENTER”. The medLIMITS are now entered and the display returns to the Pre-<br />
Prescription screen. If the entire medLIMITS Setup Screen is to be aborted, press “NO”<br />
to return to the Pre-Prescription screen.<br />
PCA EPI Therapy<br />
79
6 NEXT? If any field is not satisfactory, use the arrow keys to locate the field to be changed,<br />
enter the changes, press the “YES/ENTER” key to accept the new values and then go back<br />
to the “NEXT?” field. When all fields are satisfied with correct settings, press the<br />
“YES/ENTER” key to exit this screen, and move on to the next PCA Programming Menu.<br />
At the following screen, the patient’s prescription information is entered to complete the<br />
programming of the pump for a PCA Therapy. Remember that there may be additional limits to<br />
rates and doses based on limits for the route of administration selected. (See Figure 6.1).<br />
Note that the screen Identifier gives the abbreviation “EPI” for Epidural(or “PCA” for Patient<br />
Controlled Analgesic Therapy if a route other than epidural is selected) and has a down arrow<br />
configuration, which indicates that there are more than four fields of text or information to be<br />
considered.<br />
E P I P r e s c r i p t i o n M e n u<br />
Note: The PCA therapy can be programmed for Basal Rate (continuous infusion) only, for<br />
Bolus (patient demand dose) only, or for both. At least one of these settings must be<br />
entered, though, before this menu can be accepted at the “DONE?” prompt.<br />
1 BAG Vol (IV Bag Volume): Using the numeric keys, enter the amount of fluid in the IV Bag<br />
or <strong>Med</strong>ication Reservoir (include the overfill volume).<br />
Note: The volume used for priming via the pump is deducted from the Bag Volume.<br />
Therefore, Bag Volume should be equal to or greater than the Amount To Be Infused to<br />
start the infusion.<br />
When the correct amount has been entered, press the “YES/ENTER” key to accept this<br />
field and move on to the next. The range for this field is 1 to 9999.<br />
2 BASL RATE (Basal Rate): The <strong>Curlin</strong> Infusion pump in PCA Epidural Therapy can be<br />
set for a continuous basal infusion of 0 to 25 ml per hour. (see Figure 6.1). Use the numeric<br />
keys to enter the prescribed rate (the “units” chosen in the Pre-Prescription Menu will appear<br />
here).<br />
Note: If the rate falls out of the range of the pump (depending on the administration route<br />
selected), a beep will sound, and one of the following alert messages will appear:<br />
80
This field will not be accepted with the “YES/ENTER” key until the rate is adjusted to<br />
fall within pump’s range. When the rate is correct, use the “YES/ENTER” key to<br />
accept, and move to the next field.<br />
3 Pt. BOLUS (Patient Bolus Dose): Use the numeric keys to enter the prescribed bolus (patient<br />
demand dose) and when correct, press the “YES/ENTER” key to accept and move on to<br />
the next field. The Patient Bolus Dose can be set for 0 to 25 ml.<br />
Note: If a bolus dose entered falls out of the range of the pump, the above “Greater than Max<br />
Field Limit” or “Less than Min Field Limit” alert will also appear and display the limit.<br />
4 BOLS INT (Patient Bolus Interval): This field allows the clinician to enter the minimum<br />
amount of time (from 0 to 60 min) prescribed between patient-activated bolus dosing. Enter<br />
the time using the numeric keys and, when correct, press the “YES/ENTER” key to accept<br />
and move the cursor to the next field.<br />
5 # BOLS/hr (Number of Patient Bolus Doses per hour): Using the numeric keys, enter the<br />
number (0 to 15) of boluses allowed per hour and, when correct, press the “YES/ENTER”<br />
key to accept and move to the last field.<br />
6 DONE?: If the programming is not done, use the up or down arrow keys to locate the field<br />
to be changed, use the numeric keys to enter the corrected information and press<br />
“YES/ENTER” to accept the new data. If all the fields are acceptable, at the “DONE?”<br />
prompt, press the “YES/ENTER” key to move on to the next screen.<br />
I M P O R T A N T<br />
I N F O R M A T I O N<br />
Before the infusion is started, it is important to consider a few<br />
remaining issues, such as checking the administration set to be sure<br />
it was primed or purged of all air, or perhaps the pump may need to<br />
be put into a security lock setting for additional safety.<br />
PCA EPI Therapy<br />
The following screen offers you four choices:<br />
R u n O p t i o n s S c r e e n<br />
Note that you do not need to answer yes or no questions or enter data as previously requested.<br />
This screen requires only that you press the corresponding key on the keypad to begin the<br />
requested function. The following section explains each selection beginning with Prime:<br />
P r i m e<br />
The IV bag or syringe and administration set should be inspected and be free of all air and air<br />
bubbles before they are connected to the access site. Priming may have been done by gravity<br />
when the administration set was first connected to the bag (see Chapter 2). However, if it was not<br />
done then or if there are any remaining air bubbles to be removed, the pump’s “PRIME”<br />
function will assist in this process. To prime the set by using the pump, follow the directions<br />
below.<br />
Note: The lock setting may restrict the ability to prime using the pump.<br />
81
1 Press and release the “PRIME” key at the “Run Options” screen.<br />
2 The following screen appears:<br />
P r i m e D i r e c t i o n S c r e e n<br />
3 Disconnect the administration set from the patient’s access site using aseptic protocols.<br />
I M P O R T A N T<br />
I N F O R M A T I O N<br />
Priming with the set connected to the patient could result in<br />
overdose and may cause injury or even death to the patient.<br />
4 Release any clamps on the administration set.<br />
5 Press and hold the “PRIME” key. Fluid will be pumped at a rate of 300 ml/hr through the<br />
administration set as long as the PRIME key is pressed or until 6 ml is pumped. The pump<br />
will then beep once and require repressing and holding the “PRIME” key again until 6 more<br />
milliliters is delivered. Continue this process until all air has been purged from the IV bag and<br />
the administration set.<br />
Note:<br />
If the bag volume is depleted during priming, a subsequent priming event cannot be<br />
initiated.<br />
While the “PRIME” key is depressed, the following screen appears:<br />
The amount used for the prime session is accumulated and displayed on the bottom field of<br />
this screen.<br />
6 When priming is complete, release the “PRIME” key. The following screen will display:<br />
7 To continue priming, press the PRIME key again. If priming is complete, press<br />
“YES/ENTER” to exit and return to the Run Option screen. The total amount of solution<br />
used in this priming session displays on the bottom field.<br />
Note: The amount of fluid used in the priming process will be deducted from the Bag Volume<br />
Total but will NOT be counted in the amount infused because this amount is not to be<br />
82
delivered to the patient. The bag volume should still be equal to or greater than the<br />
Amount TBI before you can proceed with the infusion. If it is not, an alert will appear<br />
stating, “AMT TBI GREATER THAN BAG VOL.” You have the option to continue<br />
by pressing the “YES/ENTER” key or return to the “Run Options” screen by pressing<br />
the “NO” key.<br />
Options<br />
Once the prescription is programmed, there are more customizing features available for each<br />
therapy. Press the “OPTIONS” key from the Run Options screen to access these options. The<br />
OPTIONS menu can also be accessed while the pump is running.<br />
Note. After the infusion has started, any changes made through the OPTIONS menu involving:<br />
• “Clin DOSE”,<br />
• “SHFT TOT”<br />
• “HRLY TOT”, and<br />
• “CLR HRLY”<br />
will return you directly to the “ACCEPT OPT?” field.<br />
The following screen displays the EPI Therapy “Options” available. When you open this menu,<br />
use the up and down arrows to move the highlight bar to the desired option. Lock settings may<br />
require an access code before the option can be changed. Any new setting, except “CLEAR<br />
HOURLY” screen acceptance and “SHIFT TOTAL” clear screen acceptance becomes effective<br />
when the “Options” screen is exited by pressing “YES/ENTER” at the “ACCEPT OPT?” field.<br />
PCA EPI Therapy<br />
E P I O p t i o n s M e n u<br />
Note: The pump’s default settings are indicated above in the left screen.<br />
1 LOCK: When the lock is set to “OFF,” the clinician has access to all of the pump functions.<br />
After the pump is completely programmed, change the lock to meet the security needs of this<br />
therapy. There are four choices: OFF, 1, 2, or 3. Each level higher limits the available<br />
options. To change the lock setting, press the “NO/CHANGE” key until the correct lock<br />
setting appears. Then, press “YES/ENTER” key to accept the new lock selection. Once the<br />
pump has been set into a locked condition, any subsequent request to change the lock will<br />
require a clinician access code. (See “Clinical Information and Access Code” chapter for<br />
access code information, lock setting table and available features for each lock setting).<br />
2 ClinDOSE? (Clinician Dose): Allows an additional prescribed dose to be administered by a<br />
clinician at any time except during a Load Dose or Bolus Dose. The Maximum Clinician<br />
Dose is determined by the administration route (see Figure 6.1).<br />
83
C l i n i c i a n D o s e M e n u<br />
Note: If a lock setting of 1, 2, or 3 is selected, an access code will be requested. If you wish to<br />
give a clinician dose at this time, change OFF to ON and press YES key. Enter the<br />
amount of clinician dose to be delivered. Press YES to accept the clinician dose menu.<br />
The Clinician Dose will begin when the options screen is accepted and the pump is<br />
running. The following Run Screen will appear until it is completed:<br />
C l i n i c i a n D o s e R u n S c r e e n<br />
The graphic bar now depicts the clinician dose in progress and when this dose is complete,<br />
reverts back to reflecting the container in progress. The graphic bar will toggle with Line<br />
Pressure (“L Press”) which displays the current patient side (downstream) pressure<br />
in the administration set in millimeter of mercury (mmHg) units.<br />
The Volume Infused will toggle with Dose Infused if mg or mcg are the selected unit.<br />
Remaining dose time will toggle with remaining dose volume to infuse.<br />
I M P O R T A N T<br />
I N F O R M A T I O N<br />
When the clinician dose is complete, the pump will beep, return to the<br />
previous running rate, and resume the PCA therapy. The lockout<br />
time for bolus dosing will restart at the end of the clinician dose to<br />
prevent a bolus from being delivered too quickly after a clinician dose.<br />
Once the clinician dose is given, the clinician-dose field returns to its default of “0,” and any<br />
subsequent clinician doses will need to be reentered.<br />
3 SHFT TOT (Shift Totals): This feature allows the clinician to track the infusion for a selected<br />
period of time, such as an 8 or 12-hour shift. To access Shift Totals, press the<br />
“NO/CHANGE” key to change OFF to ON and then press “YES/ENTER.” The<br />
following screens will appear alternately:<br />
S h i f t T o t a l s S c r e e n s<br />
a. Cleared/ELAPSED: This field displays the date and time the shift total was last cleared.<br />
It toggles with the amount of time elapsed since that clearing.<br />
b. Vol INF/Amt INF (Volume/Amount Infused): This field displays the volume (ml) and<br />
amount (mg or mcg) infused since the shift total was cleared.<br />
84
c. BOLUS/Clin DOSE (Clinician Dose): This field displays the number of clinician doses<br />
given since the total was cleared. It toggles with the number of patient activated boluses<br />
received of those requested.<br />
d. To exit the shift total feature without clearing the totals, press the “YES” key at the<br />
highlighted EXIT field.<br />
e. To clear the Shift Totals, press the “NO” key at the EXIT field. The field will change to<br />
read “CLEAR”, press the “YES” key now to clear. A lock level 3 will require an access<br />
code entry before allowing the user to clear the Shift Totals.<br />
4 HRLY TOT (Hourly Totals): To view hourly infusion totals press the “NO/CHANGE” key<br />
to change OFF to ON and then press “YES/ENTER”. Either of the following two screens<br />
will appear:<br />
H o u r l y T o t a l s S c r e e n<br />
or<br />
PCA EPI Therapy<br />
The screen displays hourly infusion delivery for each hour (00-23) of the last 24 hours of<br />
therapy in the unit selected.<br />
a. The highlighted field has a marker ◄ indicating the current hour in progress.<br />
b. Volume or Amount will show in the first column, BG (Patient Bolus Given) in the<br />
second column and BA (Patient Bolus Attempted) in the third column.<br />
c. Use the up arrow key to scroll back through the last 24 hours.<br />
d. If the infusion was not running, a series of ------ will appear for that hour.<br />
e. To exit this screen, press the NO/CHANGE key.<br />
5 CLR HRLY (Clear Hourly Totals): To clear Hourly Totals press the “NO/CHANGE” key<br />
to change OFF to ON and then press “YES/ENTER.” The following screen will appear:<br />
C l e a r H o u r l y T o t a l s S c r e e n<br />
a. To clear the Hourly Totals, press the “YES/ENTER” key. All Hourly Totals will be<br />
cleared and the cursor will return to the Options menu.<br />
85
. To maintain the Hourly Totals, press the “NO/CHANGE” key. Hourly Totals will be<br />
maintained and the cursor will return to the Options menu.<br />
c. A lock level of 2 or 3 will require an access code entry before allowing “Hourly Totals”<br />
reset.<br />
6 medLMTS (<strong>Med</strong>ication Limits): If this feature was not selected in the Pre-Prescription<br />
Menu, it will not appear on the Options menu. If medLIMITS parameters were<br />
programmed previously, this field will appear; and if you want to titrate now, select “ON” and<br />
press the “YES/ENTER” key to go to the PCA Titrate medLIMITS menu:<br />
E P I T i t r a t e M e d L I M I T S S c r e e n<br />
This screen allows you to change the basal rate and/or the bolus parameters within the<br />
predefined prescription limits. Whenever any value is changed using the medLIMITS<br />
option, the new value will appear on the prescription menu when it is reviewed. If a delta<br />
time/rate limitation was previously programmed, the rate can be increased within those<br />
parameters up to 12 times during the delta time period. If a 13 th attempt is made an alert will<br />
display: “MAX CHANGES FOR PERIOD REACHED.”<br />
a. BASL RATE: Use the numeric keys to enter the new desired rate. When the correct rate<br />
has been entered, press the “YES/ENTER” key to accept the rate, and move to the next<br />
field. The range for this field is 0 to 25.<br />
b. Pt. BOLUS: Use the numeric keys to enter the new patient bolus dose and, when correct,<br />
press “YES/ENTER” to accept and move to the next field. The range for this field is 0<br />
to 25.<br />
c. BOLS INT (Patient Bolus Interval): Use the numeric keys to enter the new bolus time<br />
interval and, when correct, press “YES/ENTER” to accept and move to next field. The<br />
range for this field is 0 to 60.<br />
d. #BOLS /hr (number of patient boluses per hour): Use the numeric keys to enter the new<br />
number of patient boluses per hour and, when correct, press “YES/ENTER” to move to<br />
the final step in the medLIMITS Setup menu. The range for this field is 0 to 15.<br />
e. ACCEPT? YES/NO: If necessary, use the arrow keys to move to any field and change<br />
the data entered. To abort this screen entirely, press “NO” at this prompt. Any data<br />
entered on this display will be aborted and the display will return to the options menu . If<br />
the parameters entered are correct, press the “YES/ENTER” key, and the new rate or<br />
rates will be accepted. The display returns to the Options menu when this screen is<br />
exited.<br />
f. New values will be in effect when the Options menu is accepted.<br />
7 DN Occlu (Down Occlusion): This feature allows the pump to sense an occlusion pressure<br />
in the line between the pump and the access site, e.g., a kink in the tubing between the pump<br />
86
and the patient, a blockage in the access site, or a clamp left on the distal tubing. There are<br />
two options for this field: the “Low” setting triggers the alarm when it detects in-line<br />
pressures at 400 mmHg ±150 (8 ±3 psi “pounds per square inch”), or the “High” setting<br />
(default setting) alarms when it detects in-line pressures at 900 mmHg ±150 (18 ±3 psi).<br />
Press “NO” to change the selection. When the correct pressure setting appears, press the<br />
“YES/ENTER” key to accept it and move the cursor to the next field.<br />
8 AIR SENS (Air In Line Sensor): This feature allows you to select the amount of air the<br />
pump will detect in the administration set tubing before it goes into an alarm state. The<br />
choices are 0.1 ml, 0.5 ml (the default setting), 2.0 ml, and OFF. Press the “NO/CHANGE”<br />
key to change the options until the desired setting appears on the display, and then press<br />
“YES/ENTER” to select and move the cursor to the next line.<br />
I M P O R T A N T<br />
I N F O R M A T I O N<br />
Whenever the Air-In-Line Sensor is set to OFF, Moog recommends<br />
the use of an air-eliminating filter.<br />
When the Air-In-Line Sensor is set to “OFF” and the “RUN” key is pressed at the Run<br />
Option screen, the alert message below will appear on the screen. It will also appear if the<br />
Air-In-Line is changed from the OPTIONS menu when an infusion is in progress and the<br />
AIR SENS field is accepted.<br />
A i r - I n - L i n e S e n s o r O f f M e s s a g e S c r e e n<br />
PCA EPI Therapy<br />
This message alerts you to the Air-In-Line Sensor being set to “OFF.” The message will<br />
require answering “yes” or “no” to whether the administration set being used has an aireliminating<br />
filter. If you press the “YES” key to indicate that there is an air-eliminating filter in<br />
use, the Air-In-Line sensor will be completely disabled and the pump will start the infusion.<br />
If you press the “NO” key to indicate a filter is not in use, the Air-In-Line sensor will be set to<br />
detect the presence of any contiguous 2-milliliter air in the line. The alert message below will<br />
then briefly appear on the screen. If the alert occurred at the Run Options screen, the pump<br />
will start the infusion.<br />
P u m p W i l l S e n s e 2 m l A l e r t S c r e e n<br />
Also, when the Air-In-Line sensor is completely disabled and the infusion goes to an<br />
“Infusion Complete” or “Empty Bag” status, the Air Sensor setting will automatically change<br />
to 2.0 ml.<br />
9 AUDIO (Audio Volume): This feature allows you to adjust the audio volume of the pump’s<br />
alarm setting. You can enter a number from 9 (the loudest setting) to 1 (the quietest setting).<br />
When you select a number, the pump will beep at that audio level. Press the “NO” key and<br />
87
enter a new setting (1 – 9). Repeat until the desired setting is reached, and then press<br />
“YES/ENTER” to select and move the cursor to the next field.<br />
10 PWR CK? (Power Check): This feature allows you to periodically recheck the battery charge.<br />
It will display the active power source of the pump, whether internal batteries or external<br />
power. If the active source is the batteries, a graph will indicate approximately how much<br />
charge remains in the batteries. To access this information, select “ON” and press<br />
“YES/ENTER”. The Power Source Screen will display for five seconds and return to the<br />
Options Menu.<br />
11 ACCEPT OPT? If the changes made in the Options Menu are acceptable, press the<br />
“YES/ENTER” key. If the changes are not acceptable, cursor up to any field for corrections<br />
or abort all changes made in this menu by pressing the “NO” key, and return to the previous<br />
screen.<br />
There are two remaining selections to consider from the “Run Options Screen”, NO to<br />
REVIEW and RUN to START.<br />
Reviewing or Changing the Program<br />
To review or make any changes in the prescription programming, press the “NO/CHANGE”<br />
key at the Run Options screen, and the prescription screens will reappear (Changes may be<br />
inhibited by lock setting). Changes to the prescription can be made before the start of the therapy;<br />
however, once a therapy has started, no changes can be made to the Pre-Prescription Screen. It<br />
will appear only for review purposes. Attempts to change the Pre-Prescription Menu during a new<br />
program review will cause an alert screen to be displayed, notifying the programmer that changes<br />
will require reprogramming of the prescription.<br />
Starting the Infusion<br />
RUN: When the programming is complete and the pump has been primed properly and<br />
connected to the access site, press the “RUN” key at the Run Option screen to start the therapy.<br />
The pump will begin infusing, and except when a LOAD DOSE or CLIN DOSE is<br />
programmed, the following screen will display data on the status of the therapy:<br />
E P I R u n S c r e e n<br />
I M P O R T A N T<br />
I N F O R M A T I O N<br />
The amount of drug infused during the “loading dose” depends<br />
on the units chosen which may be in ml’s, mg, or mcg. A<br />
loading dose of 5 mg will infuse 50 ml if the concentration is 0.1<br />
mg/ml.<br />
This screen will continue to display as long as the infusion is running. Notice the information on<br />
each field:<br />
1 The first field displays the “RATE” of the infusion toggled with the programmed Patient<br />
88
Bolus Dose Amount. This field also displays “BOLUS xx (mg/ml/mcg)” whenever a bolus<br />
dose is being delivered. The programmed bolus amount displays and the BOLUS text flashes<br />
when the pump is delivering a patient bolus dose.<br />
2 The second field is a graphic bar representing the percentage of the completed infusion. The<br />
graphic bar will toggle with Line Pressure (“L Press”) which displays the current<br />
patient side (downstream) pressure in the administration set in millimeter of mercury<br />
(mmHg) units.<br />
3 The third line displays the total volume “TOT Vol” infused and, if mg or mcg is the selected<br />
unit, this field will toggle to display the total mg or mcg infused “TOT INF” as well.<br />
4 The fourth line displays the number of patient boluses delivered and number of boluses<br />
attempted per bag volume. If the patient attempts a bolus before the allowed amount of time<br />
set between boluses, an alert message will display “Bolus Requested,” and only the second<br />
number will increase. Also, toggling with number of boluses delivered/requested is the<br />
remaining volume left in the bag.<br />
5 In addition to the display screen, information on the status of the infusion is provided by the<br />
three LED lights. The green LED light blinks whenever the pump is infusing. If the Basal<br />
rate is set at “0,” the yellow LED light will blink along with the green light until the bolus is<br />
actually being delivered. While the bolus is infusing, only the green light will blink.<br />
The information on the run screen will alternate between a four-line display and a large font<br />
display of each individual line of information on the screen.<br />
PCA EPI Therapy<br />
E P I I n f o r m a t i o n S c r e e n s<br />
89
Interrupting an Infusion<br />
The infusion can be paused at any time by pressing the “PAUSE” key. The yellow “Standby”<br />
LED light blinks, and the following screen displays:<br />
P a u s e M e n u S c r e e n<br />
The screen offers the user three options:<br />
Resuming the Current Container<br />
1 RESUME: To resume the therapy in progress from where it left off, press the<br />
“YES/ENTER” key at this field. The pump will return to the Run Options Screen, and you<br />
can resume the therapy.<br />
Note: If you wish to hang a new container, move the cursor to REPEAT Rx (see following<br />
section).<br />
R u n O p t i o n s S c r e e n<br />
a. Press the “RUN” key to resume the therapy.<br />
b. Press the “NO” key to go back to the programming screen to make changes in the<br />
therapy program (this feature may be blocked by a security lock, thus not allowing<br />
changes to the program unless an access code is given). Also, remember that no changes<br />
are allowed in the first prescription menu if an infusion is in progress.<br />
c. Press the “OPTIONS” or “PRIME” keys if either of these functions is desired at this<br />
time.<br />
Hanging a New Container<br />
2 REPEAT Rx: To repeat the present therapy and add another IV container with the same<br />
prescription, press the “YES/ENTER” key at this field. If more than one therapy is<br />
programmed, a “Select Therapy Screen” will list all preprogrammed therapies. Select which<br />
therapy to repeat by moving the cursor to the therapy of choice and pressing the<br />
“YES/ENTER” key.<br />
The pump will then display the program screen with the last programmed values of the<br />
therapy and the cursor will automatically advance through the prescription menus. You can<br />
stop the auto-advance function by pressing any key (except ON/OFF) and then complete the<br />
confirmation of the prescription manually by pressing the “YES” key at the remaining fields.<br />
90
When the program is accepted, the display returns to the above “Run Options Screen.” If the<br />
current therapy is still in progress when the “REPEAT Rx” function is selected, the following<br />
screen will appear:<br />
a. This screen is a reminder that the infusion is not complete. If the incomplete therapy is<br />
to be continued, press “NO/CHANGE” and the Pause Menu screen will be displayed,<br />
then press “YES/ENTER” and the Run Options screen will be displayed. To resume<br />
the unfinished therapy, press “RUN.”<br />
b. If the therapy is to be terminated and a new container added, press “YES/ENTER” to<br />
repeat the infusion. The following screen will then appear, asking whether or not you<br />
wish to maintain the current Bolus or <strong>Med</strong>LIMITS schedule.<br />
PCA EPI Therapy<br />
Press “YES/ENTER” to maintain the current schedules and continue with the<br />
programming of the pump. Press “NO/CHANGE” to start a new schedule. The<br />
following screen will then appear asking you to confirm the clearing of the schedules.<br />
Press “YES/ENTER” to clear the current schedules and continue with the programming<br />
of the pump. Pressing “NO/CHANGE” will return you to the prior screen.<br />
Entering a New Program<br />
3 NEW PROGRAM: To program an entirely new prescription or different therapy, press the<br />
“YES/ENTER” key at this field (the ability to change these parameters may be controlled by<br />
the lock setting). The display will return to the “Pre-Prescription Screen.” If the current<br />
container has not completely infused, the following screen will appear:<br />
a. This screen is a reminder that the infusion is not complete. If you want to return to the<br />
current container and finish infusing it, press the “NO/CHANGE” key to return to the<br />
Pause Menu screen.<br />
91
. To abort the current container and enter a new program, press the “YES/ENTER” key.<br />
If a prescription has previously been entered for the therapy mode you wish to program,<br />
the following screen will appear:<br />
c. If you want to save the current prescription, press the “NO/CHANGE” key to return to<br />
the Pause Menu screen. If you wish to erase the current prescription and enter a new<br />
program, press the “YES/ENTER” key to proceed. All previous prescription values will<br />
be erased.<br />
Note: Selecting “NEW PROGRAM” will also reset the OPTIONS selected to their default<br />
settings except for the LOCK and AUDIO settings which must be changed manually.<br />
Infusion Complete<br />
When the infusion is complete, the audio alarm will beep, and the following screen will display:<br />
Note: To temporarily silence the alarm, press the “Silence” key.<br />
P C A I n f u s i o n C o m p l e t e<br />
This screen displays:<br />
1 “INFUSION COMPLETE.”<br />
2 A completely filled in bar graph indicating infusion complete.<br />
3 TOT Vol (Total Volume): If units are mg or mcg, this field will also toggle to give the Total<br />
Infused.<br />
4 Infusion Complete is considered an alarm status, and the audio alarm will beep periodically<br />
every three seconds to alert the user to this condition. Additionally, the red LED light blinks<br />
to indicate that the “Infusion Complete” alarm exists.<br />
Stopping the Infusion<br />
At “Infusion Complete”, press the “PAUSE” key and then choose to either:<br />
1 Turn off the pump by pressing the “OFF” key, or<br />
2 Select one of the options from the “Pause” screen:<br />
P a u s e M e n u S c r e e n<br />
92
a. REPEAT Rx: To repeat the present therapy and add another container with the<br />
same prescription, press the “YES/ENTER” key at this field. The following screen<br />
will then appear, asking whether or not you wish to maintain the current Bolus or<br />
<strong>Med</strong>LIMITS schedule.<br />
Press “YES/ENTER” to maintain the current schedules and continue with the<br />
programming of the pump. Press “NO/CHANGE” to start a new schedule. The<br />
following screen will then appear asking you to confirm the clearing of the schedules.<br />
PCA EPI Therapy<br />
Press “YES/ENTER” to clear the current schedules and continue with the<br />
programming of the pump. Pressing “NO/CHANGE” will return you to the prior<br />
screen.<br />
The pump will then display the program screens with the last programmed values of<br />
the therapy and the cursor will automatically advance through the prescription<br />
menus. You can stop the auto-advance function by pressing any key (except<br />
ON/OFF) and then complete the confirmation of the prescription manually by<br />
pressing the “YES” key at the remaining fields.<br />
b. NEW PROGRAM: To program an entirely new prescription press the<br />
“YES/ENTER” key when this field is highlighted and the display will return to the<br />
“Select Therapy Screen.” (The lock setting can control access to this function.)<br />
Note: The therapy is complete; therefore, RESUME is not an option at this time and is not<br />
displayed.<br />
93
C h a p t e r<br />
7<br />
T r o u b l e s h o o t i n g<br />
T h i s s e c t i g o n a n d a s r s e i s o t l s v i n i g n a i l d e r n t i a f n d y i a n l a r m c o<br />
C u r l i n p I u n f m u p s . i o n<br />
Alerts, Alarms, and Error Codes<br />
I M P O R T A N T<br />
I N F O R M A T I O N<br />
Alerts, Alarms, and Error Codes are classes of events that are relayed<br />
to the user and logged into the history file. The screen will display<br />
messages, the LED status lights will blink, and the audio alarm will<br />
sound. The backlight feature will illuminate the screen during an alert<br />
or alarm.<br />
If the batteries have been dislodged or are so low in power that they<br />
cannot operate the pump, a solid tone may occur accompanied by a<br />
blank display screen and a constant red alarm light. In this event,<br />
replace the batteries.<br />
ALERTS<br />
Alerts report conditions that require attention from the user but may not be safety issues.<br />
When an alert occurs, a message is displayed on the LCD screen, and the audio alarm is<br />
sounded. The message displays on the screen for three seconds if it is a user-initiated alert,<br />
such as a wrong key press. If it is an automatic alert occurring while a therapy is infusing,<br />
such as “low battery,” the message displays for twenty seconds. If it is an alert that requires<br />
a user response, the alert remains displayed until the user presses one of the keys specified<br />
on the screen. The following is a list of the alerts in alphabetical order.<br />
Troubleshooting<br />
LCD Display:<br />
Alert:<br />
Cause:<br />
Resolution:<br />
ALERT AIR SENS OFF. Using In Line Filter?<br />
Air-In-Line Sensor Disabled<br />
The Air-In-Line Sensor has been disabled and either the “RUN” key has<br />
been pressed to run an infusion or the AIR SENS setting has been set to<br />
OFF on the Options menu while the pump is running.<br />
If an air-eliminating filter is being used, press YES. The infusion will<br />
start/resume and the Air In Line sensitivity will be disabled until the empty<br />
bag alert occurs or infusion complete is reached. No “AIR IN LINE”<br />
alarms will occur while the air sensitivity is disabled.<br />
If no air-eliminating filter is being used, press NO. The infusion will<br />
94
start/resume and the Air In Line sensitivity will be set to 2 ml for the<br />
remainder of the infusion.<br />
Note: If the screen is not acknowledged with a YES or NO key press, the<br />
Air In Line sensitivity will be set to 2 ml when the screen is cleared<br />
(i.e. alarm occurs while screen is displayed).<br />
LCD Display:<br />
Alert:<br />
Cause:<br />
Resolution:<br />
LCD Display:<br />
Alert:<br />
Cause:<br />
Resolution:<br />
LCD Display:<br />
Alert:<br />
Cause:<br />
Resolution:<br />
LCD Display:<br />
Alert:<br />
Cause:<br />
Resolution:<br />
ALERT AIR SENSOR HAS BEEN SET TO 2.0 ML<br />
Air in line sensitivity will be set to 2.0ml<br />
NO was pressed at the “AIR SENS OFF. Using In Line Filter?” alert<br />
screen. The air in line sensitivity will be set to trigger an AIR IN LINE<br />
alarm if 2.0ml of air is detected.<br />
If an air eliminating filter is being used, press YES when the “AIR SENS<br />
OFF. Using In Line Filter?” screen is displayed. This will disable air<br />
detection as indicated under “AIR SENS OFF. Using In Line Filter?” alert<br />
explanation.<br />
ALERT AMT NOT 0 OR CURRENT DOSE AMT<br />
Unable to change clinician dose while clinician dose in progress<br />
A clinician dose is in progress, and a new clinician dose value is entered<br />
that is not “0” or the current dose amount.<br />
If the current clinician dose is to be continued, change the ‘Clin DOSE’<br />
value back to the original value and accept the field and menu.<br />
If the current clinician dose is to be terminated, which will allow a new<br />
clinician dose to be programmed, enter a value of 0 in the ‘Clin DOSE’<br />
field and accept the field and menu. The next time that the Options menu<br />
is accessed a new ‘Clin DOSE’ value can be entered.<br />
ALERT AMT TBI GREATER THAN BAG VOLUME<br />
Value entered is greater than value in Bag Vol field.<br />
Occurs when the amount the entered for the “Amt TBI” or “Vol TBI”<br />
field is greater than the value in the bag volume field.<br />
Recheck the data entry.<br />
ALERT AMT TBI GREATER THAN BAG VOLUME. YES to<br />
Continue NO to Return<br />
Insufficient volume<br />
Occurs when bag volume is less than amount to be infused. Can also occur<br />
when pump’s priming feature is used and bag volume is depleted by the<br />
amount used in priming.<br />
To modify the Bag Volume or Amt/Vol TBI, press “NO” to return to the<br />
Run Options screen. The programming screens will then be accessible by<br />
pressing “NO” to Review on the Run Options screen.<br />
95
Note: Access to the programming screens is lock level restrictive.<br />
If the actual amount in the source bag/container is sufficient to complete<br />
the programmed infusion, press “YES” to start the infusion.<br />
Note: If the infusion is continued without sufficient volume, air-in-line<br />
or up occlusion alarms may occur later in the infusion.<br />
LCD Display:<br />
Alert:<br />
Cause:<br />
Resolution:<br />
ALERT AMT TBI LESS THAN AMT INFUSED<br />
Unable to change amount to be infused to an amount less than what has<br />
already infused.<br />
Occurs when user tries to change the Vol TBI / Amt TBI field in the<br />
prescription menu to an amount lower that the amount which has already<br />
infused.<br />
Recheck the data entry. If alert recurs, resume the infusion and observe<br />
the Vol Inf / Amt Inf field on the run menu. The value for data entry<br />
must be greater than the value displayed on the run menu.<br />
LCD Display: ALERT BOLUS DOSE IS NON-ZERO<br />
Alert: Unable to enter a bolus interval or # of boluses/hour of “0”<br />
Cause: Bolus interval or # of boluses/hour value entered is zero, and bolus dose<br />
value is non-zero. When a bolus value is entered, there must also be a<br />
value greater than 0 entered for bolus interval and # of boluses/hour.<br />
Resolution: Recheck data entered for the prescription.<br />
LCD Display:<br />
Alert:<br />
Cause:<br />
Resolution:<br />
ALERT BOLUS DOSE NOT ALLOWED<br />
A bolus dose is not allowed<br />
Bolus key or button pressed when no bolus dose is programmed.<br />
If bolus doses are part of the prescription, modify the Rx/medLIMITS<br />
program to allow bolus doses.<br />
Troubleshooting<br />
LCD Display:<br />
Alert:<br />
Cause:<br />
Resolution:<br />
LCD Display:<br />
Alert:<br />
Cause:<br />
Resolution:<br />
ALERT BOLUS REQUESTED<br />
Not time for bolus<br />
Bolus button or key is pressed before the programmed time interval<br />
between bolus doses have elapsed.<br />
Advise patient of time limits between bolus doses per agency protocols.<br />
ALERT CALCULATED AMT OUT OF RANGE<br />
Invalid calculated amount for infusion<br />
The calculated amount for the infusion, based on the values entered for<br />
Rate and Time, exceeds either the pump limit or the value entered for bag<br />
volume.<br />
Recheck data entry for Rx.<br />
96
LCD Display:<br />
Alert:<br />
Cause:<br />
Resolution:<br />
ALERT CALCULATED RATE OUT OF RANGE<br />
Invalid calculated rate of infusion<br />
The calculated rate for the infusion, based on the values entered for<br />
Volume/Amount and Time, exceeds either the minimum or maximum<br />
rate limit of the pump or the maximum rate programmed in medLIMITS.<br />
Recheck data entry for Rx.<br />
LCD Display: ALERT CALCULATED TIME OUT OF RANGE<br />
Alert: Invalid calculated time<br />
Cause: The calculated time for the therapy, based on the values entered for<br />
Volume/Amount and Rate, exceeds the therapy time limit of 288:00<br />
HHMM (167:59 HHMM Software Versions below R37C).<br />
Resolution: Recheck data entry. The time calculated by the pump cannot exceed the<br />
pump range.<br />
LCD Display:<br />
Alert:<br />
Cause:<br />
Resolution:<br />
LCD Display:<br />
Alert:<br />
Cause:<br />
Resolution:<br />
LCD Display:<br />
Alert:<br />
Cause:<br />
Resolution:<br />
ALERT CHANGES REQUIRE REPROGRAMMING. YES to Continue<br />
NO to Return<br />
Changes to the data will require re-entry of prescription.<br />
Attempted to change the Pre-Prescription Screen prior to start of infusion.<br />
If a change to the programmed prescription is required, press “YES”.<br />
Note: Selecting “YES” will clear the entire prescription and require reentry<br />
the prescription.<br />
If no change is required, press “NO” to preserve the current prescription<br />
and return back to the Pre-Prescription screen.<br />
ALERT CMS LEARN MODE ACTIVE – KEY NOT ACCEPTED<br />
The pump is performing a CMS Create Prescription function and the key<br />
pressed is not valid for this mode.<br />
While using the pump with CMS/PC in order to create a prescription only<br />
certain keys are allowed to be recorded as part of the prescription.<br />
Whenever a prohibited key is pressed (i.e., RUN key) this alert will occur<br />
and the key will not be recorded.<br />
Do not press the key causing the alert during a CMS Create Prescription<br />
function.<br />
ALERT DATE/TIME CHANGE NOT ALLOWED<br />
Not allowed to change date or time<br />
Attempt made to modify system clock while a therapy/delay is in progress.<br />
If the therapy in progress is to be continued, wait until the infusion is<br />
complete and then change the Date and Time.<br />
If it is not necessary to preserve the therapy in progress or any other<br />
programmed therapy, use the “CLEAR Rx” feature of the Clinician<br />
Biomed menu. This feature will erase all programmed therapies in the<br />
pump. The Date and Time can then be changed.<br />
97
If the therapy is to be terminated but the prescription preserved (excluding<br />
Delayed Start), go to the “Pause” menu, select “REPEAT Rx” and press<br />
“YES” at the “Rx in progress” alert screen. The pump can then be turned<br />
off and then on to access the Date/Time change option in the Clinician<br />
Biomed menu. Selecting “NEW PROGRAM” and the name for the<br />
therapy in progress, instead of “REPEAT Rx”, may also be used but this<br />
selection will erase the prescription for the therapy.<br />
LCD Display:<br />
Alert:<br />
Cause:<br />
Resolution:<br />
ALERT DATE/TIME INVALID<br />
Unable to enter invalid date or time<br />
Date or time entry is not in a valid format.<br />
Recheck data entry. An invalid date or time will not be accepted.<br />
LCD Display:<br />
Alert:<br />
Cause:<br />
Resolution:<br />
ALERT DELAY START TIME NOT VALID<br />
Delay Start time not valid<br />
Delay start time entered is less than one minute or greater than 24 hours<br />
from the current system time.<br />
Reset Delay Start Time to fall within pump limits. (To obtain the current<br />
date and time of the pump, turn the pump off and then on and observe<br />
the time on the Welcome screen).<br />
LCD Display:<br />
Alert:<br />
Cause:<br />
Resolution:<br />
ALERT DOOR OPEN or SET NOT PROPERLY INSTALLED<br />
Door Open or Administration Set is not properly installed<br />
Door Latch is not completely closed or the Administration Set is not<br />
installed according to installation instructions.<br />
Recheck the door latch assembly and securely close the door. If the door<br />
was closed properly, re-install the set according to the installation<br />
instructions.<br />
Troubleshooting<br />
LCD Display: ALERT DOSE AMT IS LESS THAN DOSE INFUSED<br />
Alert: Dose amount entered is less than the amount already infused for the dose.<br />
Cause: New dose value entered is less than the amount already infused for the<br />
dose.<br />
Resolution: Recheck data entry. After the dose in progress finishes, the dose amount<br />
may be changed to the lower value.<br />
If the above is not suitable, re-program the prescription.<br />
LCD Display: ALERT DOSE CANCELLED, RESUME INFUSION, THEN NEW<br />
DOSE<br />
Alert: Cancellation of a Clinician Dose is pending and can only be processed with<br />
the pump running.<br />
Cause: Clinician Dose in progress is cancelled while the infusion is paused; and<br />
the user attempts to enter a new Clinician Dose, prior to resuming the<br />
infusion<br />
98
Resolution:<br />
LCD Display:<br />
Alert:<br />
Cause:<br />
Resolution:<br />
LCD Display:<br />
Alert:<br />
Cause:<br />
Resolution:<br />
LCD Display:<br />
Alert:<br />
Cause:<br />
Resolution:<br />
LCD Display:<br />
Alert:<br />
Cause:<br />
Resolution:<br />
LCD Display:<br />
Alert:<br />
Cause:<br />
Resolution:<br />
LCD Display:<br />
Alert:<br />
Cause:<br />
Resolution:<br />
Resume the infusion and then program the desired Clinician Dose.<br />
ALERT DOSE FREQ LESS THAN DOSE TIME<br />
Dose frequency time is less than the time required to infuse the<br />
programmed dose<br />
The dose frequency value entered is less than the time required to infuse<br />
the programmed dose amount.<br />
Recheck data entry. Dose frequency cannot be less than required time for<br />
dose to infuse.<br />
ALERT EMPTY BAG<br />
Empty Bag<br />
Occurs when the volume infused for the prescription is equal to the “Bag<br />
Vol”. Bag Vol may have been reduced due to priming.<br />
Verify that the volume remaining in the source container is sufficient to<br />
complete the current therapy. If the volume is insufficient, add another<br />
source container or stop the infusion.<br />
ALERT EXCEEDS POSSIBLE DOSES PER HR<br />
Unable to enter # of boluses/hr that would be possible given the<br />
programmed bolus amount<br />
# Boluses/hr value exceeds the possible # given the bolus amount.<br />
Recheck data entered. The # of boluses per hour cannot exceed the time<br />
required to deliver the bolus amount programmed.<br />
ALERT EXTERNAL POWER DISCONNECTED<br />
External power source disconnected<br />
External power source is disconnected or external battery pack power is<br />
completely depleted during pump operation.<br />
Reestablish external power source, or let pump continue to operate on<br />
batteries.<br />
Note: The battery level should be checked after the external source is<br />
disconnected to gage if additional batteries will be required before<br />
an external power source is available again.<br />
ALERT FIELD NOT ACCEPTED<br />
Field Not Accepted<br />
The field indicated by the flashing cursor has not been accepted.<br />
Recheck the field and accept it by pressing the “YES/ENTER” key.<br />
ALERT GREATER THAN MAX FIELD LIMIT, MAX = _____<br />
Unable to program a field with a value that exceeds the maximum limit<br />
Value entered is greater than the allowable limit.<br />
Recheck data entry. A value entered cannot exceed the field limit.<br />
99
LCD Display:<br />
Alert:<br />
Cause:<br />
Resolution:<br />
ALERT GREATER THAN WHAT BOLS INT ALLOWS<br />
Unable to enter a # of boluses/hr that exceeds the possible number<br />
allowed given the bolus interval<br />
# Boluses/hr value exceeds the possible number given the bolus interval<br />
(“BOLS INT”) programmed.<br />
Recheck data entry. The # of boluses/hr cannot be set for higher than the<br />
number allowed using the given bolus interval.<br />
LCD Display:<br />
Alert:<br />
Cause:<br />
Resolution:<br />
ALERT INFUSION NOT IN PROGRESS<br />
Infusion not in progress<br />
Modification attempted to Next Dose or Early Down Ramp field without<br />
an infusion in progress.<br />
Wait until infusion is in progress before modifying or modify original Rx<br />
programmed.<br />
LCD Display:<br />
Alert:<br />
Cause:<br />
Resolution:<br />
ALERT INSUFFICIENT VOLUME MAX DOSES=_____<br />
Bag Volume value is insufficient to deliver the remaining<br />
Occurs whenever the prescription is changed so that Bag Volume is now<br />
less than Amount Required for the entire therapy (based on volume<br />
already infused plus volume required to deliver the remaining doses).<br />
Recheck data entry. If the source container contains sufficient volume to<br />
complete the remaining dose cycles (dose volume + KVO volume),<br />
increase the “Bag Vol”. If the volume is insufficient, decrease the<br />
“DOSE/BAG” such that the therapy can continue with the new modified<br />
prescription.<br />
Note: If either “Bag Vol” or “DOSE/BAG” is modified and the therapy<br />
is repeated, these fields will have to be verified against the source<br />
container volume and prescribed prescription and changed<br />
accordingly.<br />
Troubleshooting<br />
LCD Display:<br />
Alert:<br />
Cause:<br />
Resolution:<br />
ALERT INVALID ENTRY<br />
Invalid Entry<br />
Data entered does not fall within the defined limits of the program.<br />
Enter data that falls within the limits of the program. Refer to the specific<br />
therapy section in the <strong>User</strong>’s <strong>Manual</strong>.<br />
100
LCD Display: ALERT KVO RATE IS GREATER THAN INF RATE<br />
Alert: Unable to enter KVO rate that is greater than infusion rate<br />
Cause: Occurs when user enters a KVO rate that is greater than infusion rate.<br />
Resolution: Recheck data entry. KVO rate must be less than programmed or<br />
calculated infusion rate.<br />
LCD Display: ALERT LESS THAN MIN FIELD LIMIT, MIN = ________<br />
Alert: Unable to program a field with a value that is less than the minimum limit<br />
Cause: Value entered is less than the minimum limit for the pump or medLIMITS<br />
programmed.<br />
Resolution: Recheck data entry. A value entered cannot be less than the field’s<br />
minimum limit.<br />
LCD Display: ALERT “LOW C BATTERIES” Alert: Battery source power is low<br />
Cause: The batteries that are powering the pump have reached levels that may<br />
prevent the continued operation of the pump beyond 1 hour (actual time is<br />
rate dependent). Alert applies only to “C size” batteries, not to the<br />
rechargeable battery pack.<br />
Resolution: “PAUSE” the therapy in progress, turn the pump “OFF”; and then replace<br />
the batteries. (See chapter 1 of the <strong>User</strong>’s <strong>Manual</strong> for instructions on<br />
battery change.)<br />
LCD Display:<br />
Alert:<br />
Cause:<br />
Resolution:<br />
LCD Display:<br />
Alert:<br />
Cause:<br />
Resolution:<br />
ALERT MAX CHANGES FOR PERIOD REACHED<br />
The maximum number of changes for the current delta time window has<br />
been reached<br />
The maximum number of pump rate changes for the current delta time<br />
window has been reached. This occurs when the rate has been changed<br />
more than 12 times during any delta time window.<br />
Allow more time to elapse before attempting to change the rate or<br />
reprogram the therapy with medLIMITS and prescription basal and bolus<br />
ranges that will reduce the number of times that the rate will have to be<br />
adjusted.<br />
ALERT MODIFICATION NOT ALLOWED<br />
Modification Not Allowed<br />
The selection cannot be modified at this time or the programmed lock<br />
setting does not permit modifications to this selection.<br />
Review the <strong>User</strong>’s <strong>Manual</strong> for program restrictions or if lock level<br />
restricted, change lock setting to access area you wish to modify.<br />
101
LCD Display:<br />
Alert:<br />
Cause:<br />
Resolution:<br />
ALERT NEW DOSE IS LESS THAN CURRENT DOSE<br />
Unable to program a lower number of doses than number of doses already<br />
infused<br />
While the Variable or Intermittent therapy is in progress, a lower number<br />
of doses to be delivered is entered than the number already infused.<br />
Wait until current therapy in progress is complete, or “PAUSE” pump<br />
and, using the REPEAT Rx function, modify the number of doses.<br />
Note: Selecting to repeat the therapy in progress will terminate the current<br />
therapy.<br />
LCD Display:<br />
Alert:<br />
Cause:<br />
Resolution:<br />
ALERT NO BOLUS DOSE DEFINED<br />
Unable to enter bolus interval or # of bolus/hr because no bolus value has<br />
been programmed<br />
Entry of a value other than zero for the Bolus Interval or #Bolus per hour<br />
field when no bolus value has been programmed.<br />
Enter bolus value before entering bolus interval or # of boluses/hr.<br />
LCD Display:<br />
Alert:<br />
Cause:<br />
Resolution:<br />
ALERT NO KEYPAD ACTIVITY<br />
No Keypad Activity<br />
The pump has been displaying a non-running screen for two minutes<br />
without any keys being pressed. The alert will recur every 2 minutes as<br />
long as there are no key presses.<br />
Complete the activity for the displayed menu. The pump may also be<br />
turned off, however, all programming that was not complete will be<br />
discarded.<br />
If the pump was running and the Options menu displayed when the alert<br />
occurred, the run screen for the therapy will be displayed when the alert is<br />
cleared. Any changes to the Options menu are discarded and will have to<br />
be re-entered.<br />
Troubleshooting<br />
LCD Display:<br />
Alert:<br />
Cause:<br />
Resolution:<br />
ALERT NO THERAPY ENABLED<br />
No Therapy Enabled<br />
Attempting to accept the Enable Therapy menu with all therapies set to<br />
“OFF”. At least one therapy must be enabled or “ON” for menu to be<br />
accepted.<br />
Enable the therapy or therapies that are to be active for the pump.<br />
LCD Display:<br />
Alert:<br />
Cause:<br />
Resolution:<br />
ALERT NOT ALLOWED, DOSE IN PROGRESS<br />
Change is not allowed while a dose is in progress<br />
Modification to the current field is not allowed while the dose is in<br />
progress.<br />
Wait until the dose in progress completes before modifying field.<br />
102
LCD Display:<br />
Alert:<br />
Cause:<br />
Resolution:<br />
LCD Display:<br />
Alert:<br />
Cause:<br />
Resolution:<br />
LCD Display:<br />
Alert:<br />
Cause:<br />
Resolution:<br />
LCD Display:<br />
Alert:<br />
Cause:<br />
Resolution:<br />
ALERT NOT in PCA. NO BOLUS ALLOWED<br />
Bolus requested when therapy is not PCA<br />
Remote Bolus button or BOLUS key is pressed when not in PCA therapy.<br />
Remove the remote bolus cord from the pump if connected. Refrain from<br />
pressing the BOLUS key.<br />
ALERT NUMBER OF DOSES INVALID<br />
Number of doses entered exceeds maximum for therapy<br />
The number of doses per bag in Intermittent therapy exceeds the allowable<br />
maximum.<br />
Recheck data entry. The number of doses requested must be less than or<br />
equal to the maximum for the therapy.<br />
ALERT PERFORM ROUTINE MAINTENANCE<br />
Maintenance Date (displayed only if date has arrived when pump is turned<br />
on)<br />
Current Date is beyond the Maintenance Date.<br />
Return pump for routine maintenance.<br />
ALERT RAMP INVALID FOR AMT/RATE<br />
Ramp time entered is invalid for amt/rate already programmed<br />
Ramp value entered for TPN is unacceptable given the desired rate and<br />
amount programmed.<br />
Recheck all data entered for prescription. If programming a new TPN<br />
therapy (”NEW PROGRAM” selected) and the ramp time is a<br />
requirement, enter the ramp time(s) and total time first followed by the<br />
next governing parameter (rate or volume to be infused).<br />
LCD Display: ALERT RATE EXCEEDS DELTA RATE/DELTA TIME<br />
Alert: Rate entered exceeds the delta time limits<br />
Cause: The rate entered falls outside of the allowable range for the delta rate /<br />
delta time limits programmed.<br />
Resolution: Recheck data entry or wait more time elapses then attempt to change the<br />
rate. Rate selected cannot exceed the range placed on medLIMITS.<br />
LCD Display:<br />
Alert:<br />
Cause:<br />
Resolution:<br />
LCD Display:<br />
ALERT RUNNING, PAUSE PUMP BEFORE OFF<br />
Pause Infusion before turning off<br />
The OFF key was pressed while the pump was infusing or a running<br />
screen displayed.<br />
Press “PAUSE” key before pressing “OFF” key to stop an infusion.<br />
ALERT Rx IN PROGRESS, YES to Repeat – NO to Return<br />
103
Alert:<br />
Cause:<br />
Resolution:<br />
REPEAT Rx selected while a therapy is already in progress<br />
REPEAT Rx was selected and there is a therapy currently in progress.<br />
To terminate the current therapy in progress, press YES. Resume will no<br />
longer be available. The Select Therapy menu will be displayed (if only<br />
one therapy is in programmed, the pre Rx menu for the therapy will be<br />
displayed). When the therapy to repeat is chosen, the last prescription data<br />
programmed will appear in the menu, excluding Delayed Start and Load<br />
Dose (if therapy was previously started). When the infusion is started the<br />
entire therapy will be repeated.<br />
To continue the current therapy in progress, press NO. The Pause menu<br />
will be displayed.<br />
LCD Display:<br />
Alert:<br />
Cause:<br />
Resolution:<br />
LCD Display:<br />
Alert:<br />
Cause:<br />
Resolution:<br />
ALERT Rx IN PROGRESS, YES New Program – NO to Return<br />
NEW PROGRAM was selected while a therapy is already in progress<br />
NEW PROGRAM was selected and there is a therapy currently in<br />
progress.<br />
To terminate the current therapy in progress, press YES. Resume will no<br />
longer be available. The Select Therapy menu will be displayed (if only<br />
one therapy is in programmed, an alert screen informing that the Rx will<br />
be erased will be displayed). When the therapy for the new program is<br />
chosen, entry of a new prescription will be required.<br />
To continue the current therapy in progress, press NO. The Pause menu<br />
will be displayed.<br />
ALERT Rx Programmed, YES to Erase – NO to Return<br />
NEW PROGRAM was selected for a therapy that has an existing<br />
prescription<br />
NEW PROGRAM was selected for a therapy that has an existing<br />
prescription.<br />
To erase the prescription for the selected therapy, press YES. The pre Rx<br />
menu will be displayed and entry of a new prescription will be required.<br />
To preserve the prescription for the selected therapy, press NO. The<br />
Pause menu will be displayed.<br />
Troubleshooting<br />
LCD Display:<br />
Alert:<br />
Cause:<br />
Resolution:<br />
ALERT SET NOT INSTALLED<br />
Set Not Installed<br />
Administration set is not properly installed.<br />
Install the appropriate <strong>Curlin</strong> Infusion administration set for the desired<br />
therapy. Use ONLY <strong>Curlin</strong> Infusion administration sets. See Chapter 1,<br />
figures 1.9 and 1.10 of the <strong>User</strong>’s <strong>Manual</strong> for proper installation of the<br />
administration set.<br />
LCD Display:<br />
Alert:<br />
ALERT SYSTEM CLOCK NOT SET<br />
System Clock Not Set<br />
104
Cause:<br />
Resolution:<br />
LCD Display:<br />
Alert:<br />
Cause:<br />
Resolution:<br />
The clock for the pump is not set<br />
Use the BIOMED SETUP menu Date and Time option to set the date<br />
and time.<br />
ALERT THERAPY TIME INVALID<br />
Invalid therapy time calculated<br />
While programming or modifying an Intermittent therapy, the combination<br />
of dose duration and dose frequency result in a prescription with a duration<br />
greater than 288:00 HH:MM.<br />
Recheck data entry. The changes to the field must comply with the total<br />
time limit.<br />
LCD Display: ALERT TIME LESS THAN RAMP TIME<br />
Alert: Unable to enter a TPN therapy time that is less than the ramp times<br />
Cause: Time value entered for TPN infusion is less than ramp times.<br />
Resolution: Recheck data entry. TPN infusion time cannot be less than specified ramp<br />
times.<br />
LCD Display:<br />
Alert:<br />
Cause:<br />
Resolution:<br />
LCD Display:<br />
Alert:<br />
Cause:<br />
Resolution:<br />
ALERT USING 2.0 ML DEFAULT, PRESS YES TO OFF FOR OFF<br />
The air sensitivity currently being used by the pump is 2.0ml<br />
YES was pressed at the “ACCEPT?” field on the Options menu and the<br />
displayed setting in Options for the AIR SENS field is OFF, however, the<br />
pump is using a setting of 2.0ml. This occurs when YES was not pressed<br />
when the “AIR SENS OFF. Using In Line Filter?” alert screen was last<br />
displayed and the down scroll arrow was used instead of the YES key to<br />
pass the AIR SENS field on the Options menu. Alert is only displayed<br />
when Options is displayed and pump is running.<br />
The cursor will be on the AIR SENS field when the alert is cleared. Press<br />
YES to display the “AIR SENS OFF. Using In Line Filter?” screen. Press<br />
YES if an air eliminating filter is being used. Press NO if no air<br />
eliminating filter is being used.<br />
ALERT VALUE PREVENTS A SUBSEQUENT DOSE<br />
Value entered will prevent the ability to program any more doses<br />
The value entered for the Variable Dose Amt or Time field will cause no<br />
remaining amount or time for a subsequent.<br />
Recheck data entry.<br />
If this is a new program, reprogramming of the therapy will be required if<br />
the error is in a previously programmed dose.<br />
If the therapy is in progress or this is a repeat program that has not started<br />
and the error is in a previously programmed dose, turn the pump off and<br />
then on. Choosing to resume or repeat the therapy will display the last<br />
prescription that was completely programmed.<br />
105
A L A R M S<br />
Alarms are conditions that require correction by the user and may be a safety issue but are not<br />
system errors of the pump. All alarm conditions stop the infusion. The only exception to this<br />
rule is at the “Infusion Complete” alarm, which allows the KVO rate, when programmed, to<br />
continue infusing. When an alarm occurs, a message is displayed on the screen, the audio alarm is<br />
sounded, and the red LED light flashes. The message stays on the screen until the pause key is<br />
pressed. The “Silence” key can be pressed to disable the audio alarm for one-minute intervals.<br />
The cause of the alarm must be resolved, or the alarm will recur when the infusion is restarted.<br />
To exit an alarm screen, press the “PAUSE” key, resolve the alarm condition, and then resume<br />
the therapy by selecting “RESUME” from the Pause Menu.<br />
The following is a selected and alphabetical list of the alarms, conditions that cause the alarms,<br />
messages displayed on the screen, and actions necessary to resolve them:<br />
LCD Display:<br />
Alarm:<br />
Cause:<br />
Resolution:<br />
ALARM AIR IN LINE<br />
Air In Line<br />
Pump has detected air in the administration set during an infusion.<br />
Check air settings and remove air from administration set and IV bag or<br />
reservoir per protocol. (Disconnect from patient’s access site before using<br />
prime function.)<br />
LCD Display:<br />
Alarm:<br />
Cause:<br />
Resolution:<br />
ALARM DOOR OPEN or SET NOT PROPERLY INSTALLED<br />
Door is opened or administration set is not properly installed while the<br />
pump is running<br />
Door is opened or administration set is not properly installed while the<br />
pump is running<br />
Check the door latch assembly and securely close the door. If the door was<br />
closed properly, re-install the set according to the installation instructions.<br />
See Figure 1.8 for instructions on closing door.<br />
Troubleshooting<br />
LCD Display:<br />
Alarm:<br />
Cause:<br />
Resolution:<br />
ALARM DOWN OCCLUSION<br />
Occlusion between pump and patient access site<br />
Pump has detected excessive pressure in the administration set between<br />
the pump and the patient’s access site.<br />
Check administration set from pump to patient access site for potential<br />
causes of occlusion. If tubing is kinked, straighten it. If filter is blocked ,<br />
replace administration set. If patient access is obstructed, check it<br />
according to protocol. Consider changing the down occlusion pressure<br />
setting from Low to High. If the occlusion is cleared without the need to<br />
open the pump door, the pump automatically resumes its operation. Note:<br />
If the door of the pump is opened to clear the occlusion, (e.g. replacing the<br />
set), you must press the pause key, select “Resume,” and then press the<br />
“RUN” key to restart the infusion.<br />
106
LCD Display: ALARM EMPTY BATTERY<br />
Alarm: Empty Battery<br />
Cause: The “C” cell battery no longer has sufficient power to run the pump.<br />
Alarm will not be displayed when external battery pack is depleted.<br />
Resolution: Turn the pump off. Replace both of the “C size” batteries. Recharge or<br />
replace the battery pack if applicable.<br />
LCD Display:<br />
Alarm:<br />
Cause:<br />
Resolution:<br />
ALARM HIGH UP PRESSURE<br />
High positive pressure between the pump and IV reservoir<br />
The pump has detected excessive positive pressure between the pump and<br />
the IV Source.<br />
Press Pause to clear alarm screen. Check for excessive pressure on the IV<br />
bag and relieve it. When ready to begin infusion, select RESUME.<br />
LCD Display: ALARM REPLACE SET 3<br />
Alarm: Replace Set<br />
Cause: The pump has detected that the disposable administration set must be<br />
replaced.<br />
Resolution: Replace the disposable administration set, prime the set if necessary, and<br />
when ready to begin infusing, select RESUME to continue the infusion.<br />
LCD Display: ALARM REPLACE SET 4<br />
Alarm: Replace Set<br />
Cause: The pump has detected excessive pressure in the disposable administration<br />
set.<br />
Resolution: Make sure that all the IV clamps are open. Relieve pressure, open and<br />
close pump door.<br />
LCD Display:<br />
Alarm:<br />
Cause:<br />
Resolution:<br />
ALARM SET NOT INSTALLED<br />
Administration Set Not Installed<br />
The administration set has not been installed or has been installed<br />
improperly.<br />
Install appropriate <strong>Curlin</strong> Infusion Administration set for desired therapy.<br />
Use ONLY <strong>Curlin</strong> Infusion Administration sets. If the blue tubing guide<br />
on the administration set has been damaged in any way, replace the entire<br />
administration set. See Chapter entitled Introduction, Figures 1.9 and 1.10<br />
for proper installation of administration set.<br />
107
LCD Display:<br />
Alarm:<br />
Cause:<br />
Resolution:<br />
ALARM UNATTENDED PUMP<br />
No key presses have occurred while the pump was paused<br />
When a therapy is in progress and a pump is placed in a paused state and<br />
left unattended for more than two minutes, this alarm will sound. If the<br />
prime menus are left unattended for one minute, this alarm will sound<br />
Press the “PAUSE” key to clear the alarm screen. If required, return to<br />
the screen displayed at the time of the alarm and complete the activity that<br />
was in progress, or resume the infusion, or turn the pump off.<br />
LCD Display:<br />
Alarm:<br />
Cause:<br />
Resolution:<br />
ALARM UP OCCLUSION<br />
Negative pressure detected between the pump and IV reservoir<br />
Pump has detected excessive negative pressure in the administration set<br />
between the medication reservoir or IV bag (“up stream”) and the pump.<br />
Pause the pump. Check administration set from IV bag to pump for<br />
potential causes of occlusion. Open the door of the pump and remove the<br />
administration set from the pumping chamber. If an area of the tubing is<br />
flattened, massage that area to a more rounded shape. If a clamp is in<br />
place, open it; if tubing is kinked, straighten it. Replace administration set<br />
back in the pump. When ready to begin infusing, select RESUME. If the<br />
alarm continues, use a new administration set or if the IV bag is almost<br />
empty, replace it.<br />
LCD Display:<br />
Alarm:<br />
Cause:<br />
Resolution:<br />
LCD Display:<br />
Alarm:<br />
Cause:<br />
Resolution:<br />
CMS NOT ENABLED<br />
Pump is not CMS capable<br />
A CMS system had attempted to communicate with this pump which was<br />
not CMS capable<br />
This pump is not capable of CMS communication and should not be used<br />
for any CMS function.<br />
COMM TIMEOUT<br />
Communication Timeout occurred during Pump/CMS communication<br />
The communication link between the pump and the P.C. running CMS<br />
was broken (i.e., the cable between them was unplugged) during a CMS<br />
upload to the pump<br />
Check the cable connection between the pump and the PDA or P.C.<br />
Troubleshooting<br />
LCD Display: INFUSION COMPLETE<br />
Alarm: Infusion Complete<br />
Cause: Programmed “Amount to be Infused” is depleted to 0.<br />
Resolution: If the therapy is to be repeated, press “PAUSE”, add another IV bag or<br />
reservoir and select the “REPEAT Rx” function.<br />
If the therapy will not be repeated, press “PAUSE” key and turn the pump<br />
off by pressing the “OFF” key.<br />
LCD Display: UPLOAD CHAR ERR<br />
108
Alarm:<br />
Cause:<br />
Resolution:<br />
LCD Display:<br />
Alarm:<br />
Cause:<br />
Resolution:<br />
While uploading a prescription to the pump a character was misinterpreted<br />
Faulty communications link between the pump and the P.C. running CMS<br />
Replace the communication cable between the pump and the PDA or PC.<br />
If other programs are running on the PC that might with the operation of<br />
CMS/PC, close those programs.<br />
UPLOAD CkSum ERR<br />
CMS Upload experienced a Check Sum Error<br />
At the completion of an upload of a CMS script the Check Sum signature<br />
from the CMS system did not match the signature calculated by the pump<br />
A second attempt to upload the script should be made. If the second<br />
attempt fails, then a new script should be created for the desired<br />
prescription. (See CMS <strong>User</strong>’s <strong>Manual</strong>).<br />
109
ERROR CODES<br />
If a pump goes into an error code, a numeric code will appear on the display screen. If this has<br />
occurred, turn the pump off and back on. If the error code message does not reappear, continue<br />
using the pump.<br />
If the pump passes its start-up diagnostic tests, resume the therapy. If an error code recurs, turn<br />
the pump off, replace it, and report the error code to the healthcare provider.<br />
Error<br />
Code<br />
LCD Displayed<br />
Message<br />
Probable Cause<br />
Corrective Action<br />
10 Turn pump OFF/ON or Replace<br />
Battery or Call Provider<br />
Motor Control Loss<br />
• Replace batteries.<br />
• Connect AC Adaptor.<br />
• Turn power off/on and resume.<br />
11 Turn pump Off/On Keyboard Buffer Full Report error code to factory.<br />
12 Air Sensor<br />
Air In Line test circuit failure Report error code to factory.<br />
Turn pump Off/ON<br />
or Call provider<br />
13 Pressure Sens DN<br />
Bad Down Strain Beam Replace set and Resume.<br />
Check Admin Set turn pump<br />
Off/On<br />
14 Pressure Sens UP Check Admin Bad Up Strain Beam<br />
Replace set and Resume.<br />
Set Turn pump Off/On<br />
15 Turn pump Off/On or Call Bad Encoder<br />
Report error code to factory.<br />
Provider<br />
16 Turn pump Off/On or call Bad Analog to Digital Report error code to factory.<br />
Provider<br />
Conversion<br />
17 Turn pump OFF Call Provider Bad Clock Report error code to factory.<br />
18 Call Provider Bad Air In Line comparator Report error code to factory.<br />
register reading from FPGA.<br />
19 Turn Pump OFF Call Provider Bad Door Sensor Report error code to factory.<br />
20 Empty Lithium Battery<br />
Empty Lithium Battery<br />
Report error code to factory.<br />
Call Provider<br />
21 Turn pump Off<br />
Bad Tristate Pin<br />
Report error code to factory.<br />
Call Provider<br />
22 Turn Pump OFF<br />
Bad Test Pin<br />
Report error code to factory.<br />
Call Provider<br />
23 Turn Pump OFF<br />
Bad Reverence Voltage Report error code to factory.<br />
Call Provider<br />
24 Turn Pump OFF<br />
Bad Motor Supply<br />
Report error code to factory.<br />
Call Provider<br />
25 Stalled Pump<br />
Broken Motor Shaft<br />
Turn power off/on and resume.<br />
Turn pump OFF/ON<br />
Call Provider<br />
26 Turn Pump OFF<br />
Bad Motor Inhibit<br />
Report error code to factory.<br />
Call Provider<br />
27 Turn Pump OFF<br />
Bad Motor Supply Enable Report error code to factory.<br />
Call Provider<br />
28 Turn Pump OFF<br />
Bad Motor Logic Enable Report error code to factory.<br />
Call Provider<br />
29 Low Alarm Batt<br />
Low Auxiliary Battery Connect pump to AC Battery<br />
Connect AC Adapt<br />
Eliminator and turn power off/on to<br />
Turn pump OFF/ON<br />
pump. May require turning pump<br />
off/on a few times.<br />
30 Turn Pump OFF<br />
Bad Auxiliary Battery<br />
Report error code to factory.<br />
Call Provider<br />
31 Turn Pump OFF<br />
Audio Main Speaker Low Report error code to factory.<br />
Call Provider<br />
32 Turn Pump OFF<br />
Audio Main Speaker High Check/replace D31. Replace PCB.<br />
Call Provider<br />
33 Low Alarm Audio<br />
Audio Auxiliary Speaker Low Connect pump to AC Battery<br />
Connect AC Adapt<br />
Eliminator and turn power off/on to<br />
Turn pump OFF/ON<br />
pump. May require turning pump<br />
off/on a few times.<br />
Troubleshooting<br />
110
Error<br />
Code<br />
LCD Displayed<br />
Message<br />
34 Turn Pump OFF<br />
Call Provider<br />
35 History File<br />
Turn pump OFF/ON<br />
36 Bad Cal Data<br />
Turn pump OFF<br />
Call Provider<br />
37 Turn Pump OFF<br />
Call Provider<br />
38 Turn Pump OFF<br />
Call Provider<br />
39 Turn Pump OFF<br />
Call Provider<br />
40 Turn Pump OFF<br />
Call Provider<br />
41 Bad Cal Range<br />
Turn Pump OFF<br />
Call Provider<br />
45 Turn pumpOFF/ON<br />
Call Provider<br />
46 Turn pumpOFF/ON<br />
Call Provider<br />
100 Turn pumpOFF/ON<br />
Call Provider<br />
101 Turn pumpOFF/ON<br />
Call Provider<br />
102 Turn pumpOFF/ON<br />
Call Provider<br />
103 Turn pumpOFF/ON<br />
Call Provider<br />
104 Turn pumpOFF/ON<br />
Call Provider<br />
105 Turn pumpOFF/ON<br />
Call Provider<br />
106 Turn pumpOFF/ON<br />
Call Provider<br />
107 Turn pumpOFF/ON<br />
Call Provider<br />
108 Turn pumpOFF/ON<br />
Call Provider<br />
109 Turn pumpOFF/ON<br />
Call Provider<br />
110 Turn pumpOFF/ON<br />
Call Provider<br />
111 Turn pumpOFF/ON<br />
Call Provider<br />
112 Turn pumpOFF/ON<br />
Call Provider<br />
140 Turn pumpOFF/ON<br />
Call Provider<br />
141 Turn pumpOFF/ON<br />
Call Provider<br />
142 Turn pumpOFF/ON<br />
Call Provider<br />
143 Turn pumpOFF/ON<br />
Call Provider<br />
144 Turn pumpOFF/ON<br />
Call Provider<br />
145 Turn pumpOFF/ON<br />
Call Provider<br />
146 Turn pumpOFF/ON<br />
Call Provider<br />
160 Stuck PERIOD Key<br />
Turn pump OFF/ON or Call<br />
Provider<br />
161 Stuck ON OFF Key<br />
Turn pump OFF/ON or Call<br />
Provider<br />
Probable Cause<br />
Audio Auxiliary Speaker High<br />
History Log Erased<br />
Bad EEPROM Data CRC<br />
value<br />
Analog to Digital Converter did<br />
not Run<br />
Air In Line Circuit not Tested<br />
Bad EEPROM Data CRC 2<br />
Bad EEPROM Data Header<br />
Bad EEPROM Limit<br />
Motor Control Loss<br />
Motor Control Loss<br />
Menu not found<br />
Mode not found<br />
Item not found<br />
Field not found<br />
Data mismatch<br />
No menu pointer<br />
Count out of range<br />
Display task queue overflow<br />
Divide by zero<br />
Concentration zero value<br />
Invalid occurrence<br />
Multiple param struct access<br />
Multiple status struct access<br />
Infusion volume out of range<br />
Infusion rate out of range<br />
Infusion time out of range<br />
Volume conversion error<br />
Rate conversion error<br />
Time conversion error<br />
Bad PCA dose ratio<br />
Stuck Period / Silence Key<br />
Stuck On / Off Key<br />
Corrective Action<br />
Report error code to factory.<br />
Report error code to factory.<br />
Report error code to factory.<br />
Report error code to factory.<br />
Report error code to factory.<br />
Report error code to factory.<br />
Report error code to factory.<br />
Report error code to factory.<br />
Report error code to factory.<br />
Report error code to factory.<br />
Report error code to factory.<br />
Report error code to factory.<br />
Report error code to factory.<br />
Report error code to factory.<br />
Report error code to factory.<br />
Report error code to factory.<br />
Report error code to factory.<br />
Report error code to factory.<br />
Report error code to factory.<br />
Report error code to factory.<br />
Report error code to factory.<br />
Report error code to factory.<br />
Report error code to factory.<br />
Report error code to factory.<br />
Report error code to factory.<br />
Report error code to factory.<br />
Report error code to factory.<br />
Report error code to factory.<br />
Report error code to factory.<br />
Report error code to factory.<br />
If key was pressed, release it.<br />
Otherwise report error code to<br />
factory.<br />
If key was pressed, release it.<br />
Otherwise report error code to<br />
factory.<br />
111
Error<br />
Code<br />
LCD Displayed<br />
Message<br />
162 Stuck 0 Key<br />
Turn pump OFF/ON or Call<br />
Provider<br />
163 Stuck 1 Key<br />
Turn pump OFF/ON or Call<br />
Provider<br />
164 Stuck 2 Key<br />
Turn pump OFF/ON or Call<br />
Provider<br />
165 Stuck 3 Key<br />
Turn pump OFF/ON or Call<br />
Provider<br />
166 Stuck 4 Key<br />
Turn pump OFF/ON or Call<br />
Provider<br />
167 Stuck 5 Key<br />
Turn pump OFF/ON or Call<br />
Provider<br />
168 Stuck 6 Key<br />
Turn pump OFF/ON or Call<br />
Provider<br />
169 Stuck 7 Key<br />
Turn pump OFF/ON or Call<br />
Provider<br />
170 Stuck 8 Key<br />
Turn pump OFF/ON or Call<br />
Provider<br />
171 Stuck 9 Key<br />
Turn pump OFF/ON or Call<br />
Provider<br />
172 Stuck UP Key<br />
Turn pump OFF/ON or Call<br />
Provider<br />
173 Stuck NO Key<br />
Turn pump OFF/ON or Call<br />
Provider<br />
174 Stuck YES Key<br />
Turn pump OFF/ON or Call<br />
Provider<br />
175 Stuck DOWN Key<br />
Turn pump OFF/ON or Call<br />
Provider<br />
176 Stuck RUN Key<br />
Turn pump OFF/ON or Call<br />
Provider<br />
177 Stuck HELP Key<br />
Turn pump OFF/ON or Call<br />
Provider<br />
178 Stuck PRIME Key<br />
Turn pump OFF/ON or Call<br />
Provider<br />
179 Bolus Cord<br />
Unplug Cord<br />
Turn pump OFF/ON<br />
180 Turn pump OFF/ON<br />
Call Provider<br />
200 Turn pump OFF/ON<br />
Call Provider<br />
201 Turn pump OFF/ON<br />
Call Provider<br />
202 Turn pump OFF/ON<br />
Call Provider<br />
203 Turn pump OFF/ON<br />
Call Provider<br />
Probable Cause<br />
Stuck 0 Key<br />
Stuck 1 Key<br />
Stuck 2 Key<br />
Stuck 3 Key<br />
Stuck 4 Key<br />
Stuck 5 Key<br />
Stuck 6 Key<br />
Stuck 7 Key<br />
Stuck 8 Key<br />
Stuck 9 Key<br />
Stuck Up Arrow Key<br />
Stuck No / Change Key<br />
Stuck Yes / Enter Key<br />
Stuck Down Arrow Key<br />
Stuck Run / Pause Key<br />
Stuck Help / Options Key<br />
Stuck Prime / Bolus Key<br />
Stuck Remote Bolus Switch<br />
Invalid Key<br />
Invalid system state<br />
Bad power up test number<br />
Bad power up state<br />
Bad A to D Max address<br />
Corrective Action<br />
If key was pressed, release it.<br />
Otherwise report error code to<br />
factory.<br />
If key was pressed, release it.<br />
Otherwise report error code to<br />
factory.<br />
If key was pressed, release it.<br />
Otherwise report error code to<br />
factory.<br />
If key was pressed, release it.<br />
Otherwise report error code to<br />
factory.<br />
If key was pressed, release it.<br />
Otherwise report error code to<br />
factory.<br />
If key was pressed, release it.<br />
Otherwise report error code to<br />
factory.<br />
If key was pressed, release it.<br />
Otherwise report error code to<br />
factory.<br />
If key was pressed, release it.<br />
Otherwise report error code to<br />
factory.<br />
If key was pressed, release it.<br />
Otherwise report error code to<br />
factory.<br />
If key was pressed, release it.<br />
Otherwise report error code to<br />
factory.<br />
If key was pressed, release it.<br />
Otherwise report error code to<br />
factory.<br />
If key was pressed, release it.<br />
Otherwise report error code to<br />
factory.<br />
If key was pressed, release it.<br />
Otherwise report error code to<br />
factory.<br />
If key was pressed, release it.<br />
Otherwise report error code to<br />
factory.<br />
If key was pressed, release it.<br />
Otherwise report error code to<br />
factory.<br />
If key was pressed, release it.<br />
Otherwise report error code to<br />
factory.<br />
If key was pressed, release it.<br />
Otherwise report error code to<br />
factory.<br />
If Bolus Switch was pressed,<br />
release it. Replace Bolus<br />
assembly. Otherwise report error<br />
code to factory.<br />
Report error code to factory.<br />
Report error code to factory.<br />
Report error code to factory.<br />
Report error code to factory.<br />
Report error code to factory.<br />
112
Error<br />
Code<br />
LCD Displayed<br />
Message<br />
Probable Cause<br />
Corrective Action<br />
Error LCD Displayed Message Probable Cause Corrective Action<br />
Code<br />
204 Turn pump OFF/ON<br />
Bad run state<br />
Report error code to factory.<br />
Call Provider<br />
205 Turn pump OFF/ON<br />
Bad pump status<br />
Report error code to factory.<br />
Call Provider<br />
206 Turn pump OFF/ON<br />
Bad volume type<br />
Report error code to factory.<br />
Call Provider<br />
207 Turn pump OFF/ON<br />
Bad rate type<br />
Report error code to factory.<br />
Call Provider<br />
208 Turn pump OFF/ON<br />
Bad motor test number Report error code to factory.<br />
Call Provider<br />
209 Turn pump OFF/ON<br />
Bad hist type<br />
Report error code to factory.<br />
Call Provider<br />
210 Turn pump OFF/ON<br />
Bad EEPROM Data ID<br />
Report error code to factory.<br />
Call Provider<br />
211 Turn pump OFF/ON<br />
Bad run time CRC state Report error code to factory.<br />
Call Provider<br />
212 Turn pump OFF<br />
Bad EEPROM Write<br />
Report error code to factory.<br />
Call Provider<br />
213 Turn pump OFF<br />
Bad total volume<br />
Report error code to factory.<br />
Call Provider<br />
214 Turn pump OFF<br />
Bad total time<br />
Report error code to factory.<br />
Call Provider<br />
300 Turn pump OFF<br />
Stack Overflow<br />
Report error code to factory.<br />
Call Provider<br />
301 Turn pump OFF<br />
Bad Flash<br />
Report error code to factory.<br />
Call Provider<br />
302 Turn pump OFF<br />
Bad Run Time Flash<br />
Report error code to factory.<br />
Call Provider<br />
303 Turn pump OFF<br />
Bad Ram<br />
Report error code to factory.<br />
Call Provider<br />
304 Turn pump OFF<br />
Bad output data<br />
Report error code to factory.<br />
Call Provider<br />
305 Turn pump OFF<br />
Bad active data<br />
Report error code to factory.<br />
Call Provider<br />
306 Turn pump OFF<br />
Bad overflow count<br />
Report error code to factory.<br />
Call Provider<br />
307 Turn pump OFF<br />
Therapy data CRC failure Report error code to factory.<br />
Call Provider<br />
308 Watch Dog<br />
Bad Watch Dog Test<br />
Report error code to factory.<br />
Call Provider<br />
309 Turn pump OFF<br />
Stopped Motor Motion Count Report error code to factory.<br />
Call Provider<br />
310 Turn pump OFF<br />
Stopped Motor Motion Volt Report error code to factory.<br />
Call Provider<br />
311 Turn pump OFF<br />
Bad Active Flags<br />
Report error code to factory.<br />
Call Provider<br />
312 Turn pump OFF<br />
Bad Active Flags 2<br />
Report error code to factory.<br />
Call Provider<br />
313 Turn pump OFF<br />
Negative Motor Motion<br />
Report error code to factory.<br />
Call Provider<br />
314 Turn pump OFF<br />
Therapy params write violate Report error code to factory.<br />
Call Provider<br />
315 Turn pump OFF<br />
Therapy status write violate Report error code to factory.<br />
Call Provider<br />
316 Turn pump OFF/ON<br />
Call Provider<br />
Configuration settings may<br />
have been compromised<br />
Try to turn off pump then on. If OK,<br />
continue, if error recurs, return for<br />
317 Turn pump OFF/ON<br />
Call Provider<br />
Configuration settings may<br />
have been compromised<br />
service.<br />
Try to turn off pump then on. If OK,<br />
continue, if error recurs, return for<br />
service.<br />
113
A c c e s s o r i e s<br />
C h a p t e r<br />
8<br />
T h e r e a r e a n u m b e r i o t f h C u t r h l e<br />
i p n f u I p l u n m f p . a u s c c i S o e m s n e s o r f i e s t h e f o r m o s u t s<br />
a c c e s s o r i e s a r e d e s c r i b e d i n t h i t s h e c w h e a M p b t o s e o i r g t . e . F o<br />
w w w .m o o g . c o m / m e d i c a l .<br />
Detachable Pole Clamps<br />
The pole clamps attach to the Lockable Safety Shells or the Pump Holster and can accommodate<br />
a pole of .75 to 1.25-inch diameter. There is a Standard Pole Clamp (340-0104) as well as a<br />
Lockable Pole Clamp (340-0125) available.<br />
Figure 8.1 Detachable Pole Clamp<br />
Accessories<br />
114
Remote Bolus Cord (340-2005)<br />
This five-foot flexible cable offers a remote push button switch for the patient’s use in<br />
administering bolus dosing in the PCA therapy. This accessory cannot be used in any therapy<br />
except PCA; and if it is left connected for any other therapy, an alert message will display on the<br />
pump screen, instructing the operator to remove this cable.<br />
Bolus/Data<br />
Port on Left<br />
side of Pump<br />
Bolus/Data<br />
Port Unique<br />
Keyhole<br />
Remote bolus<br />
access port<br />
Unique Key<br />
Locking Sleeve<br />
Four-pronged adapter<br />
with unique key plugs<br />
into access port on left<br />
side of pump as shown.<br />
To remove bolus cord, pull back on<br />
locking sleeve and pull cord straight out of<br />
access port.<br />
Figure 8.2 Remote Bolus Cord<br />
115
Lockable Safety Shells<br />
These accessories are hard-plastic, durable cases that are lockable with a key. The 250 ml safety<br />
shell (360-0018) will secure medication bags of up to 250 ml, administration set and the pump,<br />
and yet allow access to the pump’s keypad, controls, communication connectors, and battery<br />
compartment door.<br />
The 250 ml safety shells will also secure syringes and is available in light blue.<br />
All security shells can be pole mounted with the detachable pole clamp, set on a stable flat surface,<br />
or carried in a soft carry pack.<br />
Figure 8.3 Safety Shells<br />
Accessories<br />
116
Additional graphics below show how to install the Pole Clamp on the Lock Box.<br />
Align and slide the Lock Box<br />
over the Pole Clamp until the<br />
Latch is looked in place.<br />
Press Latch<br />
lever to release<br />
Figure 8.4 Pole Clamp and Safety Shell Installation<br />
Pump Holster (340-0111)<br />
This accessory is a simple “slide pump in” case with a pole clamp-mounting bracket on the back,<br />
allowing the pump to securely be mounted onto a pole and yet allow the user easy access to the<br />
display, keypad, controls, battery compartment, and connectors for external power or<br />
communications.<br />
<strong>Curlin</strong> <strong>Med</strong>ical Holster<br />
with pole mount to be<br />
attached to an IV pole.<br />
The back of the holster<br />
slides onto the pole<br />
mount and locks securely<br />
in place.<br />
Figure 8.5 Pump “Holster”<br />
117
Keypad Covers<br />
These accessories are hard-plastic, durable keypad covers that can optionally be used with the<br />
(340-0141, 340-0141-01 and 340-0141-02) lockboxes to cover the keypad. The keypad covers are<br />
available in four configurations:<br />
• Type 0 (340-0142) covers all the keys;<br />
• Type I (340-0142-01) covers all the keys, with the exception of the “SILENCE” and<br />
“RUN/PAUSE” keys;<br />
• Type II (340-0142-02) covers only the numerical and “PRIME/BOLUS” keys.<br />
• Type III (340-0142-03) covers all the keys, with the exception of the “SILENCE” key.<br />
Figure 8.6 Keypad Covers<br />
Accessories<br />
118
C h a p t e r<br />
9<br />
C l e a n i n g , E n v i r o n m e n t a l n s C , o n d a i n d t i o<br />
M a i n t e n a n c e<br />
F o l l o w i n g t h e g u i d e l i n e s f o r c a r e C l u r i l s i t n e d I n b f e u l s o i w o n w i<br />
p u m . p<br />
Cleaning, Maintenance<br />
Cleaning<br />
The <strong>Curlin</strong> Infusion pumps are designed to be resistant to fluid spillage from any direction but<br />
are not to be immersed in solutions. Keep the pump and the pumping surfaces clean, dry, and<br />
free of fluid spillage at all times. Do not use the pump in the shower, sauna, or steam bath and do<br />
not position the pump where it could accidentally be dropped into a container of fluid, (e.g. basin,<br />
tub, or toilet.) The pumping surfaces can be cleaned with a cloth dampened with any of the<br />
following solutions, and dried with a soft cloth without harming the pump.<br />
Clean the pump, remote bolus cord, AC adapter, safety shells, holster and battery pack with a soft<br />
cloth dampened in any of the following:<br />
• Warm soapy water (do not submerse)<br />
• Isopropyl alcohol<br />
• Household bleach, diluted 9:1 with water<br />
• Commercial disinfectant<br />
(Do NOT spray the cleaning solution directly on the pump.)<br />
I M P O R T A N T<br />
I N F O R M A T I O N<br />
The following cleaning/disinfecting methods are specifically<br />
prohibited:<br />
• Do not use full strength bleach<br />
• Do not autoclave or use steam sterilization<br />
• Do not clean in a dishwasher<br />
• Do not use acetone, lacquer thinner, or any other solvents or<br />
abrasive cleansers to clean the pump<br />
With proper care, the pump will retain its finish for many years of<br />
service.<br />
119
Transport and Storage<br />
During transport or storage, the batteries should be removed; the pump should be cleaned and<br />
kept in its hard-shell packing case. The environmental conditions should be within the range of:<br />
• An ambient temperature -20° F to 140°F<br />
• A relative humidity range of 10% to 95%<br />
• An atmospheric pressure range of 500 Hpa to 1060 Hpa<br />
All accessories should be stored in their original packing containers to ensure the longest service.<br />
Operating Environment<br />
The following conditions of ambient temperature range and relative humidity are recommended<br />
for the fluid delivered accuracy of:<br />
• Temperature: ±5% Accuracy: 55 to 90°F<br />
±10% Accuracy: 45 to 55°F<br />
±10% Accuracy: 90 to 104°F<br />
• Relative Humidity: 15 to 95% Non-condensing.<br />
Maintenance<br />
Yearly preventive maintenance checks are recommended and will be prompted in the “Set-Up”<br />
menu and on the display when the date occurs. This date accrues from the date of factory release<br />
and is reset when each annual maintenance check is completed.<br />
Any time an error code message occurs repeatedly or any time a pump appears to be tampered<br />
with or shows any indication of not performing to standards, the pump should be returned to the<br />
healthcare provider dispensing the pump.<br />
At no time should unauthorized personnel open the hard case of the pump.<br />
Limited Warranty<br />
ZEVEX, Inc. (the “Manufacturer”) warrants to the Original Purchaser that the<br />
infusion pump (the “Pump”), not including accessories, shall be free from defects in<br />
material and workmanship under normal use, if used in accordance with this <strong>User</strong>’s<br />
<strong>Manual</strong>, for a period of one year from the actual date of sale to the Original<br />
Purchaser. THERE ARE NO OTHER WARRANTIES.<br />
The warranty does not cover normal wear and tear and maintenance items, and specifically<br />
excludes batteries, administration sets, extension sets or any other accessory items or<br />
equipment used with the Pump.<br />
Subject to the conditions of and upon compliance with this Limited Warranty, the<br />
Manufacturer will repair or replace at its option without charge (except for a minimal charge<br />
for postage and handling) any Pump (not including accessories) which is defective if a claim<br />
is made during such one year period.<br />
The following conditions, procedures, and limitations apply to the Manufacturer’s obligation<br />
under this warranty:<br />
120
1 PARTIES COVERED BY THIS WARRANTY: This warranty extends only to the<br />
Original Purchaser of the Pump. This warranty does not extend to subsequent<br />
purchasers. The Original Purchaser may be a patient, medical personnel, or a medical<br />
facility that purchases the Pump for treatment of patients. The Original Purchaser<br />
should retain the invoice or sales receipt as proof as to the actual date of purchase.<br />
2 WARRANTY PERFORMANCE PROCEDURE: Notice of the claimed defect must be<br />
made in writing or by telephone to the Manufacturer as follows: Customer Service<br />
Department, ZEVEX, Inc., 4314 ZEVEX Park Lane, Salt Lake City, UT 84123,<br />
(801) 264-1001. Notice to the Manufacturer must include date of purchase, model and<br />
serial number, and a description of the claimed defect in sufficient detail to allow the<br />
Manufacturer to determine and facilitate any repairs that may be necessary.<br />
AUTHORIZATION MUST BE OBTAINED PRIOR TO RETURNING THE<br />
PUMP, and confirmed with issuance of an RMA (Return Materials Authorization)<br />
number. When authorized, the Pump must be properly and carefully packaged and<br />
returned to the Manufacturer, postage prepaid. Any loss or damage during shipment is<br />
at the risk of the sender.<br />
3 CONDITIONS OF WARRANTY: The warranty is void if the pump has been 1)<br />
repaired by someone other than the Manufacturer or its authorized agent; 2) altered so<br />
that its stability or reliability is affected; 3) misused; or, 4) damaged by negligence or<br />
accident. Misuse includes, but not limited to, use not in compliance with the <strong>User</strong>’s<br />
<strong>Manual</strong> or use with non approved accessories. The pump is a sealed unit, and the fact<br />
that the seal has been broken will be considered conclusive evidence that the Pump has<br />
been altered or misused. Removal or damage to the Pump’s serial number will invalidate<br />
this warranty.<br />
4 LIMITATIONS AND EXCLUSIONS: Repair or replacement of the pump or any<br />
component part thereof is the EXCLUSIVE remedy offered by the Manufacturer. The<br />
following and limitations shall apply:<br />
a. No agent, representative, or employee of the Manufacturer has authority to bind the<br />
Manufacturer to any representation or warranty, expressed or implied.<br />
b. THERE IS NO WARRANTY OF MERCHANTABILITY OR FITNESS OR USE<br />
OF THE PUMP FOR ANY PARTICULAR PURPOSE.<br />
c. The pump can only be used under the supervision of medical personnel whose skill<br />
and judgment determine the suitability of the Pump for any particular medical<br />
treatment.<br />
d. All recommendations, information, and descriptive literature supplied by the<br />
Manufacturer or its agents are believed to be accurate and reliable, but do not<br />
constitute warranties.<br />
Cleaning, Maintenance<br />
The Manufacturer disclaims responsibility for the suitability of the pump for any particular<br />
medical treatment or for any medical complications resulting from the use of the Pump.<br />
The Manufacturer shall not be responsible for any incidental damages or consequential<br />
damages to property, loss of profits, or loss of use caused by any defect or malfunction of<br />
the pump.<br />
This warranty gives the Original Purchaser specific legal rights, and the Original Purchaser<br />
may have other legal rights, which may vary from state to state.<br />
121
Procedure for Checking Pumps Between Patients<br />
Purpose<br />
This procedure is provided for use by caregivers to ensure pumps meet all critical<br />
performance specifications prior to use of the product on new patients. This procedure is<br />
for use by technicians to inspect, test, and prepare a pump for use by a new patient. The test<br />
checks for volumetric accuracy and all pump safety systems. Also, various parameters are<br />
initialized.<br />
Note: Between patient testing is not required for <strong>Curlin</strong> Infusion pumps when antisiphon<br />
valve administration sets are being used.<br />
This procedure is intended to be used by technicians familiar with operation of the <strong>Curlin</strong><br />
<strong>PainSmart</strong> IOD infusion pump.<br />
Note: This procedure does not replace the recommended Annual Preventive Maintenance.<br />
The pump should receive preventive maintenance by a qualified technician at least annually.<br />
Outpatient/Home Care/ Alternate Care Site Environment<br />
If the pump is used in an outpatient, Home Care, or Alternate Care setting, the pump<br />
must be checked between patients using the following procedure.<br />
Inpatient/Hospital Environment<br />
Moog highly recommends that the hospital conduct in between patient checks using the<br />
following procedure. Should the hospital determine, for whatever reason, that the in<br />
between patient check is not practical, <strong>Curlin</strong> <strong>Med</strong>ical recommends performing volumetric<br />
accuracy checks at regular intervals, to ensure the pump continues to meet specifications.<br />
Required Equipment<br />
The following equipment is required for this procedure:<br />
• A NEW Administration Set (old or used sets are not suitable for the volumetric delivery<br />
and pressure measurements tests.)<br />
• Volumetric measurement device (i.e. calibrated weight scale, burette or syringe.)<br />
• Beaker with clean, fresh water or I.V. container.<br />
Note: If the administration set contains a filter, sterile saline or sterile water should be used.<br />
Maintenance Between Patients<br />
1 CLEAN AND INSPECT PUMP FOR DAMAGE:<br />
a. Clean the pump with a soft cloth dampened with a designated antiseptic, disinfectant<br />
solution or a solution of household bleach diluted 9:1 with water. Be sure to clean all<br />
surfaces, including the pumping chamber.<br />
122
. Inspect pump for damage. Check all case surfaces for cracks. Open the pumping<br />
chamber door. Examine the finger seal to confirm that no cuts or tears exist.<br />
Confirm that the door is well aligned by closing it with no unreasonable interference.<br />
Verify that the Power and Bolus/Data connectors are securely mounted on the case<br />
(no loose nuts). Verify that all labels are legible and in good condition. Check that<br />
Keypad is securely attached to case and that no corners are pealing up. Verify that<br />
EPI<br />
IV<br />
the Battery Door is in place and that the Battery Contacts in the Battery<br />
Compartment are not deformed.<br />
Refer to the picture below when executing the following instructions.<br />
2 Volumetric Delivery Test:<br />
a. Install a new primed Administration Set in the pump and latch the door.<br />
b. Connect the up-stream side of administration set to a water source 12 inches +/-2<br />
inches above the pump.<br />
c. Connect the downstream side of the administration set to a volumetric accuracy<br />
measurement device (i.e. a calibrated scale or burette) at the same level as the pump<br />
+/- 2 inches.<br />
d. Program one of the following Infusions based on the default in the pump:<br />
123
Pre Rx:<br />
UNITS: ml<br />
Pre Rx:<br />
UNITS: mg<br />
Admin Rt: EPI CONC: 1 mg/ml<br />
Load Dose: 0.0 ml Admin Rt: IV<br />
<strong>Med</strong>LIMITS: OFF Load Dose: OFF<br />
NEXT? YES <strong>Med</strong>LIMITS: OFF<br />
NEXT? YES<br />
Prescription:<br />
Prescription:<br />
BAG VOL: 100 ml BAG VOL: 100 ml<br />
RATE: 0 ml/hr RATE: 0 mg/ml<br />
Pt Bolus: 9.9 ml Pt Bolus: 9.9 mg<br />
BOLS INT: 1 min BOLS INT: 1 min<br />
#BOLS/hr 1 #BOLS/hr 1<br />
DONE? YES DONE? YES<br />
e. Start the pump by pressing RUN button.<br />
f. Press the BOLUS key to start a bolus.<br />
g. When the 9.9 ml infusion is over, observe the amount volume infused as measured<br />
on the measurement device. Passing measurement is: 9.4 g to 10.4 g (9.4 ml to<br />
10.4 ml).<br />
h. When Infusion complete occurs verify that the Audio Alarm beeps and that the<br />
Green LED is flashing.<br />
3 CHECK ALL SAFETY SYSTEMS:<br />
Repeat the same Rx as above. Start the infusion and press the BOLUS key to start a<br />
bolus dose.<br />
a. Low Down Stream Occlusion - Go to the Option screen and confirm that the<br />
Down Occlusion level is set to LOW. Start the infusion and while the pump is<br />
running pinch off or close the down stream side of the administration set. Confirm<br />
the pump goes into Down Occlusion alarm. Open or clear the down stream<br />
occlusion and confirm the pump resumes infusion.<br />
b. High Down Stream Occlusion - Go to the Option screen and change the Down<br />
Occlusion level to HIGH. Again pinch off or close the clamp on the down-stream<br />
side of the administration set. Confirm the pump goes into Down Occlusion. Open<br />
or clear the down stream occlusion and confirm the pump resumes infusion.<br />
c. Up Stream Occlusion - Resume the infusion pumping then pinch off or close the<br />
up-stream side of the administration set. Confirm that the pump goes into an Up<br />
Occlusion alarm. Open or clear the up stream occlusion, press Pause then Resume<br />
the infusion.<br />
d. Door Sensor - With infusion in progress open the door latch and observe ALARM<br />
DOOR OPEN OR SET NOT PROPERLY INSTALLED. Press Pause and then<br />
YES to RESUME on the Pause Menu.<br />
e. Set Sensor - Remove the administration set from the pump and reinstall it so that<br />
the flow stop and tubing guide are not in the pumping chamber. Close the door latch<br />
and start an infusion by pressing the RUN key. Observe “ALERT DOOR OPEN<br />
124
or SET NOT PROPERLY INSTALLED” will occur.<br />
f. Air In Line Sensor - Reinstall the administration set properly and resume the<br />
infusion. From the Options menu set the AIL SENS (AIR IN LINE sensitivity) to<br />
0.1ml. With the pump running introduce an Air Bolus of approximately 0.5ml into<br />
the fluid path at the input side of the pump. Once approximately 0.1ml of air has<br />
past the AIL detector, an ALARM AIR IN LINE will occur. Pause and Prime the<br />
air bolus past the AIL sensor, then resume the infusion.<br />
g. Auxiliary Alarm - With the pump running observe the Vol INF (volume infused on<br />
the run screen) and disconnect the pump from all power sources (unplug the AC<br />
Adapter eliminator and remove one C-Cell battery.) Observe that the Auxiliary<br />
Alarm System is activated, with the Red LED and Beeper on constant (not<br />
intermittently beeping). With the battery still out of the pump, press the ON/OFF<br />
button to turn off the auxiliary alarm. Replace the battery in the battery<br />
compartment and turn on the pump. Resume the therapy and confirm that the<br />
infusion continues where it stopped due to Auxiliary Alarm occurrence.<br />
4 SET BIOMED CLINICIAN MENU ITEMS:<br />
a. Turn the pump Off and back On. While pump is performing Self Tests confirm<br />
that the pump is set to the correct Date and Time. If date and time are not<br />
correct, program the correct date and time from the Biomed/Clinician menu.<br />
Note: Setting of the Date and Time is not allowed if ‘RESUME’ (infusion is still active) is<br />
available on the Pause menu. Use the CLEAR Pt Data/Rx option on the<br />
Biomed/Clinician menu to clear the prescriptions and end the infusion. The Date<br />
and Time can then be programmed.<br />
b. From the Program/Biomed Setup Menu select Biomed Setup.<br />
c. At the Enter Code Menu, enter the Clinician Code<br />
d. (Optional) Erase the patient history file using the Clear Hx Log Menu.<br />
e. Erase any previous Programmer ID, Patient ID, Rx Number, Invoice Number, Lock<br />
Level setting, and prescriptions using the Clear Pt Data/Rx Menu<br />
f. Observe the Pump Maintenance Date, top of the Biomed/Clinician Menu, to insure<br />
adequate time for the next use by patient.<br />
g. Sign, date and return the Check List to your record file. Pumps that pass can be<br />
used for new patients. Pumps that fail are to be returned for service.<br />
125
C h a p t e r<br />
10<br />
T e c h n i c a l S p e c i f i c a t i o n s<br />
The following specifications apply to the <strong>Curlin</strong> Infusion Ambulatory Infusion Pump:<br />
Note: Flow rates and bolus dose limits may be less than indicated in these tables based on<br />
specific customizations.<br />
ITEM<br />
Pumping Mechanism:<br />
Pump Size:<br />
SPECIFICATION<br />
Curvilinear peristaltic finger action<br />
Technical Specifications<br />
Height:<br />
Width:<br />
Depth:<br />
Weight:<br />
Case Material:<br />
Operating Environment:<br />
Operating Temperature:<br />
Operating Relative Humidity:<br />
Storage Environment:<br />
Storage Temperature Range:<br />
Storage Relative Humidity:<br />
5 inches<br />
4 inches<br />
2.5 inches<br />
18.1 ounces<br />
UL rated flame-retardant, non-toxic high impact<br />
plastic<br />
± 5% Accuracy: 55° to 90 o F<br />
±10% Accuracy: 45 o to 55 o F<br />
±10% Accuracy: 90 o to 104 o F<br />
15 to 95% non condensing<br />
-20 o to 140 o F<br />
5 to 95% non-condensing<br />
126
Power Requirements:<br />
2 “C size” Single-Use Batteries<br />
AC Power<br />
ITEM<br />
Operating Time with Full Charge<br />
Batteries:<br />
Internal Memory Battery<br />
Display<br />
Flow Rates<br />
Bolus Rate<br />
Volume Accuracy<br />
Administration Sets<br />
Fill Volume for Administration Sets<br />
Up Occlusion Detection Time<br />
Microbore tubing with occlusion<br />
below spike<br />
SPECIFICATION<br />
Nominal 85 hours at a rate of 2 ml/hr<br />
5 years life<br />
Graphic LCD, 4 text fields, 16 characters per<br />
field<br />
0.1 to 50 ml/hr<br />
Up to 125 ml/hr<br />
± 5% for volume delivery >1 ml under the<br />
following conditions:<br />
• Temperature 55° to 90° F<br />
• Back pressure to 300 mmHg (5.8 PSI)<br />
±10% for volume delivery >1 ml under the<br />
following conditions:<br />
• Temperature 45° to 55°F<br />
• Temperature 90° to 104°F<br />
• Back pressure to 750 mmHg (14.5 PSI)<br />
The maximum volume that may be infused under<br />
Single Fault Conditions is 0.8 ml.<br />
Recommended administration set usage not to<br />
exceed 72* hours.<br />
*follow standards of practice for set changes<br />
Proprietary <strong>Curlin</strong> Infusion non-DEHP, PVC<br />
administration sets available in different<br />
configurations.<br />
Nonfiltered microbore sets ± 4 ml.<br />
See individual administration set label for specific<br />
fill volume<br />
Rate<br />
0.1 ml/hr<br />
1 ml/hr<br />
10 ml/hr<br />
50 ml/hr<br />
Time to Alarm<br />
Down Occlusion Detection Time<br />
Microbore tubing with occlusion at<br />
distal Luer<br />
ITEM<br />
Programmable Time (HH:MM)<br />
PCA<br />
Rate<br />
0.1 ml/hr<br />
1 ml/hr<br />
10 ml/hr<br />
50 ml/hr<br />
125 ml/hr<br />
Low Pressure<br />
Percent Error, <strong>Curlin</strong> Pump infusing at 25 ml/hr w ith zero Headheight.<br />
Percent Error<br />
3.5%<br />
3.0%<br />
2.5%<br />
2.0%<br />
1.5%<br />
1.0%<br />
0 0.5 1 1.5 2 2.5 3 3.5 4 4.5<br />
Time (hrs)<br />
Percent Error, <strong>Curlin</strong> Pump infusing at 1 ml/hr w ith zero headheight (hour 2, detail)<br />
10%<br />
Percent Error<br />
5%<br />
0%<br />
-5%<br />
11 19 31<br />
Rate Calculation Window (min)<br />
Percent Error, <strong>Curlin</strong> Pump infusing at 1 ml/hr w ith a positive headheight of 100 mm Hg<br />
Percent Error<br />
60%<br />
40%<br />
20%<br />
0%<br />
-20%<br />
-40%<br />
-60%<br />
2 5 11 19 31<br />
Rate Calculation Window ( min)<br />
Percent Error, <strong>Curlin</strong> Pump infusing at 1 ml/hr w ith a positive headheight of 100 mm Hg (Detail)<br />
Percent Error<br />
15%<br />
10%<br />
5%<br />
0%<br />
-5%<br />
11 19 31<br />
Rate Calculation Window (min)<br />
129
<strong>Curlin</strong> pump inusing at .1 ml/hr w ith zero headheight (hour 2)<br />
Infusion Volume (ml)<br />
0.11<br />
0.105<br />
0.1<br />
0.095<br />
0.09<br />
1 3 5 10 15 20<br />
Rate Calculation Window (hrs)<br />
Infusion Volume (ml)<br />
0.11<br />
0.105<br />
0.1<br />
0.095<br />
0.09<br />
0.085<br />
0.08<br />
<strong>Curlin</strong> pump infusing at .1 ml/hr w ith zero headheight (hour 70)<br />
1 3 5 10 15 20<br />
Rate Calculation Window (hrs)<br />
Technical Specifications<br />
Flow Rate (1 hour<br />
calculation window)<br />
0.12<br />
0.11<br />
0.1<br />
0.09<br />
<strong>Curlin</strong> Pump delivering at .1 ml per hour with zero headheight<br />
Calculated Average: 0.1011 ml per hr<br />
0.08<br />
5 10 15 20 25 30 35 40 45<br />
infusion time (hrs)<br />
Percent Error, <strong>Curlin</strong> Pump delivering successive shots of 1 ml at 25 ml per/hr in Intermittent<br />
Mode<br />
3%<br />
Percent Error<br />
1%<br />
-1%<br />
0.0<br />
0.1<br />
0.2<br />
0.3<br />
0.4<br />
0.5<br />
0.6<br />
0.7<br />
0.8<br />
0.9<br />
1.0<br />
1.1<br />
1.2<br />
1.3<br />
1.4<br />
1.5<br />
1.6<br />
1.7<br />
1.8<br />
1.9<br />
2.0<br />
2.1<br />
2.2<br />
-3%<br />
Time (hrs)<br />
130
Percentage Error, <strong>Curlin</strong> Pump delivering successive boluses of 1 ml in PCA SQ mode<br />
Percent Error<br />
8%<br />
6%<br />
4%<br />
2%<br />
0%<br />
-2%<br />
-4%<br />
0.1 0.1 0.2 0.3 0.3 0.4 0.5 0.5 0.6 0.7 0.7 0.8 0.9 0.9 1.0 1.1 1.1 1.2 1.3 1.3 1.4 1.5 1.5 1.6<br />
Time (hrs)<br />
Percent Erro, <strong>Curlin</strong> Pump delivering successive boluses of 1 ml in PCA IV mode<br />
8%<br />
Percent Error<br />
6%<br />
4%<br />
2%<br />
0%<br />
0.1 0.1 0.2 0.3 0.3 0.4 0.5 0.5 0.6 0.7 0.7 0.8 0.9 0.9 1.0 1.1 1.1 1.2 1.3 1.3 1.4 1.5 1.5 1.6 1.7<br />
Time (hrs)<br />
Percent Error, <strong>Curlin</strong> Pump infusing at 1 ml/hr w ith a negative headheight of 100 mm Hg<br />
Percent Error<br />
60%<br />
40%<br />
20%<br />
0%<br />
-20%<br />
-40%<br />
-60%<br />
2 5 11 19 31<br />
Rate Calculation Window (min)<br />
Percent Error, <strong>Curlin</strong> Pump infusing at 1 ml/hr w ith a negative headheight of 100 mm Hg<br />
(Detail)<br />
Percent Error<br />
10%<br />
5%<br />
0%<br />
-5%<br />
-10%<br />
11 19 31<br />
Rate Calculation Window (min)<br />
131
Percent Error, <strong>Curlin</strong> Pump infusing at 1 ml/hr zero headheight (hour 2)<br />
Percent Error<br />
60%<br />
40%<br />
20%<br />
0%<br />
-20%<br />
-40%<br />
-60%<br />
2 5 11 19 31<br />
Rate Calculation Window (min)<br />
Percent Error<br />
0.6<br />
0.4<br />
0.2<br />
0<br />
-0.2<br />
-0.4<br />
-0.6<br />
Percent Error, <strong>Curlin</strong> Pump infusing at 1 ml/hr w ith zero headheight (hour 70)<br />
2 5 11 19 31<br />
Rate Calculation Window (min)<br />
Technical Specifications<br />
<strong>Curlin</strong> Infusion pump delivering in TPN mode at 25 ml/hr w ith 1 hour ramp up and 1 hour ramp<br />
dow n<br />
30<br />
Infusion rate<br />
20<br />
10<br />
0<br />
0<br />
-10<br />
1 2 3 4 5 6<br />
Time (hrs)<br />
Percent Error, <strong>Curlin</strong> Pump infusing at 1 ml/hr no headhight (hour 70, detail)<br />
Percent Error<br />
0.1<br />
0.05<br />
0<br />
-0.05<br />
-0.1<br />
19 31<br />
Rate Calculation Window<br />
132
Flow Rate (1 hour<br />
calculation window)<br />
0.12<br />
0.115<br />
0.11<br />
0.105<br />
0.1<br />
0.095<br />
<strong>Curlin</strong> Pump delivering at .1 ml per hour with zero headheight (detail)<br />
Calculated Average: 0.1011 ml per hr<br />
0.09<br />
10 10.5 11 11.5 12 12.5 13 13.5 14 14.5 15<br />
infusion time (hrs)<br />
<strong>Curlin</strong> pump infusing at .1 ml/hr w ith zero headheight (hour 2)<br />
% infusion error<br />
7%<br />
2%<br />
-3%<br />
1 3 5 10 15 20<br />
-8%<br />
Rate Calculation Window (hrs)<br />
<strong>Curlin</strong> pump infusing at .1 ml/hr w ith zero headheight (hour 70)<br />
% Infusion error<br />
10%<br />
5%<br />
0%<br />
-5%<br />
-10%<br />
-15%<br />
1 3 5 10 15 20<br />
Rate Calculation Window (hrs)<br />
133
Lock Setting Table<br />
The following table illustrates which features are controlled under which lock settings:<br />
Pump Operation<br />
Active<br />
Therapy<br />
Lock<br />
OFF<br />
Lock<br />
1<br />
Lock<br />
2<br />
Lock<br />
3<br />
Change Lock Settings PCA All settings with correct access<br />
code<br />
Turn Pump Off/On PCA Yes Yes Yes Yes<br />
Pause/Run Therapy PCA Yes Yes Yes Yes<br />
Access Help/Options PCA Yes Yes Yes Yes<br />
Check Power Source PCA Yes Yes Yes Yes<br />
Resume Therapy PCA Yes Yes Yes Yes<br />
View Rx Screens at “No to Review” PCA Yes Yes Yes Yes<br />
Repeat Therapy PCA Yes Yes Yes No<br />
Prime Pump PCA Yes Yes Yes* No<br />
Change Audio Level PCA Yes Yes Yes No<br />
Change Rx screen information PCA Yes Yes No No<br />
Change Rx screen at “No to Review” PCA Yes Yes No No<br />
Access New Program PCA Yes No No No<br />
Change Air in Line Setting PCA Yes No No No<br />
Change Down Pressure PCA Yes No No No<br />
Change Units (New Program) PCA Yes No No No<br />
Change Concentration (New Program) PCA Yes No No No<br />
Utilize medLIMITS Option PCA Yes Yes No No<br />
Program medLIMITS PCA Yes No No No<br />
Change Administration Route (New Program) PCA Yes No No No<br />
Program Loading Dose PCA Yes No No No<br />
Program Clinician Dose PCA Yes No No No<br />
Whenever a lock setting is placed in the pump it is retained unless changed by using either the<br />
BIOMED SETUP function or the OPTIONS function to change the setting. If a locked-out<br />
function is requested, such as PRIME in lock setting 3, a screen will appear requesting the entry of<br />
the access code. When the correct code is entered, the locked out function can be performed by<br />
the clinician.<br />
Note: The lock setting remains the same, but the pump recognizes the access code, and<br />
authorizes the function to be performed without the need to change the lock setting.<br />
* with software revision of 6R9 and higher, Prime Pump is Lock Level 2 protected.<br />
135
C h a p t e r<br />
12<br />
P a i n S m a r T t<br />
M I O DC a t a l o g N u m b e r s<br />
PAINSMART TM IOD CATALOG NUMBERS<br />
Catalog Number Units Default Route Fixed Route Lock Code Lens Color<br />
360-1300-E1 ml EPI 5 Yellow<br />
360-1300-E2 ml EPI 9 Yellow<br />
360-1300-E3 ml IV 9 White<br />
360-1300-E4 ml EPI 9 White<br />
360-1300-E5 mg IV 5 White<br />
360-1300-E6 mg IV 9 White<br />
360-1300-E7 ml IV 5 White<br />
360-1300-E8 mg IV 9 Green<br />
360-1300-E9 ml EPI 5 White<br />
360-1300-E10 mg IV 5 Green<br />
Pump has been factory configured to specifications indicated in the above columns. Therefore,<br />
all options indicated in the manual will not be available. Pump will function according to set<br />
specifications.<br />
<strong>PainSmart</strong> Catalog Numbers<br />
136


