Download Prodigy Instruction Manual PDF file - Raynor Garage Doors
Download Prodigy Instruction Manual PDF file - Raynor Garage Doors
Download Prodigy Instruction Manual PDF file - Raynor Garage Doors
Create successful ePaper yourself
Turn your PDF publications into a flip-book with our unique Google optimized e-Paper software.
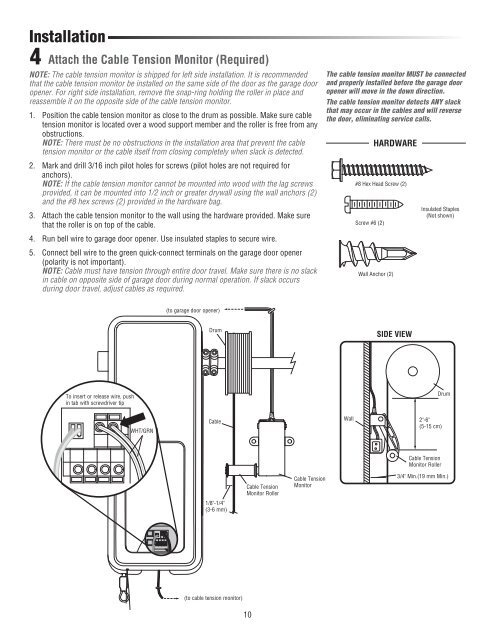
Installation<br />
4<br />
Attach the Cable Tension Monitor (Required)<br />
NOTE: The cable tension monitor is shipped for left side installation. It is recommended<br />
that the cable tension monitor be installed on the same side of the door as the garage door<br />
opener. For right side installation, remove the snap-ring holding the roller in place and<br />
reassemble it on the opposite side of the cable tension monitor.<br />
1. Position the cable tension monitor as close to the drum as possible. Make sure cable<br />
tension monitor is located over a wood support member and the roller is free from any<br />
obstructions.<br />
NOTE: There must be no obstructions in the installation area that prevent the cable<br />
tension monitor or the cable itself from closing completely when slack is detected.<br />
2. Mark and drill 3/16 inch pilot holes for screws (pilot holes are not required for<br />
anchors).<br />
NOTE: If the cable tension monitor cannot be mounted into wood with the lag screws<br />
provided, it can be mounted into 1/2 inch or greater drywall using the wall anchors (2)<br />
and the #8 hex screws (2) provided in the hardware bag.<br />
3. Attach the cable tension monitor to the wall using the hardware provided. Make sure<br />
that the roller is on top of the cable.<br />
4. Run bell wire to garage door opener. Use insulated staples to secure wire.<br />
5. Connect bell wire to the green quick-connect terminals on the garage door opener<br />
(polarity is not important).<br />
NOTE: Cable must have tension through entire door travel. Make sure there is no slack<br />
in cable on opposite side of garage door during normal operation. If slack occurs<br />
during door travel, adjust cables as required.<br />
The cable tension monitor MUST be connected<br />
and properly installed before the garage door<br />
opener will move in the down direction.<br />
The cable tension monitor detects ANY slack<br />
that may occur in the cables and will reverse<br />
the door, eliminating service calls.<br />
HARDWARE<br />
#8 Hex Head Screw (2) (2)<br />
Screw #6 (2)<br />
Wall Anchor (2)<br />
Insulated Staples<br />
(Not shown)<br />
(to garage door opener)<br />
Drum<br />
SIDE VIEW<br />
To insert or release wire, push<br />
in tab with screwdriver tip<br />
Drum<br />
WHT/GRN<br />
Cable<br />
Wall 2"-6"<br />
(5-15 cm)<br />
Cable Tension<br />
Monitor Roller<br />
1/8"-1/4"<br />
(3-6 mm)<br />
Cable Tension<br />
Monitor Roller<br />
Cable Tension<br />
Monitor<br />
3/4" Min.(19 mm Min.)<br />
(to cable tension monitor)<br />
10


