Download Prodigy Instruction Manual PDF file - Raynor Garage Doors
Download Prodigy Instruction Manual PDF file - Raynor Garage Doors
Download Prodigy Instruction Manual PDF file - Raynor Garage Doors

You also want an ePaper? Increase the reach of your titles
YUMPU automatically turns print PDFs into web optimized ePapers that Google loves.
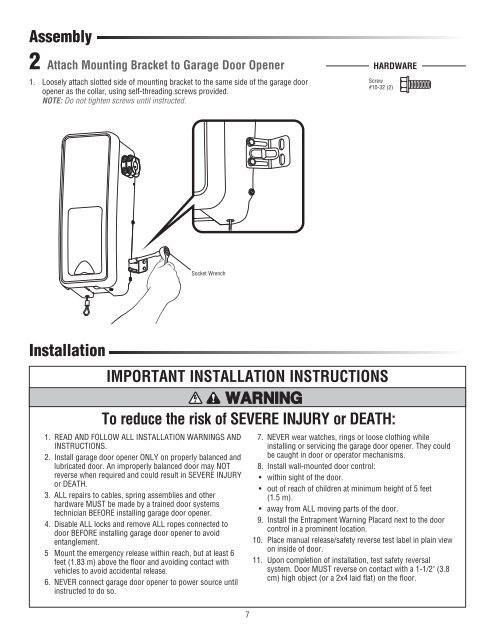
Assembly<br />
2<br />
Attach Mounting Bracket to <strong>Garage</strong> Door Opener<br />
1. Loosely attach slotted side of mounting bracket to the same side of the garage door<br />
opener as the collar, using self-threading screws provided.<br />
NOTE: Do not tighten screws until instructed.<br />
HARDWARE<br />
Screw<br />
#10-32 (2)<br />
Socket Wrench<br />
Installation<br />
IMPORTANT INSTALLATION INSTRUCTIONS<br />
WARNING<br />
To reduce the risk of SEVERE INJURY or DEATH:<br />
1. READ AND FOLLOW ALL INSTALLATION WARNINGS AND<br />
INSTRUCTIONS.<br />
2. Install garage door opener ONLY on properly balanced and<br />
lubricated door. An improperly balanced door may NOT<br />
reverse when required and could result in SEVERE INJURY<br />
or DEATH.<br />
3. ALL repairs to cables, spring assemblies and other<br />
hardware MUST be made by a trained door systems<br />
technician BEFORE installing garage door opener.<br />
4. Disable ALL locks and remove ALL ropes connected to<br />
door BEFORE installing garage door opener to avoid<br />
entanglement.<br />
5 Mount the emergency release within reach, but at least 6<br />
feet (1.83 m) above the floor and avoiding contact with<br />
vehicles to avoid accidental release.<br />
6. NEVER connect garage door opener to power source until<br />
instructed to do so.<br />
7. NEVER wear watches, rings or loose clothing while<br />
installing or servicing the garage door opener. They could<br />
be caught in door or operator mechanisms.<br />
8. Install wall-mounted door control:<br />
• within sight of the door.<br />
• out of reach of children at minimum height of 5 feet<br />
(1.5 m).<br />
• away from ALL moving parts of the door.<br />
9. Install the Entrapment Warning Placard next to the door<br />
control in a prominent location.<br />
10. Place manual release/safety reverse test label in plain view<br />
on inside of door.<br />
11. Upon completion of installation, test safety reversal<br />
system. Door MUST reverse on contact with a 1-1/2" (3.8<br />
cm) high object (or a 2x4 laid flat) on the floor.<br />
7