Download Prodigy Instruction Manual PDF file - Raynor Garage Doors
Download Prodigy Instruction Manual PDF file - Raynor Garage Doors
Download Prodigy Instruction Manual PDF file - Raynor Garage Doors

Create successful ePaper yourself
Turn your PDF publications into a flip-book with our unique Google optimized e-Paper software.
Installation<br />
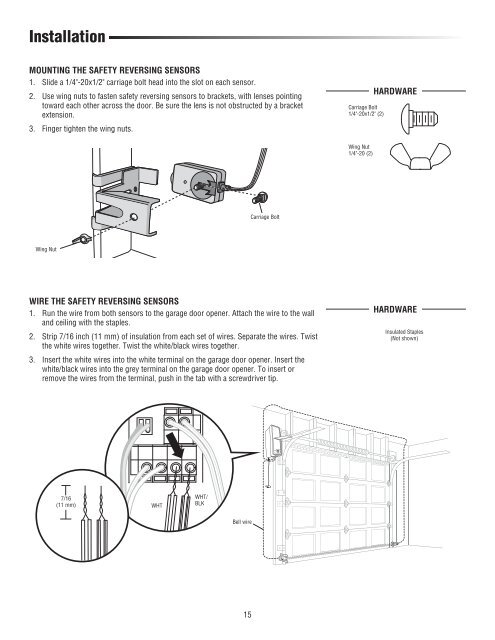
MOUNTING THE SAFETY REVERSING SENSORS<br />
1. Slide a 1/4"-20x1/2" carriage bolt head into the slot on each sensor.<br />
2. Use wing nuts to fasten safety reversing sensors to brackets, with lenses pointing<br />
toward each other across the door. Be sure the lens is not obstructed by a bracket<br />
extension.<br />
3. Finger tighten the wing nuts.<br />
Carriage Bolt<br />
1/4"-20x1/2" (2)<br />
HARDWARE<br />
Wing Nut<br />
1/4"-20 (2)<br />
Carriage Bolt<br />
Wing Nut<br />
WIRE THE SAFETY REVERSING SENSORS<br />
1. Run the wire from both sensors to the garage door opener. Attach the wire to the wall<br />
and ceiling with the staples.<br />
2. Strip 7/16 inch (11 mm) of insulation from each set of wires. Separate the wires. Twist<br />
the white wires together. Twist the white/black wires together.<br />
3. Insert the white wires into the white terminal on the garage door opener. Insert the<br />
white/black wires into the grey terminal on the garage door opener. To insert or<br />
remove the wires from the terminal, push in the tab with a screwdriver tip.<br />
HARDWARE<br />
Insulated Staples<br />
(Not shown)<br />
7/16<br />
(11 mm)<br />
WHT<br />
WHT/<br />
BLK<br />
Bell wire<br />
15