Download Prodigy Instruction Manual PDF file - Raynor Garage Doors
Download Prodigy Instruction Manual PDF file - Raynor Garage Doors
Download Prodigy Instruction Manual PDF file - Raynor Garage Doors
Create successful ePaper yourself
Turn your PDF publications into a flip-book with our unique Google optimized e-Paper software.
Installation<br />
8<br />
Connect Power<br />
To avoid installation difficulties, do not run<br />
the garage door opener at this time.<br />
To reduce the risk of electric shock, your<br />
garage door opener has a grounding type<br />
plug with a third grounding pin. This plug<br />
will only fit into a grounding type outlet. If<br />
the plug doesn’t fit into the outlet you have,<br />
contact a qualified electrician to install the<br />
proper outlet.<br />
There are two options for connecting<br />
power:<br />
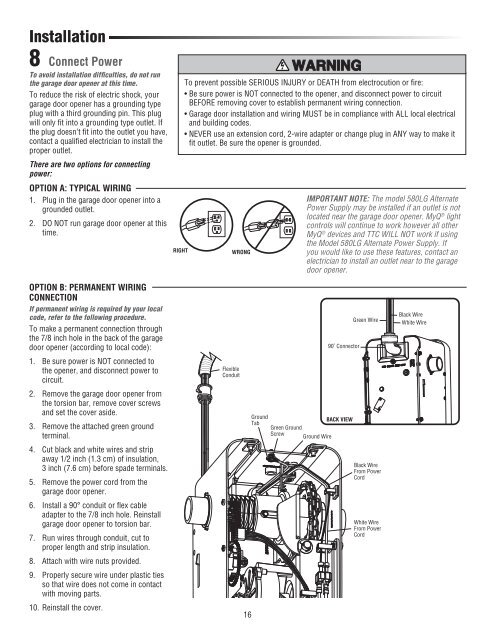
OPTION A: TYPICAL WIRING<br />
1. Plug in the garage door opener into a<br />
grounded outlet.<br />
2. DO NOT run garage door opener at this<br />
time.<br />
RIGHT<br />
To prevent possible SERIOUS INJURY or DEATH from electrocution or fire:<br />
• Be sure power is NOT connected to the opener, and disconnect power to circuit<br />
BEFORE removing cover to establish permanent wiring connection.<br />
• <strong>Garage</strong> door installation and wiring MUST be in compliance with ALL local electrical<br />
and building codes.<br />
• NEVER use an extension cord, 2-wire adapter or change plug in ANY way to make it<br />
fi t outlet. Be sure the opener is grounded.<br />
WRONG<br />
IMPORTANT NOTE: The model 580LG Alternate<br />
Power Supply may be installed if an outlet is not<br />
located near the garage door opener. MyQ ® light<br />
controls will continue to work however all other<br />
MyQ ® devices and TTC WILL NOT work if using<br />
the Model 580LG Alternate Power Supply. If<br />
you would like to use these features, contact an<br />
electrician to install an outlet near to the garage<br />
door opener.<br />
OPTION B: PERMANENT WIRING<br />
CONNECTION<br />
If permanent wiring is required by your local<br />
code, refer to the following procedure.<br />
To make a permanent connection through<br />
the 7/8 inch hole in the back of the garage<br />
door opener (according to local code):<br />
1. Be sure power is NOT connected to<br />
the opener, and disconnect power to<br />
circuit.<br />
2. Remove the garage door opener from<br />
the torsion bar, remove cover screws<br />
and set the cover aside.<br />
3. Remove the attached green ground<br />
terminal.<br />
4. Cut black and white wires and strip<br />
away 1/2 inch (1.3 cm) of insulation,<br />
3 inch (7.6 cm) before spade terminals.<br />
5. Remove the power cord from the<br />
garage door opener.<br />
6. Install a 90° conduit or fl ex cable<br />
adapter to the 7/8 inch hole. Reinstall<br />
garage door opener to torsion bar.<br />
7. Run wires through conduit, cut to<br />
proper length and strip insulation.<br />
8. Attach with wire nuts provided.<br />
9. Properly secure wire under plastic ties<br />
so that wire does not come in contact<br />
with moving parts.<br />
10. Reinstall the cover.<br />
Flexible<br />
Conduit<br />
16<br />
Ground<br />
Tab<br />
Green Ground<br />
Screw<br />
Ground Wire<br />
90˚ Connector<br />
BACK VIEW<br />
Green Wire<br />
Black Wire<br />
From Power<br />
Cord<br />
White Wire<br />
From Power<br />
Cord<br />
Black Wire<br />
White Wire


