Download Prodigy Instruction Manual PDF file - Raynor Garage Doors
Download Prodigy Instruction Manual PDF file - Raynor Garage Doors
Download Prodigy Instruction Manual PDF file - Raynor Garage Doors

Create successful ePaper yourself
Turn your PDF publications into a flip-book with our unique Google optimized e-Paper software.
Installation<br />
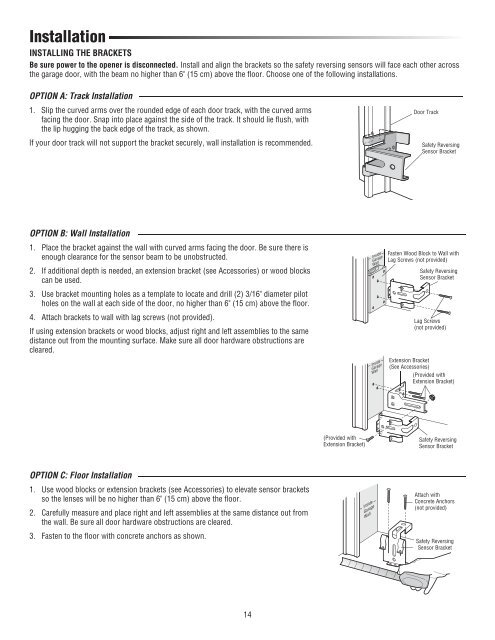
INSTALLING THE BRACKETS<br />
Be sure power to the opener is disconnected. Install and align the brackets so the safety reversing sensors will face each other across<br />
the garage door, with the beam no higher than 6" (15 cm) above the floor. Choose one of the following installations.<br />
OPTION A: Track Installation<br />
1. Slip the curved arms over the rounded edge of each door track, with the curved arms<br />
facing the door. Snap into place against the side of the track. It should lie flush, with<br />
the lip hugging the back edge of the track, as shown.<br />
If your door track will not support the bracket securely, wall installation is recommended.<br />
Door Track<br />
Safety Reversing<br />
Sensor Bracket<br />
OPTION B: Wall Installation<br />
1. Place the bracket against the wall with curved arms facing the door. Be sure there is<br />
enough clearance for the sensor beam to be unobstructed.<br />
2. If additional depth is needed, an extension bracket (see Accessories) or wood blocks<br />
can be used.<br />
3. Use bracket mounting holes as a template to locate and drill (2) 3/16" diameter pilot<br />
holes on the wall at each side of the door, no higher than 6" (15 cm) above the floor.<br />
4. Attach brackets to wall with lag screws (not provided).<br />
If using extension brackets or wood blocks, adjust right and left assemblies to the same<br />
distance out from the mounting surface. Make sure all door hardware obstructions are<br />
cleared.<br />
Fasten Wood Block to Wall with<br />
Lag Screws (not provided)<br />
Safety Reversing<br />
Sensor Bracket<br />
Lag Screws<br />
(not provided)<br />
Extension Bracket<br />
(See Accessories)<br />
(Provided with<br />
Extension Bracket)<br />
(Provided with<br />
Extension Bracket)<br />
Safety Reversing<br />
Sensor Bracket<br />
OPTION C: Floor Installation<br />
1. Use wood blocks or extension brackets (see Accessories) to elevate sensor brackets<br />
so the lenses will be no higher than 6" (15 cm) above the floor.<br />
2. Carefully measure and place right and left assemblies at the same distance out from<br />
the wall. Be sure all door hardware obstructions are cleared.<br />
3. Fasten to the fl oor with concrete anchors as shown.<br />
Attach with<br />
Concrete Anchors<br />
(not provided)<br />
Safety Reversing<br />
Sensor Bracket<br />
14