Sentry II Remote Operating Instructions - Truth Hardware
Sentry II Remote Operating Instructions - Truth Hardware
Sentry II Remote Operating Instructions - Truth Hardware

Create successful ePaper yourself
Turn your PDF publications into a flip-book with our unique Google optimized e-Paper software.
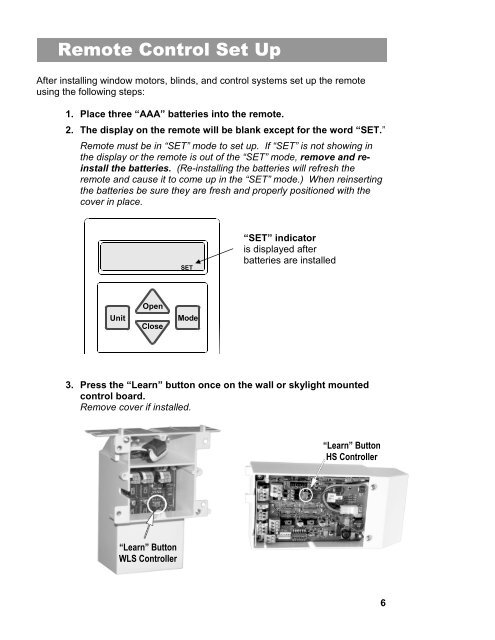
<strong>Remote</strong> Control Set Up<br />
After installing window motors, blinds, and control systems set up the remote<br />
using the following steps:<br />
1. Place three “AAA” batteries into the remote.<br />
2. The display on the remote will be blank except for the word “SET.”<br />
<strong>Remote</strong> must be in “SET” mode to set up. If “SET” is not showing in<br />
the display or the remote is out of the “SET” mode, remove and reinstall<br />
the batteries. (Re-installing the batteries will refresh the<br />
remote and cause it to come up in the “SET” mode.) When reinserting<br />
the batteries be sure they are fresh and properly positioned with the<br />
cover in place.<br />
SET<br />
“SET” indicator<br />
is displayed after<br />
batteries are installed<br />
Unit<br />
Open<br />
Close<br />
Mode<br />
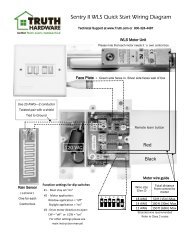
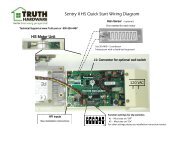
3. Press the “Learn” button once on the wall or skylight mounted<br />
control board.<br />
Remove cover if installed.<br />
“Learn” Button<br />
HS Controller<br />
“Learn” Button<br />
WLS Controller<br />
6