Sentry II Remote Operating Instructions - Truth Hardware
Sentry II Remote Operating Instructions - Truth Hardware
Sentry II Remote Operating Instructions - Truth Hardware

Create successful ePaper yourself
Turn your PDF publications into a flip-book with our unique Google optimized e-Paper software.
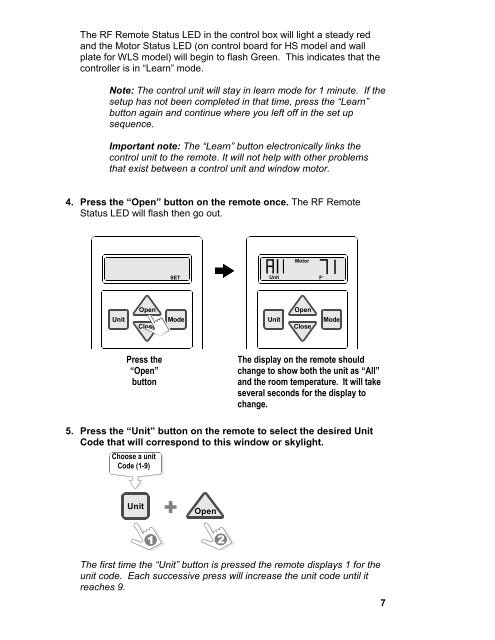
The RF <strong>Remote</strong> Status LED in the control box will light a steady red<br />
and the Motor Status LED (on control board for HS model and wall<br />
plate for WLS model) will begin to flash Green. This indicates that the<br />
controller is in “Learn” mode.<br />
Note: The control unit will stay in learn mode for 1 minute. If the<br />
setup has not been completed in that time, press the “Learn”<br />
button again and continue where you left off in the set up<br />
sequence.<br />
Important note: The “Learn” button electronically links the<br />
control unit to the remote. It will not help with other problems<br />
that exist between a control unit and window motor.<br />
4. Press the “Open” button on the remote once. The RF <strong>Remote</strong><br />
Status LED will flash then go out.<br />
Motor<br />
SET<br />
Unit<br />
F°<br />
Unit<br />
Open<br />
Close<br />
Mode<br />
Unit<br />
Open<br />
Close<br />
Mode<br />
Press the<br />
“Open”<br />
button<br />
The display on the remote should<br />
change to show both the unit as “All”<br />
and the room temperature. It will take<br />
several seconds for the display to<br />
change.<br />
5. Press the “Unit” button on the remote to select the desired Unit<br />
Code that will correspond to this window or skylight.<br />
Choose a unit<br />
Code (1-9)<br />
Unit<br />
+ Open<br />
1 2<br />
The first time the “Unit” button is pressed the remote displays 1 for the<br />
unit code. Each successive press will increase the unit code until it<br />
reaches 9.<br />
7