Sentry II Remote Operating Instructions - Truth Hardware
Sentry II Remote Operating Instructions - Truth Hardware
Sentry II Remote Operating Instructions - Truth Hardware

Create successful ePaper yourself
Turn your PDF publications into a flip-book with our unique Google optimized e-Paper software.
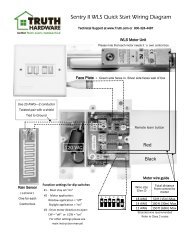
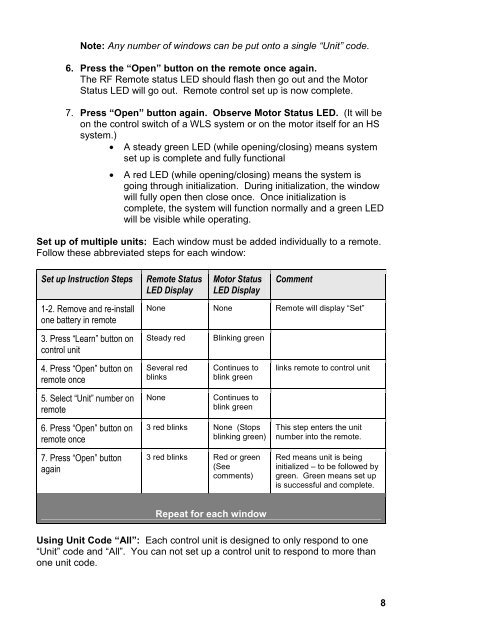
Note: Any number of windows can be put onto a single “Unit” code.<br />
6. Press the “Open” button on the remote once again.<br />
The RF <strong>Remote</strong> status LED should flash then go out and the Motor<br />
Status LED will go out. <strong>Remote</strong> control set up is now complete.<br />
7. Press “Open” button again. Observe Motor Status LED. (It will be<br />
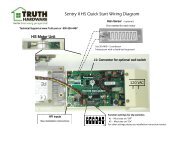
on the control switch of a WLS system or on the motor itself for an HS<br />
system.)<br />
• A steady green LED (while opening/closing) means system<br />
set up is complete and fully functional<br />
• A red LED (while opening/closing) means the system is<br />
going through initialization. During initialization, the window<br />
will fully open then close once. Once initialization is<br />
complete, the system will function normally and a green LED<br />
will be visible while operating.<br />
Set up of multiple units: Each window must be added individually to a remote.<br />
Follow these abbreviated steps for each window:<br />
Set up Instruction Steps<br />
<strong>Remote</strong> Status<br />
LED Display<br />
Motor Status<br />
LED Display<br />
Comment<br />
1-2. Remove and re-install<br />
one battery in remote<br />
None None <strong>Remote</strong> will display “Set”<br />
3. Press “Learn” button on<br />
control unit<br />
Steady red<br />
Blinking green<br />
4. Press “Open” button on<br />
remote once<br />
Several red<br />
blinks<br />
Continues to<br />
blink green<br />
links remote to control unit<br />
5. Select “Unit” number on<br />
remote<br />
None<br />
Continues to<br />
blink green<br />
6. Press “Open” button on<br />
remote once<br />
7. Press “Open” button<br />
again<br />
3 red blinks None (Stops<br />
blinking green)<br />
3 red blinks Red or green<br />
(See<br />
comments)<br />
This step enters the unit<br />
number into the remote.<br />
Red means unit is being<br />
initialized – to be followed by<br />
green. Green means set up<br />
is successful and complete.<br />
Repeat for each window<br />
Using Unit Code “All”: Each control unit is designed to only respond to one<br />
“Unit” code and “All”. You can not set up a control unit to respond to more than<br />
one unit code.<br />
8