- Page 1 and 2:
PDFlib GmbH München, Germanywww.pd
- Page 3 and 4:
Contents0 Applying the PDFlib Licen
- Page 5 and 6:
5.6.1 Standard CJK Fonts 1165.6.2 C
- Page 7 and 8:
10.2.2 Block Properties 22710.2.3 W
- Page 9:
0 Applying the PDFlib License KeyAl
- Page 12 and 13:
Licensing options. Different licens
- Page 14 and 15:
PDFlib TET (Text Extraction Toolkit
- Page 16 and 17:
PDFlib can be integrated directly i
- Page 18 and 19:
Improved handling of Chinese, Japan
- Page 20 and 21:
1.4 Features in PDFlib/PDFlib+PDI/P
- Page 22 and 23:
1.5 Availability of Features in dif
- Page 24 and 25:
24 Chapter 1: Introduction
- Page 26 and 27:
2.2 COM Binding(This section is onl
- Page 28 and 29:
necessary. After fatal exceptions t
- Page 30 and 31:
2.4 C++ BindingIn addition to the p
- Page 32 and 33:
PDFlib servlets and Java applicatio
- Page 34 and 35:
2.6 .NET Binding(This section is on
- Page 36 and 37:
More than one way of String handlin
- Page 38 and 39:
PHP on Windows will find files with
- Page 40 and 41:
2.10 REALbasic Binding 1(This secti
- Page 42 and 43:
Now you can compile your program us
- Page 44 and 45:
2.13 Tcl BindingInstalling the PDFl
- Page 46 and 47:
Error policies. When PDFlib detects
- Page 48 and 49:
plied), but only the corresponding
- Page 50 and 51:
name exactly as supplied and try to
- Page 52 and 53:
3.1.4 Generating PDF Documents in M
- Page 54 and 55:
3.2 Page Descriptions3.2.1 Coordina
- Page 56 and 57:
In order to facilitate the use of t
- Page 58 and 59:
Merely constructing a path doesn’
- Page 60 and 61:
3.3 Working with ColorNote The PDFl
- Page 62 and 63:
where is the identifier of the col
- Page 64 and 65:
Rendering Intents. Although PDFlib
- Page 66 and 67:
p.set_parameter("errorpolicy", "ret
- Page 68 and 69:
with a thin black border. Initially
- Page 70 and 71:
}p.begin_page_ext(pagewidth, pagehe
- Page 72 and 73:
Table 3.5 Parameters for the JavaSc
- Page 74 and 75:
4.2 Important Unicode ConceptsChara
- Page 76 and 77:
4.3 Strings in PDFlib4.3.1 String T
- Page 78 and 79:
EBCDIC UTF-8 BOM). If the usehypert
- Page 80 and 81:
values 0x7B and 0x7D must be preced
- Page 82 and 83:
Table 4.4 Availability of glyphs fo
- Page 84 and 85:
exclam 33 0x0021...If no Unicode va
- Page 86 and 87:
Table 4.5 Predefined CMaps for Japa
- Page 88 and 89:
4.6 Addressing Characters and Glyph
- Page 90 and 91:
Table 4.8 Control characters and th
- Page 92 and 93:
glyphcheck=replace: silent approach
- Page 94 and 95:
94 Chapter 4: Unicode and Legacy En
- Page 96 and 97:
5.1.2 Font EncodingsAll fonts for t
- Page 98 and 99:
5.2 Font Format Details5.2.1 PostSc
- Page 100 and 101:
the contents of the characters in a
- Page 102 and 103:
Path resource category (again, the
- Page 104 and 105:
When working with host fonts it is
- Page 106 and 107:
Note The Leopard builds of PDFlib (
- Page 108 and 109:
put by default. For encodings which
- Page 110 and 111:
5.4.2 Glyph ID Addressing for TrueT
- Page 112 and 113:
5.5 Font Metrics and Text Variation
- Page 114 and 115:
Temporarily disabling kerning may b
- Page 116 and 117:
5.6 Chinese, Japanese, and Korean F
- Page 118 and 119:
CJK host font names on Windows can
- Page 120 and 121: 120 Chapter 5: Font Handling
- Page 122 and 123: tion) if the user coordinate system
- Page 124 and 125: color: black and white, grayscale,
- Page 126 and 127: PDFlib supports three kinds of tran
- Page 128 and 129: BMP> PNG> JPEG> TIFF> GIFFor images
- Page 130 and 131: 6.2 Importing PDF Pages with PDI (P
- Page 132 and 133: Alternatively, you can use the pdiu
- Page 134 and 135: 20Kraxitext on top right of the box
- Page 136 and 137: can be used. In Figure 7.5h the tex
- Page 138 and 139: 7.1.5 Placing a StampCookbook A ful
- Page 140 and 141: 7.2 Multi-Line TextflowsIn addition
- Page 142 and 143: piece of normal text. Font, font si
- Page 144 and 145: leftindent = 15parindent = 20leadin
- Page 146 and 147: hortabmethod rulertabalignment left
- Page 148 and 149: leftindent = &indentparindent = - &
- Page 150 and 151: To fold the famous rocket looper pr
- Page 152 and 153: Our paper planes are the ideal way
- Page 154 and 155: Our paper planesare the ideal way o
- Page 156 and 157: p.fit_textflow(textflow, left_x, le
- Page 158 and 159: 7.3 Placing Images and Imported PDF
- Page 160 and 161: Fig. 7.28 Fitting an image into a b
- Page 162 and 163: Fitting an oriented image into a bo
- Page 164 and 165: 7.4 Table FormattingThe table forma
- Page 166 and 167: tbl = p.add_table_cell(tbl, 1, 1, "
- Page 168 and 169: cell border as the Material text. T
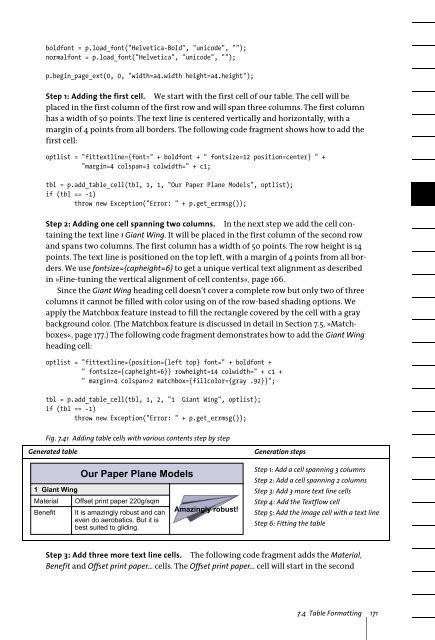
- Page 172 and 173: column defining a column width of 1
- Page 174 and 175: The table in Figure 7.42 is spread
- Page 176 and 177: Splitting a row. If the last body d
- Page 178 and 179: To increase the box height to match
- Page 180 and 181: Fig. 7.48 Using the image matchbox
- Page 182 and 183: size of a page. Determining the pag
- Page 184 and 185: 8.3 Composite Data Structures and I
- Page 186 and 187: Table 8.2 pCOS path prefixesprefixl
- Page 188 and 189: Table 8.3 Universal pseudo objectso
- Page 190 and 191: Table 8.4 Pseudo objects for PDF ob
- Page 192 and 193: Table 8.5 Pseudo objects for resour
- Page 194 and 195: 194 Chapter 8: The pCOS Interface
- Page 196 and 197: Table 9.2 PDFlib features for PDF 1
- Page 198 and 199: to disable any access restrictions.
- Page 200 and 201: Table 9.4 Access restriction keywor
- Page 202 and 203: 9.4 PDF/X for Print Production9.4.1
- Page 204 and 205: Table 9.6 Operations which must be
- Page 206 and 207: work as a full PDF/X validator or t
- Page 208 and 209: 9.5.2 Generating PDF/A-conforming O
- Page 210 and 211: Table 9.11 Additional requirements
- Page 212 and 213: This statement will retrieve a stri
- Page 214 and 215: Table 9.16 Predefined XMP schemas f
- Page 216 and 217: 9.6 Tagged PDFTagged PDF is a certa
- Page 218 and 219: quired, but will enhance the qualit
- Page 220 and 221:
* 1 create top part of left column
- Page 222 and 223:
optlist = "Title=Insert parent=" +
- Page 224 and 225:
exported to other formats. If the A
- Page 226 and 227:
Click Add... and select the PDFlib
- Page 228 and 229:
scaling factor or rotation. For eac
- Page 230 and 231:
10.3 Using the PDFlib Block Plugin
- Page 232 and 233:
next step other objects which are p
- Page 234 and 235:
Use Ctrl-V (on Windows) or Cmd-V (o
- Page 236 and 237:
Associating form fields with corres
- Page 238 and 239:
Property overrides can be achieved
- Page 240 and 241:
10.5 Standard Properties for Automa
- Page 242 and 243:
10.5.2 Text PropertiesText-related
- Page 244 and 245:
Table 10.6 Textflow block propertie
- Page 246 and 247:
Table 10.6 Textflow block propertie
- Page 248 and 249:
10.6 Querying Block Names and Prope
- Page 250 and 251:
10.7 PDFlib Block SpecificationThe
- Page 252 and 253:
Example. The following fragment sho
- Page 254 and 255:
254 Chapter 10: Variable Data and B
- Page 256 and 257:
256
- Page 258 and 259:
Ffeatures of PDFlib 20fill 57font m
- Page 260:
TrimBox 57TrueType fonts 95TTC (Tru


