Line 6 FBV MkII Advanced User Guide, English (Rev. 2)
Line 6 FBV MkII Advanced User Guide, English (Rev. 2)
Line 6 FBV MkII Advanced User Guide, English (Rev. 2)

Create successful ePaper yourself
Turn your PDF publications into a flip-book with our unique Google optimized e-Paper software.
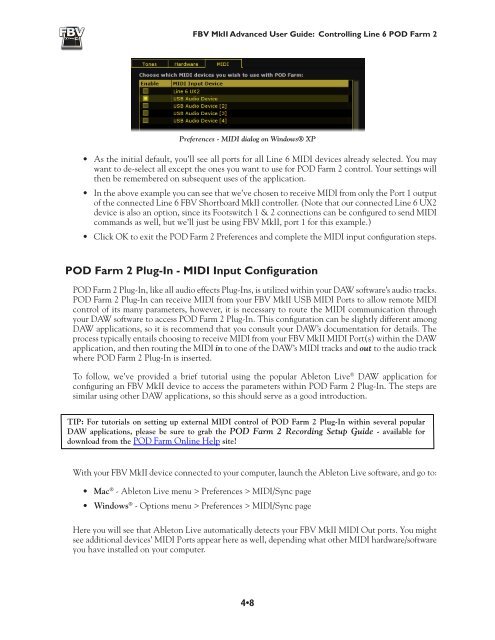
<strong>FBV</strong> <strong>MkII</strong> <strong>Advanced</strong> <strong>User</strong> <strong>Guide</strong>: Controlling <strong>Line</strong> 6 POD Farm 2Preferences - MIDI dialog on Windows® XP• As the initial default, you’ll see all ports for all <strong>Line</strong> 6 MIDI devices already selected. You maywant to de-select all except the ones you want to use for POD Farm 2 control. Your settings willthen be remembered on subsequent uses of the application.• In the above example you can see that we’ve chosen to receive MIDI from only the Port 1 outputof the connected <strong>Line</strong> 6 <strong>FBV</strong> Shortboard <strong>MkII</strong> controller. (Note that our connected <strong>Line</strong> 6 UX2device is also an option, since its Footswitch 1 & 2 connections can be configured to send MIDIcommands as well, but we’ll just be using <strong>FBV</strong> <strong>MkII</strong>, port 1 for this example.)• Click OK to exit the POD Farm 2 Preferences and complete the MIDI input configuration steps.POD Farm 2 Plug-In - MIDI Input ConfigurationPOD Farm 2 Plug-In, like all audio effects Plug-Ins, is utilized within your DAW software’s audio tracks.POD Farm 2 Plug-In can receive MIDI from your <strong>FBV</strong> <strong>MkII</strong> USB MIDI Ports to allow remote MIDIcontrol of its many parameters, however, it is necessary to route the MIDI communication throughyour DAW software to access POD Farm 2 Plug-In. This configuration can be slightly different amongDAW applications, so it is recommend that you consult your DAW’s documentation for details. Theprocess typically entails choosing to receive MIDI from your <strong>FBV</strong> <strong>MkII</strong> MIDI Port(s) within the DAWapplication, and then routing the MIDI in to one of the DAW’s MIDI tracks and out to the audio trackwhere POD Farm 2 Plug-In is inserted.To follow, we’ve provided a brief tutorial using the popular Ableton Live ® DAW application forconfiguring an <strong>FBV</strong> <strong>MkII</strong> device to access the parameters within POD Farm 2 Plug-In. The steps aresimilar using other DAW applications, so this should serve as a good introduction.TIP: For tutorials on setting up external MIDI control of POD Farm 2 Plug-In within several popularDAW applications, please be sure to grab the POD Farm 2 Recording Setup <strong>Guide</strong> - available fordownload from the POD Farm Online Help site!With your <strong>FBV</strong> <strong>MkII</strong> device connected to your computer, launch the Ableton Live software, and go to:• Mac ® - Ableton Live menu > Preferences > MIDI/Sync page• Windows ® - Options menu > Preferences > MIDI/Sync pageHere you will see that Ableton Live automatically detects your <strong>FBV</strong> <strong>MkII</strong> MIDI Out ports. You mightsee additional devices’ MIDI Ports appear here as well, depending what other MIDI hardware/softwareyou have installed on your computer.4•8